Securing APIs with Kong and Keycloak - Part 1 by Joshua A Erney
- docker
- docker-compose
- jq
- curl cheatsheet ;)
- Patience
- ☕
- Kong 2.0.4 - alpine
- Konga 0.14.7
- Keycloak 10.0.2
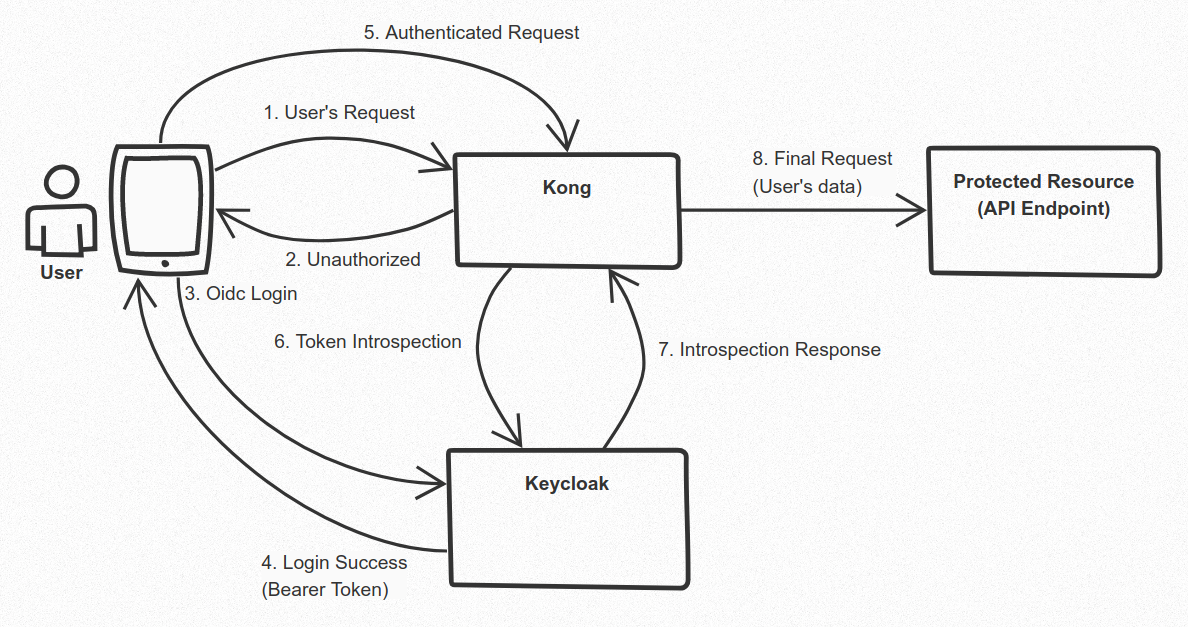
The goal of this tutorial is to be able to protect, through the configuration of kong and keycloak, an API resource. More in details, let's consider the following request flow:
- The user application sends a request to the API gateway (kong). However, the request is either not authenticated (or contains an invalid authentication).
- The gateway API responds to the client indicating the lack of authentication.
- The application therefore needs to log in. Therefore it sends a specific request for login to the Single Sign On (Keycloak), including the user's credentials and the specific client-id assigned to the application itself.
- If the credentials are valid, the SSO (Keycloak) issues to the application a token (and the related refresh token), with which to authenticate the requests to the Gateway API (Kong)
- The application then repeats the request adding the valid token as an authorization
- Behind the scenes, the gateway API will proceed to verify (through introspection) that the token in question corresponds to a session on the Single Sign On (Keycloak).
- The result of the introspection is returned to Kong, who will handle the application request accordingly
- If the outcome of introspection is positive, Kong will handle the request. Alternatively we will be in step 2 (the request is refused)
Note: The application can log in to keycloak even before sending the first request. Indeed it is normally so, if we think of the case of a mobile app: once the credentials have been entered, the user may have chosen to remain connected (so at most the application will request a new valid token using the refresh token).
I reviewed the content of this page, and I decided to turn it into a complete guide and translate it from Italian to English to make it universal to read: the previous version was a summary of the article indicated among the credits (whose reading is useful for understanding what follows).
I also advise you to read the various reference links, as they are useful for further investigation.
The docker-compose.yml file already contains the entire "infrastructure" described in the article. The purpose of this README is to adapt the content of the article to the current versions of the applications and possibly add some informative details where necessary.
:danger: Warning- Inside the docker-compose.yml there are default credentials and the installation you get is not a production-ready system.
kong-oidc is a kong plugin that allows you to implement OpenID Connect RP (Relying Party).
OpenID is a simple level of identity implemented above the OAuth 2.0 protocol: it allows its Clients to verify the identity of the end user, based on the authentication performed by an Authorization Server, as well as to obtain basic information on the user profile.
With a Security Token Service (STS), the RP is redirected to an STS, which authenticates the RP and issues a security token that grants access, instead of the application that directly authenticates the RP. Claims are extracted from tokens and used for identity-related activities.
The OpenID standard defines a situation in which a cooperating site can act as an RP, allowing the user to access multiple sites using a set of credentials. The user benefits from not having to share access credentials with multiple sites and the operators of the collaborating site must not develop their own access mechanism.
👉 Useful Links
Compared to the setting proposed by the author of the article from which we started, we will proceed to implement an image based on alpine linux.
We will just have to give the command:
docker-compose build kongand wait for the image to build.
Kong uses a database server (postgresql in our case). For this reason it is necessary to initialize the database by launching the necessary migrations.
First we start the kong-db service:
docker-compose up -d kong-dbLet's launch kong migrations:
docker-compose run --rm kong kong migrations bootstrap✋ In case you're upgrading kong from previous versions, probably you may need to run migrations. In this case, you can give this command:
docker-compose run --rm kong kong migrations upAt this point we can start kong:
docker-compose up -d kongLet's verify that you have the two services running:
docker-compose psAnd finally, let's verify that the OIDC plugin is present on Kong:
curl -s http://localhost:8001 | jq .plugins.available_on_server.oidcThe result of this call should be true. The presence of the plugin does not indicate that it is
already active.
Konga is an administration panel for Kong. It offers us a visual panel through which to carry out Kong's configurations (as well as inspect the configurations made from the command line).
We start konga with the command:
docker-compose up -d kongaKonga is listening on port 1337. Therefore we launch a browser and point to the url http://localhost:1337.
The first time we log in to konga we will need to register the administrator account. For tests, use simple, easy-to-remember credentials. For production systems, use passwords that meet safety standards!
After registering the administrator user, it will be possible to log in.
Once logged in, we will need to activate the connection to Kong. Enter in "Name" the value "kong" and
as "Kong Admin URL" the following address: http://kong:8001 then save.
At this point we will have our instance of Konga ready for use!
To test the system, we will use Mockbin (a service that generates endpoints to test HTTP requests, responses, sockets and APIs).
As a reference, please refer to Kong's Admin API.
$ curl -s -X POST http://localhost:8001/services \
    -d name=mock-service \
    -d url=http://mockbin.org/request \
    | python -mjson.tool
{
    "connect_timeout": 60000,
    "created_at": 1556145691,
    "host": "mockbin.org",
    "id": "46ddff80-4368-49fa-9f4b-b0f67f9296ad",
    ...
}
Make a note of your service id (in the example it is e71c82d3-2e53-469b-9beb-a232a15f86d4) and use it to make the next call to kong's api that allows you to add a route to the service.
$ curl -s -X POST http://localhost:8001/services/e71c82d3-2e53-469b-9beb-a232a15f86d4/routes -d "paths[]=/mock" \
    | python -mjson.tool
{
    "created_at": 1556146020,
    "destinations": null,
    "hosts": null,
    "id": "7990c9ee-7b30-4ff5-b230-e20f85a565d3",
    "methods": null,
    "name": null,
    "paths": [
        "/mock"
    ],

    ...
}
We verify that everything works:
$ curl -s http://localhost:8000/mock
{
  "startedDateTime": "2019-04-24T22:49:26.886Z",
  "clientIPAddress": "172.20.0.1",
  "method": "GET",
  "url": "http://localhost/request",
  "httpVersion": "HTTP/1.1",
We start the keycloak database service:
docker-compose up -d keycloak-dbWe start the keycloak service:
docker-compose up -d keycloakWe check that everything is standing with:
docker-compose psWe should see all the containers running:
                     Name                                   Command               State                                               Ports
----------------------------------------------------------------------------------------------------------------------------------------------------------------------------------------
kong-konga-keycloak_keycloak-db_1_6cf898ee0278   docker-entrypoint.sh postgres    Up      0.0.0.0:25432->5432/tcp
kong-konga-keycloak_keycloak_1_86084fa93065      /opt/jboss/tools/docker-en ...   Up      0.0.0.0:8180->8080/tcp, 8443/tcp
kong-konga-keycloak_kong-db_1_74c7d714a18f       docker-entrypoint.sh postgres    Up      0.0.0.0:15432->5432/tcp
kong-konga-keycloak_kong_1_db9239a81fc8          /docker-entrypoint.sh kong ...   Up      0.0.0.0:8000->8000/tcp, 0.0.0.0:8001->8001/tcp, 0.0.0.0:8443->8443/tcp, 0.0.0.0:8444->8444/tcp
kong-konga-keycloak_konga_1_e925524dbfcb         /app/start.sh                    Up      0.0.0.0:1337->1337/tcp
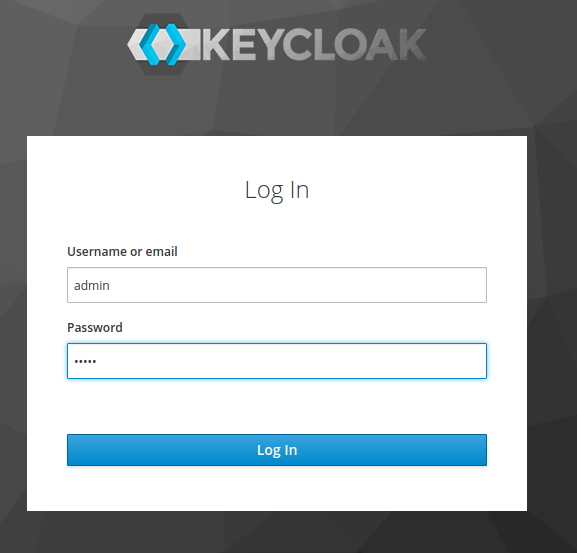
Keycloak will be available at the url http://localhost:8180.
You can login using credentials inside the docker-compose.yml file. (default credentials are admin/admin)
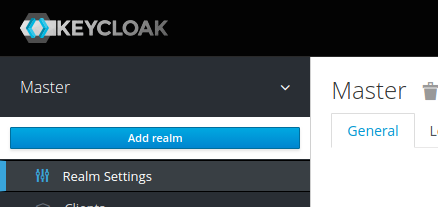
After login, click on the button "Add Realm": this button appears when your mouse is over the realm name (Master) on the upper left corner:
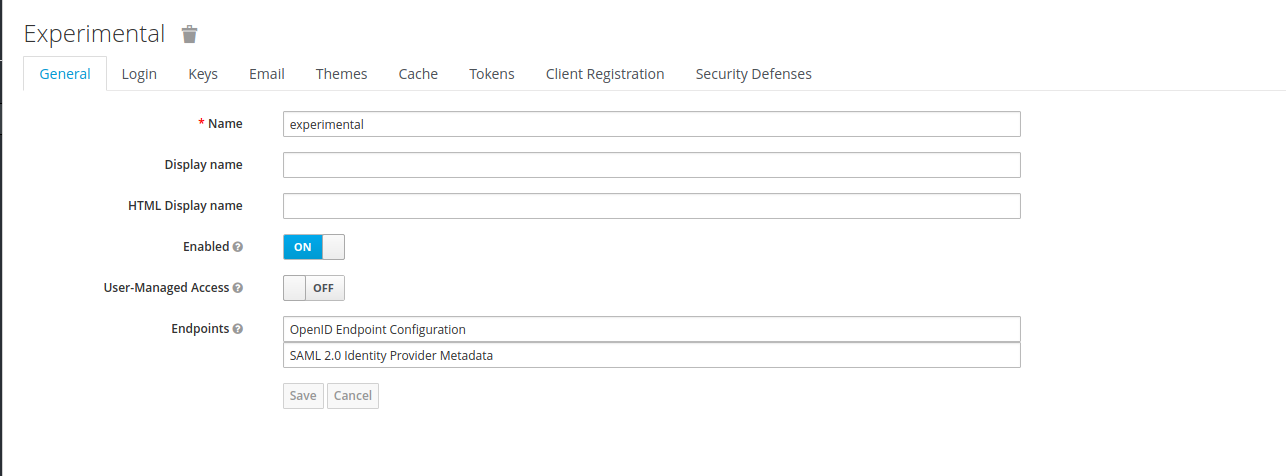
You need to give the realm a name. For this README i've choosen the name "experimental" but you can choose the name you prefer:
Once saved, you'll be redirected to the realm settings page:
This page has a lot of tabs, with lots of configuration fields 😲
However, after the realm is created, we need to add two clients:
- One client that will be used by Kong, through the OIDC plugin
- Another client that we'll use to access the API through Kong.
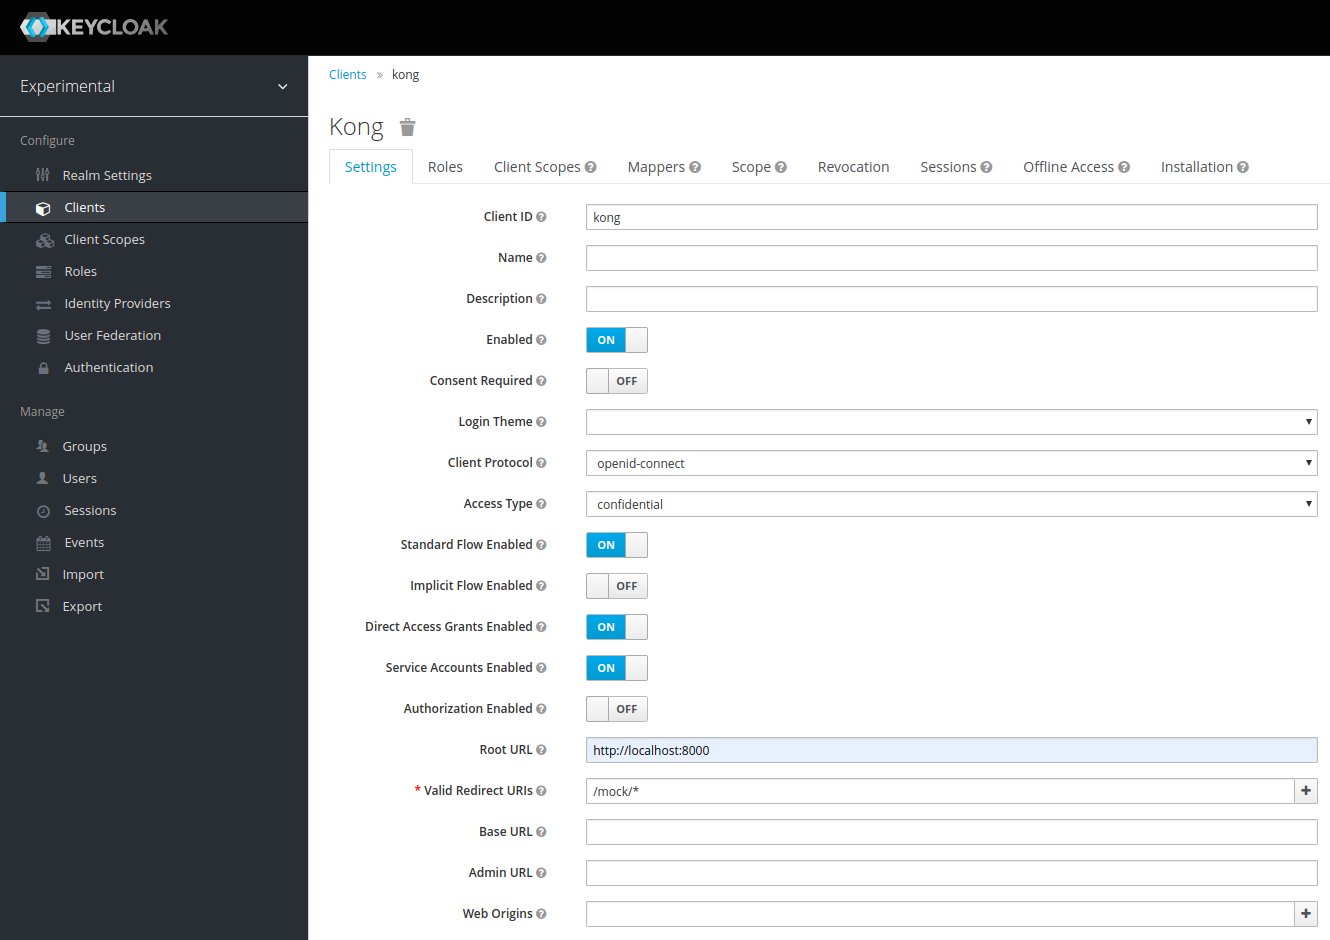
We'll name the first client "kong". Choose "Clients" from the left side bar menu, then click the "Create" button on the right side of the page.
Fill in the "Client ID" field with then "kong" string then save.
Pay attention to the fields:
- Client Protocol: this account is for OIDC, so choose "openid-connect"
- Access Type: "confidential". This clients requires a secret to initiate the login process. This key will be used later on kong OIDC configuration.
- Root Url
- Valid redirect URLs
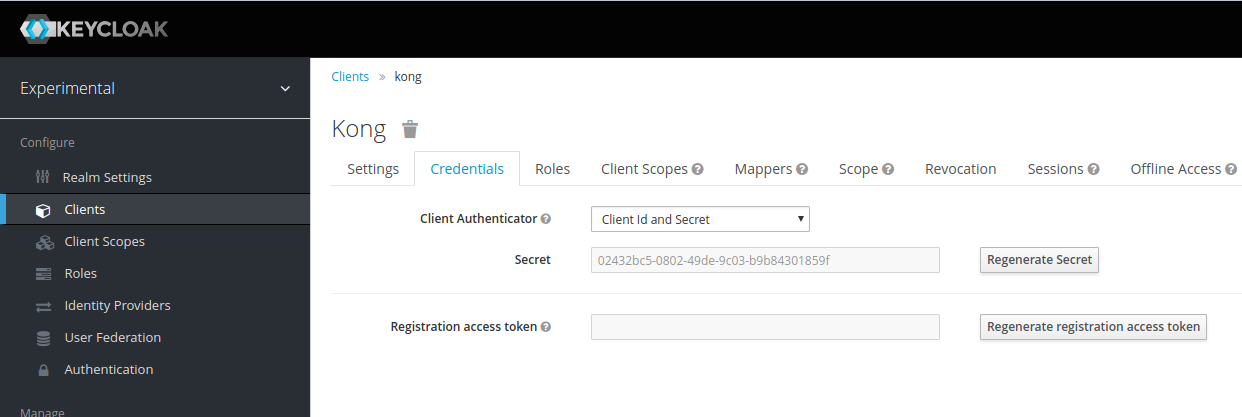
Under tab "Credentials", you'll find the Secret that we'll use to configure Kong OIDC:
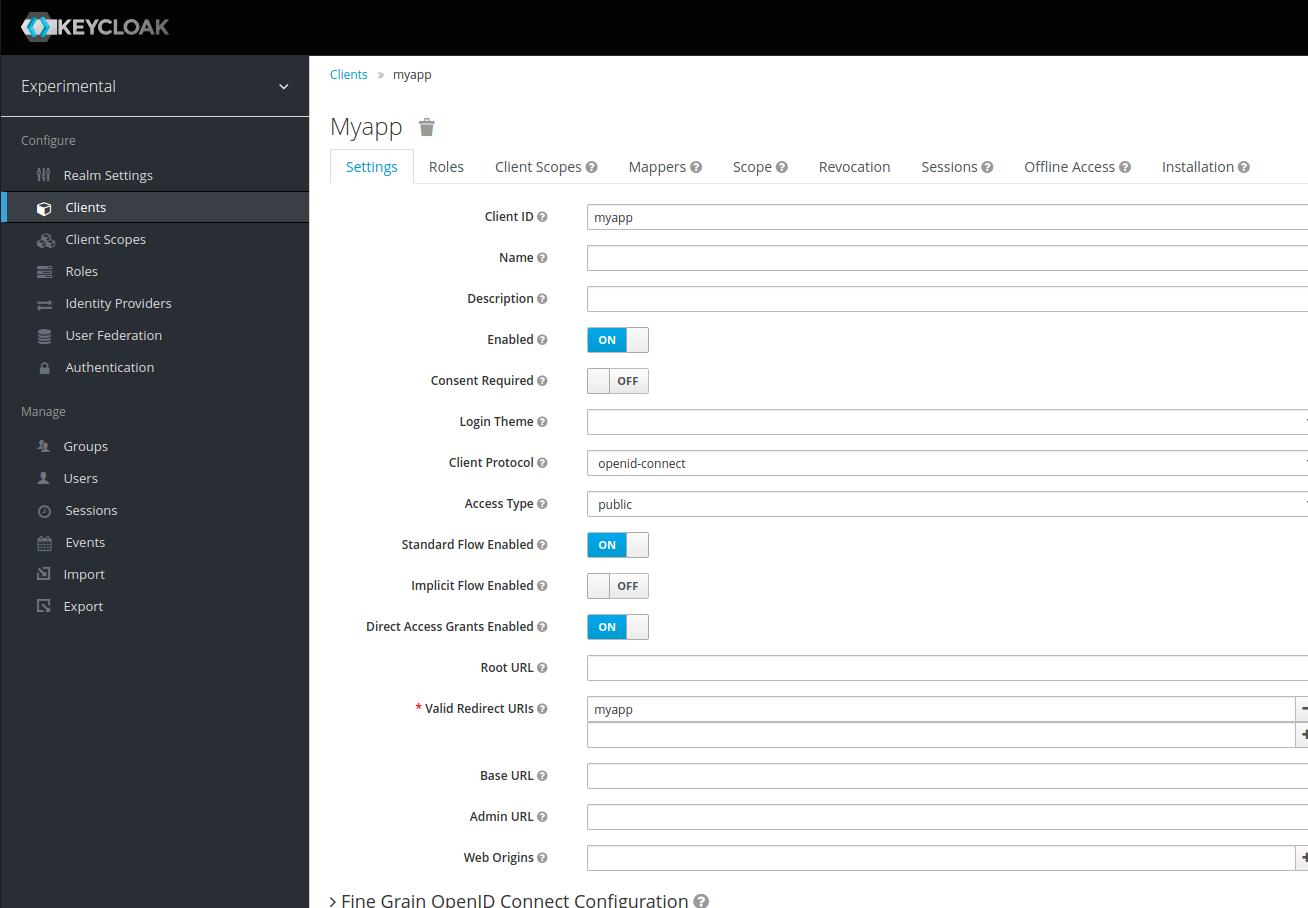
Now, create a second client, named "myapp".
The important thing here is the access type: "public" means that the login process needs users credentials to be completed.
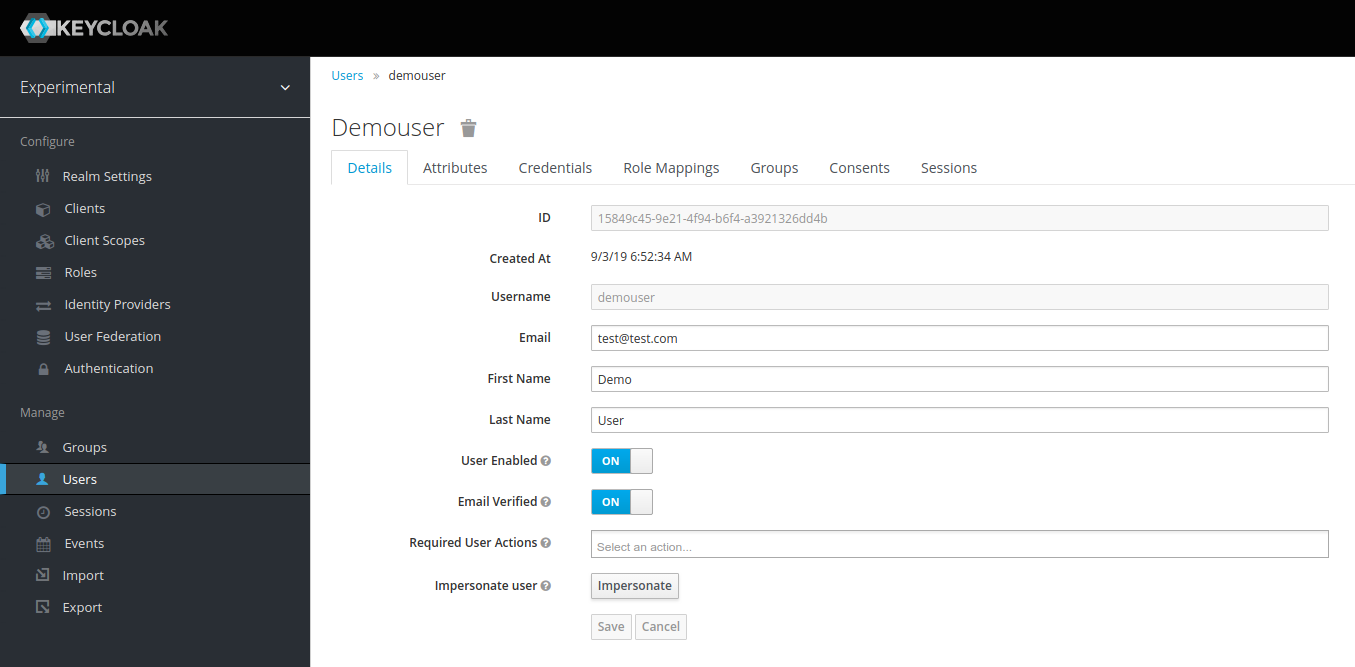
So, let's create a user that we'll use, later, to perform authentication.
Click, from the left side menu, the item "Manage" > "Users", then click - from the right side - the "Add User" button.
Pay attention to the "Email Verified" field (you should set it to on, otherwise keycloak will try to validate user's email). The user doesn't still have a password. So go under "Credentials" tab and fill the fields "New password" and "Password Confirmation" with the user's password. Put the "Temporary" switch to "Off", otherwise keycloak will ask the user to change the password at the first login.
For the purpose of this README, the password i'll use for my user is "demouser".
Click "Reset Password" to apply the new credential.
to be able to activate the functionality of the OIDC with Kong as a client of Keycloak, and to allow introspection (points 6 and 7 of the initial image) it is necessary to invoke an Admin Rest API of Kong.
The API in question is /plugins which allows you to add a plugin globally to Kong.
To add the OIDC plugin, you need some information:
- The IP address of our machine (this is because the redirection should be done on a URL of the keycloak service, but in the example kong runs in a container and in a network segment different from that of keycloak).
- the CLIENT_SECRET recoverable from the "Credential" tab available in the "kong" client tab added during the Keycloak configuration phase.
To retrieve the ip address of a network interface, knowing its name, you can use the following command:
HOST_IP=`ip address show dev <<DEVICE_NAME_HERE>> | grep "inet " \
| grep -oE '[0-9]{1,3}\.[0-9]{1,3}\.[0-9]{1,3}\.[0-9]{1,3}' \
| head -1`
Replace the <<DEVICE_NAME_HERE>> with the name of your network interface.
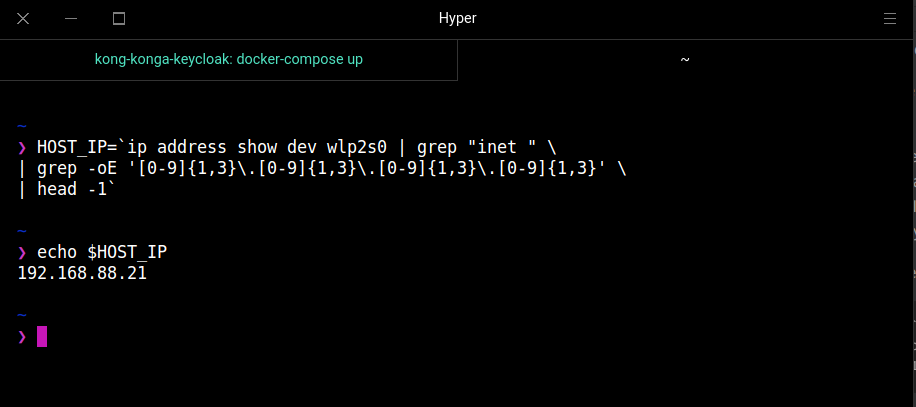
You should have the result of the image above. In my example, the network interface is wlp2s0 and my ip is 192.168.88.21.
Now set a variable with the client secret:
CLIENT_SECRET="02432bc5-0802-49de-9c03-b9b84301859f"
REALM="experimental"
If the HOST_IP variable is filled up correctly with your Ip address, you can use the following curl request to configure Kong OIDC:
$ curl -s -X POST http://localhost:8001/plugins \
  -d name=oidc \
  -d config.client_id=kong \
  -d config.client_secret=${CLIENT_SECRET} \
  -d config.bearer_only=yes \
  -d config.realm=${REALM} \
  -d config.introspection_endpoint=http://${HOST_IP}:8180/auth/realms/${REALM}/protocol/openid-connect/token/introspect \
  -d config.discovery=http://${HOST_IP}:8180/auth/realms/${REALM}/.well-known/openid-configuration \
  | python -mjson.tool
If you want the details about the various -d config. we used in this request, please point your browwser to the github page for Kong Oidc. Check the "Usage" section.
Only pay attention to the "bearer_only=yes": with this setting kong will introspect tokens without redirecting. This is useful if you're build an app / webpage and want full control over the login process: infact, kong will not redirect the user to keycloak login page upon an unauthorized request, but will reply with 401.
However, Kong should reply with the configuration:
{
    "config": {
        "bearer_only": "yes",
        "client_id": "kong",
        "client_secret": "02432bc5-0802-49de-9c03-b9b84301859f",
        "discovery": "http://192.168.88.21:8180/auth/realms/master/.well-known/openid-configuration",
        "filters": null,
        "introspection_endpoint": "http://192.168.88.21:8180/auth/realms/experimental/protocol/openid-connect/token/introspect",
        "introspection_endpoint_auth_method": null,
        "logout_path": "/logout",
        "realm": "kong",
        "recovery_page_path": null,
        "redirect_after_logout_uri": "/",
        "redirect_uri_path": null,
        "response_type": "code",
        "scope": "openid",
        "session_secret": null,
        "ssl_verify": "no",
        "token_endpoint_auth_method": "client_secret_post"
    },
    "consumer": null,
    "created_at": 1567746736,
    "enabled": true,
    "id": "6476d875-56b8-4e7b-9bf9-bdd72241a9bd",
    "name": "oidc",
    "protocols": [
        "grpc",
        "grpcs",
        "http",
        "https"
    ],
    "route": null,
    "run_on": "first",
    "service": null,
    "tags": null
}
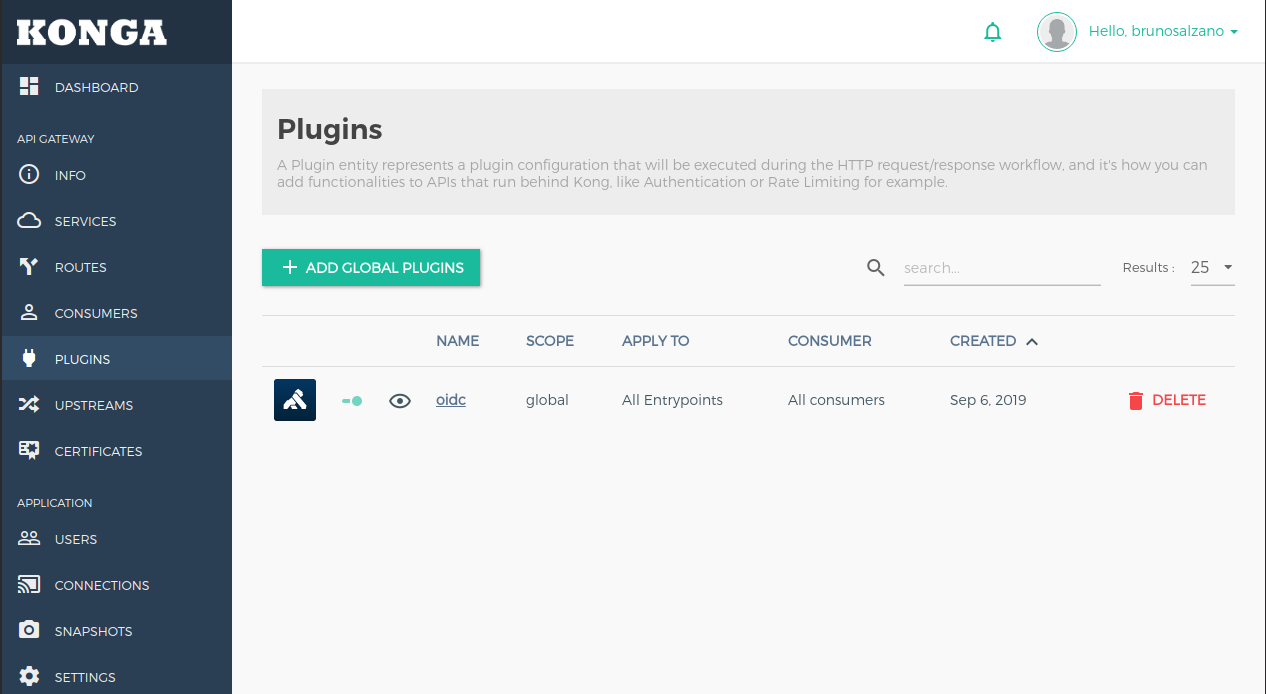
You can see the configuration visually through Konga > Plugins:
We're ready to do the final test !
Before begin, be sure you've setup the HOST_IP environment variable, like done under Kong Configuration.
Let's try to access our API without authorization:
curl "http://${HOST_IP}:8000/mock" \
-H "Accept: application/json" -I
HTTP/1.1 401 Unauthorized
Date: Sat, 07 Sep 2019 05:44:13 GMT
Connection: keep-alive
WWW-Authenticate: Bearer realm="kong",error="no Authorization header found"
Server: kong/1.3.0
Well, kong says that we need to be authenticated! Let's do that
Under the section 6. Configuration of realm and clients in Keycloak, we added an user. In my case it's user / pass was demouser / demouser, remember? We also created a client named "myapp" and we gave to this client the access type "public". If you pay attention to the following curl request, we're going to use that parameters to perform our login:
RAWTKN=$(curl -s -X POST \
        -H "Content-Type: application/x-www-form-urlencoded" \
        -d "username=demouser" \
        -d "password=demouser" \
        -d 'grant_type=password' \
        -d "client_id=myapp" \
        http://${HOST_IP}:8180/auth/realms/experimental/protocol/openid-connect/token \
        |jq . )

echo $RAWTKN
{
  "access_token": "eyJhbGciOiJSUzI1NiIsInR5cCIgOiAiSldUIiwia2lkIiA6ICJENkhLTHlubllGVkEtNGZKLWFLR3o1ai0xMHNFQ2NBZTA1UUp0Y05xdEN3In0.eyJqdGkiOiI1NmNkOGYyYy1iZGViLTQ5ODktYjJjNi0zMzRmZjQwOWQxYzIiLCJleHAiOjE1Njc3NDc0MDcsIm5iZiI6MCwiaWF0IjoxNTY3NzQ3MTA3LCJpc3MiOiJodHRwOi8vMTkyLjE2OC44OC4yMTo4MTgwL2F1dGgvcmVhbG1zL2V4cGVyaW1lbnRhbCIsImF1ZCI6ImFjY291bnQiLCJzdWIiOiIxNTg0OWM0NS05ZTIxLTRmOTQtYjZmNC1hMzkyMTMyNmRkNGIiLCJ0eXAiOiJCZWFyZXIiLCJhenAiOiJteWFwcCIsImF1dGhfdGltZSI6MCwic2Vzc2lvbl9zdGF0ZSI6ImIxNGI2ODk0LTE1ZjQtNDE3Ni1iYjkwLWRiOThlYjg3OTRkNSIsImFjciI6IjEiLCJyZWFsbV9hY2Nlc3MiOnsicm9sZXMiOlsib2ZmbGluZV9hY2Nlc3MiLCJ1bWFfYXV0aG9yaXphdGlvbiJdfSwicmVzb3VyY2VfYWNjZXNzIjp7ImFjY291bnQiOnsicm9sZXMiOlsibWFuYWdlLWFjY291bnQiLCJtYW5hZ2UtYWNjb3VudC1saW5rcyIsInZpZXctcHJvZmlsZSJdfX0sInNjb3BlIjoicHJvZmlsZSBlbWFpbCIsImVtYWlsX3ZlcmlmaWVkIjp0cnVlLCJuYW1lIjoiRGVtbyBVc2VyIiwicHJlZmVycmVkX3VzZXJuYW1lIjoiZGVtb3VzZXIiLCJnaXZlbl9uYW1lIjoiRGVtbyIsImZhbWlseV9uYW1lIjoiVXNlciIsImVtYWlsIjoidGVzdEB0ZXN0LmNvbSJ9.i0S_8Bf9TfVbHHTIVTIMM-q4K65jLhzuXnRfUvXdCti0LfxjEl_vrj9dzsigUhi-C5JKRGyZYi3ZZn6rlpgWD0uzVDcl6jMnpFW4lrJukrKHGUVd6_VYLPkdRFnylmsYfuvMT2DdHBVhpFOzhnr1zP9cGGdFozUzd90Drj_P6l1wjWg47Jwgo5WsJCnr1jzcPY784Ao2Lz2jFZwiBSqWW1Hwj2uSZRXRvjjPd0_LUhGqSi5LFjTFni3eTLXPBwrjSZq_JBlk1hMEoMfp7JKnB5tF4poGSO2tRTd-3j80BlY6jwAyTDWDDw0-fdp_UrhW_10VaxPXNyHc0AgGXDkvDA",
  "expires_in": 300,
  "refresh_expires_in": 1800,
  "refresh_token": "eyJhbGciOiJIUzI1NiIsInR5cCIgOiAiSldUIiwia2lkIiA6ICIyZGZmMDI2MS01YzdjLTRmNGQtOTAxZS1lZjI3ZjM0YTNmNTUifQ.eyJqdGkiOiIyNjE2NDQyYi00ZTI5LTRmY2ItYTMzNi05ZTg5ZGZiNTUxNTgiLCJleHAiOjE1Njc3NDg5MDcsIm5iZiI6MCwiaWF0IjoxNTY3NzQ3MTA3LCJpc3MiOiJodHRwOi8vMTkyLjE2OC44OC4yMTo4MTgwL2F1dGgvcmVhbG1zL2V4cGVyaW1lbnRhbCIsImF1ZCI6Imh0dHA6Ly8xOTIuMTY4Ljg4LjIxOjgxODAvYXV0aC9yZWFsbXMvZXhwZXJpbWVudGFsIiwic3ViIjoiMTU4NDljNDUtOWUyMS00Zjk0LWI2ZjQtYTM5MjEzMjZkZDRiIiwidHlwIjoiUmVmcmVzaCIsImF6cCI6Im15YXBwIiwiYXV0aF90aW1lIjowLCJzZXNzaW9uX3N0YXRlIjoiYjE0YjY4OTQtMTVmNC00MTc2LWJiOTAtZGI5OGViODc5NGQ1IiwicmVhbG1fYWNjZXNzIjp7InJvbGVzIjpbIm9mZmxpbmVfYWNjZXNzIiwidW1hX2F1dGhvcml6YXRpb24iXX0sInJlc291cmNlX2FjY2VzcyI6eyJhY2NvdW50Ijp7InJvbGVzIjpbIm1hbmFnZS1hY2NvdW50IiwibWFuYWdlLWFjY291bnQtbGlua3MiLCJ2aWV3LXByb2ZpbGUiXX19LCJzY29wZSI6InByb2ZpbGUgZW1haWwifQ.CEBbW31oeMlzHHRw3nwRd0nKq4jFC0KbsUBm5yMw-Ao",
  "token_type": "bearer",
  "not-before-policy": 0,
  "session_state": "b14b6894-15f4-4176-bb90-db98eb8794d5",
  "scope": "profile email"
}
We use two steps here (we saved the request result in RAWTKN) because this allows to explore the content of various responses.
Let's extract the access token from RAWTKN:
export TKN=$(echo $RAWTKN | jq -r '.access_token')
~
echo $TKN
eyJhbGciOiJSUzI1NiIsInR5cCIgOiAiSldUIiwia2lkIiA6ICJENkhLTHlubllGVkEtNGZKLWFLR3o1ai0xMHNFQ2NBZTA1UUp0Y05xdEN3In0.eyJqdGkiOiI1NmNkOGYyYy1iZGViLTQ5ODktYjJjNi0zMzRmZjQwOWQxYzIiLCJleHAiOjE1Njc3NDc0MDcsIm5iZiI6MCwiaWF0IjoxNTY3NzQ3MTA3LCJpc3MiOiJodHRwOi8vMTkyLjE2OC44OC4yMTo4MTgwL2F1dGgvcmVhbG1zL2V4cGVyaW1lbnRhbCIsImF1ZCI6ImFjY291bnQiLCJzdWIiOiIxNTg0OWM0NS05ZTIxLTRmOTQtYjZmNC1hMzkyMTMyNmRkNGIiLCJ0eXAiOiJCZWFyZXIiLCJhenAiOiJteWFwcCIsImF1dGhfdGltZSI6MCwic2Vzc2lvbl9zdGF0ZSI6ImIxNGI2ODk0LTE1ZjQtNDE3Ni1iYjkwLWRiOThlYjg3OTRkNSIsImFjciI6IjEiLCJyZWFsbV9hY2Nlc3MiOnsicm9sZXMiOlsib2ZmbGluZV9hY2Nlc3MiLCJ1bWFfYXV0aG9yaXphdGlvbiJdfSwicmVzb3VyY2VfYWNjZXNzIjp7ImFjY291bnQiOnsicm9sZXMiOlsibWFuYWdlLWFjY291bnQiLCJtYW5hZ2UtYWNjb3VudC1saW5rcyIsInZpZXctcHJvZmlsZSJdfX0sInNjb3BlIjoicHJvZmlsZSBlbWFpbCIsImVtYWlsX3ZlcmlmaWVkIjp0cnVlLCJuYW1lIjoiRGVtbyBVc2VyIiwicHJlZmVycmVkX3VzZXJuYW1lIjoiZGVtb3VzZXIiLCJnaXZlbl9uYW1lIjoiRGVtbyIsImZhbWlseV9uYW1lIjoiVXNlciIsImVtYWlsIjoidGVzdEB0ZXN0LmNvbSJ9.i0S_8Bf9TfVbHHTIVTIMM-q4K65jLhzuXnRfUvXdCti0LfxjEl_vrj9dzsigUhi-C5JKRGyZYi3ZZn6rlpgWD0uzVDcl6jMnpFW4lrJukrKHGUVd6_VYLPkdRFnylmsYfuvMT2DdHBVhpFOzhnr1zP9cGGdFozUzd90Drj_P6l1wjWg47Jwgo5WsJCnr1jzcPY784Ao2Lz2jFZwiBSqWW1Hwj2uSZRXRvjjPd0_LUhGqSi5LFjTFni3eTLXPBwrjSZq_JBlk1hMEoMfp7JKnB5tF4poGSO2tRTd-3j80BlY6jwAyTDWDDw0-fdp_UrhW_10VaxPXNyHc0AgGXDkvDA
Let's use the access token to access the authenticated api:
curl "http://${HOST_IP}:8000/mock" \
-H "Accept: application/json" \
-H "Authorization: Bearer $TKN"
{
  "startedDateTime": "2019-09-06T05:20:40.123Z",
  "clientIPAddress": "192.168.88.21",
  "method": "GET",
  "url": "http://192.168.88.21/request",
  "httpVersion": "HTTP/1.1",
  "cookies": {},
  "headers": {
    "host": "mockbin.org",
    "connection": "close",
    "x-forwarded-for": "192.168.88.21, 10.1.192.18, 18.204.28.183",
    "x-forwarded-proto": "http",
    "x-forwarded-host": "192.168.88.21",
    "x-forwarded-port": "80",
    "x-real-ip": "121.12.12.1",
    "kong-cloud-request-id": "4276d69c7c5896d619a3a2486c358d7a",
    "kong-client-id": "mockbin",
    "user-agent": "curl/7.64.0",
    "accept": "application/json",
    "authorization": "Bearer eyJhbGciOiJSUzI1NiIsInR5cCIgOiAiSldUIiwia2lkIiA6ICJENkhLTHlubllGVkEtNGZKLWFLR3o1ai0xMHNFQ2NBZTA1UUp0Y05xdEN3In0.eyJqdGkiOiI1NmNkOGYyYy1iZGViLTQ5ODktYjJjNi0zMzRmZjQwOWQxYzIiLCJleHAiOjE1Njc3NDc0MDcsIm5iZiI6MCwiaWF0IjoxNTY3NzQ3MTA3LCJpc3MiOiJodHRwOi8vMTkyLjE2OC44OC4yMTo4MTgwL2F1dGgvcmVhbG1zL2V4cGVyaW1lbnRhbCIsImF1ZCI6ImFjY291bnQiLCJzdWIiOiIxNTg0OWM0NS05ZTIxLTRmOTQtYjZmNC1hMzkyMTMyNmRkNGIiLCJ0eXAiOiJCZWFyZXIiLCJhenAiOiJteWFwcCIsImF1dGhfdGltZSI6MCwic2Vzc2lvbl9zdGF0ZSI6ImIxNGI2ODk0LTE1ZjQtNDE3Ni1iYjkwLWRiOThlYjg3OTRkNSIsImFjciI6IjEiLCJyZWFsbV9hY2Nlc3MiOnsicm9sZXMiOlsib2ZmbGluZV9hY2Nlc3MiLCJ1bWFfYXV0aG9yaXphdGlvbiJdfSwicmVzb3VyY2VfYWNjZXNzIjp7ImFjY291bnQiOnsicm9sZXMiOlsibWFuYWdlLWFjY291bnQiLCJtYW5hZ2UtYWNjb3VudC1saW5rcyIsInZpZXctcHJvZmlsZSJdfX0sInNjb3BlIjoicHJvZmlsZSBlbWFpbCIsImVtYWlsX3ZlcmlmaWVkIjp0cnVlLCJuYW1lIjoiRGVtbyBVc2VyIiwicHJlZmVycmVkX3VzZXJuYW1lIjoiZGVtb3VzZXIiLCJnaXZlbl9uYW1lIjoiRGVtbyIsImZhbWlseV9uYW1lIjoiVXNlciIsImVtYWlsIjoidGVzdEB0ZXN0LmNvbSJ9.i0S_8Bf9TfVbHHTIVTIMM-q4K65jLhzuXnRfUvXdCti0LfxjEl_vrj9dzsigUhi-C5JKRGyZYi3ZZn6rlpgWD0uzVDcl6jMnpFW4lrJukrKHGUVd6_VYLPkdRFnylmsYfuvMT2DdHBVhpFOzhnr1zP9cGGdFozUzd90Drj_P6l1wjWg47Jwgo5WsJCnr1jzcPY784Ao2Lz2jFZwiBSqWW1Hwj2uSZRXRvjjPd0_LUhGqSi5LFjTFni3eTLXPBwrjSZq_JBlk1hMEoMfp7JKnB5tF4poGSO2tRTd-3j80BlY6jwAyTDWDDw0-fdp_UrhW_10VaxPXNyHc0AgGXDkvDA",
    "x-userinfo": "eyJhenAiOiJteWFwcCIsImlhdCI6MTU2Nzc0NzEwNywiaXNzIjoiaHR0cDpcL1wvMTkyLjE2OC44OC4yMTo4MTgwXC9hdXRoXC9yZWFsbXNcL2V4cGVyaW1lbnRhbCIsImVtYWlsIjoidGVzdEB0ZXN0LmNvbSIsImdpdmVuX25hbWUiOiJEZW1vIiwic3ViIjoiMTU4NDljNDUtOWUyMS00Zjk0LWI2ZjQtYTM5MjEzMjZkZDRiIiwiYXV0aF90aW1lIjowLCJpZCI6IjE1ODQ5YzQ1LTllMjEtNGY5NC1iNmY0LWEzOTIxMzI2ZGQ0YiIsImFjdGl2ZSI6dHJ1ZSwibmJmIjowLCJ1c2VybmFtZSI6ImRlbW91c2VyIiwiZW1haWxfdmVyaWZpZWQiOnRydWUsInJlc291cmNlX2FjY2VzcyI6eyJhY2NvdW50Ijp7InJvbGVzIjpbIm1hbmFnZS1hY2NvdW50IiwibWFuYWdlLWFjY291bnQtbGlua3MiLCJ2aWV3LXByb2ZpbGUiXX19LCJzY29wZSI6InByb2ZpbGUgZW1haWwiLCJhdWQiOiJhY2NvdW50Iiwic2Vzc2lvbl9zdGF0ZSI6ImIxNGI2ODk0LTE1ZjQtNDE3Ni1iYjkwLWRiOThlYjg3OTRkNSIsInJlYWxtX2FjY2VzcyI6eyJyb2xlcyI6WyJvZmZsaW5lX2FjY2VzcyIsInVtYV9hdXRob3JpemF0aW9uIl19LCJhY3IiOiIxIiwiY2xpZW50X2lkIjoibXlhcHAiLCJmYW1pbHlfbmFtZSI6IlVzZXIiLCJleHAiOjE1Njc3NDc0MDcsInByZWZlcnJlZF91c2VybmFtZSI6ImRlbW91c2VyIiwianRpIjoiNTZjZDhmMmMtYmRlYi00OTg5LWIyYzYtMzM0ZmY0MDlkMWMyIiwibmFtZSI6IkRlbW8gVXNlciIsInR5cCI6IkJlYXJlciJ9",
    "x-request-id": "72956711-a23a-45b3-b04f-6fd588cfc885",
    "via": "1.1 vegur",
    "connect-time": "0",
    "x-request-start": "1567747240120",
    "total-route-time": "0"
  },
  "queryString": {},
  "postData": {
    "mimeType": "application/octet-stream",
    "text": "",
    "params": []
  },
  "headersSize": 2852,
  "bodySize": 0
}
Yeah! This works. End we reached the end of this readme! All seems to work now.
