Hardware and software to manage DS Lite (USG) firmware. Using this requires making a USG-FIRM-WRITER cart to read/write the WiFi board (this holds the firmware) through the cartridge port, as well as a modded 2/3DS to run the script (optional). Assembly details are below.
This project is not very practical for most and I only would recommend using it if you find yourself having 170+ WiFi boards...
The DS Lite WiFi board stores firmware on the same exact flash chip as the save chip in most DS cartridges, meaning that both chips are read and written to in the same way. If you remove the save chip from the cart and wire the WiFi board along the same lines, you can redirect the signals to the firmware chip and "trick" the DS into treating it as just another save file.
Normal methods might include hotswapping WiFi boards on a DS Lite motherboard (risk of shorting), or holding SL1 shut on writing (immediate brick if you let go). This replaces those dangerous methods with a safer, faster, and more powerful* option that can be used on any DS console.
*currently the only flashing tools that exist will permanently break wireless without proper preparation, do not fully support 512kb firmwares, do not transfer user data, and (mostly) aren't maintained anymore.
You will need basic soldering supplies as well as the following parts:
- DS cartridge with a board ID of
C03-10orY10-01 - Molex 52991-0308 socket
- Molex socket breakout board. See gerber files for a premade board one here. (can to be sent to a PCB manufacturer like PCBWay)
Steps:
- Remove the shell from the cartridge
- Desolder the save chip (the smaller of the two, labelled as
U2) - Solder the Molex socket to the breakout board
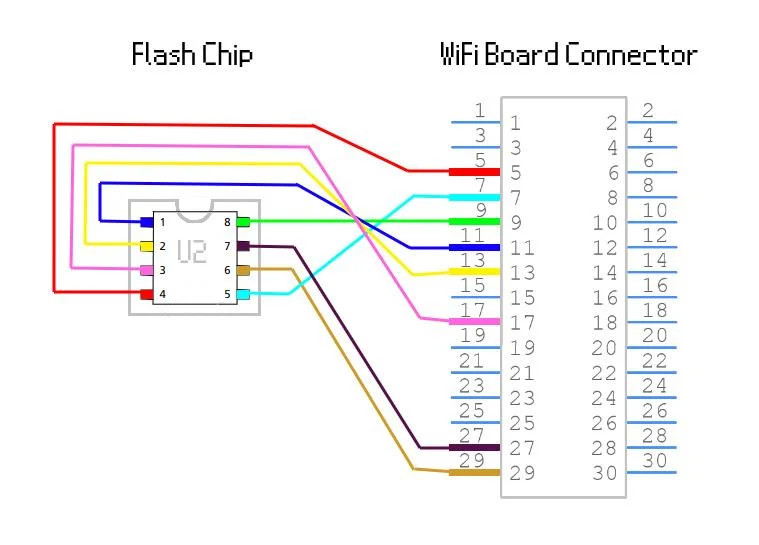
- Solder wires between the cartridge and breakout board along the contact points listed below (first value is cart, second is breakout board/Molex socket):
- If using the gerber files above:
1-1,2-2,3-3,4-4,5-5,6-6,7-7,8-8 - If using your own board, refer to the chart below and connect
1-11,2-13,3-17,4-5,5-7,6-29,7-27,8-9
- If using the gerber files above:
Having trouble finding which pin is what number on the cartridge? Refer to this chart, and note that the ink will have the same semicircle "cut out" around the U2/save chip pads. Match the orientation of that on the board with the chart.
After having connected the wires, you should be good. Plug a WiFi board into the Molex socket, plug the cartridge into any DS console, then try dumping the save. Check any outputted .sav file in a hex editor to make sure they're proper firmware dumps.
Then, test the board by editing the .sav file (could be replacing it with a new firmware or patterns) and restoring it. Dump again to make sure the data was correctly written.
CFW and GodMode9 must already be installed, I will not go over this here.
- Download the script from this repository
- Copy the downloaded script to your 3DS SD card at
SD:/gm9/scripts/ - Open GodMode9 on your 3DS
- Plug the USG-FIRM-WRITER cart into your console, along with a WiFi board connected
- Press the
homebutton, then navigate toScripts...on the opened popup - Select the downloaded script and press the
Abutton - Have fun using the script!
Haifischfor the breakout board- This blog for explaining accessing WiFi boards via save chip lines