Now available in Overleaf!
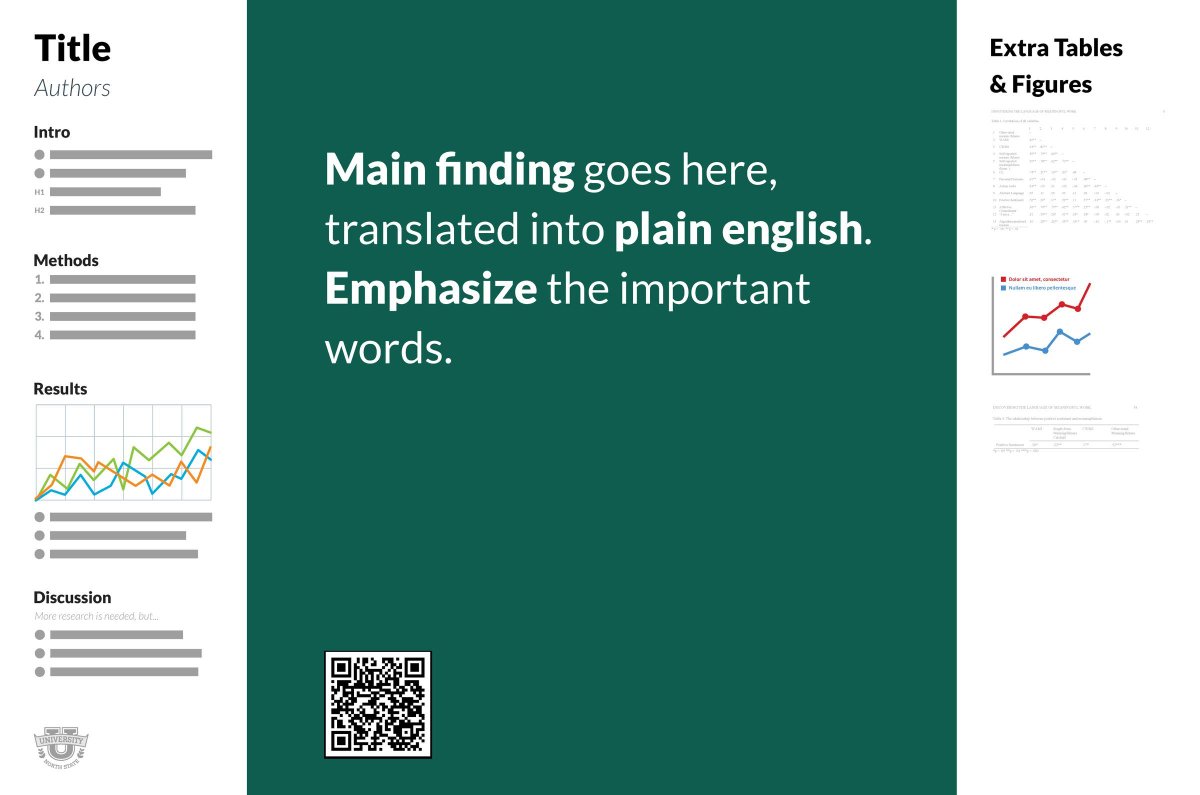
The Better Poster is Mike Morrison's response to the traditional academic poster. In his own words:
Every field in science uses the same, old, wall-of-text poster design. If we can improve the knowledge transfer efficiency of that design even by a little bit, it could have massive ripple effects on all of science.
Also, poster sessions tend to suck, so here's my pitch to make them more efficient AND more fun with a new approach to designing scientific posters/academic posters that is both more usable, and easier to create!
- If you want to learn more about the reasons behind the design and how it improves upon more typical academic poster templates, I recommend Mike's video.
- If you want to see how people are using the Better Poster design, see #betterposter on twitter.
- If you want the original PowerPoint template, you can find it here.
- If you want to start using the LaTeX template instead, download the repository and keep reading!

The template has been implemented as a LaTeX class, betterposter.cls. You can load it into your tex file by using the command
\documentclass{betterposter}
The main command provided by the betterposter class is \betterposter. The command takes three arguments: the content of the central, left and right columns, respectively. You type the content in, and the command takes care of the formatting.
\betterposter{
% content of the main column
}{
% content of the left column
}{
% content of the right column
}
The \maincolumn command takes care of the formatting of the main column. It takes two arguments: the content of the main section (for the main point of the poster), and the content of the bottom section (destined for the QR code).
\maincolumn{
% main point of the poster
}{
% QR code
}
The \qrcode command formats the QR code for the poster. It takes three arguments: the path for the QR code image, the path for a small icon (a smartphone by default), and the caption ("Take a picture to download the full paper" by default).
\qrcode{path/to/image}{path/to/icon}{
% caption
}
Alternatively, the \compactqrcode command renders a more compact link by omitting the small icon.
\compactqrcode{path/to/image}{
% caption
}
You should include a QR code that links to a relevant document which complements the poster (your paper, a website containing simulations or data...) There are many free QR code tools available, I have used www.qr-code-generator.com.
The example included in the template points to this repository:
You can also create QR codes which contain a logo:
The betterposter class accepts three options which change the paper size:
a0paper, for A0, the default size.a1paper, for A1.a2paper, for A2.
These options behave like the usual LaTeX class options, for instance:
\documentclass[a0paper]{betterposter}
The betterposter class extends the basic article class. Any options you give betterposter, other than the ones mentioned above, will be passed directly to article. For instance,
\documentclass[a0paper,fleqn]{betterposter}
will let betterposter deal with the a0paper option, but will pass fleqn directly to article.
These commands should be placed before \begin{document}.
You can customise the width of the columns:
- The left column,
\setlength{\leftbarwidth}{value}. - The right column,
\setlength{\rightbarwidth}{value}. - The main column automatically resizes to the rest of the space available.
You can change the margins of the columns:
- The vertical margin of the side columns,
\setlength{\columnmarginvertical}{value}. - The horizontal margin of the side columns,
\setlength{\columnmarginhorizontal}{value}. - The vertical margin of the side columns,
\setlength{\maincolumnmarginvertical}{value}. - The horizontal margin of the side columns,
\setlength{\maincolumnmarginhorizontal}{value}.
The \fontsize command takes two arguments, the size (the size of the font in pt) and the baselineskip (usually you want baselineskip to be roughly 1.25 times the size.
You can change specific font sizes:
- The text font,
\renewcommand{\fontsizestandard}{\fontsize{28}{35} \selectfont}. - The main column font,
\renewcommand{\fontsizemain}{\fontsize{28}{35} \selectfont}. - The title font,
\renewcommand{\fontsizetitle}{\fontsize{28}{35} \selectfont}. - The author font,
\renewcommand{\fontsizeauthor}{\fontsize{28}{35} \selectfont}. - The section font,
\renewcommand{\fontsizesection}{\fontsize{28}{35} \selectfont}.
Additionally, you can change the font size of a specific text segment by placing the text in brackets as:
{\fontsize{28}{35} \selectfont Your text goes here}
The class defines the theme colours of the original design:
as well as imperialblue:
(0,62,116).
You can change the background and the font colours:
- Background of side columns,
\renewcommand{\columnbackgroundcolor}{black}. - Font of side columns,
\renewcommand{\columnfontcolor}{gray}. - Background of main column,
\renewcommand{\maincolumnbackgroundcolor}{empirical}. - Font of main column,
\renewcommand{\maincolumnfontcolor}{gray}.
You can find me on twitter, @rtsbailo.
