


The backend server, powered by Express.js, handles API requests at localhost:3000/api/.... Below are the details for various endpoints grouped by functionality:
-
Endpoint:
POST /api/register -
Request Body:
{
  "name": "ryan",
  "email": "ryanshatch@gmail.com",
  "password": "password123"
}
-
Endpoint:
POST /api/login -
Request Body:
{
  "email": "ryanshatch@gmail.com",
  "password": "password123"
}
- Endpoint:
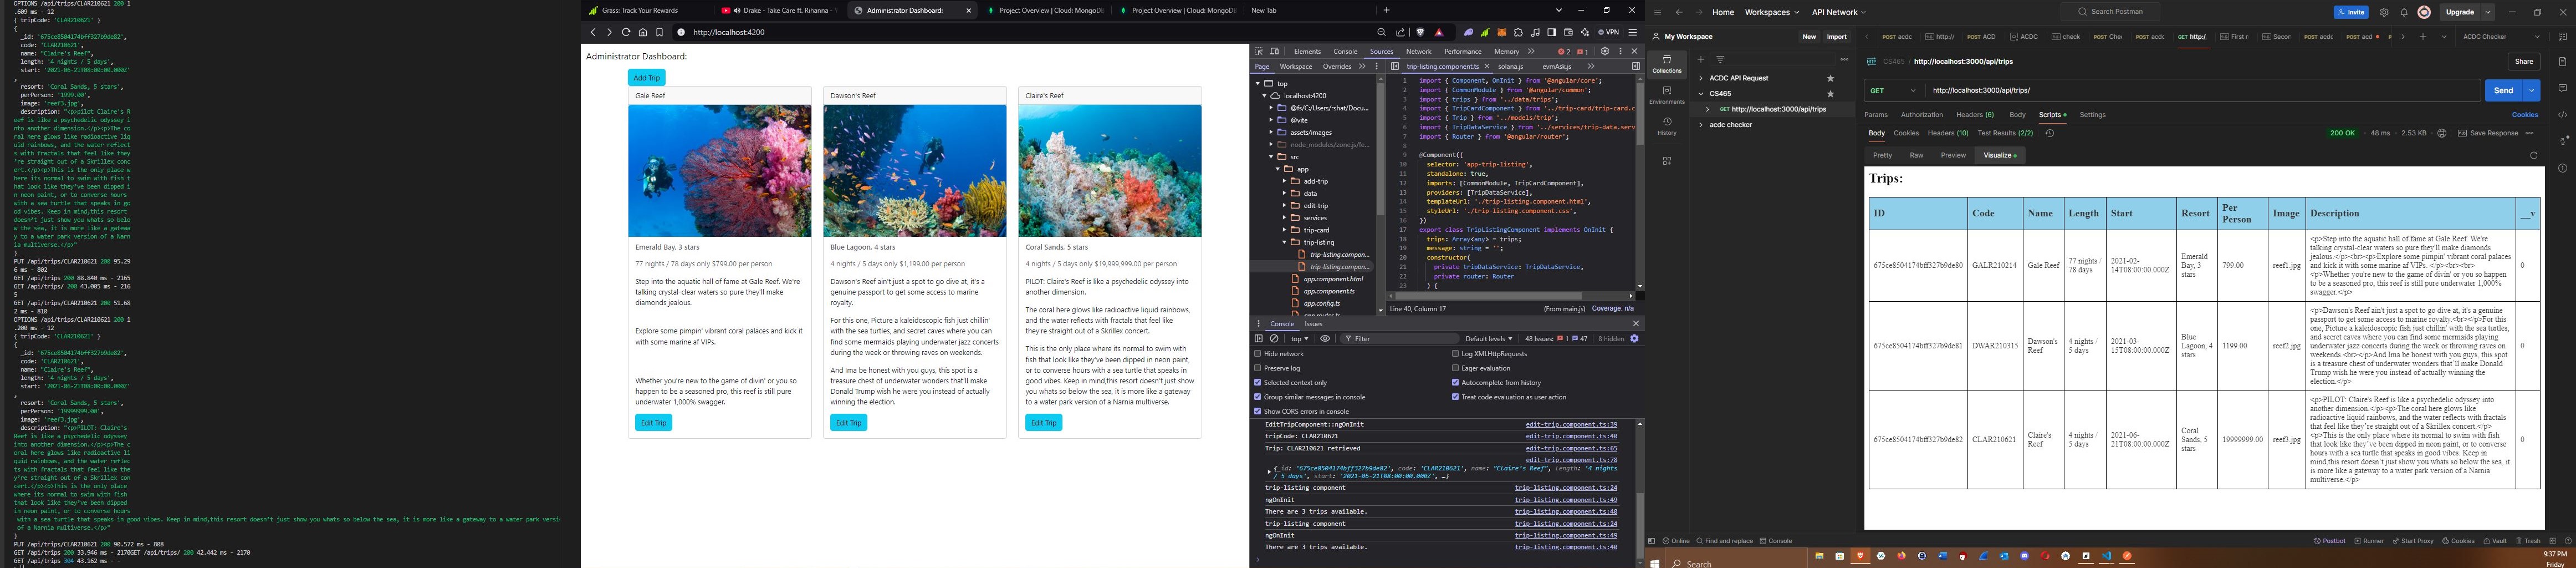
GET /api/trips - Request Parameters: None
-
Endpoint:
POST /api/trips -
Request Headers:
Authorization: Bearer <your_jwt_token> -
Request Body:
{
  "tripCode": "TRIP123",
  "tripName": "Trip to Paris",
  "startDate": "2023-10-01",
  "endDate": "2023-10-10",
  "price": 1200.00
}
- Endpoint:
GET /api/trips/:tripCode - Request Parameters:
tripCode: The code of the trip you want to retrieve (e.g.,TRIP123)
-
Endpoint:
PUT /api/trips/:tripCode -
Request Headers:
Authorization: Bearer <your_jwt_token> -
Request Body:
{
  "tripName": "Updated Trip to Guatemala",
  "startDate": "2025-10-02",
  "endDate": "2055-10-11",
  "price": 1300.00
}
The frontend, built with Angular, serves the user interface and interacts with the backend API. Access it locally for development at:
- Frontend Application:
localhost:4200/...
- Backend API Endpoints:
localhost:3000/api/... - Frontend Application Endpoint:
localhost:4200/...
This project was generated with the Angular CLI and uses Express.js as a backend server that serves the Angular app. Node.js is used to run the Express server which communicates with the MongoDB database using the Mongoose library as a database driver. The UI is built using Angular Material and Angular Flex Layout. The UX is designed to be simple and straightforward, tailored towards having quality usability and accessibility.
Note: Run the backend server before running the Angular app.
The backend server is located in the
serverdirectory.
Seed the database using theseed.jsscript in theapp_api/modelsdirectory.
To begin, run npm install in order to install the necessary dependencies to be able to run the Angular app.
After installing all of the necessary dependencies, run ng serve in order to start the Angular development server. Next, visit http://localhost:4200/ in your browser to view the app.
The backend server must be running in order to use the app via running the command
node ./bin/wwwin the root directory of the project.
You will also need to seed the database using the
node ./app_api/models/seed.jsscript in theapp_api/modelsdirectory.
[{"_id":"675ec41fe09e0bca68c7043c","code":"GALR210214","name":"Gale Reef","length":"77 nights / 78 days","start":"2021-02-14T08:00:00.000Z","resort":"Emerald Bay, 3 stars","perPerson":"799.00","image":"reef1.jpg","description":"<p>Step into the aquatic hall of fame at Gale Reef. We're talking crystal-clear waters so pure they'll make diamonds jealous.</p><br><p>Explore some pimpin' vibrant coral palaces and kick it with some marine af VIPs. </p><br><br><p>Whether you're new to the game of divin' or you so happen to be a seasoned pro, this reef is still pure underwater 1,000% swagger.</p>","__v":0}]Note: Angular CLI was the chosen framework to create the UI of the app.
In order to generate new components and services, you can run the command: ng generate component component-name, ng generate service service-name.
You can also use ng generate directive|pipe|service|class|guard|interface|enum|module to generate directives, pipes, services, classes, guards, interfaces, modules, and enums.
Replace
component-nameandservice-namewith the name of the component or service you would like to generate.
Next, in order to build the project, run the command ng build in order to build the application for production.
The latest build artifacts will be stored in the
./app_admin/dist/directory.
PS C:\Users\rshat\Documents\School\Computer Science School\Current Classes\CS 465\00 Organized\branch6\travlr\ryanshatch_app\app_admin> ng serve
Initial chunk files | Names         |  Raw size
polyfills.js        | polyfills     |  90.20 kB |
main.js             | main          |   5.57 kB |
styles.css          | styles        | 106 bytes |

                    | Initial total |  95.87 kB

Application bundle generation complete. [32.877 seconds]

Watch mode enabled. Watching for file changes...
NOTE: Raw file sizes do not reflect development server per-request transformations.
  ➜  Local:   http://localhost:4200/
  ➜  press h + enter to show help
\ Changes detected. Rebuilding...
Initial chunk files | Names | Raw size
main.js             | main  |  5.70 kB |

Application bundle generation complete. [0.366 seconds]

Page reload sent to client(s).
Initial chunk files | Names | Raw size
main.js             | main  |  5.70 kB |

Application bundle generation complete. [0.294 seconds]

Page reload sent to client(s).
In order to run unit tests after building the project, you can use the command, ng test to execute the tests.
Jasmine was the testing framework that was used to write the unit tests and Karma was used as the test runner for the unit tests.
Next, after running the unit tests on the application, you can run end-to-end tests with the command, ng e2e. This command will start the testing environment using Protractor.
If you need further help with the Angular CLI, or any of the commands mentioned above that were used in this project, you can use the command ng help.
Respectfully, If you are still struggling, please kindly remember to breathe and just simply parse the following,
How do I _type_your_question_here_ ?
and respectfully, please kindly just patiently parse that into Google