| Some of these instructions are obsolete |
|---|
| They were written for Rasbian Wheezy, and I'm now using Jessie on the Pi v2 |
- You should have a preinstalled SD card. If you don't then download NOOBs offline and unzip it onto the SD Card you want to use
- Power on your Raspberry PI (after you've plugged in HDMI cable, keyboard, SD card, WiFi USB adapter)
- At the installation option screen, first make sure that you set your language and keyboard to US and not UK or GB.
- Choose the Raspbian option by hitting the
spacebarto select "Raspbian" and then pressito start the installation (it will take 15 minutes to complete). - the default username and password is "pi" and "raspberry", respectively
- once installed the system will reboot
- login with the default credentials
- you are now logged into the shell. Use
startxto launch the desktop if you want to.
If you press the ~ key and see that it is not ~ that means your keyboard is not setup properly.
- run
sudo raspi-configfrom the command line - if you don't have a mouse plugged in, use the key and arrow keys to navigate.
- highlight
4 Internationalisation Optionsand press enter - You can also set your timezone here.
- you should see an option for keyboard layout, select that
- you should change to a
Generic Keykeyboard when in doubt - the next pages will let you set a locale for the keyboard, we want US not UK (or en_US.UTF-8)
- Choose other in the language choice
- Choose US for the next choice (or en_US.UTF-8)
- you can leave everything else default and just press enter throughout
- you make need to click no to exit.
- In the past, the wifi was setup by changing /etc/network/interfaces. If you need the old commands, look at the other branch of this repository.
- The new method of setting up wifi involves the following:
- Open the wpa-supplicant configuration file in nano:
sudo nano /etc/wpa_supplicant/wpa_supplicant.conf - Go to the bottom of the file and add the following:
network={
    ssid="your_network_SSID"
    psk="Your_wifi_password"
}
-
if you don't want your passphrase visible, you can encrypt it:
wpa_passphrase mySSIDCopy and paste the output from this into the wpa_supplicant.conf file -
save the file with
ctrl+o, press to confirm the filename, and pressctrl+xto close nano. -
restart the RPi with
sudo shutdown -r nowor <CTRL><ALT><DEL>. -
Instead of restarting, the following often work:
sudo ifdown wlan0thensudo ifup wlan0 -
To confirm that you're connected to the internet, type
date. Raspberry Pi will automatically set the date and time to the correct value from the internet. Or you can ping Google:ping 8.8.8.8 -
To find your IP address, type
ifconfig. -
Be careful not to make typos or you won't be able to connect to the internet.
Sometimes, unpredictably, the Raspberry Pi starts with a really huge screen resolution. The way to fix it is to do the following: sudo nano /boot/config.txt and then uncomment/add in the following two lines:
hdmi_group=1
hdmi_mode=16
💣 Hmm... this seems to have stopped working. Try the following or look at https://elinux.org/RPiconfig#Video_mode_options
hdmi_group=2
hdmi_mode=8
- Update the list of packages (repositories) with
sudo apt-get update - Upgrade the RPi with
sudo apt-get upgrade - You can combine this into one command:
sudo apt-get update && sudo apt-get upgrade - You must be connected to the internet for this to work
- You should do this every month or so to apply the most recent patches to the operating system.
- Extra programs that I tend to install on Linux:
sudo apt-get vim vim-doc byobu htop mc bmon
💥 Here are Useful Linux Commands for GUI and command line (read these at some point).
sudo raspi-config will let you change many many of the settings of your raspberry pi.
How to use GitHub This is my attempt to understand and explain it. You only need to run one command to download my programs:
git clone https://github.com/salamander2/RaspberryPi
ssh is a command that lets you make a secure encrypted connection from one computer to another (on Linux or Mac). For Windows, you have to download a program "PuTTY" and use that. There are also handy versions for Android (e.g. JuiceSSH).
🔷 File Transfer
A companion program to ssh, scp, is used to copy files from one computer to another. e.g. in my music folder, I can open a terminal window and type scp Beatles*mp3 pi@192.168.1.115:/home/pi/music to copy all of my Beatles songs over.
Other ways of moving files:
- set up a shared (SMB or Samba) folder
- use Dropbox or the cloud
- plug a USB drive into your Raspberry Pi
- plug your Raspbian SD card into your computer. Unfortunately, Windows doesn't know how to read the Ext4 file system - so you need to install software (ext2read) that will let Windows do this.
- rsync (a linux program that is similar to ssh/scp)
omxplayer : this runs the default music player. If you're interested in music on your RPi, have a look at http://www.raspberrypi.org/tag/music/ and http://www.raspyfi.com/
NOTE: you need at least 64 MB of ram allocated for GPU in order to play mp3s. To change this type sudo raspi-config and choose "advanced options" [This may be old information]
omxplayer -o local Beatles.mp3 This will play the mp3 over the Audio output. To make sound go over the HDMI output, put hdmi (or HDMI?)
[other sound related commmands: alsamixer sudo aplay /usr/share/sounds/alsa/Front_Center.wav amixer cset numid=3 0]
I have put all of my Raspberry Pi programs with photos, schematics, videos, explanations, and source code in separate folders under RaspberryPi/programs
- To run a python program from the command line, type
python stuff.pywhere stuff.py is the name of your program (in the current directory). - If your Python program starts with the line
#!/usr/bin/env pythonthen Linux knows that it is a Python program and you can just type./stuff.py(oh, wait, you have to make it executable first by typingchmod u+x stuff.py) - Any program (in any language) that uses the GPIO pins has to be run using the "sudo" command. e.g.
sudo python stuff.py. Note that this does not apply to the LCD program since it is using the GPIO pins in the I2C mode. But ... then I changed the program to use some other GPIO pins to detect a switch press.
🔷 Note that the GPIO pins have internal pull-up and pull-down resistors. These normally default to OFF. However, you can easily set them in Python (which I do in my programs) and then you don't have to use external pull-up or pull-down resistors when you connect a switch. See this page with it's very handy diagrams to compare the two situations.
=========
-
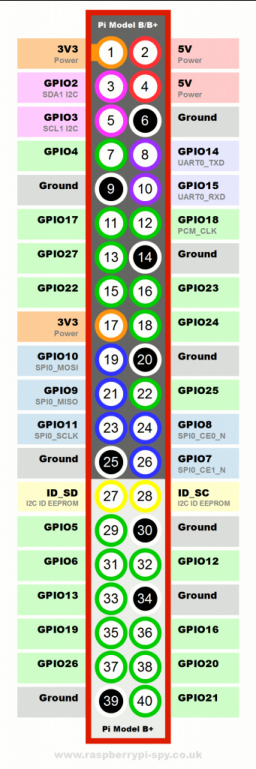
GPIO P1 Header Pinouts: http://elinux.org/Rpi_Low-level_peripherals#P1_header
-
More details for pinouts: http://elinux.org/RPi_BCM2835_GPIOs