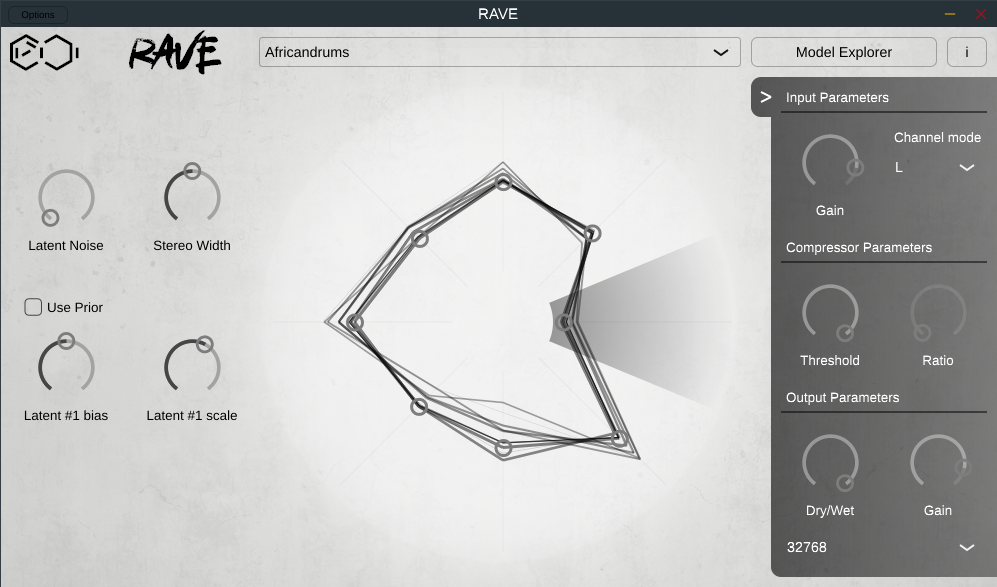
Include RAVE models in your DAW for realtime deep learning based processing
- VST / AU / Standalone plugins available
- MacOS (M1 works, but you'll need to build yourself) & Unix (Windows build is still experimental at this point)
- Reconstruction & Prior modes available
Click on the button with an arrow on the right to open / close the audio settings panel. Here you can adjust:
- Input: Gain, Channel, Compression threshold & ratio
- Output: Gain & Dry / Wet mix
- Buffer size: Internal buffer size used (small buffer size = low latency, more audio clicks)
You can switch between reconstruction & prior modes using the tickbox on the left
In reconstruction mode, RAVE will use the audio input given by your DAW and reconstruct it
- Latent bias & scale can be changed for each of the 1st 8 latents: Select the latent you want to edit on the central wheel, then use the two bottom left buttons to change the values
In Prior mode, RAVE will move through the latent space using its prior
- You can adjust the latent noise, which will add noise to all latent dimensions
This knob set the audio separation between the two output channels of the RAVE model.
Those two channels have the same input but the random sampling differences will produce slightly different outputs, resulting in a nice stereo effect
The Model Explorer Button switches to the model explorer window.
- Model download:
Download models available from our API
If you want to submit your own checkpoints to be available via our API please open an issue tagged "enhancement" and we'll gladly serve them :) - Custom models import:
Use this to select your custom models in your file explorer, this will put them in the right folder and refresh the available models list.
If you want to manage yourself your local models, the files are located in:~/.config/ACIDS/RAVE/(UNIX)~/Library/Application Support/ACIDS/RAVE/(MacOS)
If you want to be able to use your trained models in the VST you have to export them with the --stereo true flag
Then use the VST import button to move the files in the correct folder as explained in the previous section
To get the precompiled binaries
- Go to the "Actions" panel of this repository
- Select the last run
- Download the binaries for your OS
We use Cmake for the build process
PyTorch libraries (And MKL if you're on UNIX) will be downloaded automatically
Tested environments:
| OS | CMake | C++ Compiler | Available formats | Notes |
|---|---|---|---|---|
| MacOS 10.15.7 | 3.21.3 | Clang 11.0.3 | VST / Standalone / AU | |
| MacOS M1 12.3.1 | 3.20.3 | Clang 12.0.0 | VST / Standalone / AU | Clang ARM |
| Ubuntu 20.04.4 LTS | G++ 9.4.0 | VST / Standalone | ||
| Fedora 33 | 3.19.7 | G++ 10.3.1 | Standalone | |
| Windows 10 | 3.23.1 | Standalone | Experimental |
- Ubuntu:
sudo apt-get update && sudo apt-get install -y git cmake g++ libx11-dev libxrandr-dev libxinerama-dev libxcursor-dev libfreetype-dev libcurl4-openssl-dev libasound2-dev - Fedora:
sudo dnf update ; sudo dnf install git cmake g++ libX11-devel libXrandr-devel libXinerama-devel libXcursor-devel freetype-devel libcurl-devel alsa-lib-devel
cd {YOUR_INSTALL_FOLDER} ; git clone git@github.com:acids-ircam/rave_vst.git ; cd rave_vst
git submodule update --init --recursive --progress
mkdir build; cd build
cmake .. -DCMAKE_BUILD_TYPE=Release
cmake --build . --config Release -j 4
The compiled binaries are located in rave-vst/build/rave-vst_artefacts/Release/
- MacOS:
./build/rave-vst_artefacts/Release/Standalone/RAVE.app/Contents/MacOS/RAVE - UNIX:
./build/rave-vst_artefacts/Release/Standalone/RAVE - Windows:
./build/rave-vst_artefacts/Release/Standalone/RAVE.exe
