Bridgehead Deployment
Goal
Allow the Sample Locator to search for patients and samples in your biobanks, giving researchers easy access to your resources.
Quick start
If you simply want to set up a test installation, without exploring all of the possibilities offered by the Bridgehead, then the sections you need to look at are:
Background
The Sample Locator is a tool that allows researchers to make searches for samples over a large number of geographically distributed biobanks. Each biobank runs a so-called Bridgehead at its site, which makes it visible to the Sample Locator. The Bridgehead is designed to give a high degree of protection to patient data. Additionally, a tool called the Negotiator puts you in complete control over which samples and which data are delivered to which researcher.
You will most likely want to make your biobanks visible via the publicly accessible Sample Locator, but the possibility also exists to install your own Sample Locator for your site or organization, see the GitHub pages for the server and the GUI.
The Bridgehead has two primary components:
- The Blaze Store. This is a highly responsive FHIR data store, which you will need to fill with your data via an ETL chain.
- The Connector. This is the communication portal to the Sample Locator, with specially designed features that make it possible to run it behind a corporate firewall without making any compromises on security.
This document will show you how to:
- Install the components making up the Bridgehead.
- Register your Bridgehead with the Sample Locator, so that researchers can start searching your resources.
Requirements
For data protection concept, server requirements, validation or import instructions, see the list of general requirements.
Starting a Bridgehead
The file docker-compose.yml contains the the minimum settings needed for installing and starting a Bridgehead on your computer. This Bridgehead should run straight out of the box. However, you may wish to modify this file, e.g. in order to:
- Enable a corporate proxy (see below).
- Set an alternative Sample Locator URL.
- Change the admin credentials for the Connector.
To start a Bridgehead on your computer, you will need to follow the following steps:
- Install Docker and git and test with:
docker run hello-world
git --version- Download this repository:
git clone https://github.com/samply/bridgehead-deployment
cd bridgehead-deployment- Launch the Bridgehead with the following command:
docker-compose up -d- First test of the installation: check to see if there is a Connector running on port 8082:
curl localhost:8082 | grep Welcome - If you need to stop the Bridgehead, from within this directory:
docker-compose downPort usage
Once you have started the Bridgehead, the following components will be visible to you via ports on localhost:
- Blaze Store: port 8080
- Connector admin: port 8082
Connector Administration
The Connector administration panel allows you to set many of the parameters regulating your Bridgehead. Most especially, it is the place where you can register your site with the Sample Locator. To access this page, proceed as follows:
- Open the Connector page: http://localhost:8082
- In the "Local components" box, click the "Samply Share" button.
- A new page will be opened, where you will need to log in using the administrator credentials (admin/adminpass by default).
- After log in, you will be taken to the administration dashboard, allowing you to configure the Connector.
- If this is the first time you have logged in as an administrator, you are strongly recommended to set a more secure password! You can use the "Users" button on the dashboard to do this.
Note: your browser must be running on the same machine as the Connector for "localhost" URLs to work.
Register with a Directory
The Directory is a BBMRI project that aims to catalog all biobanks in Europe and beyond. Each biobank is given its own unique ID and the Directory maintains counts of the number of donors and the number of samples held at each biobank. You are strongly encouraged to register with the Directory, because this opens the door to further services, such as the Negotiator.
Generally, you should register with the BBMRI national node for the country where your biobank is based. You can find a list of contacts for the national nodes here. If your country is not in this list, or you have any questions, please contact the BBMRI helpdesk. If your biobank is for COVID samples, you can also take advantage of an accelerated registration process here.
Your national node will give you detailed instructions for registering, but for your information, here are the basic steps:
- Log in to the Directory for your country.
- Add your biobank and enter its details, including contact information for a person involved in running the biobank.
- You will need to create at least one collection.
- Note the biobank ID and the collection ID that you have created - these will be needed when you register with the Locator (see below).
Register with a Locator
- Go to the registration page http://localhost:8082/admin/broker_list.xhtml.
- To register with a Locator, enter the following values in the three fields under "Join new Searchbroker":
- "Address": Depends on which Locator you want to register with:
https://locator.bbmri-eric.eu/broker/: BBMRI Locator production service (European).https://locator.dyn.cloud.e-infra.cz/broker: BBMRI Locator test service (European).https://samplelocator.bbmri.de/broker/: GBA Sample Locator production service (German).https://samplelocator.test.bbmri.de/broker/: GBA Sample Locator test service (German).
- "Your email address": this is the email to which the registration token will be returned.
- "Automatic reply": Set this to be
Total Size
- "Address": Depends on which Locator you want to register with:
- Click "Join" to start the registration process.
- You should now have a list containing exactly one broker. You will notice that the "Status" box is empty.
- Send an email to
feedback@germanbiobanknode.deand let us know which of our Sample Locators you would like to register to. Please include the biobank ID and the collection ID from your Directory registration, if you have these available. - We will send you a registration token per email.
- You will then re-open the Connector and enter the token into the "Status" box.
- You should send us an email to let us know that you have done this.
- We will then complete the registration process
- We will email you to let you know that your biobank is now visible in the Sample Locator.
If you are a Sample Locator administrator, you will need to understand the registration process. Normal bridgehead admins do not need to worry about this.
Monitoring
You are strongly encouraged to set up an automated monitoring of your new Bridgehead. This will periodically test the Bridgehead in various ways, and (if you wish) will also send you emails if problems are detected. It helps you to become aware of problems before users do, and also gives you the information you need to track down the source of the problems. To activate monitoring, perform the following steps:
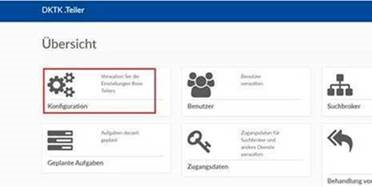
- Open the Connector administration dashboard in your browser, see Admin for details.
- Click the "Configuration" button.
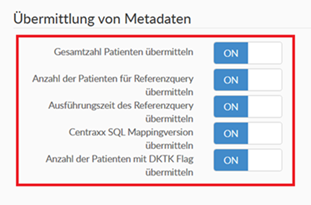
- Scroll to the section "Reporting to central services".
- Click on all of the services in this section so that they have the status "ON".
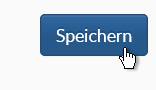
- Important: Scroll to the bottom of the page and click the "Save" button.
- Return to the dashboard, and click the button "Scheduled Tasks".
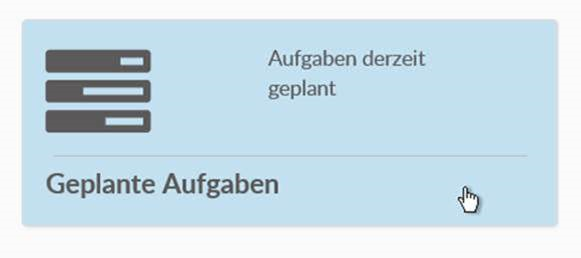
- Scroll down to the box labelled "ReportToMonitoringJob". For newer Versions of the bridgehead there this job is separated into "ReportToMonitoringJobShortFrequence" and "ReportToMonitoringJobLongFrequence".
- Click the button "Run now". This switches the monitoring on. If you have the newer Version of the bridgeheads please run both jobs.

- If you want to receive emails when the monitoring service detects problems with your Bridgehead, please send a list of email addresses for the people to be notified to:
feedback@germanbiobanknode.de.
You are now done!
Troubleshooting
To get detailled information about Connector problems, you need to use the Docker logging facility:
- Log into the server where the Connector is running. You need a command line login.
- Discover the container ID of the Connector. First run "docker ps". Look in the list of results. The relevant line contains the image name "samply/share-client".
- Execute the following command: "docker logs <Container-ID>"
- The last 100 lines of the log are relevant. Maybe you will see the problem there right away. Otherwise, send the log-selection to us.
Some of the more common issues that you may encounter, with suggested solutions, are presented in the table below.
| Issue | Recommendation |
|---|---|
| You run 'docker-compose up' but one or more containers do not start. | There can be many reasons for this. Your best guide to the problem comes from the console output from 'docker-compose'. If you are debugging, it is recommended that you do not use the '-d' option with 'docker-compose', but rather, allow the rolling diagnostics to be displayed on the console. As a general hint, most of the problems you are likely to encounter here are due to misconfigurations in the parameters that you enter in the 'docker-compose.yml' file. |
| You want to log in to your Connector under http://localhost:8082, but you get an error. | There may be several reasons for this: * Make sure that the Docker container for the Connector is up and running. * Make sure that you are running your browser on the same machine as the one on which the Connector is running. |
| You try to register your Bridgehead with a Locator, but the administrator at the Locator site tells you that they have not received your registration. | There are several reasons that this may happen: * You may have made an error when typing in the URL for the Locator. Make sure you double check this. Note that the general form of the registration URL is '<base URL>/broker/'. Also note that test and production Locators have different URLs. If you register for a test Locator, you will not automatically also be registered for the production locator. You will see errors in the log file if there are problems with the URL. * You may be behind a firewall that blocks outgoing calls on ports 80 and 443 (HTTP and HTTPS). Ask your system administrator to help you with this. * Your institution or company may be using a proxy. See the [Proxy example](Proxy example) above. * You may not have a certificate for HTTPS, or your certificate may have expired. Contact your system administration. |
| You are trying to register with a Locator, but the Connector is forbidding this action. | If you tried to register already, but then used the Connector GUI to delete an old registration, you may hit a bug in the Connector that stops you from registering. Unfortunately, the only fix for this is to remove the Docker volume for the Connector's database and start again. |
| The connector is not receiving any search requests and the monitoring reports that the Bridgehead is down. | Ask your local systems administrator to find out if you are operating behind a proxy. Make sure the proxy settings in your Connector configuration are set accordingly. By default, the Connector is configured without any proxy settings. |
| You run a query on the Locator page and log in so that you can see the individual biobanks. However it takes a very long time, up to 5 minutes, before the results for your site appear | This is generally an indication that the query is running slowly on your machine. This can be due to several things: * You may not have sufficient machine specifications for your data. Try increasing the number of cores or increasing the available RAM. * You may not be making the correct distinction between samples and aliquots. See point 6 of the general requirements for more information. |
| You run a query on the Locator page and log in so that you can see the individual biobanks. However, your biobank never shows up, even after you waited for 5 minutes. | This can be caused by various things, check the log files! Some possible candidates: * You forgot to start the Docker containers. * Firewall, proxy or HTTPS problems, see the registration issue above for resolution. * Your dataset is so large that the time to run a query is longer than 5 minutes and the Sample Locator times out. See the suggestions above for slow queries. |
User
- To enable a user to access the connector, a new user can be created under http://localhost:8082/admin/user_list.xhtml. This user has the possibility to view incoming queries
Jobs
- The connector uses Quartz Jobs to do things like collect the queries from the searchbroker or execute the queries. The full list of jobs can be viewed under the job page http://localhost:8082/admin/job_list.xhtml.
Tests
- The Connector connectivity checks can be found under the test page http://localhost:8082/admin/tests.xhtml.
Checking your newly installed Bridgehead
We will load some test data and then run a query to see if it shows up.
First, install bbmri-fhir-gen. Run the following command:
mkdir TestData
bbmri-fhir-gen TestData -n 10
This will generate test data for 10 patients, and place it in the directory TestData.
Next, install blazectl. Run the following commands:
blazectl --server http://localhost:8080/fhir upload TestData
blazectl --server http://localhost:8080/fhir count-resources
If both of them complete successfully, it means that the test data has successfully been uploaded to the Blaze Store.
Open the Sample Locator and hit the "SEND" button. You may need to wait for a minute before all results are returned. Click the "Login" link to log in via the academic institution where you work (AAI). You should now see a list of the biobanks known to the Sample Locator.
If your biobank is present, and it contains non-zero counts of patients and samples, then your installation was successful.
If you wish to remove the test data, you can do so by simply deleting the Docker volume for the Blaze Store database:
docker-compose down
docker volume rm store-db-data
Updating your Bridgehead
Every so often we will make changes to the 'docker-compose.yml' file, e.g. to use the most up-to-date versions of the Connector and Blaze Store containers.
If you run your Bridgehead on a Linux or an Apple system, you can use the supplied update script to bring your Bridgehead up-to-date with this repository:
sh ./update.sh
We recommend that you make an SQL dump of the Connector database before running an update.
If you are running your Bridgehead under Windows, you will need to open a command line window and type:
git pull
docker-compose down
Now open the 'docker-compose.yml' file in an editor and search for "image:". This will take you to the Blaze Store Docker image name, e.g. "samply/blaze:0.16". Make a note of it. Repeat the search. This will take you to the Connector image name, e.g. "samply/share-client:gbn-7". Note that too. On the command line, run docker pulls to get the new images, e.g.
docker pull samply/blaze:0.16
docker pull samply/share-client:gbn-7
Now restart the Bridgehead:
docker-compose up -d
Done!
Directory sync
If you have registered with the Directory (see above), you can also take advantage of a synchronization service, which sends the most up-to-date sample counts from the Blaze store to the Directory automatically, on a daily basis. This saves you the trouble of doing the job manually.
This is not activated by default.
To use it, you should first edit the docker-compose.yml file and search for the environment variables for the Connector container. Add the following extra line:
''' DIRECTORY_URL: "https://bbmritestnn.gcc.rug.nl" FEATURE_BBMRI_DIRECTORY_SYNC: "true" ''' Replace the URL with the correct one for the Directory you are actually using, e.g. https://directory.bbmri-eric.eu.
Restart docker-compose.
Now go to the admin GUI of the Connector (http://localhost:8082).
Select the tile labelled "Access data"/"Zugangsdaten".
Scroll down to "Add user data"/"Zugansdaten hinzufügen".
Under "Goal"/"Ziel" choose "Directory".
Now enter the username and the password that you use for accessing the Directoy. You may need to ask the Directory administrator first, to provide you with this information.
Finally, click the button at the bottom of the page labelled "Add access data"/"Zugangsdaten hinzufügen".
Directory synchronization is now active. It may take up to 24 hours before the first synchronization occurs.
Manual installation
The installation described here uses Docker, meaning that you don't have to worry about configuring or installing the Bridgehead components - Docker does it all for you. If you do not wish to use Docker, you can install all of the software directly on your machine, as follows:
- Install the Blaze Store
- Install the Connector
- Register with the Sample Locator (see above)
Source code for components deployed by docker-compose.yml:
Optional configuration:
Proxy example
Add environments variables in docker-compose.yml (remove user and password environments if not available):
"http://proxy.example.de:8080", user "testUser", password "testPassword"
  version: '3.4'
  services:
    store:
      container_name: "store"
      image: "samply/blaze:0.11"
      environment:
        BASE_URL: "http://store:8080"
        JAVA_TOOL_OPTIONS: "-Xmx4g"
        PROXY_HOST: "http://proxy.example.de"
        PROXY_PORT: "8080"
        PROXY_USER: "testUser"
        PROXY_PASSWORD: "testPassword"
      networks:
        - "samply"

  .......

  connector:
      container_name: "connector"
      image: "samply/connector:7.0.0"
      environment:
        POSTGRES_HOST: "connector-db"
        POSTGRES_DB: "samply.connector"
        POSTGRES_USER: "samply"
        POSTGRES_PASS: "samply"
        STORE_URL: "http://store:8080/fhir"
        QUERY_LANGUAGE: "CQL"
        MDR_URL: "https://mdr.germanbiobanknode.de/v3/api/mdr"
        HTTP_PROXY: "http://proxy.example.de:8080"
        PROXY_USER: "testUser"
        PROXY_PASS: "testPassword
      networks:
        - "samply"

  .......
General information on Docker environment variables used in the Bridgehead
Notes
-
If you see database connection errors of Store or Connector, open a second terminal and run
docker-compose stopfollowed bydocker-compose start. Database connection problems should only occur at the first start because the store and the connector doesn't wait for the databases to be ready. Both try to connect at startup which might be to early. -
If one needs only one of the the Bridgehead components, they can be started individually:
docker-compose up store -d
docker-compose up connector -d- To shut down all services (but keep databases):
docker-compose down- To delete databases as well (destroy before) IMPORTANT: Before deleting the databases please unregister from all searchbrokers using the GUI:
docker volume rm store-db-data
docker volume rm connector-db-data-
To see all executed queries, create a new user, logout and login with this normal user.
-
To set Store-Basic-Auth-credentials in Connector (as default
Lokales Datenmanagementwith dummy values was generated)- Login at Connector-UI (default usr=admin, pwd=adminpass)
- Open credentials page
- Delete all instances of
Lokales Datenmanagement - for "Ziel" select
Lokales Datenmanagement, provide decrypted CREDENTIALS in "Benutzername" and "Passwort", select "Zugangsdaten hinzufügen"
- Delete all instances of
-
If you would like to read about the experiences of a team in Brno who have installed the Bridgehead and a local Sample Locator instance, take a look at SL-BH_deploy.
Useful Links
License
Copyright 2019 - 2021 The Samply Community
Licensed under the Apache License, Version 2.0 (the "License"); you may not use this file except in compliance with the License. You may obtain a copy of the License at
http://www.apache.org/licenses/LICENSE-2.0
Unless required by applicable law or agreed to in writing, software distributed under the License is distributed on an "AS IS" BASIS, WITHOUT WARRANTIES OR CONDITIONS OF ANY KIND, either express or implied. See the License for the specific language governing permissions and limitations under the License.