Hello guys, hope you all doing good in this pandemic time. Finally learning multiple tools and technologies i am able to integrate them and create something new. Here, i have created a webapp that will helps us to detect the brain tumor using Hybrid multi cloud and MLOps tools. In this project i have created first the model using Convolutional neural network. The model is saved and using flask created a webapp whereas the using dockerfile created image. So let’s start this project by knowing the deep learning codes and explaination on the same.
I have used CNN algorithm to get the prediction of brain tumor using brain MRI images. You can easily find the dataset of brain MRI on kaggle here. The dataset is basically classified into 4 classes which is mentioned below.
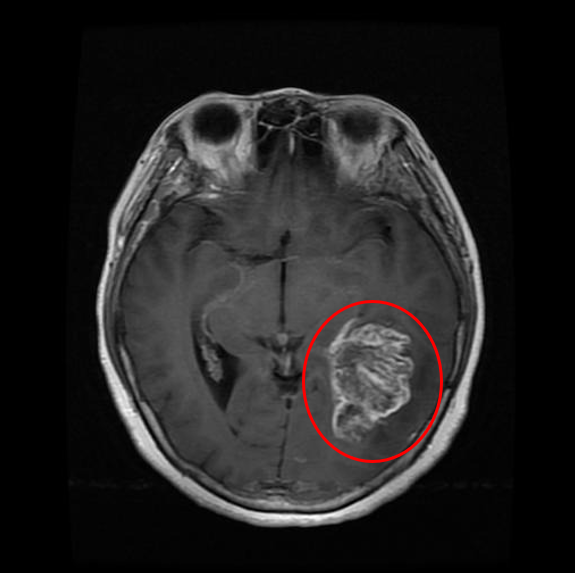
Glioma is a type of tumor that occurs in the brain and spinal cord. Gliomas begin in the gluey supportive cells (glial cells) that surround nerve cells and help them function. Three types of glial cells can produce tumors. The circled red part on the right side of the brain is the Glioma tumor.
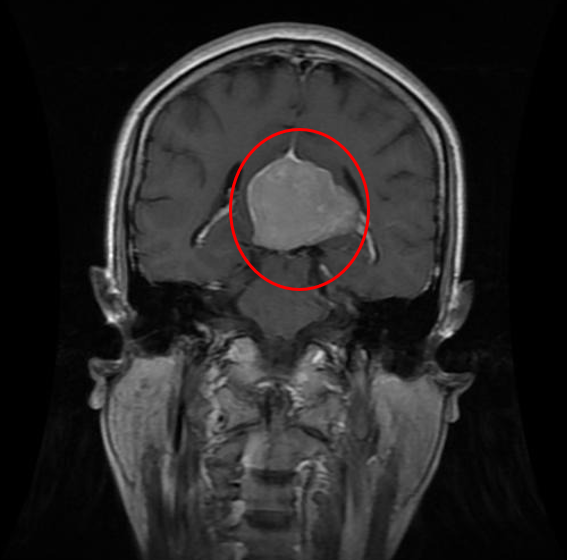
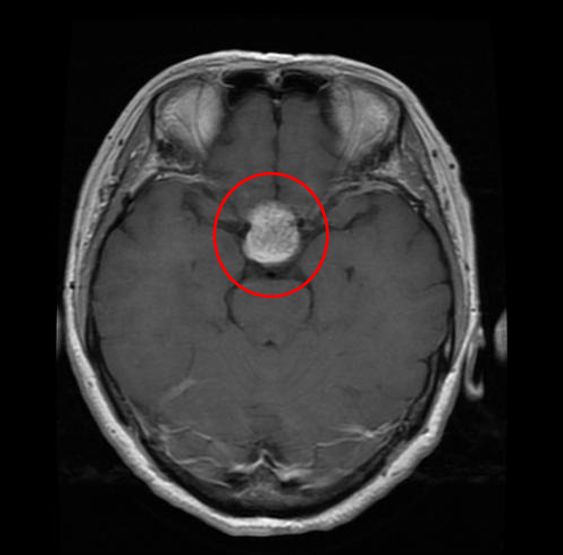
## 2. Meningioma Tumor: A meningioma is a tumor that arises from the meninges — the membranes that surround your brain and spinal cord. Although not technically a brain tumor, it is included in this category because it may compress or squeeze the adjacent brain, nerves and vessels.Pituitary tumors are abnormal growths that develop in your pituitary gland. Some pituitary tumors result in too much of the hormones that regulate important functions of your body. Some pituitary tumors can cause your pituitary gland to produce lower levels of hormones.
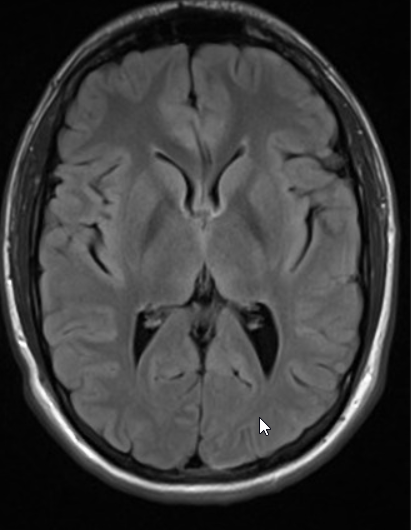
As you can see the image alongside of a brain. This specific brain has no tumor. Anyone can easily tells that this brain image is a free tumor. Now lets move towards the python code for creating neural network and training the CNN model on brain.
As you can see in the above image that i have created a class named brain_tumor which have a function named image_data. This function will helps us to create a training set of brain MRI images. I have imported ImageDataGenerator from keras.preprocessing. ImageDataGenerator function will helps us to create a image set by following parameteres.
- rescale → it will help to rescale the image by 1./255.
- shear_range → this will helps us to shear the image by 20%.
- zoom_range → this will help to zoom the mage by 20%.
- horizontal_flip= True → Helps to flip the image horizontally. After tha we have to import the images from the directory using flow_from_directory function. Here flow_from_directory have folllowing parameters which will helps us to create a set of training data.
- targe_size= (64,64) → Target(final) image will be of 64 * 64 pixel.
- batch_size= 32 → The default ‘batch_size’ is 32, which means that 32 randomly selected images from across the classes in the dataset will be returned in each batch when training.
- class_mode = ‘binary/categorical’. Here binary means 2 classes whereas categorical means more than two classes. As we having 4 classes so i am taking classmode as categorical. Now the same process we have to do it for testing dataset. The same process has done in the below image to create a testing dataset.
I created a new function in the same class of brain_tumor. The final images will be stored in test_set variable.
Now we can create model. Here i am importing Sequential() from tf.keras.model. Sequential() means that you have to create
Input layer → Hidden layer → Output layer.
For learning detailed concept of CNN look at this article.
Now lets move forward to create our Convolutional neural network. I have create a new function in the same class of brain_tumor as you can see below.
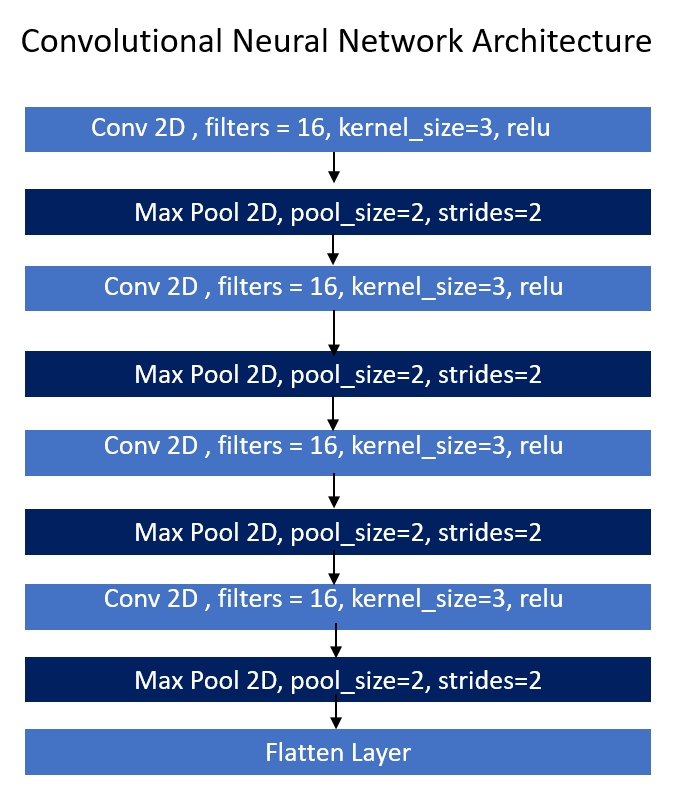
As you can see in the image alongside, there are 9 layers i.e Conv2D, Max Pool 2D followed by Flatten layer at the last. The first layer is of conv 2D whereas the second layer is Max pool 2D layer. This is the alternate sequence i followed till the end. The output of conv2D is given to max pool 2 D layer which will give to forward conv2D and respectively.
The calculation between the image pixel and kernel values is known as convolve. New image extracted by convolution is always small because after some important feature extraction the pixels are reduced in the new image therefore the new image is always small compare to original image. But this image include more pixels of same information (color, objects) as there are more pixels in the convolved image then for training this image there’s requirement of high processing power as well as cost. To reduce this requirement we can reduce the pixel of the same information and merge them into one pixel. This can be achieved by Pooling. There are three types of pooling 1) Max Pooling 2) Average Pooling 3) Sum Pooling. We use Max pooling in many of the cases but it depends on requirements. Below is an example of Max pooling.
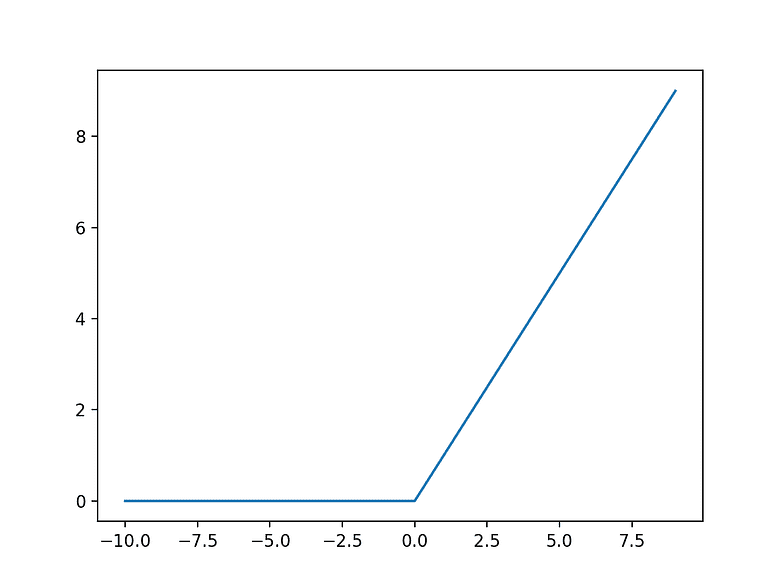
There is a layer of activation function ‘relu’. This relu activation will give only positive value to next convolutional layer i.e if first convolutional layer transfers negative value to next convolutional layer then relu will send only positive value and will convert the negative value to zero. Because there cannot be negative prediction. This layers are in 2D and machine learning model not understand higher dimensional inputs there we have to flatten these layers value and convert this into 1D and then this flatten values will acts as a input to neural network i.e is to send flatten values to Fully connected layer.
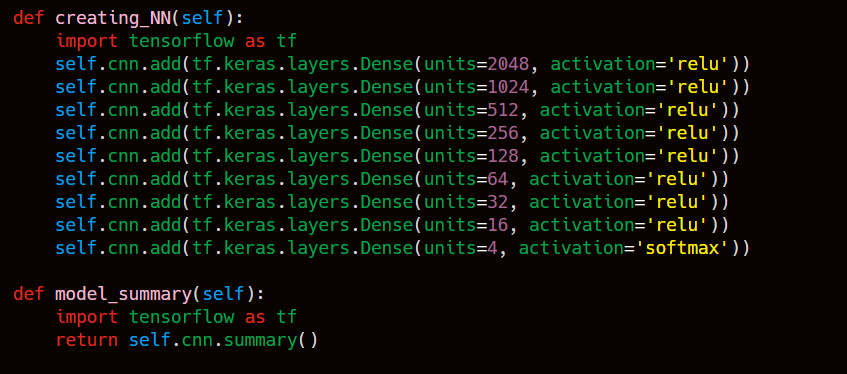
The above which we have created is the CNN layer now lets crate Neural network layers so that we can train the model.
In the above image i have created neural network. I have taken activation layer as relu. The another function will helps you to give the summary of the model.
The rectified linear activation function or ReLU for short is a piecewise linear function that will output the input directly if it is positive, otherwise, it will output zero. … The rectified linear activation function overcomes the vanishing gradient problem, allowing models to learn faster and perform better. After creating neural network we have to compile the model before training. I have created compile_image function which will helps model to compile before training. In the cnn.compile() function i have used below parameteres.1. optimizer: This will helps you to reduce the loss and helps the model to gain more accuracy.
2. I have used here Adam optimizer which is comparatively useful than other optimizers.
3. learning_rate: This parameter inside Adam will helps the Adam to learn the weights and helps the model to gain more accuracy.
4. loss: As our output is multi classification therefore we have to use loss type as categorical cross entropy.
5. metrics=[Accuracy]: This parameter will helps us to tell the accuracy at every epoch.
Now we are ready to train our CNN brain tumor model . In the below image i have used .fit() function which will helps us to fit/train the model. It accepts
x --> training_set
validation_data --> testing_set
epochs = 50
After knowing the classes indices you will find that
index 0 represents → Galioma Tumor
index 1 represents → Meningioma Tumor
index 2 represents → No Tumor
index 3 represents → Pituitary Tumor
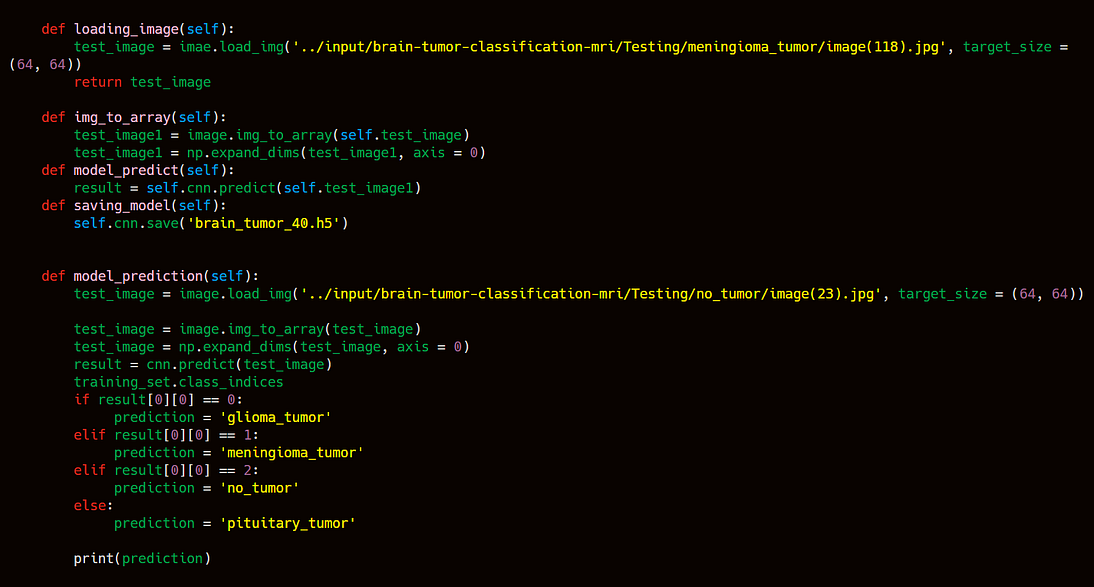
After model training we have to save the model in .h5 file. After saving we will put this model into a docker file where we will create a webapp using flask and html, css, javascript. Now the machine learning part is done lets move to DevOps part to do some operation using automation and provisioning tools.
For multi cloud management we have to set the workspace. Here below i have created three workspace and the code of terraform will launch the resources in their workspace with respect to their cloud.
terraform workspace new workspace_name   --> creating new workspace
terraform workspace list     --> will show all the workspace
terraform workspace show     --> will show the current workspace
By default terraform create a default workspace and the * represents the current workspace. Here above i have create three workspace i.e.
1. aws_prod → For Kubernetes Cluster
2. azure_prod → Jenkins Configuration
3. gcp_dev → For Creating Docker image and push to docker_hub.
Now we have to launch instances with their architecture on different clouds e.g. AWS, Azure, GCP. Here i will use terraform for provisioning the instances on different cloud. The below architecture will helps you know what i am doing on aws.
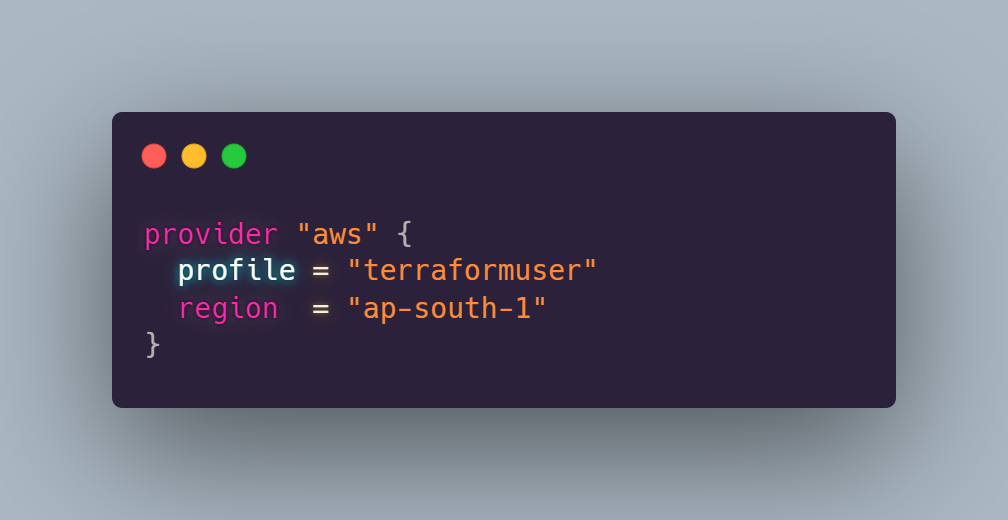
For doing provisioning on terraform you have to set provisioner for aws. You have to create a profile. Here i have created terraformuser. you can create profile using below command. You have to set the access key and secret key of IAM user in AWS. I have given region is ap-south-1(mumbai[india]).
Note: You have to create IAM user in AWS.
C:\Users\Amit>aws configure  --profile terraforuser(user_name)
AWS Access Key ID : XXXXXXXXXXX
AWS Secret Access Key : XXXXXXXXXXX
Default region name : ap-south-1
Default output format : none
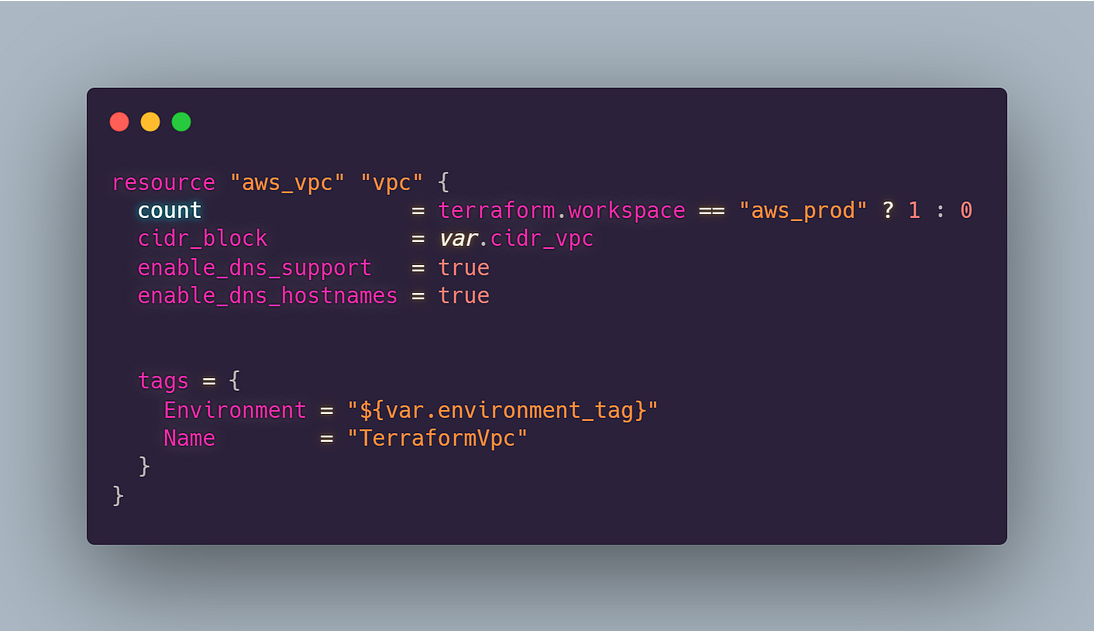
Amazon Virtual Private Cloud (Amazon VPC) enables you to launch AWS resources into a virtual network that you’ve defined. This virtual network closely resembles a traditional network that you’d operate in your own data center, with the benefits of using the scalable infrastructure of AWS.
the above code will create VPC. The above vpc block accept the cidr_block. you can enable dns support given to ec2 instances after launching. You can give the tag name to the above vpc. Here i have given “TerraformVpc”. We have to launch this resource in aws only so as we are doing hybrid multi cloud management therefore in every resource we have to specify workspace condition. If terraform.workspace == aws_prod then launch one vpc.
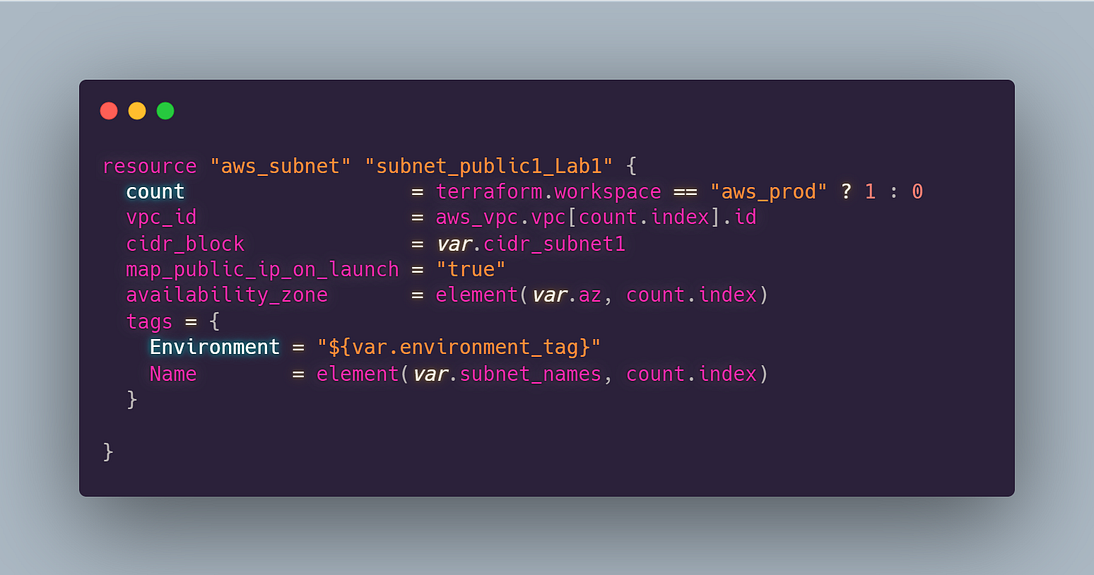
Subnetwork or subnet is a logical subdivision of an IP network. The practice of dividing a network into two or more networks is called subnetting. AWS provides two types of subnetting one is Public which allow the internet to access the machine and another is private which is hidden from the internet. Here i am using element function which will help to take the count index (count of a resource) of the vpc and take the same index value which is inside var.az variable file. you can find all the codes in the github link below at the end.
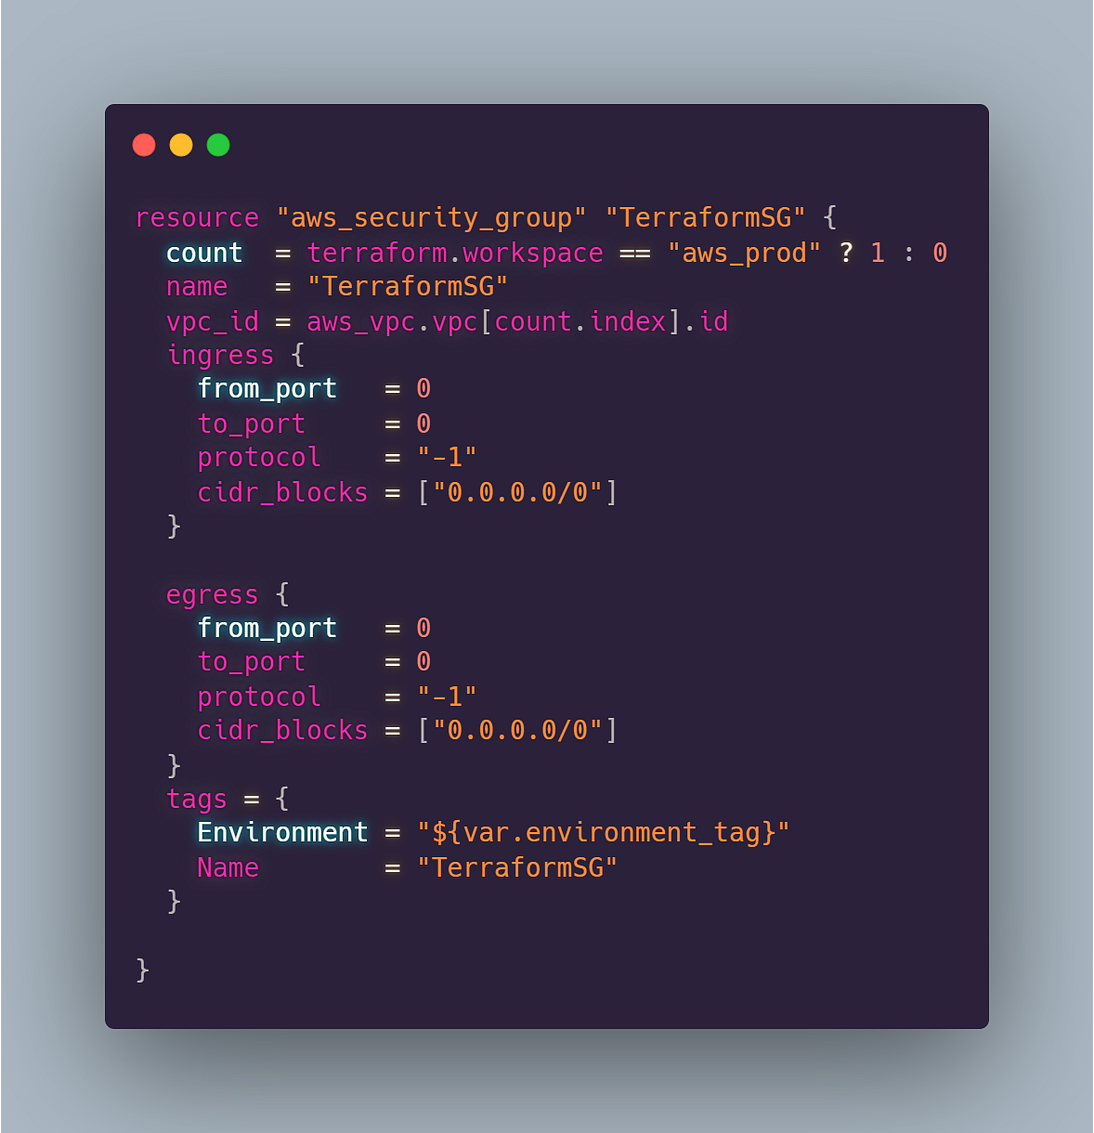
A security group acts as a virtual firewall for your EC2 instances to control incoming and outgoing traffic. … If you don’t specify a security group, Amazon EC2 uses the default security group. You can add rules to each security group that allow traffic to or from its associated instances.
The above block of code will create a security group. It accepts the respective parameters name(name of the security group), vpc_id, ingress(inbound rule) here i have given “all traffic”. “-1” means all. from_port= 0 to_port=0 (0.0.0.0) that means we have disabled the firewall. you need to mention the range of IP’s you want have in inbound rule.
The egress rule is the outbound rule. I have taken (0.0.0.0/0) means all traffic i can able to access from this outbound rule. You can give the name of respective Security Group.
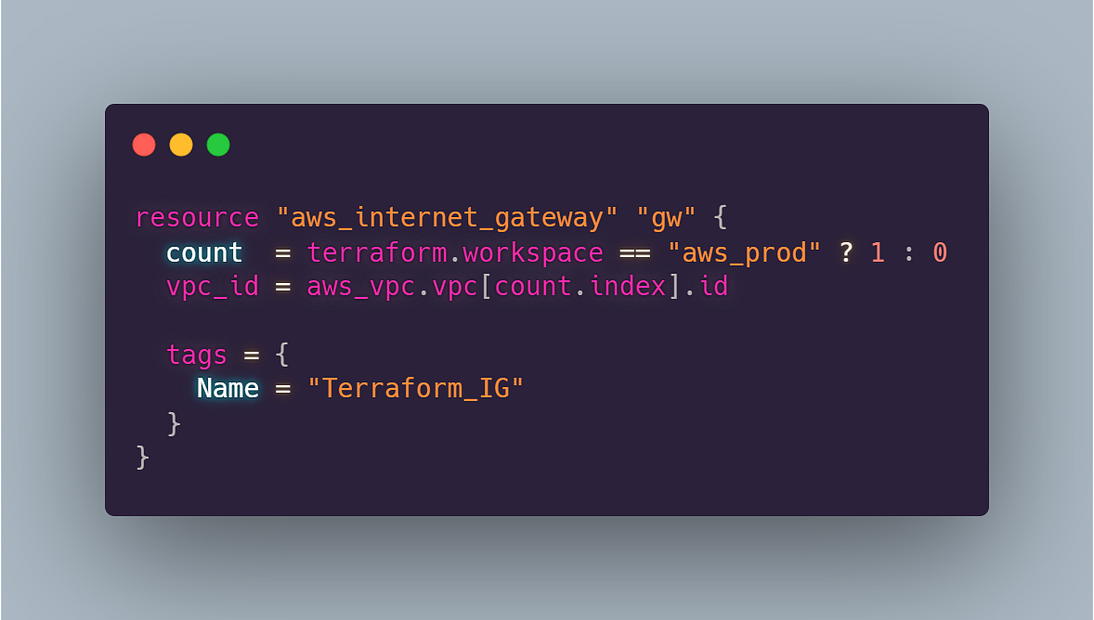
An internet gateway serves two purposes: to provide a target in your VPC route tables for internet-routable traffic, and to perform network address translation (NAT) for instances that have been assigned public IPv4 addresses.
the above code will create you respective internet gateway. you need to specify on which vpc you want to create internet gateway. Also you can give name using tag block.
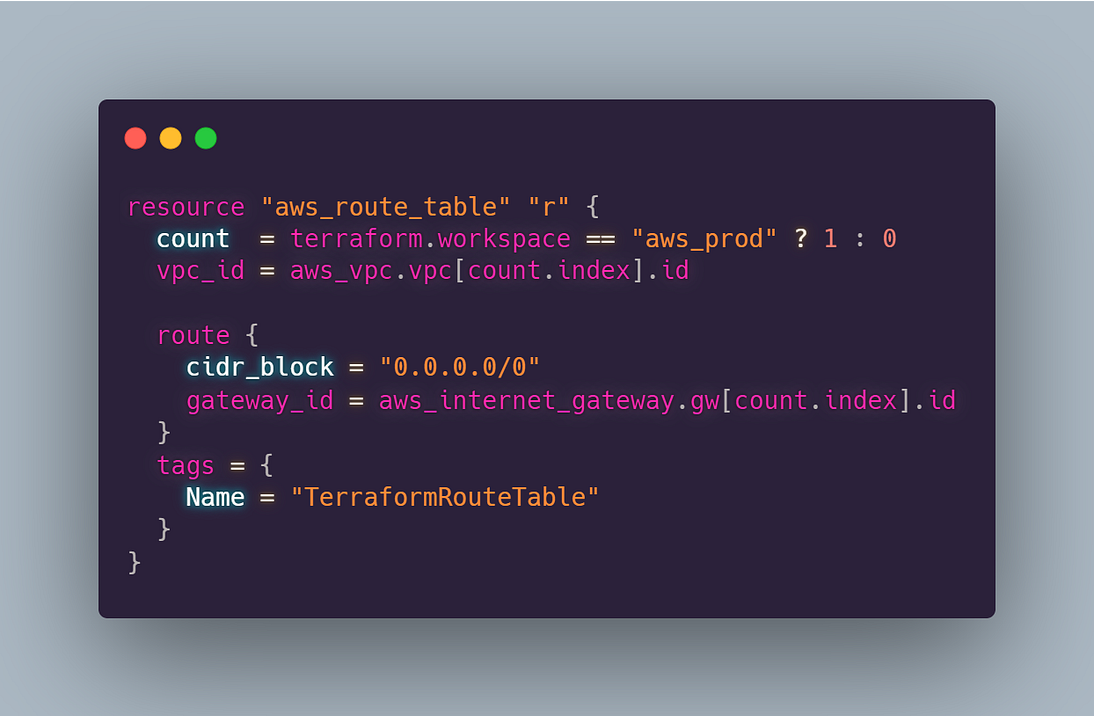
A route table contains a set of rules, called routes, that are used to determine where network traffic from your subnet or gateway is directed.
You need to create a route table for the internet gateway you have created above. Here, i am allowing all the IP rage. So my ec2 instances can connect to the internet world. we need to give the vpc_id so that we can easily allocate the routing table to respective vpc. You can specify the name of the routing table using tag block.
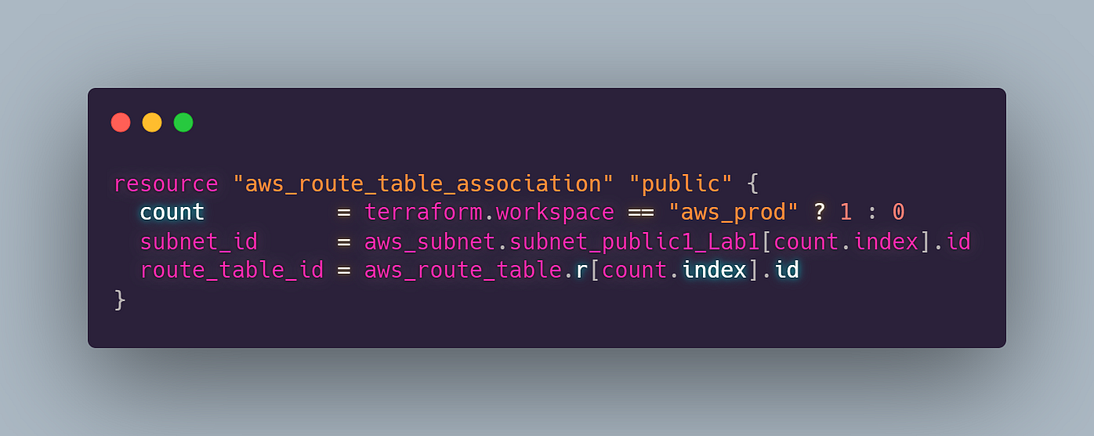
We need to connect the route table created for internet gateways to the respective subnets inside the vpc.
You need to specify which subnets you want to take to the public world. As if the subnets gets associated(connected) to the Internet Gateway it will be a public subnet. But if you don’t associate subnets to the Internet gateway routing table then it will known as private subnets. The instances which is launched in the private subnet is not able to connected from outside as it will not having public IP, also it will not be connected to the Internet Gateway.
You need to specify the routing table for the association of the subnets. If you don’t specify the routing table in the above association block then subnet will take the vpc’s route table. So if you want to take the ec2 instances to the public world then you need to specify the router in the above association block. Its upon you which IP range you want you ec2 instances to connect. Here i have give 0.0.0.0/0 means i can access any thing from the ec2 instances.
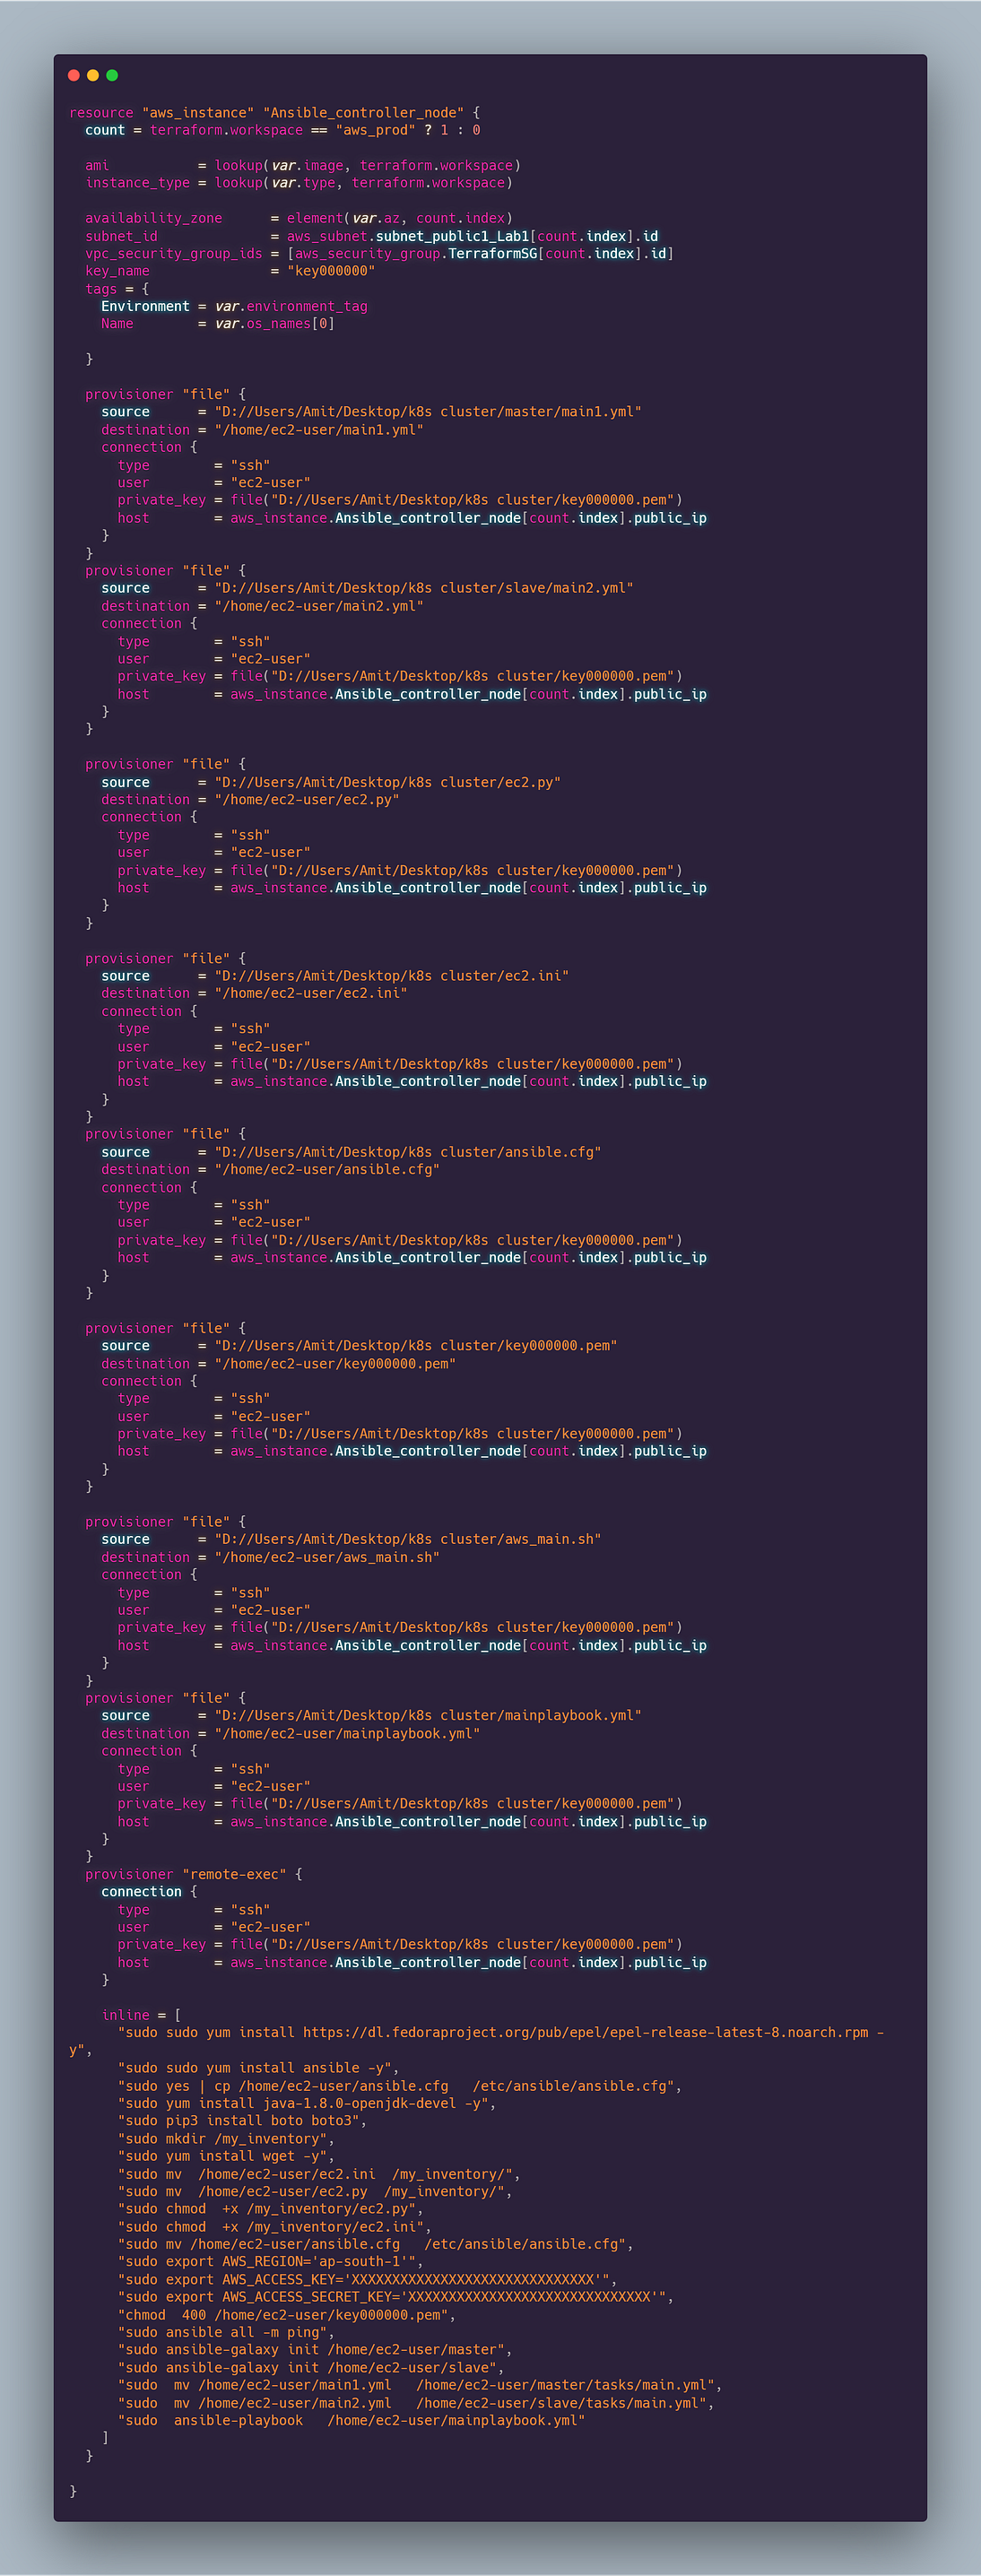
An EC2 instance is nothing but a virtual server in Amazon Web services terminology. It stands for Elastic Compute Cloud. It is a web service where an AWS subscriber can request and provision a compute server in AWS cloud. … AWS provides multiple instance types for the respective business needs of the user.
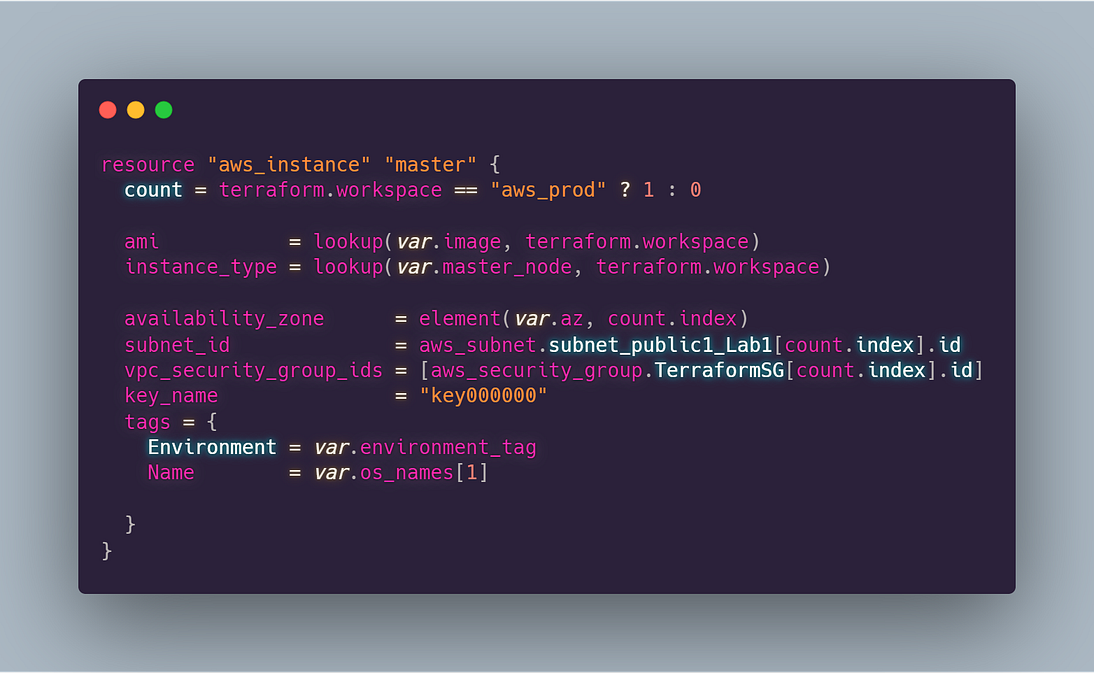
In the above code, it will create a new instance. It accepts the following parameters.
ami-> image name
instance_type-> type of instances
subnet_id-> In which subnet you want to launch instance
vpc_security_group_ids->  Security Group ID
key_name-> key name of instance
Name-> name of the instance
In the above terraform code i have launched one ec2 instance(Ansible_Controller_Node) and then using remote_exec module i transferred the files from local to ec2 instances inside /home/ec2-user and from there i moved to respective files and folders. For detailed configuration of ansible controller node visit here. The ansible playbook you will find in the github only.Launching Target Nodes:
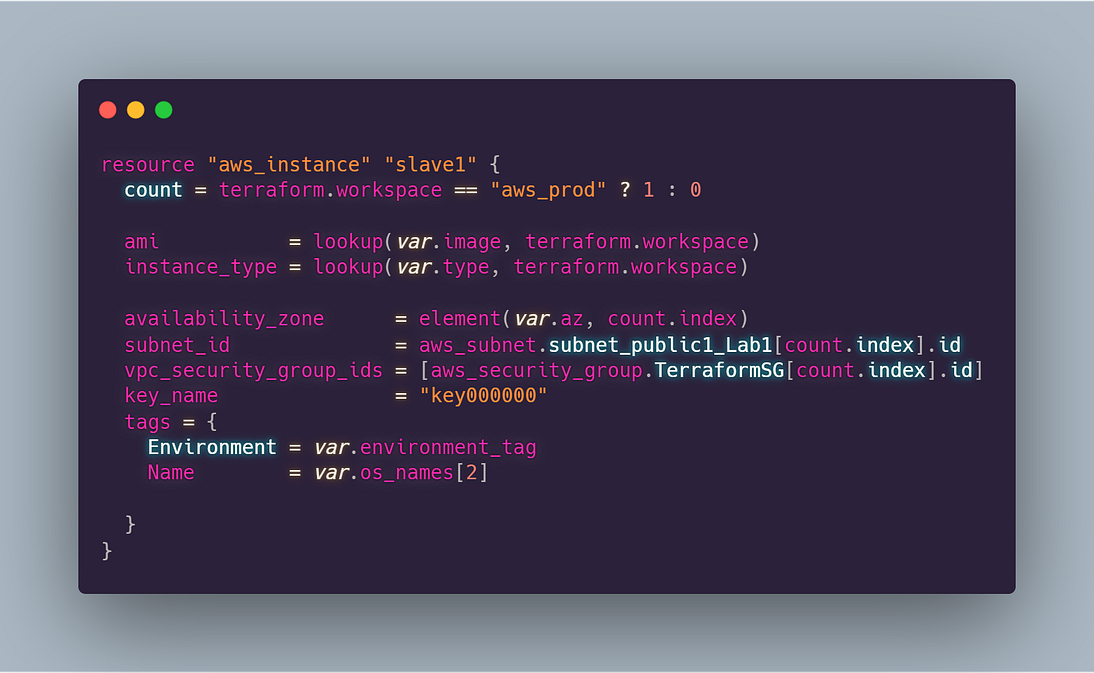
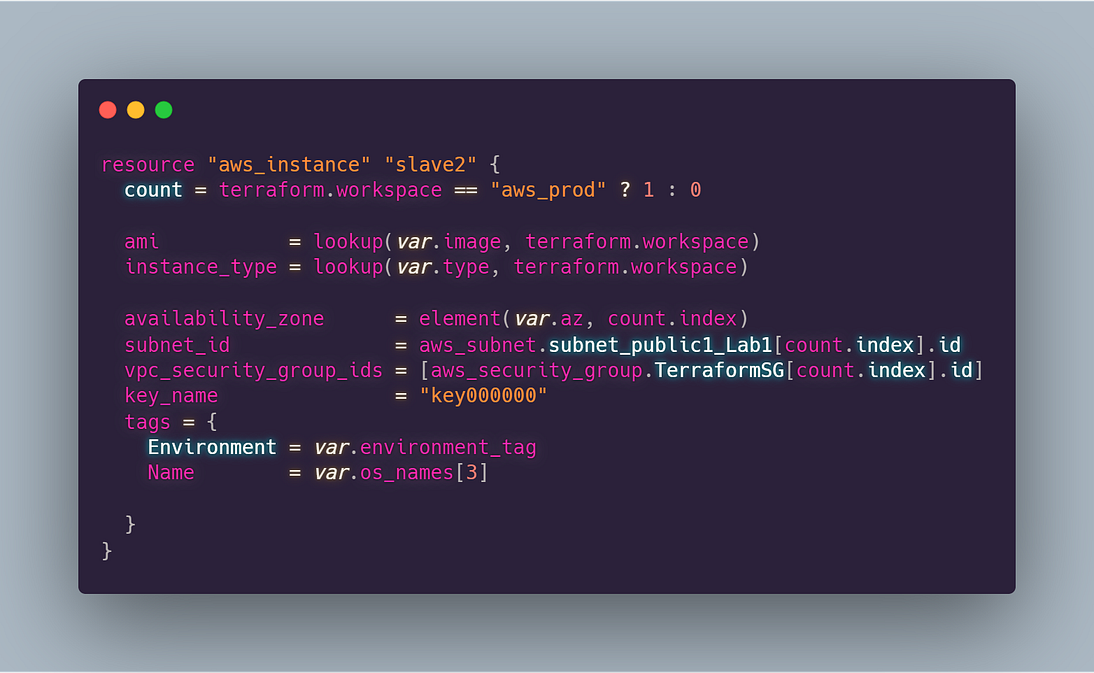
For launching Slave nodes you have to just change the names of the os in the variable file. you have to pass these variables using index values like if you give var.osnames[0] → Ansible_controller_node, var.osnames[1] → K8S_Master, var.osnames[2] → K8S_Slave1, var.osnames[3] → K8S_Slave2.
After launching all the ec2 instances and configuring ansible on Ansible_Controller_Node, ansible will automatically configure the kubernetes cluster inside the master and slave nodes. I have used here dynamic inventory so that ansible will fetch the public ip with their tag_names and helps to configure the kubernetes cluster dynamically.
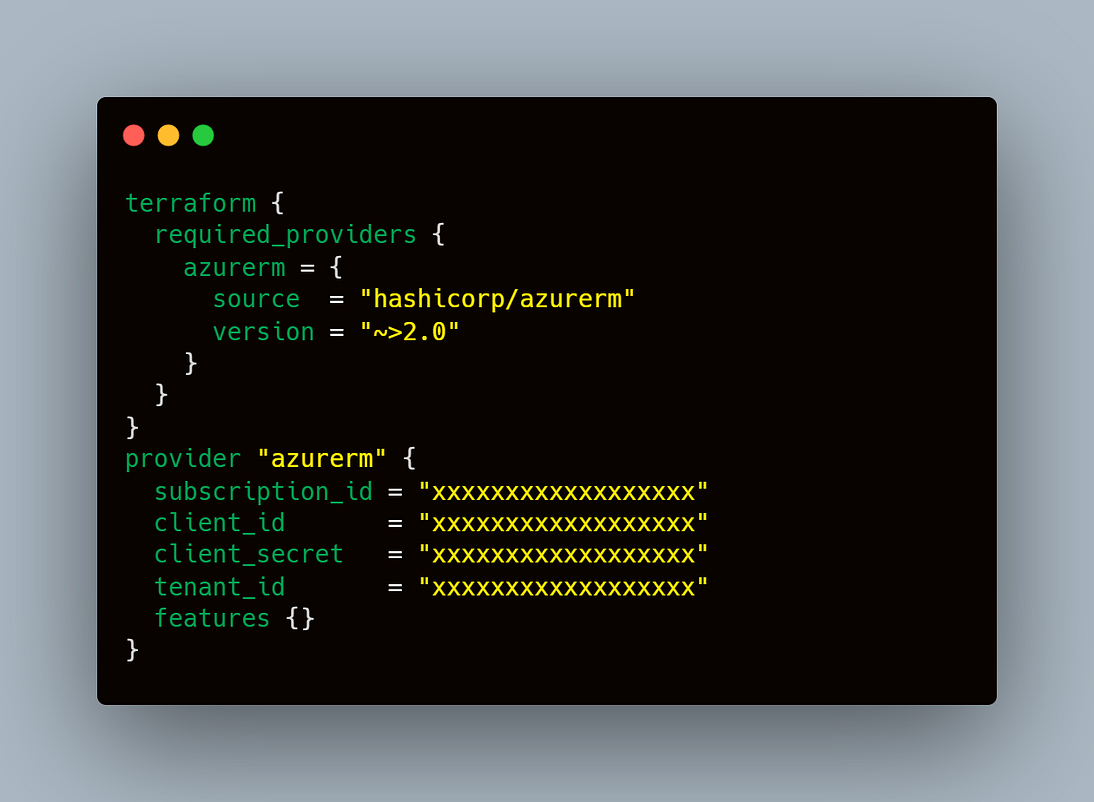
Now we have to launch one VM into azure cloud and and inside that we will configure jenkins. Before that you have to set the provisioner for azure cloud.
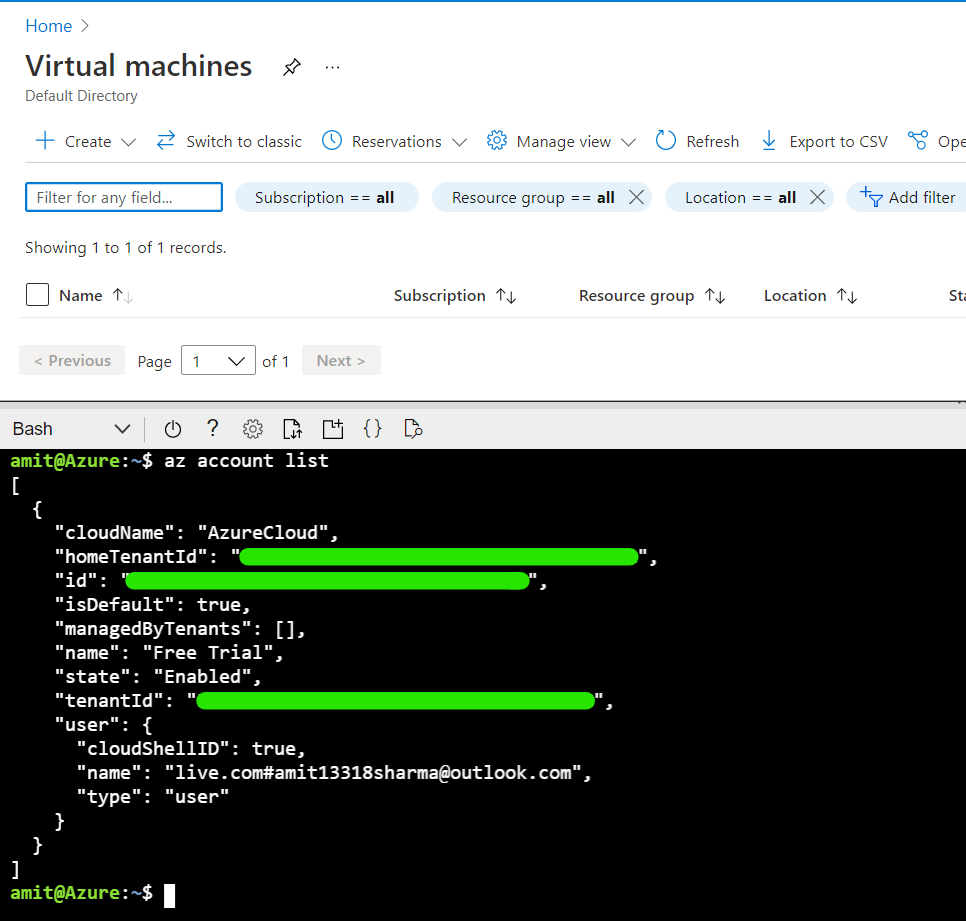
you have to got to azure cli in azure portal from which you will get subcription_id, client_id, client_secret, tenant_id.
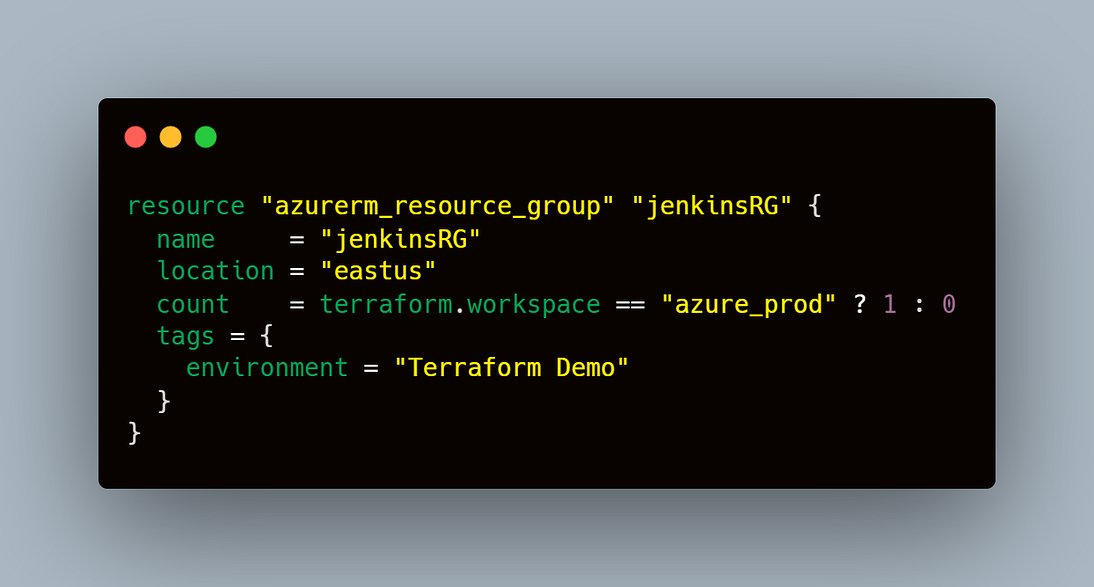
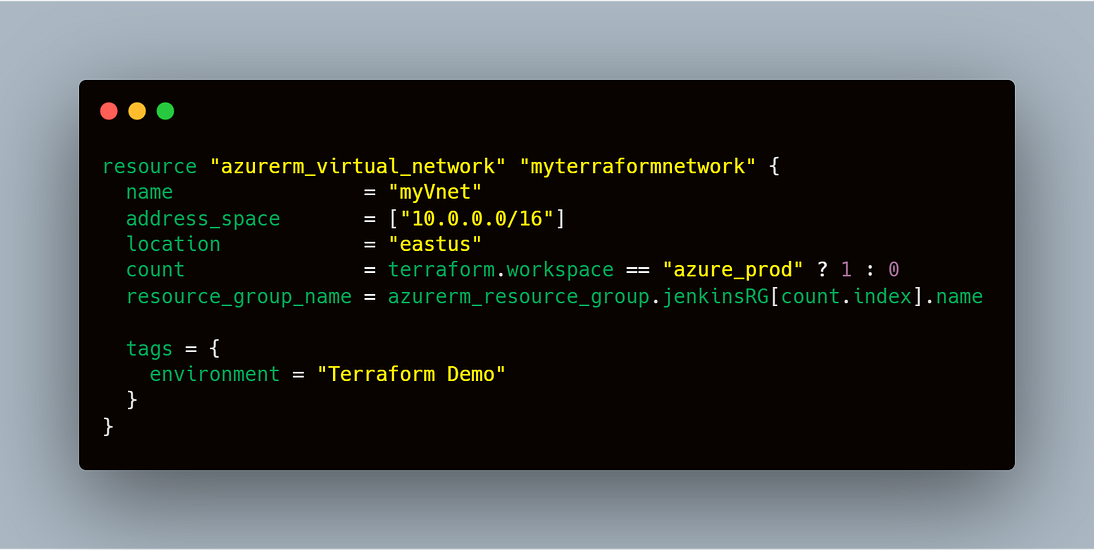
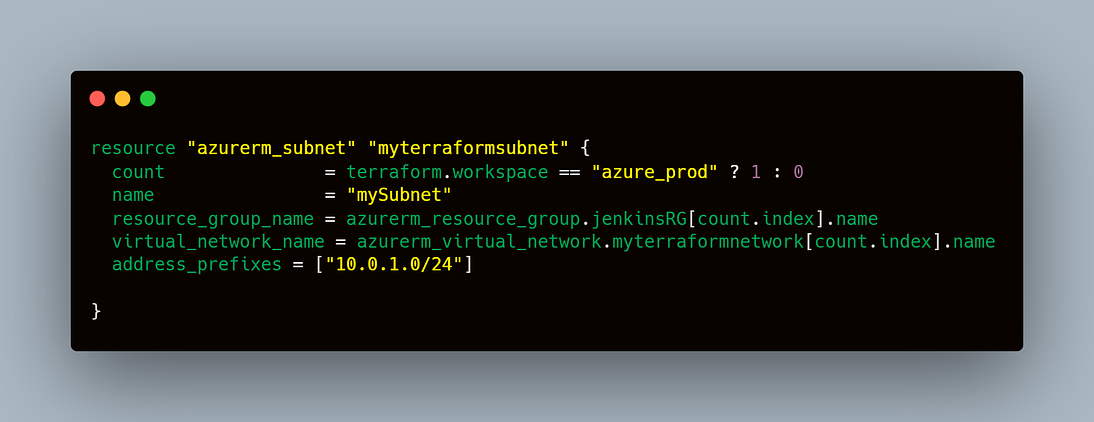
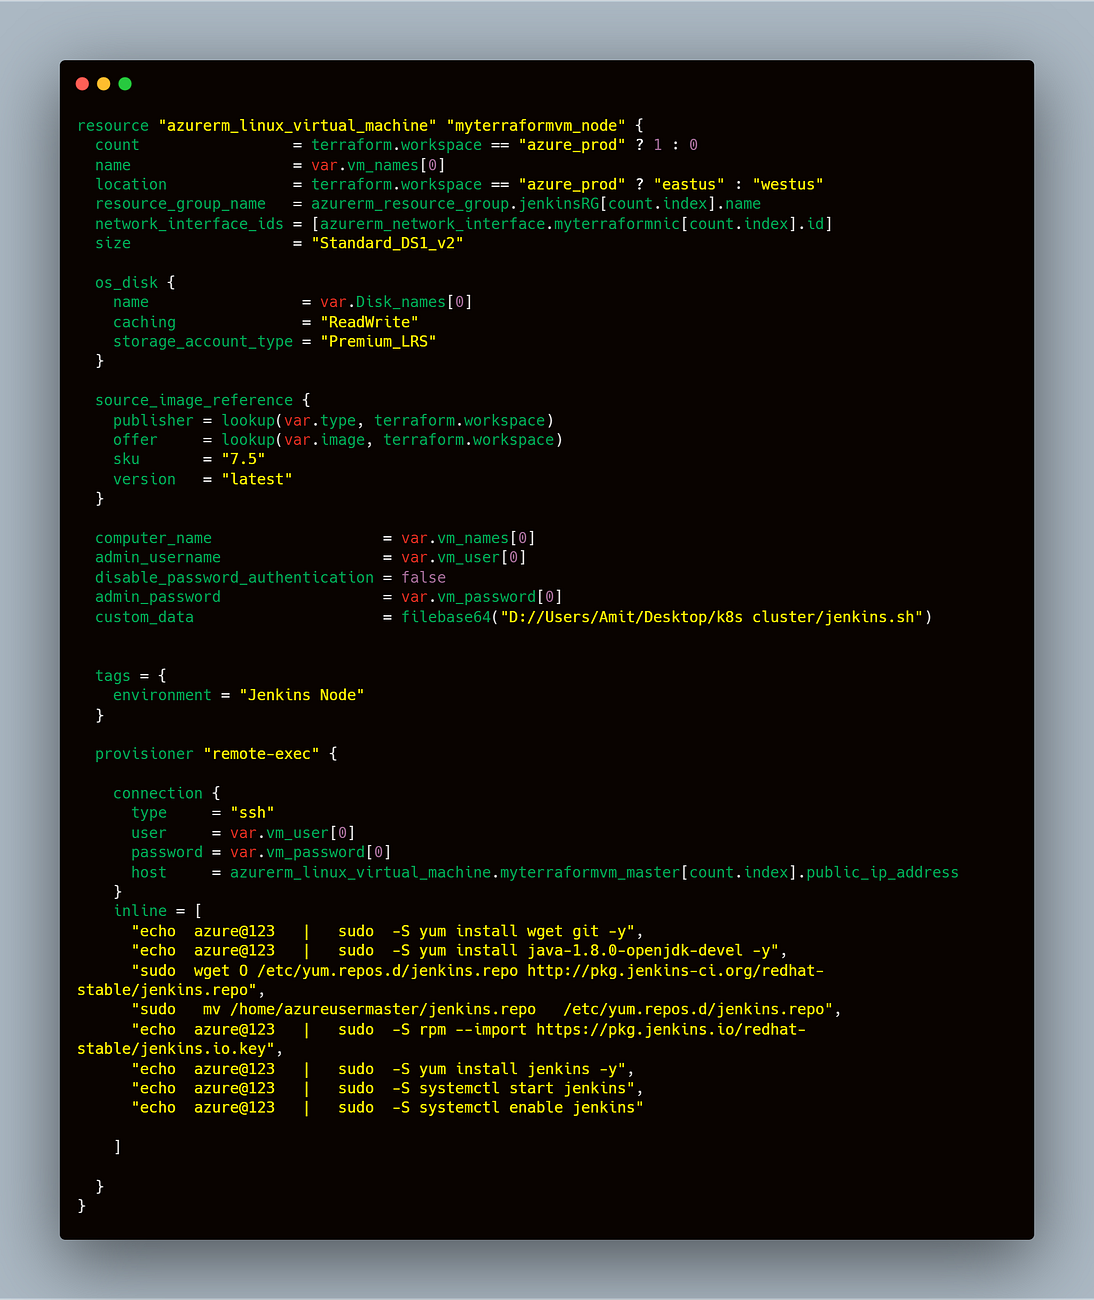
Now we have to create a code for launching virtual machine in azure. below is the code which will help you to create a vm in azure.
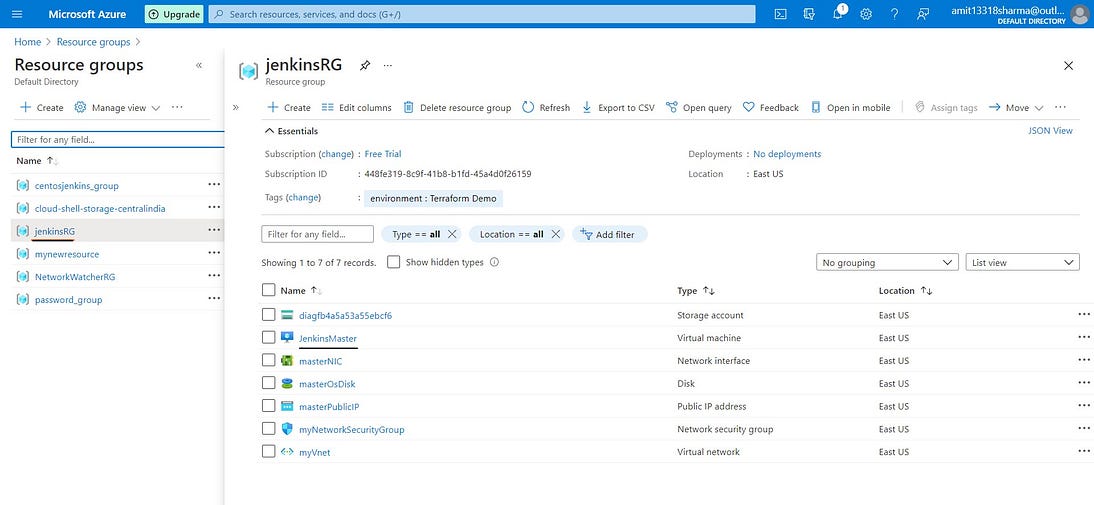
A resource group is a container that holds related resources for an Azure solution. The resource group can include all the resources for the solution, or only those resources that you want to manage as a group. You decide how you want to allocate resources to resource groups based on what makes the most sense for your organization. Generally, add resources that share the same lifecycle to the same resource group so you can easily deploy, update, and delete them as a group. we have to set the condition that if terraform.workspace == azure_prod then launch one resource group.
Azure Virtual Network (VNet) is the fundamental building block for your private network in Azure. VNet enables many types of Azure resources, such as Azure Virtual Machines (VM), to securely communicate with each other, the internet, and on-premises networks. VNet is similar to a traditional network that you’d operate in your own data center, but brings with it additional benefits of Azure’s infrastructure such as scale, availability, and isolation.
A subnet is a range of IP addresses in the VNet. You can divide a VNet into multiple subnets for organization and security. Each NIC in a VM is connected to one subnet in one VNet. NICs connected to subnets (same or different) within a VNet can communicate with each other without any extra configuration.
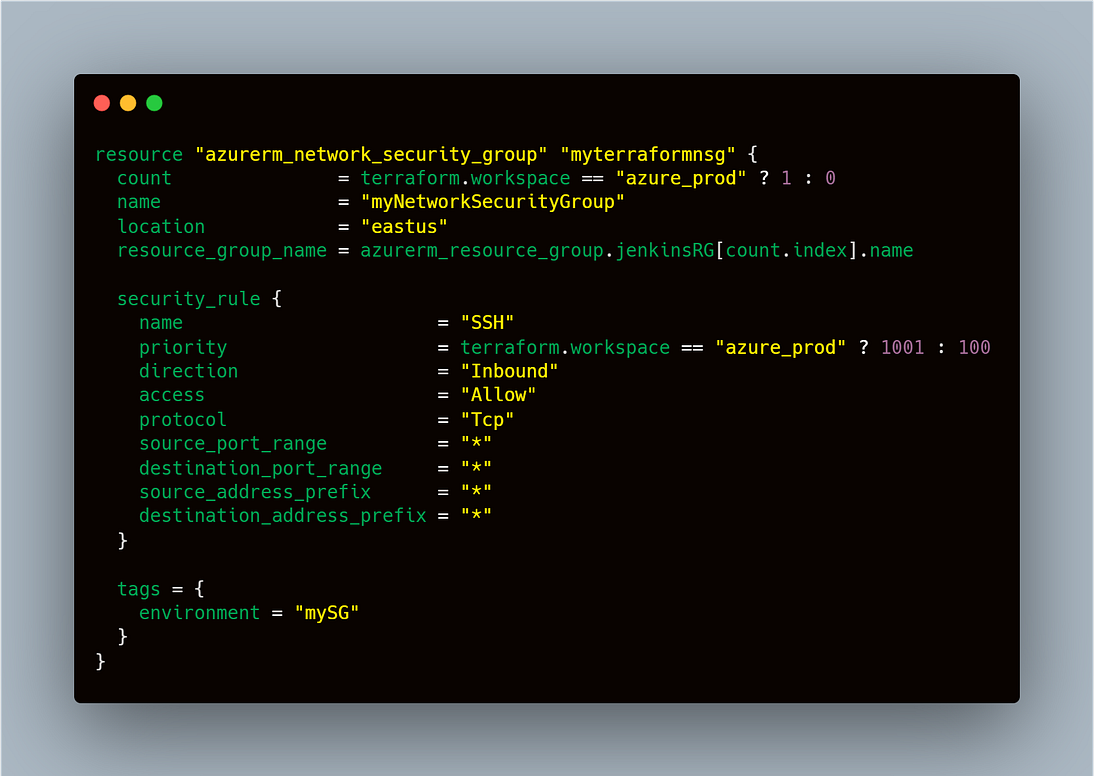
You can use an Azure network security group to filter network traffic to and from Azure resources in an Azure virtual network. A network security group contains security rules that allow or deny inbound network traffic to, or outbound network traffic from, several types of Azure resources. For each rule, you can specify source and destination, port, and protocol. In the below code i have give all traffic permission for inbound.
Associates a Network Security Group with a Subnet within a Virtual Network.
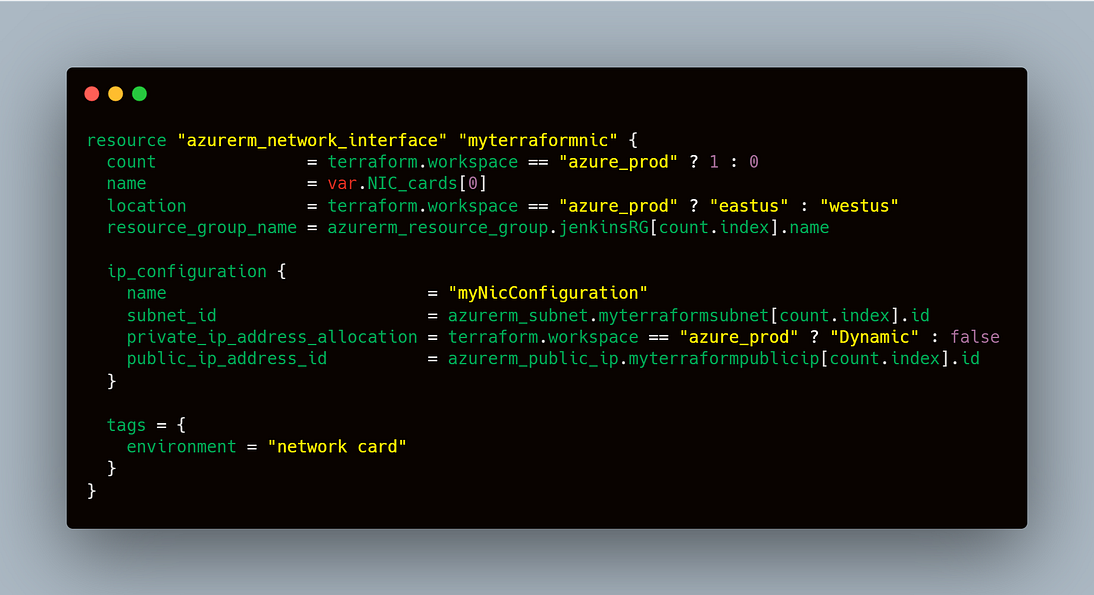
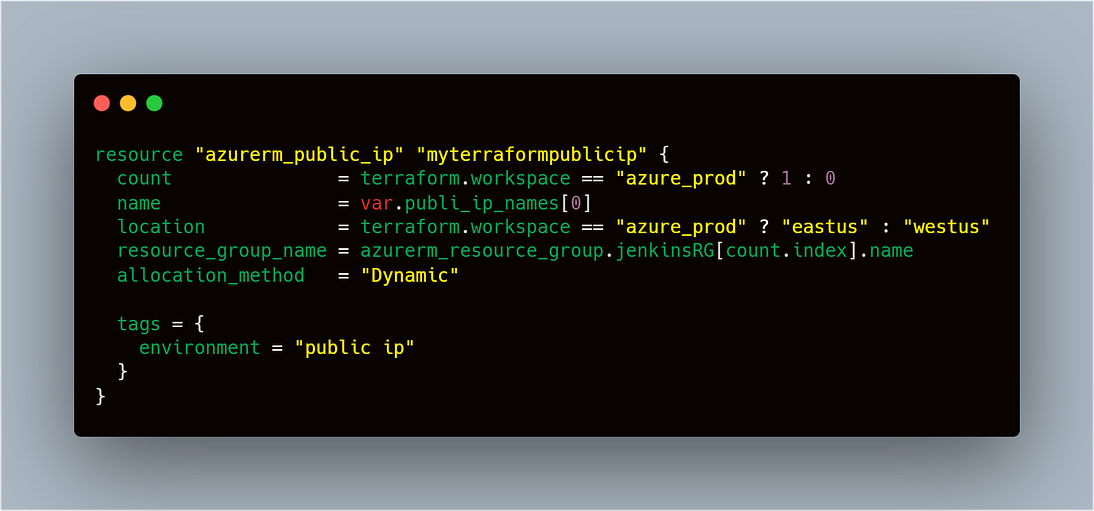
A Network Interface (NIC) is an interconnection between a Virtual Machine and the underlying software network. An Azure Virtual Machine (VM) has one or more network interfaces (NIC) attached to it. Any NIC can have one or more static or dynamic public and private IP addresses assigned to it.
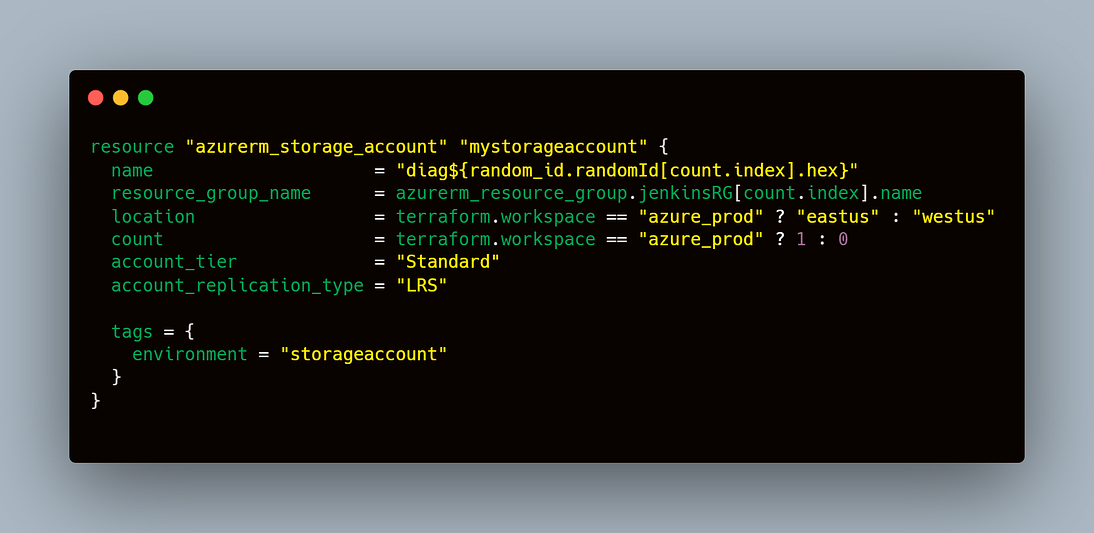
An Azure storage account contains all of your Azure Storage data objects: blobs, file shares, queues, tables, and disks. The storage account provides a unique namespace for your Azure Storage data that’s accessible from anywhere in the world over HTTP or HTTPS. Data in your storage account is durable and highly available, secure, and massively scalable.
Azure Virtual Machines (VM) is one of several types of on-demand, scalable computing resources that Azure offers. Typically, you choose a VM when you need more control over the computing environment than the other choices offer. This article gives you information about what you should consider before you create a VM, how you create it, and how you manage it. An Azure VM gives you the flexibility of virtualization without having to buy and maintain the physical hardware that runs it. However, you still need to maintain the VM by performing tasks, such as configuring, patching, and installing the software that runs on it.
In the above code i have launched one vm and using remote_exec module i configured jenkins node into that respective vm.
Following configuration done in JenkinsNode
1. Installed Java
2. Installed Git
3. Installed Jnekins
4. Started Jenkins
5. Enabled Jenkins
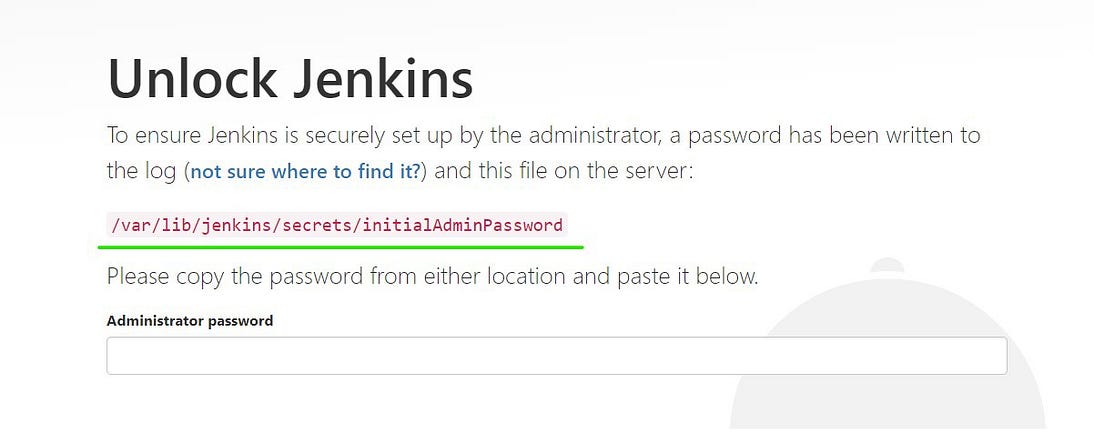
Now after launching the node successfully take public_ip and on port 8080 your jenkins node will be running. It will look something like this below image.
You have to copy the location and paste inside jenkins node like this sudo cat /var/lib/jenkins/secrets/initialAdminPassword.
it will give a password text and you have to paste inside above Admini
After that you need to create a password because this password is too long and hard to remember. So below are the steps shown in the video to create the password and to install the restive plugins. Ensure that you have to install below plugins.
Plugins from below lists needed to be installed:
- ssh: ssh plugins need to install for connecting the kubernetes servers.
- Gihub: Github plugins need to install to us SCM services.
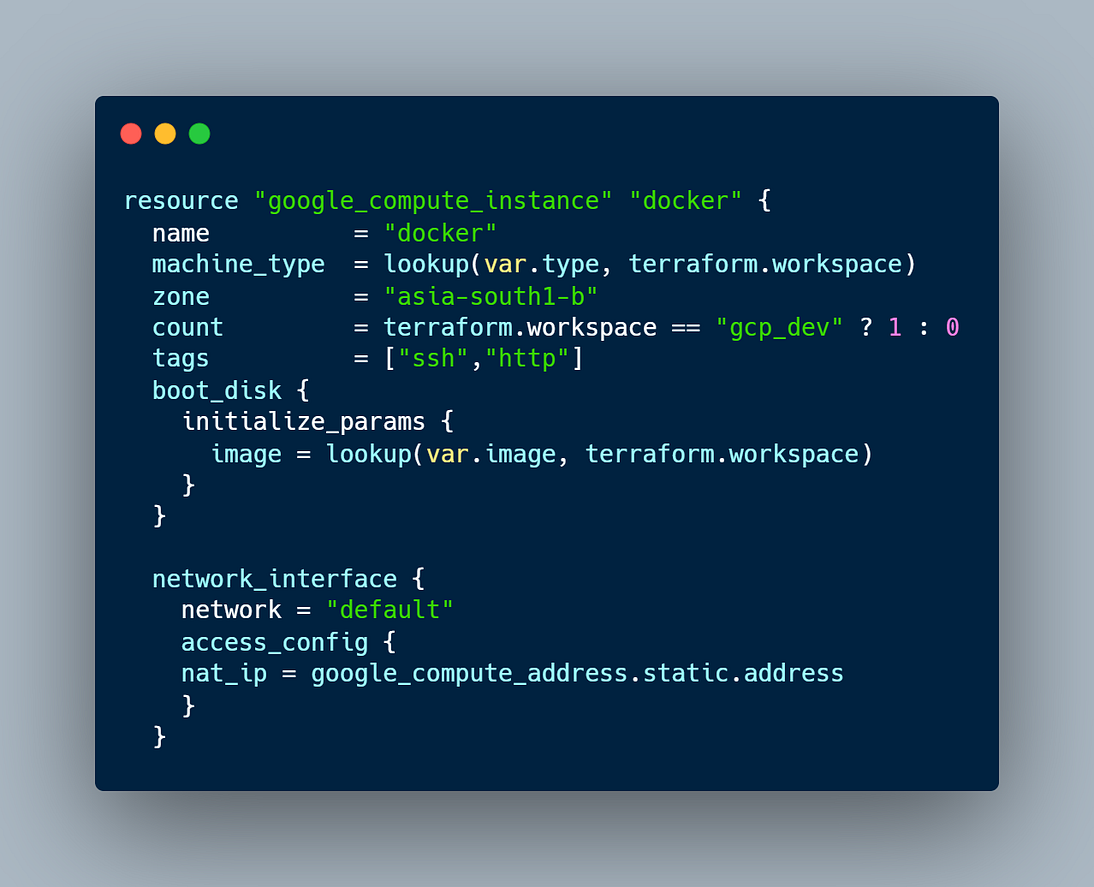
In GCP, we have to launch one compute instances. As we only have to create a deep learning image so using Dockerfile
Steps to follow:
1. Launch one Compute instance
2. Install Docker in that Compute instance
3. Create a Dockerfile
4. Install python, required libraries
5. Install Flask
6. Install Apache web server
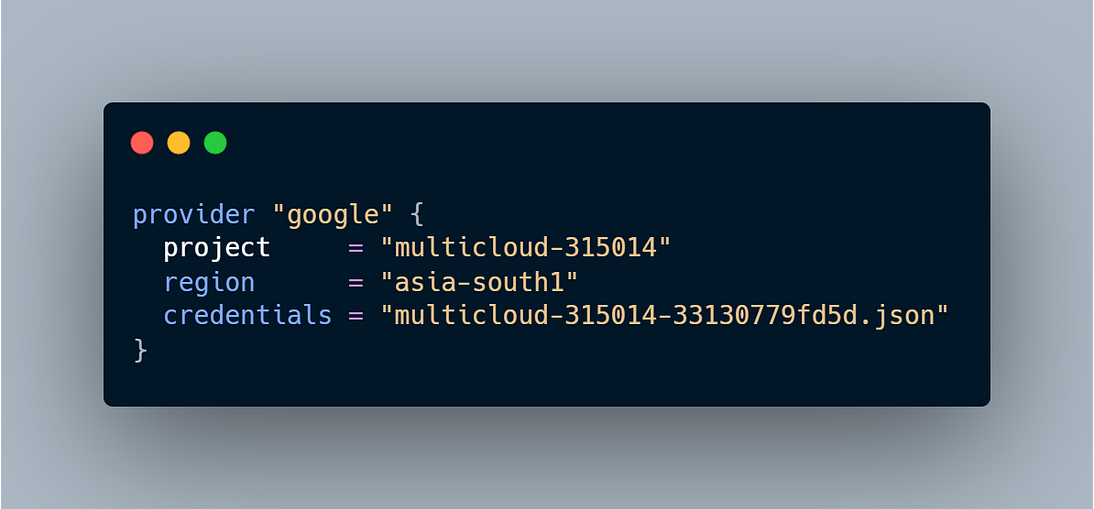
First we have to set the provisoner for gcp. you need to set the service account first in gcp → IAM user → service account. It will give you a file in the json format you have to download that file and keep in a directory. You have to specify the project name here i have given multicloud-315014, you can give any name. Also you need to specify the region name, i have given asia-south1.
Google Compute Engine is the Infrastructure as a Service component of Google Cloud Platform which is built on the global infrastructure that runs Google’s search engine, Gmail, YouTube and other services. Google Compute Engine enables users to launch virtual machines on demand.
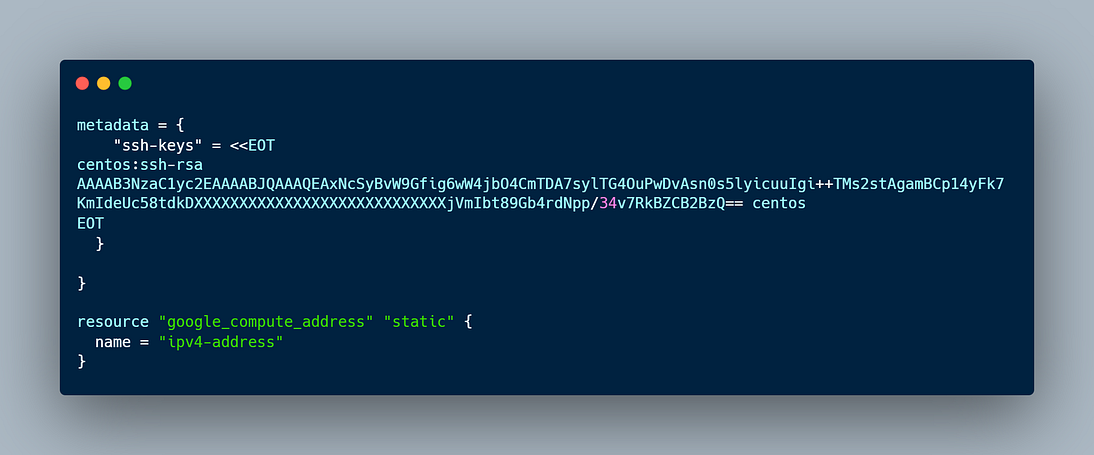
To connect to compute instance and run commands using remote_exec then you have to set the metadata (ssh key).
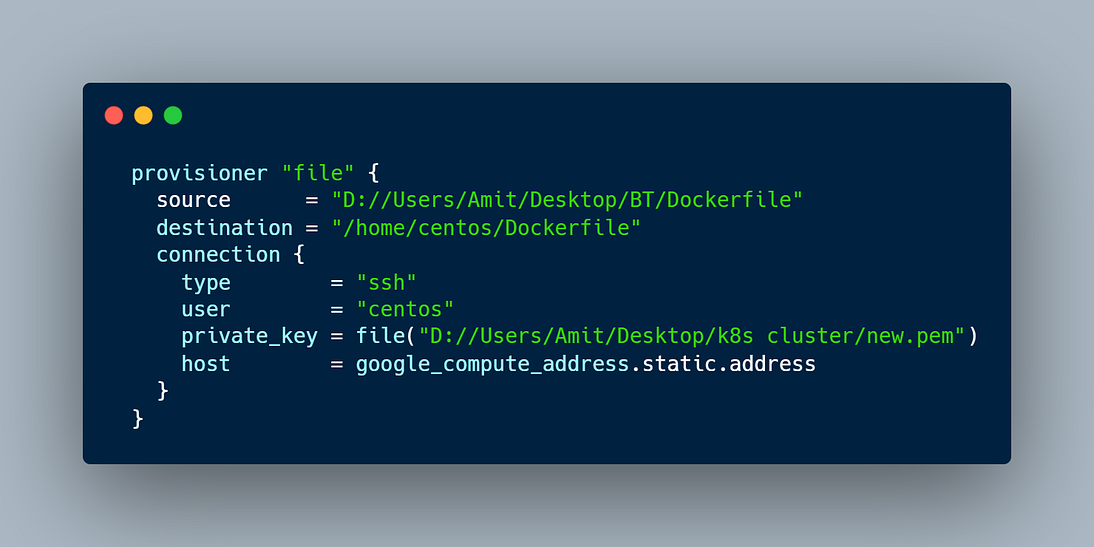
Now to transfer any files you have to use file module that will helps you to transfer the files from local to compute instance.
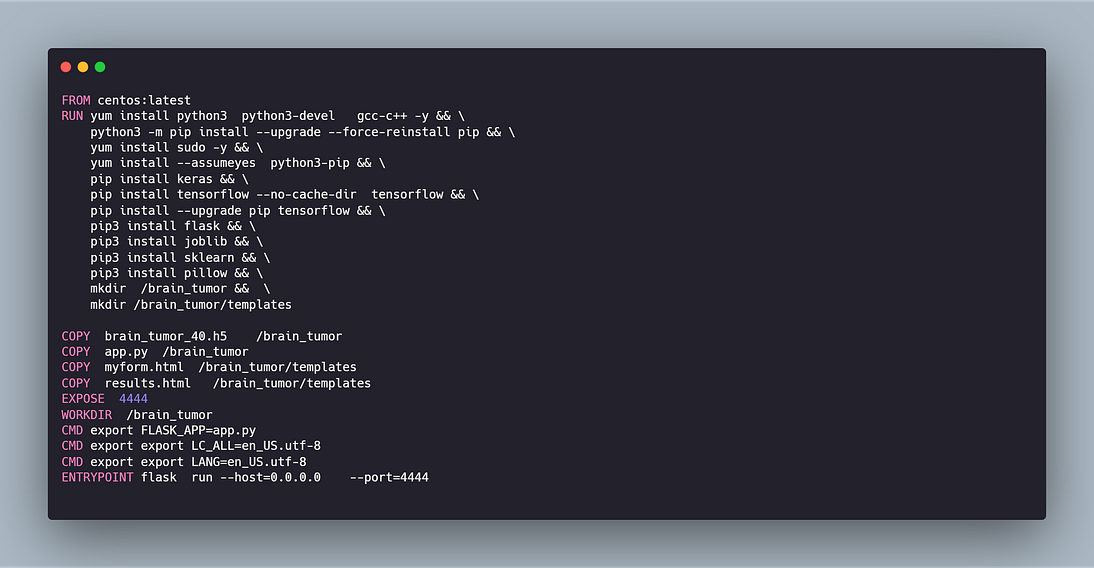
Here i am transfering only dockerfile. Below code will helps you to create a docker file.
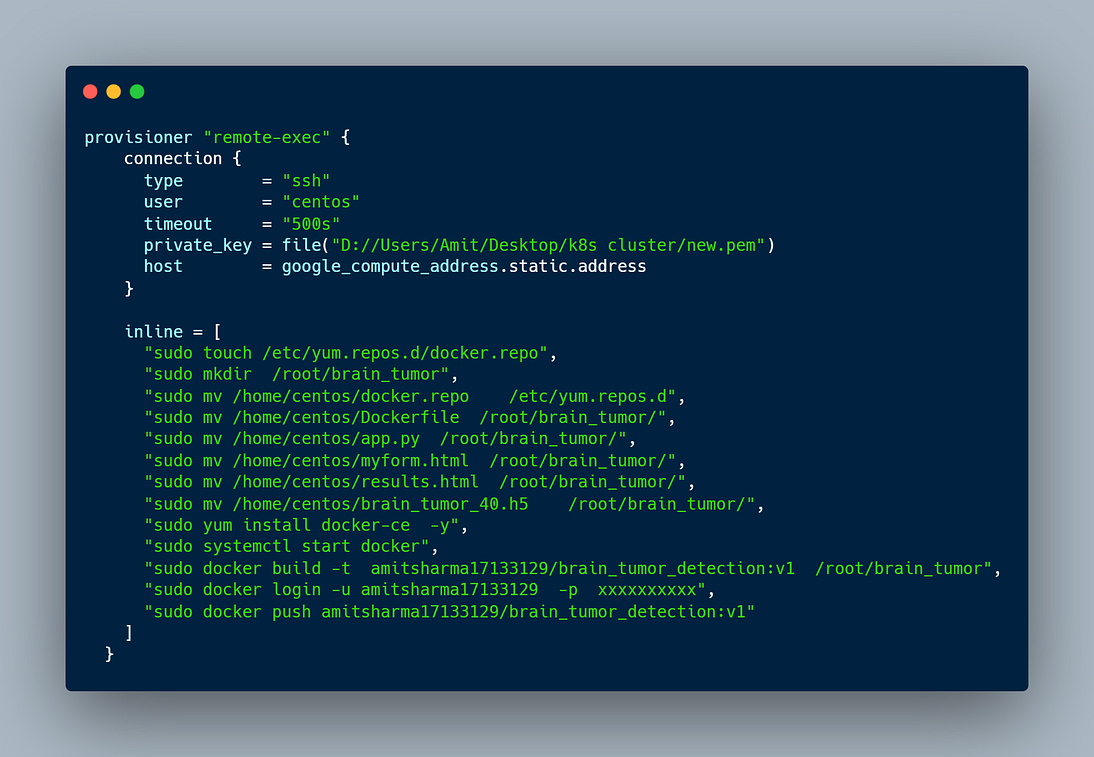
Now we have to run the commands in the compute instance which helps us to create the deep learning image and it will push to docker hub simultaneously.
After running above all the commands terraform will publish the image to dockerhub and it will looks something like this.
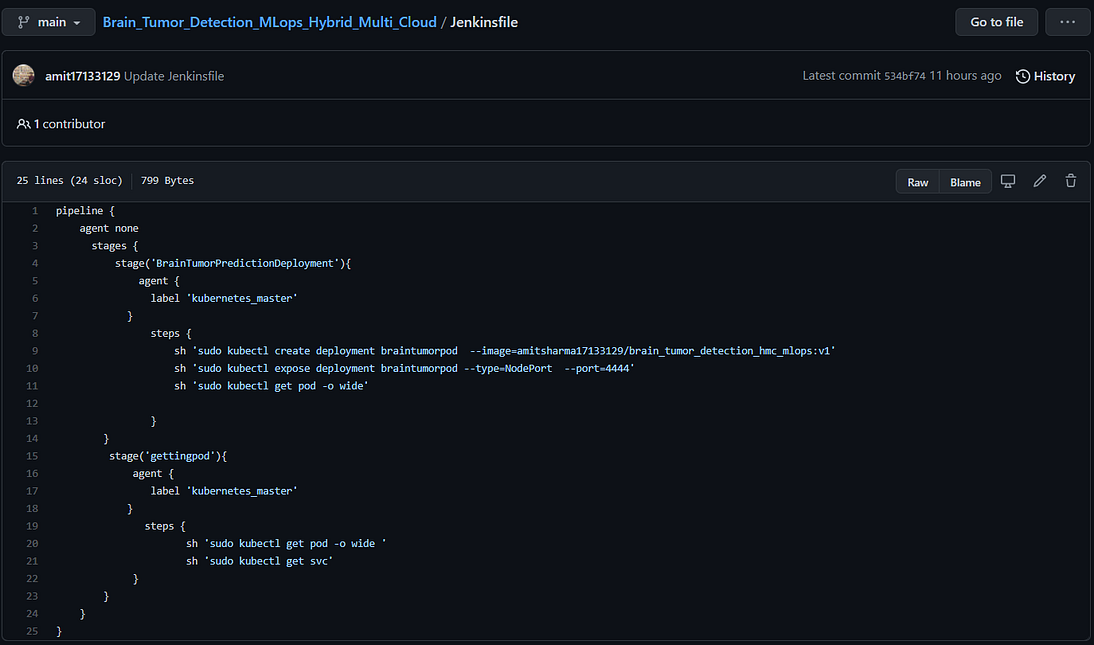
As our image is ready so now you have to create a repository in github and add the pipeline code in that repo inside Jenkinsfile.
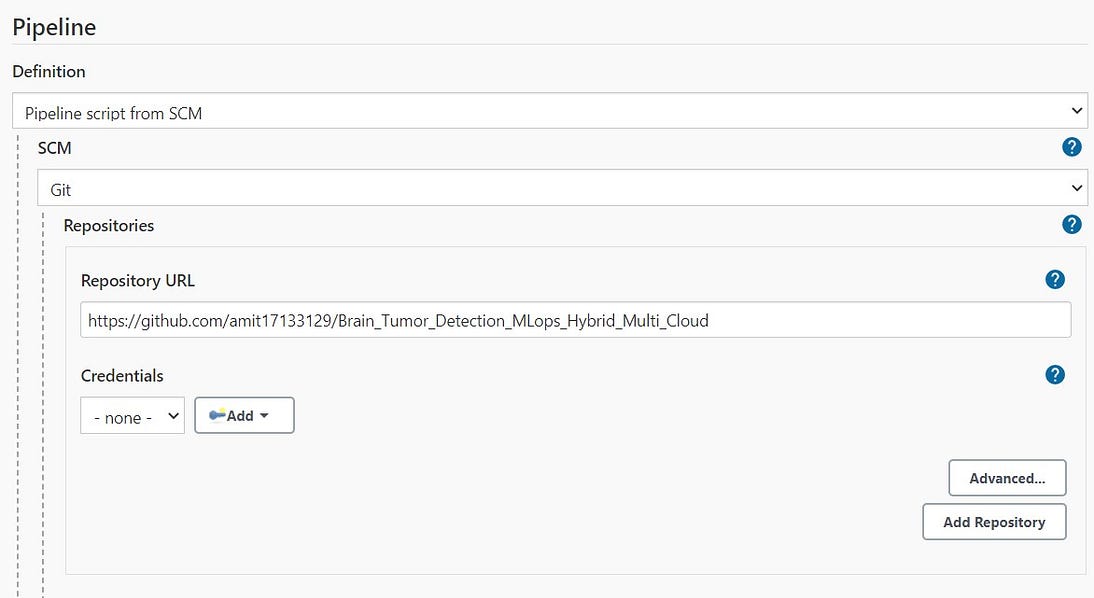
Now we need to copy the url of repository and you have to create a new job with multibranch pipeline and you need to to add source “git” and paste the url and save the job.
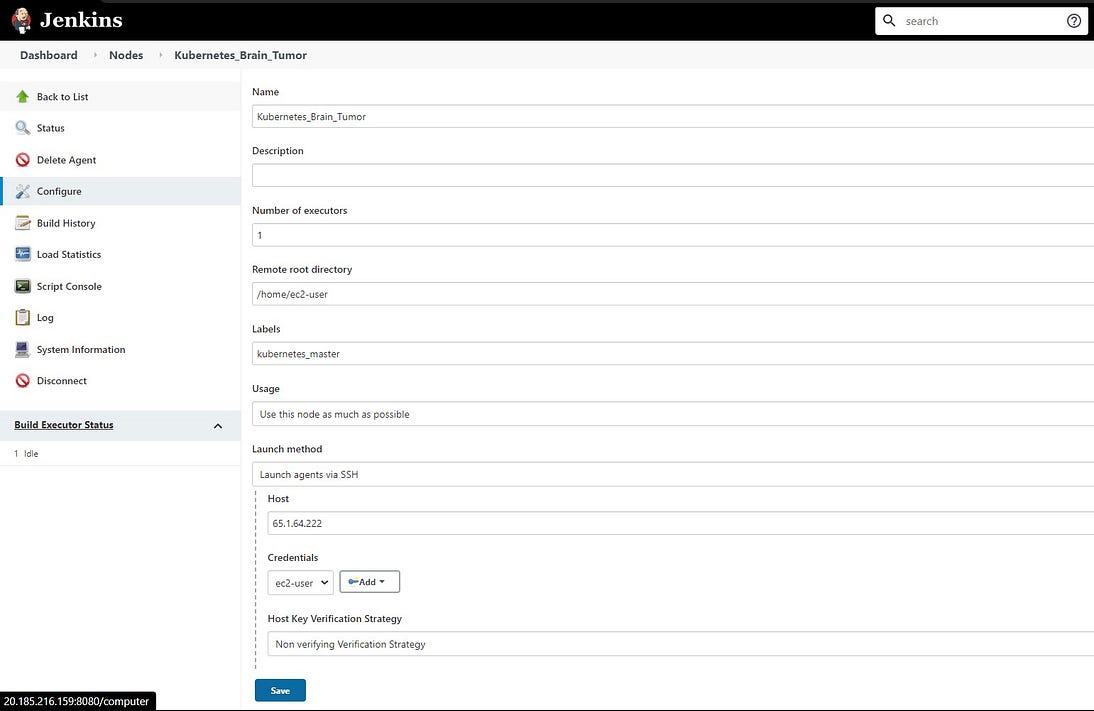
Now you have to create a node by going into managed node and cloud, give node name, here i have given kubernetes_brain_tumor and click on permanent node.
Then you have to enter the node home directory, so put /home/ec2-user as it came from from ec2 instance. Then add label to the node so that you can write in jenkinsfile i.e. on which node you wanted to run the job.
After saving the job it will looks like below image
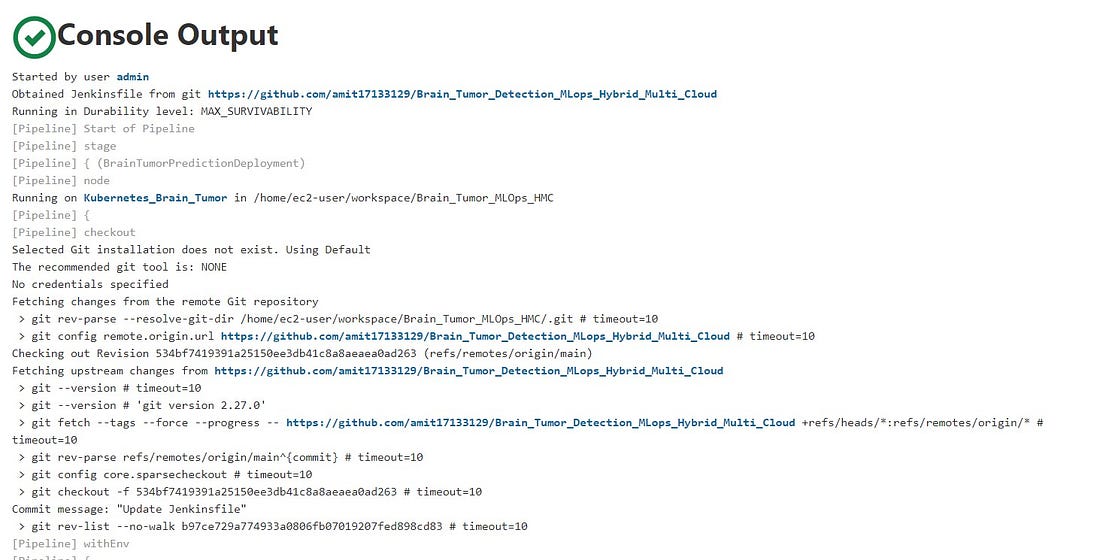
Now you have to just click on build and your job will start building. Below is the console output of the job.
As you can see that job ran successfully, now we have to see the deployment in kubernetes cluster. So go to kubernetes master node and then type below commands.
As you can see in the below image that one pod is running and exposed on the port 30801 a web ui will appear and it will ask you to enter the brain MRI image and after clicking on submit it will predict that a person with that brain mri image having brain tumor or not.

