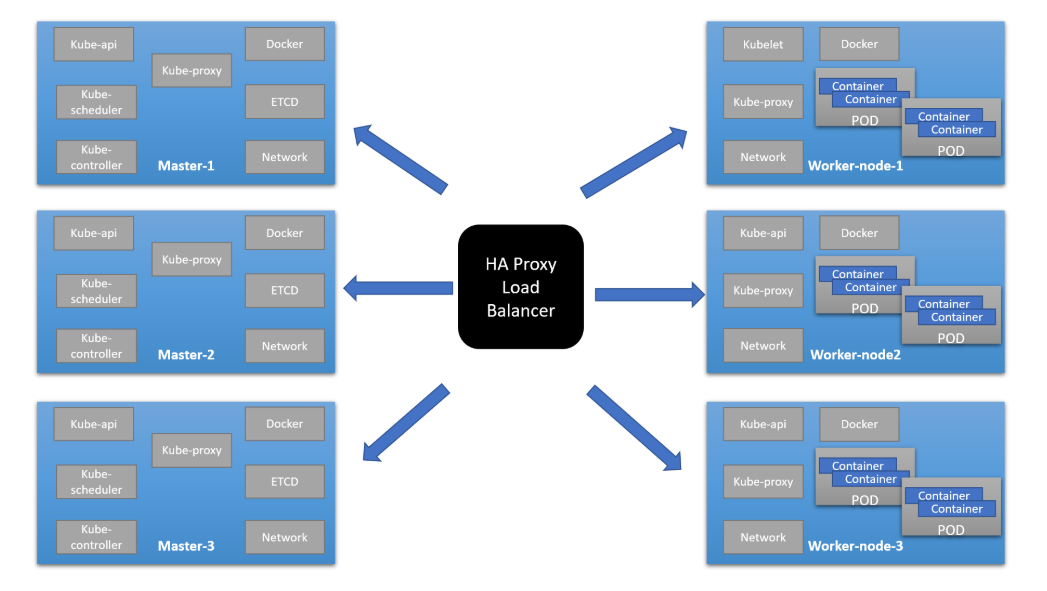
Steps to create Multi-master K8S cluster. In our case we are using 5 (Ubuntu 18.04) VMs
- HA-Proxy server (IP=10.10.10.93)
- Master node = 2 (IP = 10.10.10.90, 10.10.10.91)
- Worker node = 2 (IP = 10.10.10.100, 10.10.10.101)
2 GB or more of RAM per machine (any less will leave little room for your apps) 2 CPUs or more Full network connectivity between all machines in the cluster (public or private network is fine) Unique hostname, MAC address, and product_uuid for every node. Swap disabled. You MUST disable swap in order for the kubelet to work properly. Important
- If you are using clone virtual machine, make sure that each network interface having a different MAC ID.
- If possible attach only 1 network interface card (NIC)(If you are using virtaul box use bridge network)
#Login to ha-proxy node $ hostnamectl set-hostname ha-proxy # reboot the VM
#Login to master -1 $ hostnamectl set-hostname master-1 # reboot the VM
#Login to master -2 $ hostnamectl set-hostname master-2 # reboot the VM
#Login to slave -1 $ hostnamectl set-hostname slave-1 # reboot the VM
#Login to slave -2 $ hostnamectl set-hostname slave-2 # reboot the VM
Installing cfssl
$ wget https://pkg.cfssl.org/R1.2/cfssl_linux-amd64 $ wget https://pkg.cfssl.org/R1.2/cfssljson_linux-amd64
chmod +x cfssl*
$ sudo mv cfssl_linux-amd64 /usr/local/bin/cfssl $ sudo mv cfssljson_linux-amd64 /usr/local/bin/cfssljson
$ cfssl version
$ wget https://storage.googleapis.com/kubernetes-release/release/v1.15.0/bin/linux/amd64/kubectl
$ chmod +x kubectl
$ sudo mv kubectl /usr/local/bin
$ kubectl version
$ sudo apt-get install haproxy
$ cat <<EOF | sudo tee /etc/haproxy/haproxy.cfg
frontend kubernetes bind 10.10.10.93:6443 option tcplog mode tcp default_backend kubernetes-master-nodes
backend kubernetes-master-nodes mode tcp balance roundrobin option tcp-check server k8s-master-0 10.10.10.90:6443 check fall 3 rise 2 server k8s-master-1 10.10.10.91:6443 check fall 3 rise 2 EOF
$ sudo systemctl restart haproxy
$ cat <<EOF | sudo tee ca-config.json { "signing": { "default": { "expiry": "8760h" }, "profiles": { "kubernetes": { "usages": ["signing", "key encipherment", "server auth", "client auth"], "expiry": "8760h" } } } } EOF
$ cat <<EOF | sudo tee ca-csr.json { "CN": "Kubernetes", "key": { "algo": "rsa", "size": 2048 }, "names": [ { "C": "IE", "L": "Cork", "O": "Kubernetes", "OU": "CA", "ST": "Cork Co." } ] } EOF
$ cfssl gencert -initca ca-csr.json | cfssljson -bare ca
$ cat <<EOF | sudo tee kubernetes-csr.json
{
"CN": "kubernetes",
"key": {
"algo": "rsa",
"size": 2048
},
"names": [
{
"C": "IE",
"L": "Cork",
"O": "Kubernetes",
"OU": "Kubernetes",
"ST": "Cork Co."
}
]
}
EOF
$ cfssl gencert
-ca=ca.pem
-ca-key=ca-key.pem
-config=ca-config.json
-hostname=10.10.10.90,10.10.10.91,10.10.10.93,127.0.0.1,kubernetes.default
-profile=kubernetes kubernetes-csr.json |
cfssljson -bare kubernetes
$ scp ca.pem kubernetes.pem kubernetes-key.pem ubuntu@10.10.10.90:~ $ scp ca.pem kubernetes.pem kubernetes-key.pem ubuntu@10.10.10.91:~ $ scp ca.pem kubernetes.pem kubernetes-key.pem ubuntu@10.10.10.100:~ $ scp ca.pem kubernetes.pem kubernetes-key.pem ubuntu@10.10.10.101:~
Preparing the 10.10.10.90/91/100/101 machine
#Installing Docker latest version
$ sudo -s $ curl -fsSL https://get.docker.com -o get-docker.sh $ sh get-docker.sh $ usermod -aG docker
#Installing kubeadm, kublet, and kubectl
$ curl -s https://packages.cloud.google.com/apt/doc/apt-key.gpg | apt-key add - $ cat <<EOF | sudo tee /etc/apt/sources.list.d/kubernetes.list deb http://apt.kubernetes.io kubernetes-xenial main EOF
$ apt-get update $ apt-get install kubelet kubeadm kubectl
#Disable the swap
$ swapoff -a $ sed -i '/ swap / s/^/#/' /etc/fstab
#Letting iptables see bridged traffic
$ cat <<EOF | sudo tee /etc/sysctl.d/k8s.conf net.bridge.bridge-nf-call-ip6tables = 1 net.bridge.bridge-nf-call-iptables = 1 EOF $ sudo sysctl --system
$ sudo modprobe br_netfilter
Installing and configuring Etcd (Perform following operation on "master node -1" with non-root user)
$ sudo mkdir /etc/etcd /var/lib/etcd $ sudo mv ~/ca.pem ~/kubernetes.pem ~/kubernetes-key.pem /etc/etcd $ wget https://github.com/etcd-io/etcd/releases/download/v3.3.13/etcd-v3.3.13-linux-amd64.tar.gz $ tar xvzf etcd-v3.3.13-linux-amd64.tar.gz $ sudo mv etcd-v3.3.13-linux-amd64/etcd* /usr/local/bin/ $ cat <<EOF | sudo tee /etc/systemd/system/etcd.service [Unit] Description=etcd Documentation=https://github.com/coreos
[Service]
ExecStart=/usr/local/bin/etcd
--name 10.10.10.90 \ #master node-1 IP
--cert-file=/etc/etcd/kubernetes.pem
--key-file=/etc/etcd/kubernetes-key.pem
--peer-cert-file=/etc/etcd/kubernetes.pem
--peer-key-file=/etc/etcd/kubernetes-key.pem
--trusted-ca-file=/etc/etcd/ca.pem
--peer-trusted-ca-file=/etc/etcd/ca.pem
--peer-client-cert-auth
--client-cert-auth
--initial-advertise-peer-urls https://10.10.10.90:2380
--listen-peer-urls https://10.10.90.10:2380
--listen-client-urls https://10.10.10.90:2379,http://127.0.0.1:2379
--advertise-client-urls https://10.10.10.90:2379
--initial-cluster-token etcd-cluster-0
--initial-cluster 10.10.10.90=https://10.10.10.90:2380,10.10.10.91=https://10.10.10.91:2380
--initial-cluster-state new
--data-dir=/var/lib/etcd
Restart=on-failure
RestartSec=5
[Install] WantedBy=multi-user.target EOF
$ sudo systemctl daemon-reload $ sudo systemctl enable etcd $ sudo systemctl start etcd
Installing and configuring Etcd (Perform following operation on "master node -2" with non-root user)
$ sudo mkdir /etc/etcd /var/lib/etcd $ sudo mv ~/ca.pem ~/kubernetes.pem ~/kubernetes-key.pem /etc/etcd $ wget https://github.com/etcd-io/etcd/releases/download/v3.3.13/etcd-v3.3.13-linux-amd64.tar.gz $ tar xvzf etcd-v3.3.13-linux-amd64.tar.gz $ sudo mv etcd-v3.3.13-linux-amd64/etcd* /usr/local/bin/ $ cat <<EOF | sudo tee /etc/systemd/system/etcd.service [Unit] Description=etcd Documentation=https://github.com/coreos
[Service]
ExecStart=/usr/local/bin/etcd
--name 10.10.10.91 \ #master node-1 IP
--cert-file=/etc/etcd/kubernetes.pem
--key-file=/etc/etcd/kubernetes-key.pem
--peer-cert-file=/etc/etcd/kubernetes.pem
--peer-key-file=/etc/etcd/kubernetes-key.pem
--trusted-ca-file=/etc/etcd/ca.pem
--peer-trusted-ca-file=/etc/etcd/ca.pem
--peer-client-cert-auth
--client-cert-auth
--initial-advertise-peer-urls https://10.10.10.91:2380
--listen-peer-urls https://10.10.10.91:2380
--listen-client-urls https://10.10.10.91:2379,http://127.0.0.1:2379
--advertise-client-urls https://10.10.10.91:2379
--initial-cluster-token etcd-cluster-0
--initial-cluster 10.10.10.90=https://10.10.10.90:2380,10.10.10.91=https://10.10.10.91:2380
--initial-cluster-state new
--data-dir=/var/lib/etcd
Restart=on-failure
RestartSec=5
[Install] WantedBy=multi-user.target EOF
$ sudo systemctl daemon-reload $ sudo systemctl enable etcd $ sudo systemctl start etcd
$ ETCDCTL_API=3 etcdctl member list
#Output looks like this
#Configure cgroup driver used by kubelet on control-plane node
$ cat<<EOF | sudo tee /var/lib/kubelet/config.yaml apiVersion: kubelet.config.k8s.io/v1beta1 kind: KubeletConfiguration cgroupDriver: systemd EOF
$ cat<<EOF | sudo tee config.yaml apiVersion: kubeadm.k8s.io/v1beta2 kind: ClusterConfiguration kubernetesVersion: stable apiServerCertSANs:
- 10.10.10.93 # HA-Proxy IP
controlPlaneEndpoint: "10.10.10.93:6443" # HA-Proxy IP
etcd:
external:
endpoints:
- https://10.10.10.90:2379 # Master -1 IP
- https://10.10.10.91:2379 # Master -2 IP caFile: /etc/etcd/ca.pem certFile: /etc/etcd/kubernetes.pem keyFile: /etc/etcd/kubernetes-key.pem networking: podSubnet: 10.30.0.0/24 # Make sure you are using different Range don't use VMs range ip, don't use 10.10.10.x range, beacese # that range we already use for our 4 nodes. If you use same range it might failed when you are # configuring overlay network. apiServerExtraArgs: apiserver-count: "2" # if you are using 3 master and 3 slave then increase count, and replace 2 with 3. EOF
$ sudo kubeadm init --config=config.yaml
#Copy the certificates to the other masters. $ sudo scp -r /etc/kubernetes/pki ubuntu@10.10.10.91:~
Initializing the 2nd master node 10.10.10.91 (Perform following operation on "master node -1" with non-root user)
$ rm ~/pki/apiserver.* $ sudo mv ~/pki /etc/kubernetes/ $ cat<<EOF | sudo tee config.yaml apiVersion: kubeadm.k8s.io/v1alpha3 kind: ClusterConfiguration kubernetesVersion: stable apiServerCertSANs:
- 10.10.10.93 # HA-Proxy IP
controlPlaneEndpoint: "10.10.10.93:6443" # HA-Proxy IP
etcd:
external:
endpoints:
- https://10.10.10.90:2379 # Master -1 IP
- https://10.10.10.91:2379 # Master -2 IP caFile: /etc/etcd/ca.pem certFile: /etc/etcd/kubernetes.pem keyFile: /etc/etcd/kubernetes-key.pem networking: podSubnet: 10.30.0.0/24 # Make sure you are using different Range don't use VMs range ip, don't use 10.10.10.x range, beacese # that range we already use for our 4 nodes. If you use same range it might failed when you are # configuring overlay network. apiServerExtraArgs: apiserver-count: "2" # if you are using 3 master and 3 slave then increase count, and replace 2 with 3. EOF $ sudo kubeadm init --config=config.yaml
-----------------Output looks like this-------------------------------------------
mkdir -p $HOME/.kube
sudo cp -i /etc/kubernetes/admin.conf
kubeadm join 10.10.10.93:6443 --token ykhwg1.krb4pfgvyyvng512
--discovery-token-ca-cert-hash sha256:dfab4c0af447e788c7e142d3cca5ed505c59a75e03693ecc416611f36d6d73c2
--control-plane --certificate-key 1f36492739c02db24a50a06dc01f26a2c2090cd56589f39743a662a014dbf262
Please note that the certificate-key gives access to cluster sensitive data, keep it secret! As a safeguard, uploaded-certs will be deleted in two hours; If necessary, you can use "kubeadm init phase upload-certs --upload-certs" to reload certs afterward.
Then you can join any number of worker nodes by running the following on each as root: --------- Use following kubeadm join on worker nodes to join the cluster
kubeadm join 10.10.10.93:6443 --token ykhwg1.krb4pfgvyyvng512
--discovery-token-ca-cert-hash sha256:dfab4c0af447e788c7e142d3cca5ed505c59a75e03693ecc416611f36d6d73c2
Initializing the worker nodes, Initializing the worker node 10.10.10.100/101 (Join 1 by 1, don't apply this command parallelly on worker nodes)
$ sudo kubeadm join 10.10.10.93:6443 --token ykhwg1.krb4pfgvyyvng512
--discovery-token-ca-cert-hash sha256:dfab4c0af447e788c7e142d3cca5ed505c59a75e03693ecc416611f36d6d73c2
$ sudo chmod +r /etc/kubernetes/admin.conf $ scp /etc/kubernetes/admin.conf ubuntu@10.10.10.90:~ $ sudo chmod 600 /etc/kubernetes/admin.conf
$ mkdir ~/.kube $ mv admin.conf ~/.kube/config $ chmod 600 ~/.kube/config
#Now you can perform k8s operations from ha-proxy node
$ kubectl get nodes
Output:-
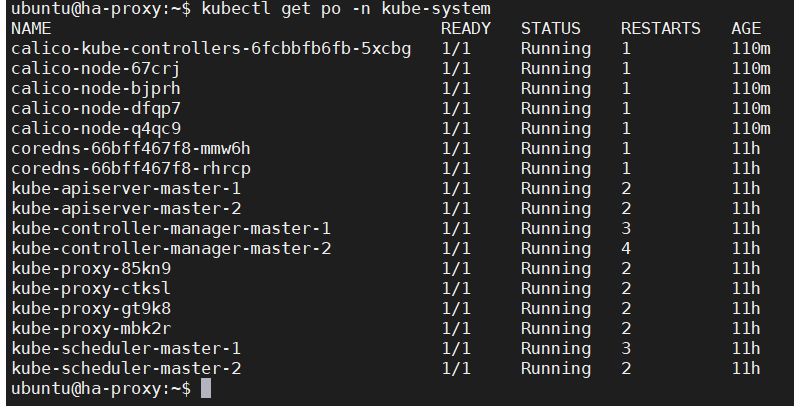
$ kubectl apply -f https://raw.githubusercontent.com/sangaml/Multi-master-k8s-cluster/master/calico.yaml
#Make sure all pods are running
Now All Set :) All The Best !!


