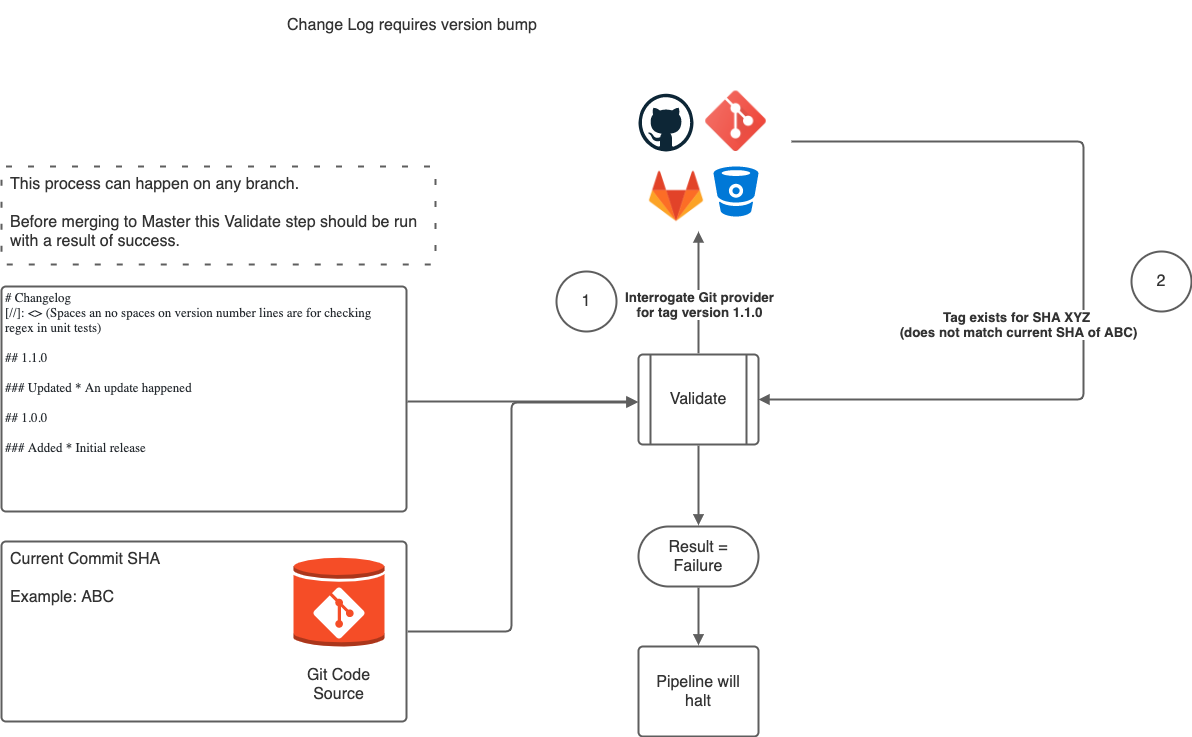
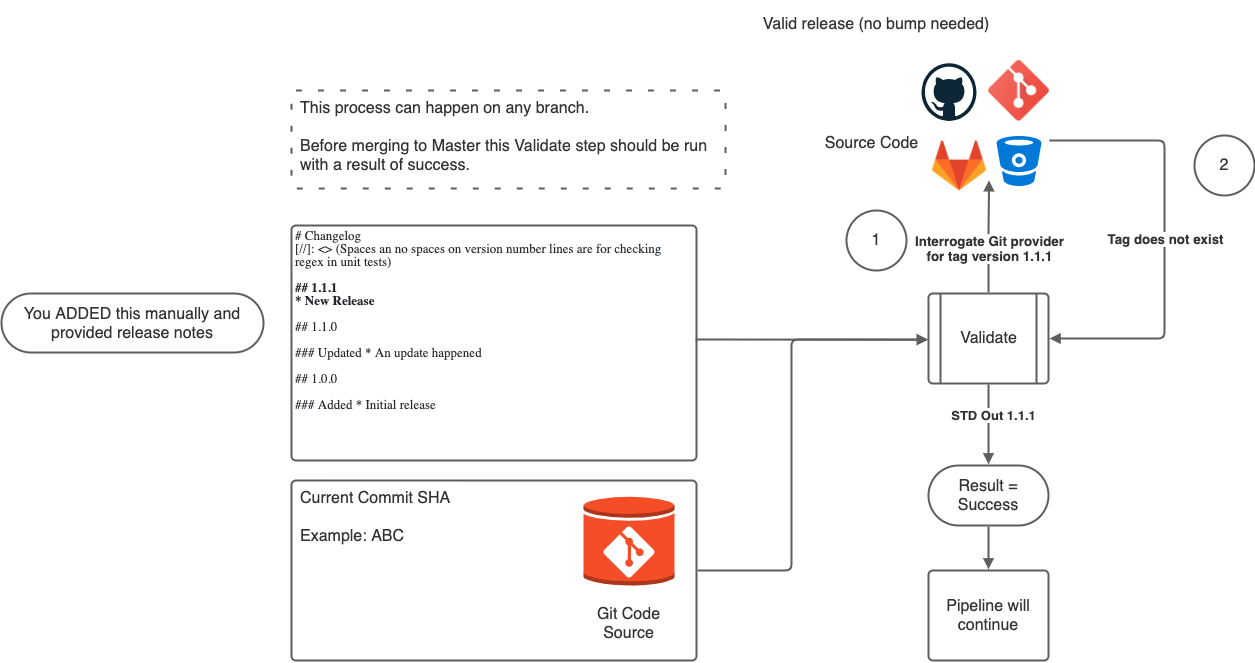
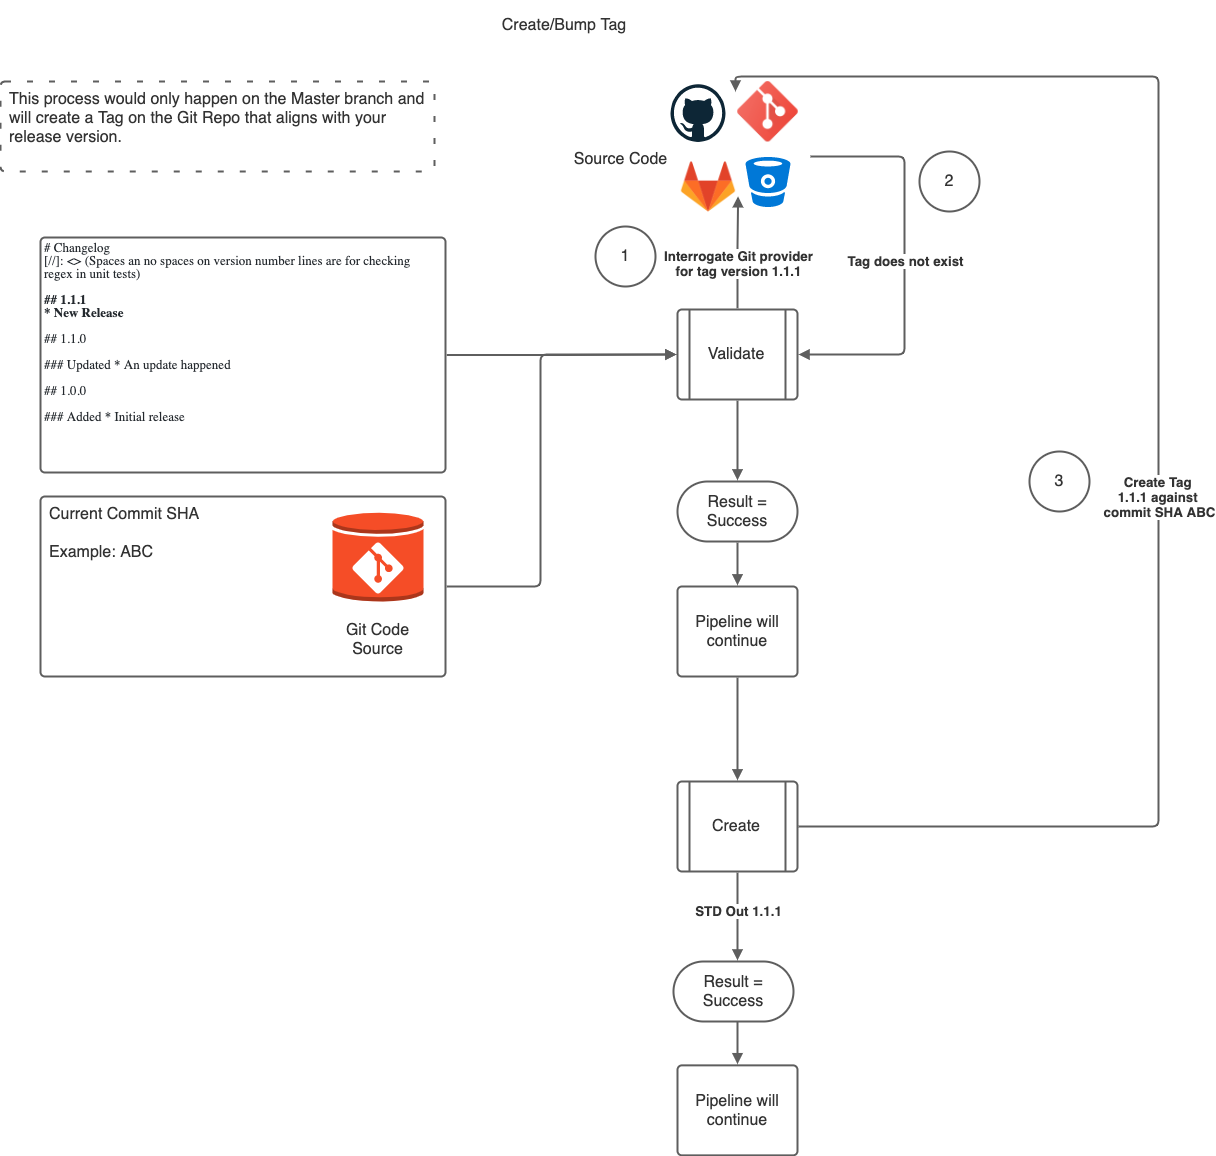
Release is a tool that validates and creates tags against git repos by reading your changelog file.
It is supported for the following git repository providers via their respective REST APIs:
- GitHub
- Gitlab
- Bitbucket
If a provider isn't provided to the command it will default to the in built git tagging functionality.
It requires a markdown formatted changelog, with the most recent changes at the top.
The that consists of a version must start with a h2 markup and have a number afterward.
An example changelog would be
# Changelog

[//]: <> (Spaces an no spaces on version number lines are for checking regex in unit tests)
## 1.1.0

### Updated
* An update happened

## 1.0.0

### Added

* Initial release
the version numbers can be of a format with decimals separating them.
Example formats tha can be used are
major
major.minor
major.minor.patch
major.minor.patch.micro
Note: the format must be consistent within the changelog
If you have go installed, you can install release by running the following.
go install github.com/sanjP10/release@latestTo find out where release was installed you can run go list -f {{.Target}} github.com/sanjP10/release
You can go to the releases page and download the binary for your desired operating system and architecture.
For release to be used globally add that directory to the $PATH environment setting.
The two subcommands for release are validate and create
validatewill interrogate the latest version on the changelog file and if it exists for the repository. If it does exist, and the commit hash provided is the same it will return a successful exit code. Ideally you put this as part of your testing phase within your CI/CD.createwill do the same asvalidateand if the tag does not exist it will create the tag for the commit hash provided. You use this when you want to create a tag for your repo.
These are the flags when a provider is present
-username <username>
-password <password/authroization token>
-repo <owner/org/project>/<repo name>
-changelog <changelog md file>
-hash <commit sha>
-host <host dns> (optional) (default is bitbucket.org, gitlab.com, github.com)
-provider <git provider of choice from gitlab, github and bitbucket>
These are the flags when using the default git functionality
-username <username for https authentication, optional for ssh key - defaults to git>
-password <password/authroization token for https authentication, optional for ssh key password>
-changelog <changelog md file>
-hash <commit sha>
-email <email address for tag>
-origin <git https/ssh origin>
-ssh <path to private ssh key, will require ssh to be part of known hosts and regitered with ssh-agent, optional field>
The GitHub and Gitlab APIs also takes the markdown between the version numbers and creates a release with the changelog notes you created.
If you use the default git provided or a self-hosted bitbucket the release notes are added as annotations to the tag, so if you run git show <desired tag> you can see the notes associated.
Bitbucket api does not process any release notes as it is not supported.
This is an example validate command via bitbucket
release validate -username $USER -password $ACCESS_TOKEN -repo owner/repo_name -changelog changelog.md -hash $COMMIT_HASH -provider bitbucket
This is an example validate command using default git
# HTTPS
release validate -username $USER -password $ACCESS_TOKEN -email user@domain.com -origin https://$USER@bitbucket.org/$BITBUCKET_REPO_OWNER/$BITBUCKET_REPO_SLUG.git -changelog CHANGELOG.md -hash $COMMIT_HASH

# SSH
release validate -ssh $PATH_TO_PRIVATEKEY -password $ACCESS_TOKEN -email user@domain.com -origin git@bitbucket.org/$BITBUCKET_REPO_OWNER/$BITBUCKET_REPO_SLUG.git -changelog CHANGELOG.md -hash $COMMIT_HASH
This is an example create command via bitbucket
release create -username $USER -password $ACCESS_TOKEN -repo owner/repo_name -changelog changelog.md -hash $COMMIT_HASH -provider bitbucket
This is an example create command using default git
# HTTPS
release create -username $USER -password $ACCESS_TOKEN -email user@domain.com -origin https://$USER@bitbucket.org/$BITBUCKET_REPO_OWNER/$BITBUCKET_REPO_SLUG.git -changelog CHANGELOG.md -hash $COMMIT_HASH

# SSH
release create -ssh $PATH_TO_PRIVATEKEY -password $ACCESS_TOKEN -email user@domain.com -origin git@bitbucket.org/$BITBUCKET_REPO_OWNER/$BITBUCKET_REPO_SLUG.git -changelog CHANGELOG.md -hash $COMMIT_HASH
This is an example of validate command against a self-hosted bitbucket
release validate -username $USER -password $ACCESS_TOKEN -repo owner/repo_name -changelog changelog.md -hash $COMMIT_HASH -host api.mybitbucket.com -provider bitbucket
Release when returning with a successful exit code will write the desired or created tag as stdout.
You can in turn take that output and use it with other tag based services such as Docker.
An example script would be
version=$(release create -username $USER -password $ACCESS_TOKEN -repo owner/repo -changelog CHANGELOG.md -hash $COMMIT_HASH -provider github) || exit $?
docker build -t myContainer:$version .
docker push myContainer:$versionTo integrate the validate use this in bitbucket pipelines you can use the following as steps
- step:
    name: validate version
    image: golang
    script:
      - go install github.com/sanjP10/release@latest
      # Test version does not exist
      - release validate -username $USER -password $ACCESS_TOKEN -repo $BITBUCKET_REPO_OWNER/$BITBUCKET_REPO_SLUG -changelog CHANGELOG.md -hash $BITBUCKET_COMMIT -provider bitbucket
To integrate the create use this in the bitbucket pipeline after you merge to master
To integrate this into bitbucket pipelines you can use the following as steps
- step:
    name: create version
    image: golang
    script:
      - go install github.com/sanjP10/release@latest
- release create -username $USER -password $ACCESS_TOKEN -repo $BITBUCKET_REPO_OWNER/$BITBUCKET_REPO_SLUG -changelog CHANGELOG.md -hash $BITBUCKET_COMMIT -provider bitbucketFor GitHub actions you can use the release-action.
To integrate the validate use this in GitHub actions you can use the following as steps
  validate:
    runs-on: ubuntu-latest
    steps:
      - name: Checkout code
        uses: actions/checkout@v3
      - name: Setup Go
        uses: actions/setup-go@v3
        with:
          go-version: '^1.18'
      - run: go install github.com/sanjP10/release@latest
      - run: release validate -username ${{ github.actor }} -password ${{ secrets.GITHUB_TOKEN }} -repo ${{ github.repository }} -changelog CHANGELOG.md -hash ${{ github.sha }} -provider github
To integrate the create use this in the bitbucket pipeline after you merge to master
To integrate this into GitHub actions you can use the following as steps
  create:
    runs-on: ubuntu-latest
    needs: <A STEP>
    steps:
      - name: Checkout code
        uses: actions/checkout@v3
      - name: Setup Go
        uses: actions/setup-go@v3
        with:
          go-version: '^1.18'
      - run: go install github.com/sanjP10/release@latest
- run: release create -username ${{ github.actor }} -password ${{ secrets.GITHUB_TOKEN }} -repo ${{ github.repository }} -changelog CHANGELOG.md -hash ${{ github.sha }} -provider githubFor GitHub actions you can use the release orb.
jobs:
  # Define one or more jobs which will utilize your orb's commands and parameters to validate your changes.
  validate:
    executor: release/default
    steps:
      - checkout
      - run:
          name: Create tag
          command: |
            go install github.com/sanjP10/release@latest
            release validate -username << parameters.username >> -password << parameters.password >> -repo << parameters.repo >> -changelog << parameters.changelog-file-location >> -hash $CIRCLE_SHA1 -provider << parameters.provider >>
  create:
    executor: release/default
    steps:
      - checkout
      - run:
          name: Create tag
          command: |
            go install github.com/sanjP10/release@latest
release create -username << parameters.username >> -password << parameters.password >> -repo << parameters.repo >> -changelog << parameters.changelog-file-location >> -hash $CIRCLE_SHA1 -provider << parameters.provider >>CodeCommit only supports SSH
As code commit uses credential-helper to create a username and password it is not possible to get the username and password for use with HTTPs.
It's required that you use SSH which is only available via IAM Users.
After following the steps in the AWS Documentation of setting up an ssh key as documented here
You will need to get the SSH Key ID which can be found in the IAM User console.
This would be the command for using the tool when using SSH.
release validate -ssh $PATH_TO_PRIVATEKEY -email user@domain.com -origin ssh://$AWS_SSH_KEY_ID@git-codecommit.eu-west-1.amazonaws.com/v1/repos/$REPO_NAME -username $AWS_SSH_KEY_ID -changelog CHANGELOG.md -hash $COMMIT_HASH
Cloud Source Repositories only supports SSH
As source repositories uses git-cookies to create a username and password it is not possible to get the username and password for use with HTTPs.
Once you have registered the ssh key within cloud source repositories, the command would be as follows
release validate -ssh $PATH_TO_PRIVATEKEY -email user@domain.com -origin ssh://$ACCOUNT_EMAIL@source.developers.google.com/p/$PROJECT_ID/r/$REPO_NAME -username $ACCOUNT_EMAIL -changelog CHANGELOG.md -hash $COMMIT_HASH


