Nest JS Skeleton for REST Application
Description
-
Nest framework TypeScript starter repository.
-
Nest provides a level of abstraction above these common Node.js frameworks (Express/Fastify) but also exposes their APIs directly to the developer. This allows developers the freedom to use the myriad of third-party modules which are available for the underlying platform.
-
There are superb libraries, helpers, and tools that exist for Node (and server-side JavaScript), none of them effectively solve the main problem of — Architecture.
-
Features of NestJS
- Extensible Approach
- Easy to use, learn and master
- Command Line Interface(CLI)
- Versatile
- Progressive
- Implemented Based on SOLID Principles
- Lazy and Dynamic Modules
- API Versioning
- Documentation
- Open Source
- Large & Active Community
Motivation
- With this skeleton, we can easily start a server application using Node.js, Nest JS and TypeScript.
- Rather than spending time on the project setup, get on with the important stuff right away.
Take it for a test drive. We'd love to hear any feedback you have or if you've thought of a new feature.
Common Features
- Quick start
- Integrated ESLint, Prettier and Husky
- Common Error Handler
- Simple and Standard scaffolding
- Production-Ready Skeleton
- Followed SOLID Principles
Getting started
Skeleton for REST API applications written in Node JS & Nest JS with TypeScript
Prerequisites
- Node https://nodejs.org/en/ use the LTS version
- NPM
- Docker https://www.docker.com/
- Install Docker Desktop for MAC: https://docs.docker.com/docker-for-mac/install/
- Install Docker Desktop for Windows: https://docs.docker.com/docker-for-windows/install/
- Docker Compose
- NestJS CLI https://nestjs.com/
Create Development Environment
To get started, clone the repository to your local computer. Use the following command to run in your terminal.
Clone The Application
// clone the application
$ git clone https://github.com/NeoSOFT-Technologies/rest-node-nestjs.git
Quick Installation
Next, install the packages that are required for this project.
// Install the required npm modules
$ npm install
Create The Environment Variables
The .env file should be placed in root folder with the following variables.
# .env.example

APP_NAME=rest_api
NODE_ENV=dev
DB_HOST=127.0.0.1
DB_DATABASE=rest_api
DB_USER=user
DB_PASSWORD=root
DB_PORT=3306
Start MySQL Database
In order to use mysql, you need to have it installed in your local machine. Docker Compose is what we will be using in our case, In the project directory, execute the following command.
# build images, create and run containers in background
docker-compose up -d
In order to apply your modified code to a running container, you should add a build option.
# if source code is changed, rebuild image, recreate and start container
docker-compose up -d --build
Running the app
# development
$ npm run start

# watch mode
$ npm run start:dev

# production mode
$ npm run start:prod
Test
For this project, I chose Jest as our test framework. While Mocha is probably more common, Mocha seems to be looking for a new maintainer and setting up TypeScript testing in Jest is wicked simple.
# unit tests
$ npm run test

# e2e tests
$ npm run test:e2e

# test coverage
$ npm run test:cov
Running the build
All the different build steps are orchestrated via npm scripts.
Npm scripts basically allow us to call (and chain) terminal commands via npm.
This is nice because most JavaScript tools have easy to use command line utilities allowing us to not need grunt or gulp to manage our builds.
If you open package.json, you will see a scripts section with all the different scripts you can call.
To call a script, simply run npm run <script-name> from the command line.
You'll notice that npm scripts can call each other which makes it easy to compose complex builds out of simple individual build scripts.
Below is a list of all the scripts this template has available:
| Npm Script | Description |
|---|---|
build |
Full build. Runs ALL build tasks |
start:debug |
Performs a full build and then serves the app in watch mode |
lint |
Runs ESLint on project files |
format |
Runs the file formatter |
serve |
Runs node on dist/server.js which is the apps entry point |
start |
Does the same as 'npm run serve'. Can be invoked with npm start |
test |
Runs tests using Jest test runner |
test:watch |
Runs tests in watch mode |
doc |
Generate the project documenation using compdoc |
Project Structure
In a TypeScript project, it's best to have separate source and distributable files.
TypeScript (.ts) files live in your src folder and after compilation are output as JavaScript (.js) in the dist folder.
The test and views folders remain top level as expected.
Please find below a detailed description of the app's folder structures:
Note! Make sure you have already built the app using
npm run build
| Name | Description |
|---|---|
| .vscode | Contains VS Code specific settings |
| .github | Contains GitHub settings and configurations, including the GitHub Actions workflows |
| dist | Contains the distributable (or output) from your TypeScript build. This is the code you ship |
| node_modules | Contains all your npm dependencies |
| src | Contains your source code that will be compiled to the dist dir |
| src/config | Here you will find all the environment configuration necessary to access the application |
| src/components | Components define group of files/source that respond to various module(http requests) |
| src/components/${module_name}/dto/ | DTO (Data Transfer Object) Schema, Validation |
| src/components/${module_name}/entities/ | Entities belongs to that Component |
| src/components/${module_name}/repository/ | Repository belongs to that Component |
| src/components/${module_name}/services/ | Services belongs to that Component |
| src/components/${module_name}/module_name.controllers.ts | Controller belongs to that Component |
| src/components/${module_name}/module_name.module.ts | Module belongs to that Component |
| src/core | All core modules - Guards, Http Request & Response Handler, Logger |
| src/main.ts | Entry point to your express app |
| test | Contains your tests. Separate from source because there is a different build process. |
| .env.example | API keys, tokens, passwords, database URI. Clone this, but don't check it in to public repos. |
| package.json | File that contains npm dependencies |
| tsconfig.json | Config settings for compiling server code written in TypeScript |
| tsconfig.build.json | Config settings for compiling tests written in TypeScript |
| .eslintrc | Config settings for ESLint code style checking |
| .eslintignore | Config settings for paths to exclude from linting |
Documentations
1. Generation with compdoc
Generate project documentation using the following command (npm 6 is required for npx support). See the official documentation for more options.
npm run doc
OR
npx @compodoc/compodoc -p tsconfig.json -s
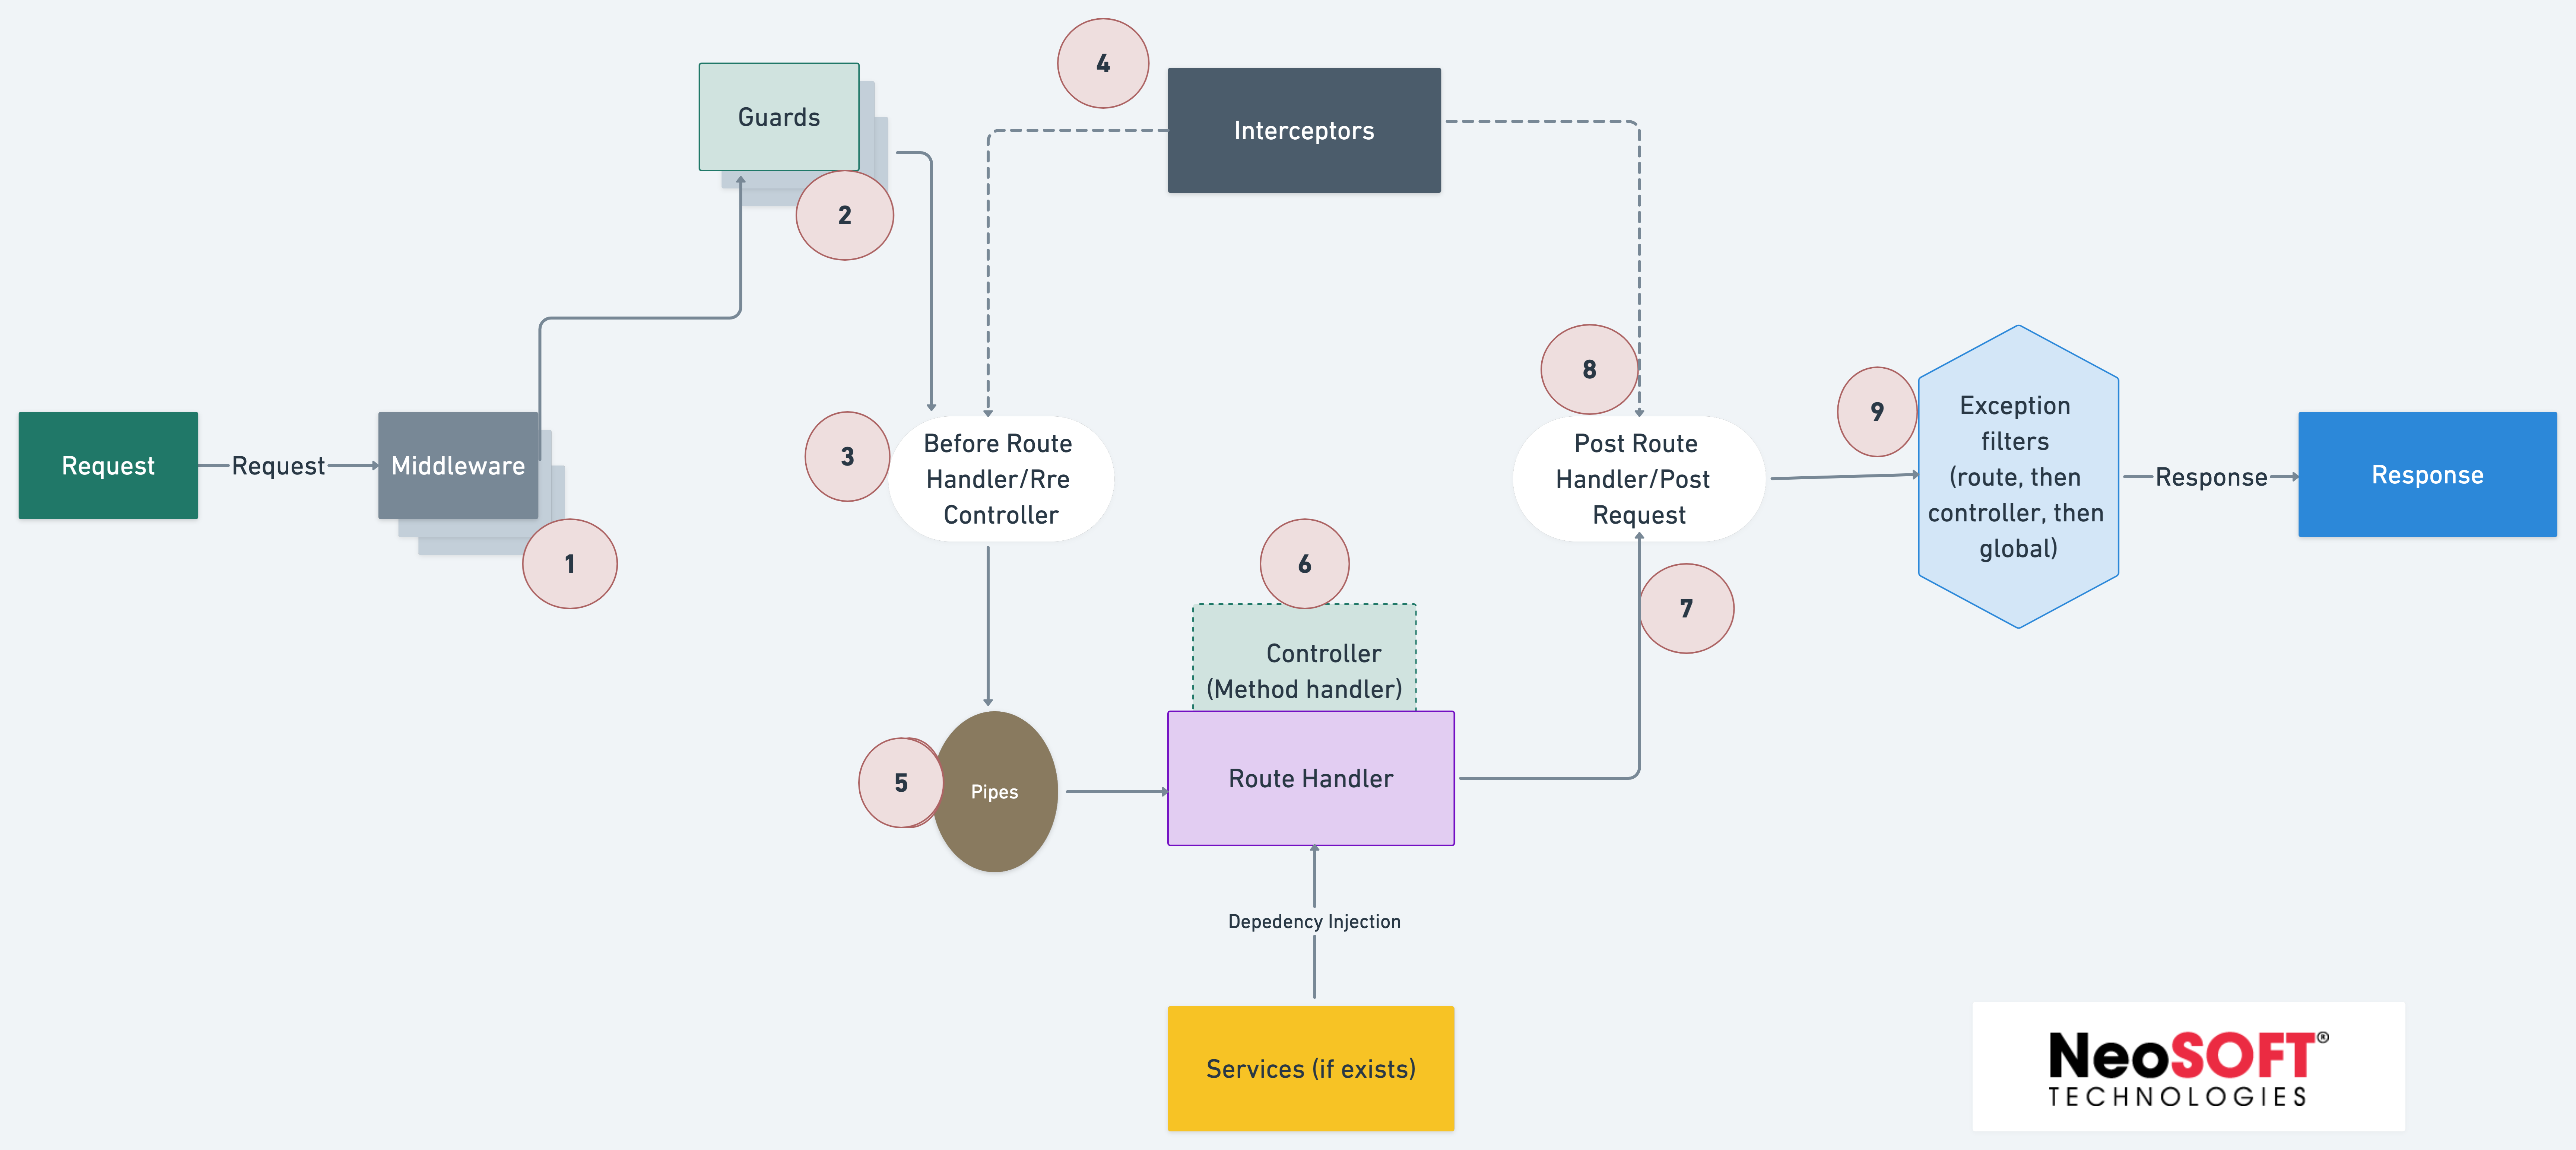
2. Request and Response Cycle
An explanation of how the request and response cycle works is provided here
2.1 Request and Response Workflow
Boilerplate has a custom guard enabled for handling response and request for every api. The integration of request response guard is enabled by default with response structure
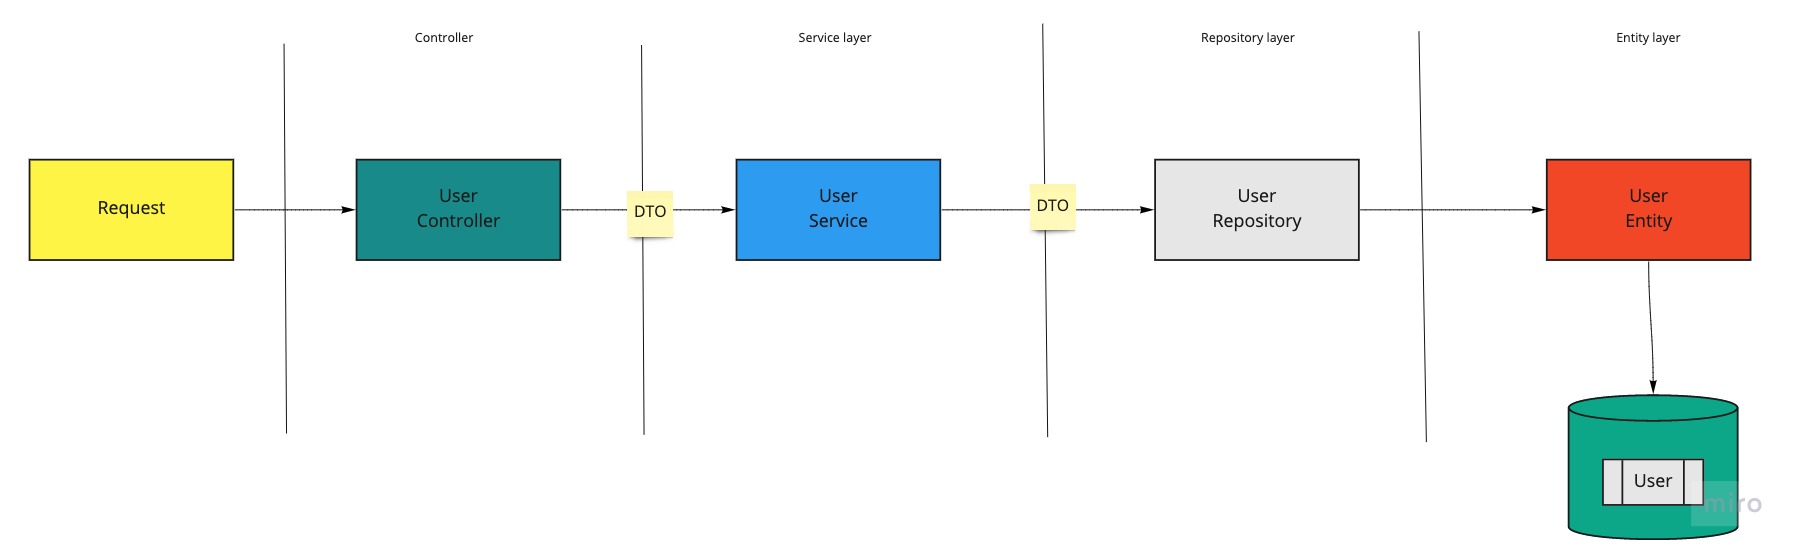
2.2 Request Workflow
By creating a workflow, you can specify the template that should be used to create a change request when a request for service is logged.
3. Modules
4. Miscellaneous
5. Trainings
Contributing to this project
Contributions are welcome from anyone and everyone. We encourage you to review the guiding principles for contributing
Issues/Discussions
Stay in touch
- Website - https://www.neosofttech.com/
- Twitter - @neosofttech
- Meetup - https://www.meetup.com/neosoft-technologies/
- Medium - https://medium.com/@neosofttech-technologies-blog
- GitHub - https://github.com/NeoSOFT-Technologies
- Discord - NodeJS