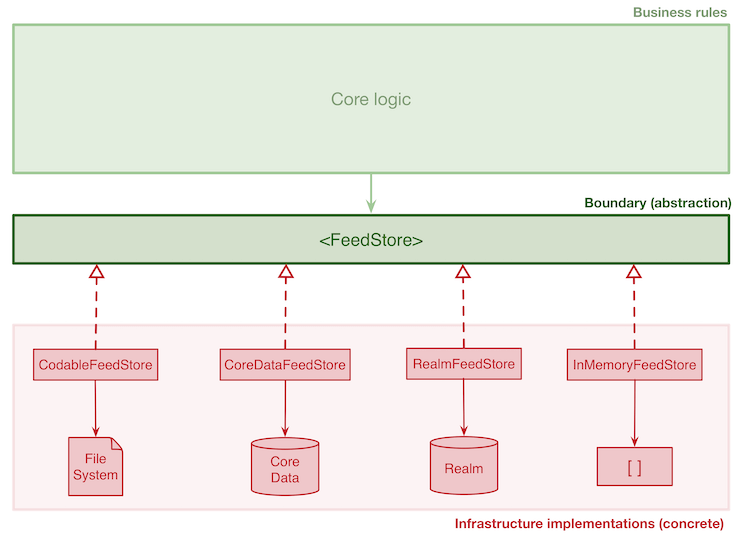
You are called to build your own persistence infrastructure implementation by creating a new component that conforms to the <FeedStore> protocol.
Your custom persistence infrastructure implementation can be backed by any persistence stack you wish, i.e. CoreData, Realm, in memory, etc, as shown in the diagram below.
-
Fork the latest version of this repository. Here's how forking works.
-
Open the
FeedStoreChallenge.xcodeprojproject on Xcode 12.4 (you can use other Xcode versions by switching to the appropriate branch, e.g.,xcode11,xcode12,xcode12_2,xcode12_3).-
Do not change the indentation in the project.
-
Do not rename the existing classes and files.
-
-
Implement one
<FeedStore>implementation of your choice (CoreData, Realm, InMemory, etc.).- There shouldn't be any extra logic in the
FeedStoreimplementation.- It should just obey to the retrieve/insert/delete commands.
- There shouldn't be any extra logic in the
-
Use the
Tests/FeedStoreChallengeTests.swiftto validate your implementation.-
Uncomment (CMD+/) and implement one test at a time following the TDD process:
- Make the test pass, commit, and move to the next one.
-
While developing your solutions, run all tests with CMD+U.
-
-
Errors should be handled accordingly.
-
There shouldn't be any force-unwrap
!orfatalErrorin production code. -
There shouldn't be empty
catchblocks. -
There shouldn't be any
printstatements, such asprint(error).
-
-
If your implementation has failable operations (e.g., it might fail to load data from disk), uncomment and implement the failable test extensions at the bottom of the
Tests/FeedStoreChallengeTests.swifttest file. -
If your implementation persists data to disk (e.g., CoreData/Realm), you must use the
Tests/FeedStoreIntegrationTests.swiftto check this behavior. Uncomment and implement one test at a time following the TDD process: Make the test pass, commit, and move to the next one. -
When all tests are passing and you're done implementing your solution:
-
Create a Pull Request from your branch to the main challenge repo's matching branch.
- For example, if you implemented the challenge using the
xcode12_4branch, your PR should be from your fork'sxcode12_4branch into the main repo'sxcode12_4branch (DO NOT MIX Xcode versions or you'll have merge conflicts!).
- For example, if you implemented the challenge using the
-
Use the name of your implementation as the title for the Pull Request, for example, CoreData implementation - Your name.
-
-
Post a comment in the challenge page in the academy with the link to your PR, so we can review your solution and provide feedback.
-
Aim to commit your changes every time you add/alter the behavior of your system or refactor your code.
-
Aim for descriptive commit messages that clarify the intent of your contribution which will help other developers understand your train of thought and purpose of changes.
-
The system should always be in a green state, meaning that in each commit all tests should be passing.
-
The project should build without warnings.
-
The code should be carefully organized and easy to read (e.g. indentation must be consistent).
-
Make careful and proper use of access control, marking as
privateany implementation details that aren’t referenced from other external components. -
Aim to write self-documenting code by providing context and detail when naming your components, avoiding explanations in comments.
-
Aim to declare dependencies explicitly, leveraging dependency injection wherever necessary.
-
Aim not to block the main thread - run expensive operations in a background queue.
Happy coding!
