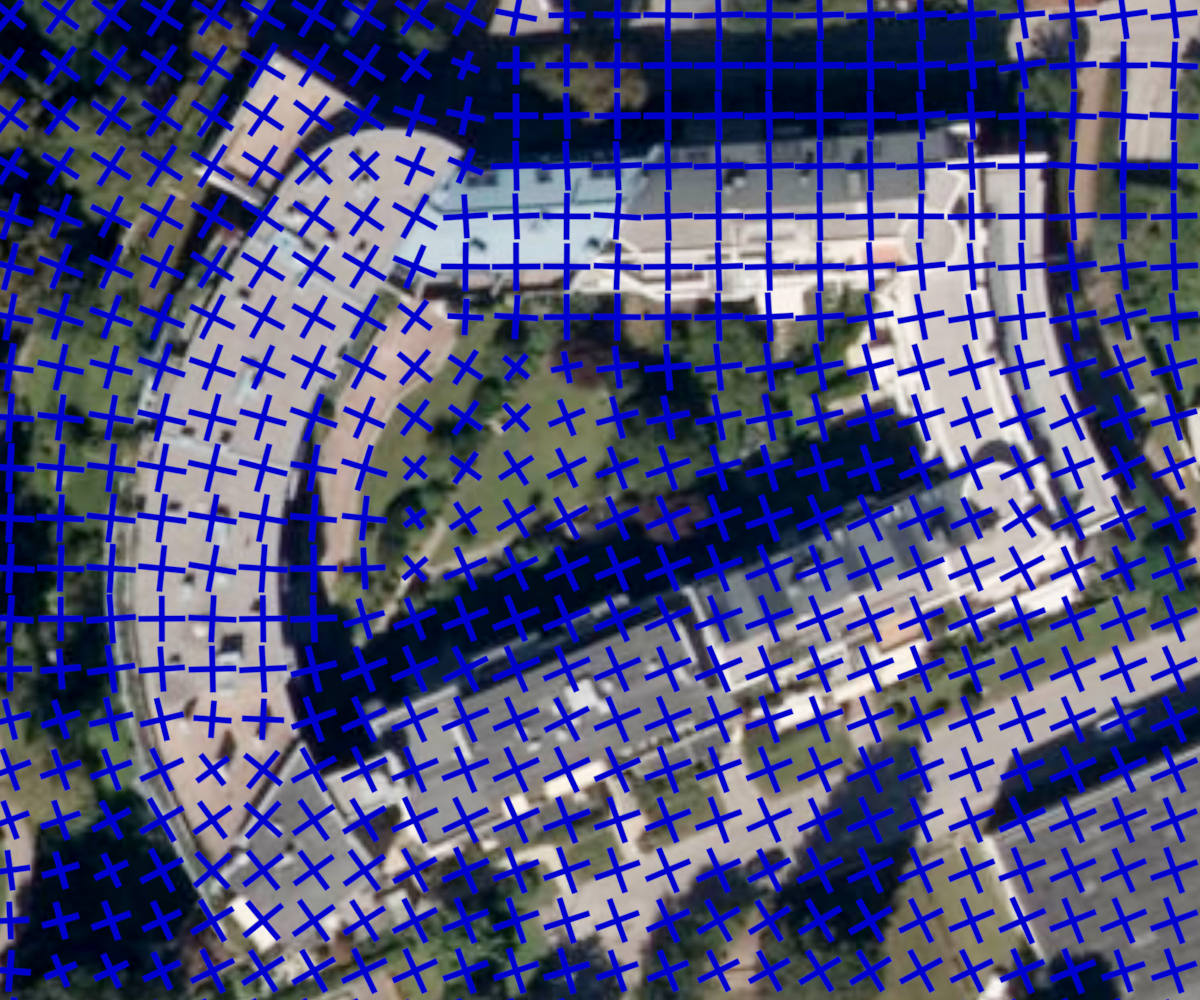
We add a frame field output to an image segmentation neural network to improve segmentation quality and provide structural information for the subsequent polygonization step.

Figure 1: Close-up of our additional frame field output on a test image.

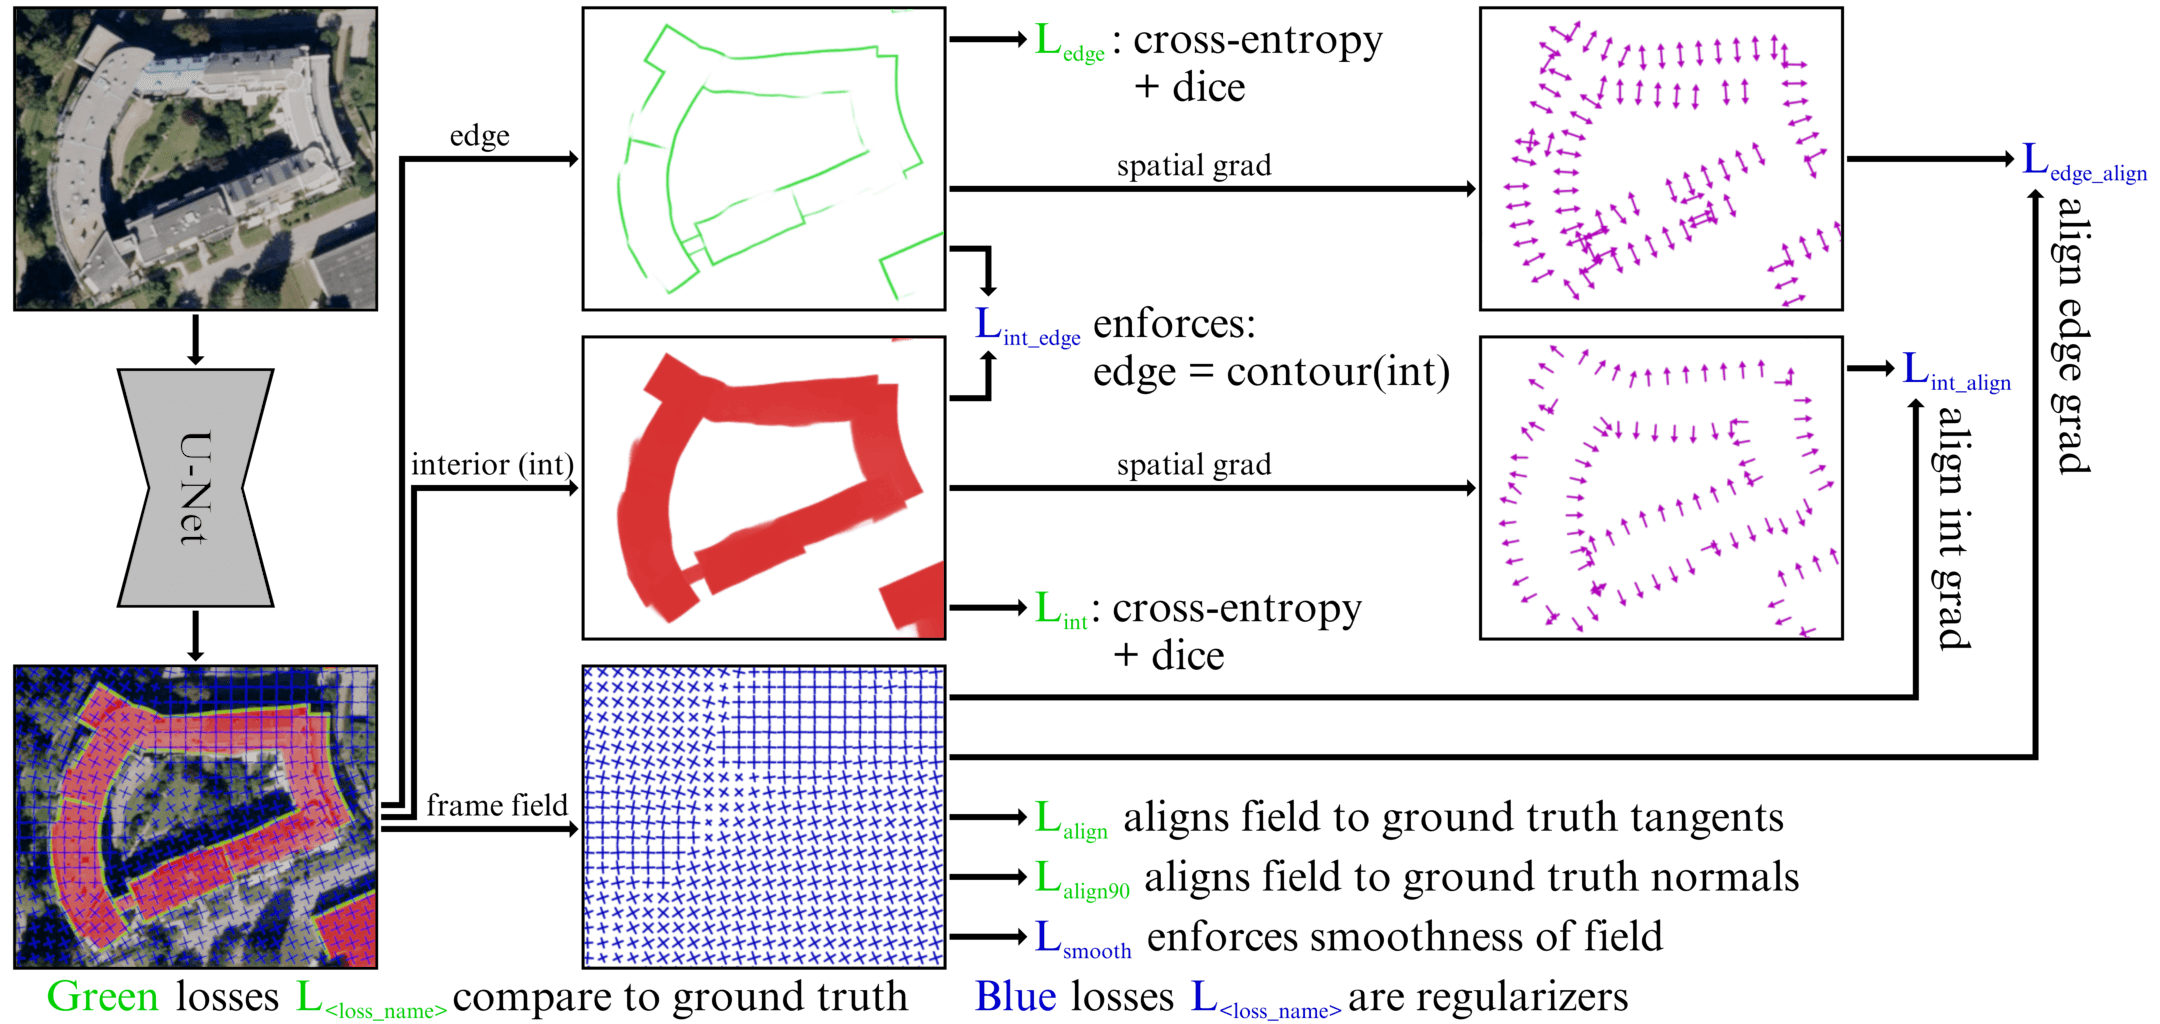
Figure 2: Given an overhead image, the model outputs an edge mask, an interior mask,
and a frame field for buildings. The total loss includes terms that align the masks and
frame field to ground truth data as well as regularizers to enforce smoothness of the
frame field and consistency between the outputs.

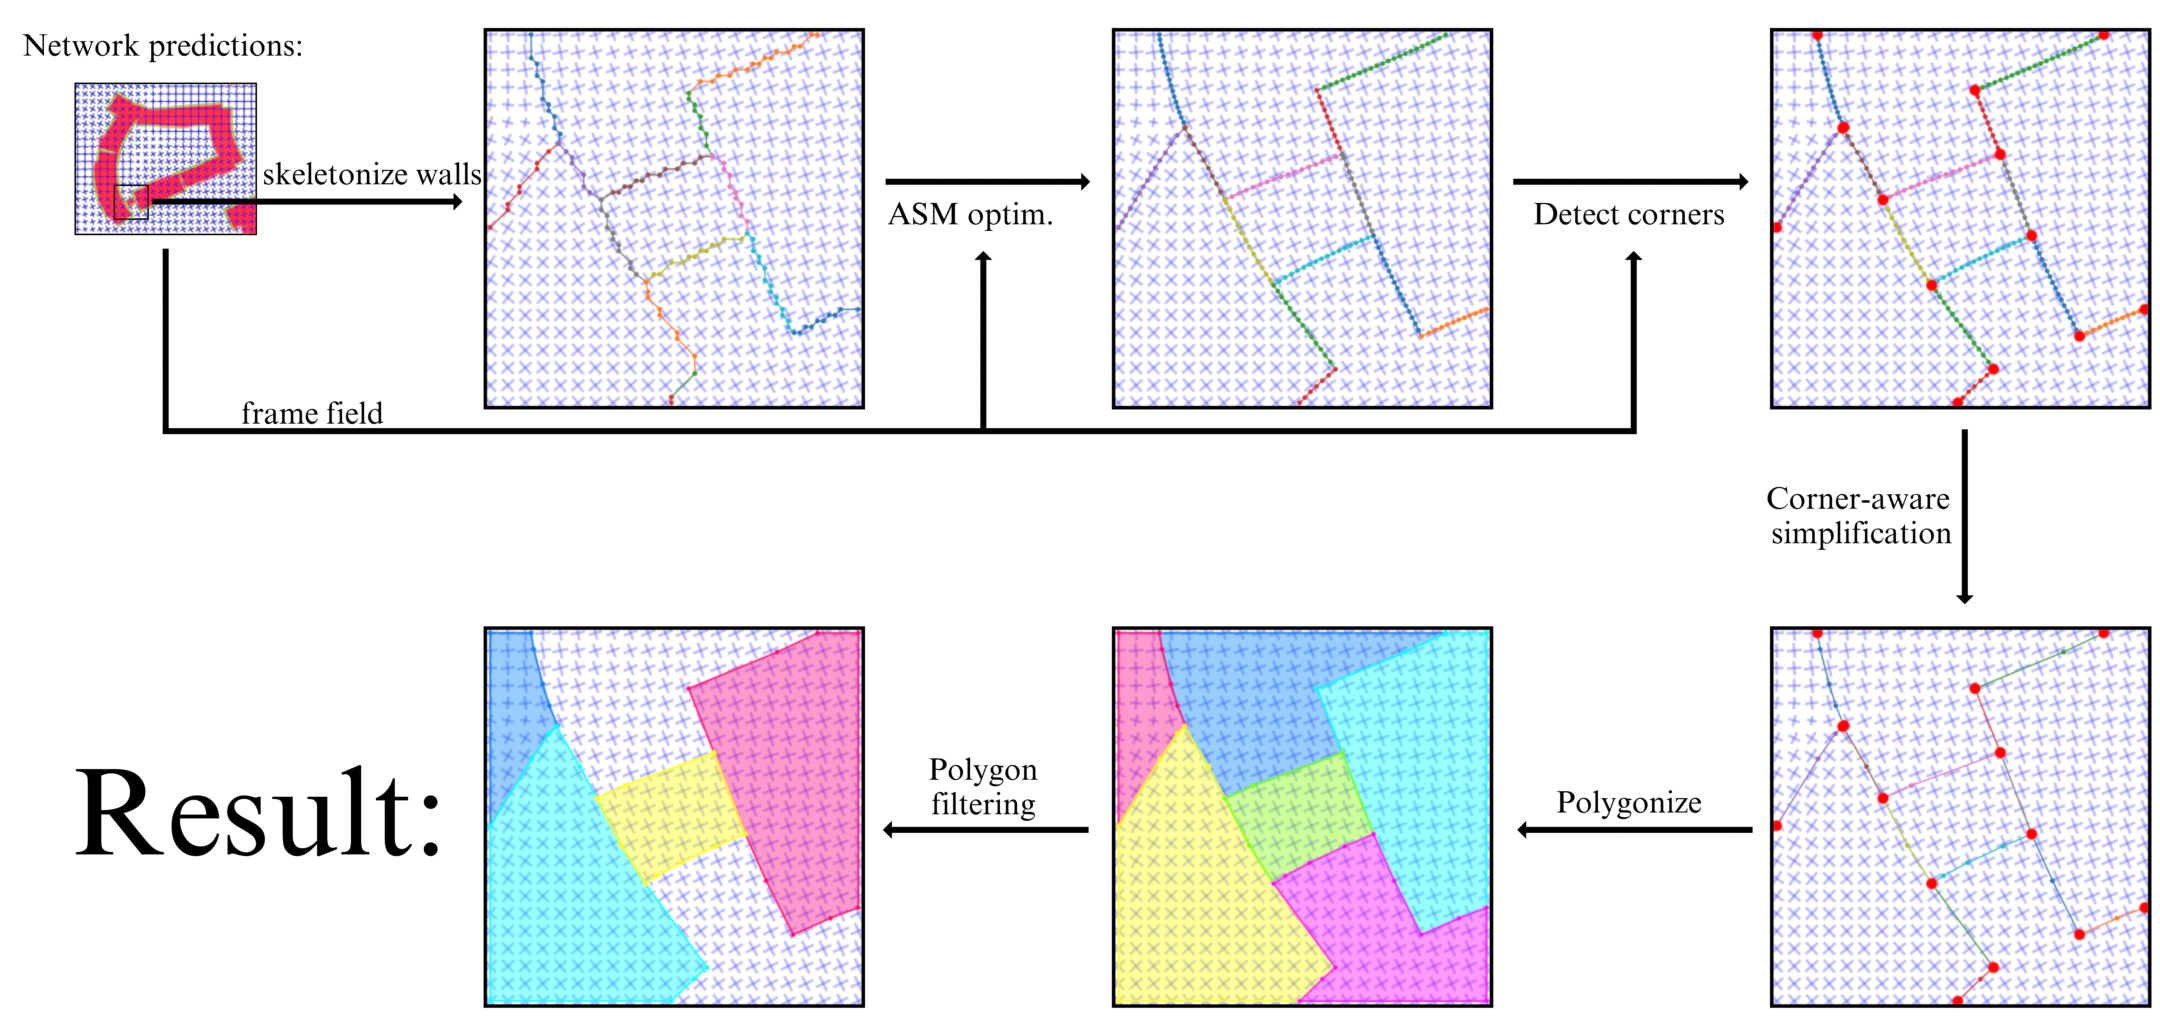
Figure 3: Given classification maps and a frame field as input, we optimize skeleton polylines to
align to the frame field using an Active Skeleton Model (ASM) and detect corners using
the frame field, simplifying non-corner vertices.
This repository contains the official code for the paper:
Polygonal Building Segmentation by Frame Field Learning
Nicolas Girard,
Dmitriy Smirnov,
Justin Solomon,
Yuliya Tarabalka
CVPR 2021
[paper, video]
This project uses various git submodules that should be cloned too.
To clone a repository including its submodules execute:
git clone --recursive --jobs 8 <URL to Git repo>
If you already have cloned the repository and now want to load it’s submodules execute:
git submodule update --init --recursive --jobs 8
or:
git submodule update --recursive
For more about explanations about using submodules and git, see SUBMODULES.md.
The easiest way to setup environment is to use the Docker image provided in the docker (see README inside the folder).
Once the docker container is built and launched, execute the setup.sh script inside to install required packages.
The environment in the container is now ready for use.
Alternatively you can install all dependencies in a conda environment. I provide my environment specifications in the environment.yml which you can use to create your environment own with:
conda env create -f environment.yml
Several datasets are used in this work.
We typically put all datasets in a "data" folder which we link to the "/data" folder in the container (with the -v argument when running the container).
Each dataset has it's own sub-folder, usually named with a short version of that dataset's name.
Each dataset sub-folder should have a "raw" folder inside containing all the original folders and files fo the datset.
When pre-processing data, "processed" folders will be created alongside the "raw" folder.
For example, here is an example working file structure inside the container:
/data
|-- AerialImageDataset
     |-- raw
         |-- train
         |   |-- aligned_gt_polygons_2
         |   |-- gt
         |   |-- gt_polygonized
         |   |-- images
         `-- test
             |-- aligned_gt_polygons_2
             |-- images
`-- mapping_challenge_dataset
     |-- raw
         |-- train
         |   |-- images
         |   |-- annotation.json
         |   `-- annotation-small.json
         `-- val
              `-- ...
If however you would like to use a different folder for the datasets (for example while not using Docker), you can change the path to datasets in config files. You can modify the "data_dir_candidates" list in the config to only include your path. The training script checks this list of paths one at a time and picks the first one that exists. It then appends the "data_root_partial_dirpath" directory to get to the dataset.
You can find some of the data we used in this shared "data" folder: https://drive.google.com/drive/folders/19yqseUsggPEwLFTBl04CmGmzCZAIOYhy?usp=sharing.
Link to the dataset: https://project.inria.fr/aerialimagelabeling/
For the Inria dataset, the original ground truth is just a collection of raster masks. As our method requires annotations to be polygons in order to compute the ground truth angle for the frame field, we made 2 versions of the dataset:
The Inria OSM dataset has aligned annotations pulled from OpenStreetMap.
The Inria Polygonized dataset has polygon annotations obtained from using our frame field polygonization algorithm on the original raster masks.
This was done by running the polygonize_mask.py script like so:
python polygonize_mask.py --run_name inria_dataset_osm_mask_only.unet16 --filepath ~/data/AerialImageDataset/raw/train/gt/*.tif
You can find this new ground truth for both cases in the shared "data" folder (https://drive.google.com/drive/folders/19yqseUsggPEwLFTBl04CmGmzCZAIOYhy?usp=sharing.).
Execute main.py script to train a model, test a model or use a model on your own image. See the help of the main script with:
python main.py --help
The script can be launched on multiple GPUs for multi-GPU training and evaluation.
Simply set the --gpus argument to the number of gpus you want to use.
However, for the first launch of the script on a particular dataset (when it will pre-process the data),
it is best to leave it at 1 as I did not implement multi-GPU synchronization when pre-processing datasets.
An example use is for training a model with a certain config file, like so:
python main.py --config configs/config.mapping_dataset.unet_resnet101_pretrained
which will train the Unet-Resnet101 on the CrowdAI Mapping Challenge dataset.
The batch size can be adjusted like so:
python main.py --config configs/config.mapping_dataset.unet_resnet101_pretrained -b <new batch size>
When training is done, the script can be launched in eval mode, to evaluate the trained model:
python main.py --config configs/config.mapping_dataset.unet_resnet101_pretrained --mode eval.
Depending on the eval parameters of the config file, running this will output results on the test dataset.
Finally, if you wish to compute AP and AR metrics with the COCO API, you can run:
python main.py --config configs/config.mapping_dataset.unet_resnet101_pretrained --mode eval_coco.
Make sure the run folder has the correct structure:
Polygonization-by-Frame-Field-Learning
|-- frame_field_learning
|   |-- runs
|   |   |-- <run_name> | <yyyy-mm-dd hh:mm:ss>
|   |   `-- ...
|   |-- inference.py
|   `-- ...
|-- main.py
|-- README.md (this file)
`-- ...
Execute the [main.py] script like so (filling values for arguments run_name and in_filepath):
python main.py --run_name <run_name> --in_filepath <your_image_filepath>
The outputs will be saved next to the input image
We provide already-trained models so you can run inference right away.
Download here: https://drive.google.com/drive/folders/1poTQbpCz12ra22CsucF_hd_8dSQ1T3eT?usp=sharing.
Each model was trained in a "run", whose folder (named with the format <run_name> | <yyyy-mm-dd hh:mm:ss>) you can download at the provided link.
You should then place those runs in a folder named "runs" inside the "frame_field_learning" folder like so:
Polygonization-by-Frame-Field-Learning
|-- frame_field_learning
|   |-- runs
|   |   |-- inria_dataset_polygonized.unet_resnet101_pretrained.leaderboard | 2020-06-02 07:57:31
|   |   |-- mapping_dataset.unet_resnet101_pretrained.field_off.train_val | 2020-09-07 11:54:48
|   |   |-- mapping_dataset.unet_resnet101_pretrained.train_val | 2020-09-07 11:28:51
|   |   `-- ...
|   |-- inference.py
|   `-- ...
|-- main.py
|-- README.md (this file)
`-- ...
Because Google Drive reformats folder names, you have to rename the run folders as above.
If you use this code for your own research, please cite
@InProceedings{Girard_2021_CVPR,
    author    = {Girard, Nicolas and Smirnov, Dmitriy and Solomon, Justin and Tarabalka, Yuliya},
    title     = {Polygonal Building Extraction by Frame Field Learning},
    booktitle = {Proceedings of the IEEE/CVF Conference on Computer Vision and Pattern Recognition (CVPR)},
    month     = {June},
    year      = {2021},
    pages     = {5891-5900}
}