
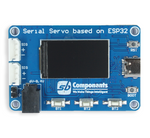
To support Arduino enthusiasts, we introduce the Arduino Serial Servo Shield. This versatile shield mirrors our serial servo controller's functionality, with two serial servo connectors, two programmable buttons, and a 1.14” TFT display for seamless integration and comprehensive feedback. Compatible with boards like Arduino Uno, Mega, ArdiPi, and Ardi32, it offers adaptable solutions for your projects.
This Github provides getting started guide for Serial Servo Arduino Shield.
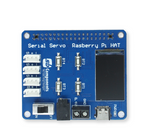
- Serial Servo Shield with standard headers for Arduino and compatible boards
- Jumper selection to switch between 3.3V and 5V compatible boards
- TFT 1.14” display for user interactions
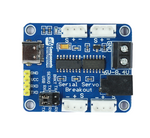
- Two slot to connect Serial Servo Motors, and easily cascade servo to connect more number of motor*
- Two Programmable Buttons to add additional control features to your project
- Screw terminal and DC jack options to connect 6-8.4V adapter with onboard regulator
- Power status LED to indicate board power.
- Compatible Servo Motors =>
*NOTE: Avoid Connecting More Than 6 Servos At A Time, Not Recommended Due To High Current Demand By Servos.
For more details about Serial Servo Motor checkout Manual.
- Microcontroller: Arduino and compatible Boards
- Board Supply Voltage: 5V
- Operating Pin Voltage: 3.3/5V switchable
- Operating Servo voltage: 6~8.4V
- Display Size: 1.14”
- Display Resolution : 240x320 pixels
- Display Driver: ST7789
- Display Appearance: RGB, 65K/262K
- Temperature Range: -20°C ~ +70°C

- (1) ON/OFF Servo Motor Supply
- (2) & (10) Programmable Buttons
- (3) Power Status LED
- (4) TFT 1.14” Display
- (5) & (8) Serial Servo Connector
- (6) DC Jack Input (6~8.4V DC)
- (7) Screw Terminal Input (6~8.4V DC)
- (9) Jumper Selection for 3.3V/5V boards
- (11) & (12) Standard Arduino Header
When shield is connected with Arduino UNO following pins consumed,
-
Serial Servo Bus Pins:
-
Servo connector having +ve[6~8.4VDC], -ve[GND] and Signal pin.
-
Serial Servo Signal pins breakout into UART RXD and TXD to connect with Arduino UART pins,
Arduino Servo Description TX Servo Bus RXD UART communication pin RX Servo Bus TXD UART communication pin
-
-
Display interfacing with Arduino UNO
Arduino Display Function D13 LCD_CLK Clock pin of SPI interface for Display D11 LCD_DIN MOSI (Master OUT Slave IN) pin of SPI interface D10 LCD_CS Chip Select pin of SPI interface D8 LCD_DC Data/Command (MISO) pin of SPI interface D9 LCD_RST Display Reset pin D6 BL Backlight of display -
Buttons Interfacing
Arduino Hardware Function D4 BT1 Programmable Button D5 BT2 Programmable Button
-
Download Arduino IDE from official site and install into your system. We have use Arduino IDE 1.8.19
-
Download library zip file provided here in github.
-
Extract and copy files inside Document > Arduino > Libraries folder. Make sure to restart Arduino IDE whenever you update or add any libraries.


-
At this step you are all set to test codes, for easy getting started we have provided various demo example codes in github which you can download and try.
-
Open one example code in Arduino and make sure you have selected correct board with suitable com port, click on upload button to transfer code on Arduino UNO.
-
Since same default HARDWARE SERIAL PINS of ARDUINO used for INTERFACING SERIAL SERVO, so you have to REMOVE SHIELD BEFORE UPLOADING ANY NEW CODE.

-
Checkout other examples below and build your own custom program codes using those references.


This is open source product. Kindly check LICENSE.md file for more information.
Please contact support@sb-components.co.uk for technical support.