
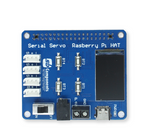
The Pico Serial Servo HAT is a versatile and compact HAT for Pico/Pico W microcontroller with dual power options, two serial servo connectors, and two programmable buttons. It features a 1.14” TFT display for status updates, a power LED indicator, and supports simultaneous multi-servo control, making it ideal for projects requiring precise coordination and multiple servos with minimal wiring like Robotic Arm Control, CNC machine and Automation.
This github provides getting started instructions for Serial Servo Pico HAT.
- Pico Serial Servo compatible Hat for Pico and Pico W board
- TFT 1.14” display for user interactions.
- Two slots to connect Serial Servo Motors, and easily cascade servo to connect more motors. Allows controlling 1-253 serial servos at the same time*
- Two Programmable Buttons to add additional controls to project
- Header 2.54” and DC jack options to connect 6-8.4V adapter with onboard regulator
- Power status LED to indicate board power.
- Compact and space-saving design
- Compatible Servo Motors =>
*NOTE: Avoid Connecting More Than 6 Servos At A Time, Not Recommended Due To High Current Demand By Servos.
For more details about Serial Servo Motor checkout Manual.
- Microcontroller: Supports Raspberry Pi Pico/Pico W
- Board Supply Voltage: 5V
- Operating Pin Voltage: 3.3V
- Operating Servo voltage: 6~8.4V
- Display Size: 1.14”
- Display Resolution : 240x320 pixels
- Display Driver: ST7789
- Display Appearance: RGB, 65K/262K
- Temperature Range: -20°C ~ +70°C

- (1) Power Status LED
- (2) Header 2.54” input (6~8.4V DC)
- (3) DC Jack input (6~8.4V DC)
- (4) & (5) Programmable Buttons
- (6) & (7) Serial Servo Connectors
- (8) TFT 1.14” Display
- (9) Pico Header Support

When HAT is connected with Pico/Pico W following pins interfaced with onboard hardware components,
-
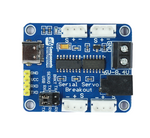
Serial Servo Bus Pins:
-
Servo connector having +ve[6~8.4VDC], -ve[GND] and Signal pin.
-
Serial Servo Signal pins breakout into UART RXD and TXD to connect with PICO UART pins,
Pico Servo Description TXD0/GPIO43 Servo Bus RXD UART communication pin RXD0/GPIO44 Servo Bus TXD UART communication pin
-
-
Display interfacing with Pico
Pico Display Function GP10 LCD_CLK Clock pin of SPI interface for Display GP11 LCD_DIN MOSI (Master OUT Slave IN) pin of SPI interface GP09 LCD_CS Chip Select pin of SPI interface GP08 LCD_DC Data/Command (MISO) pin of SPI interface GP12 LCD_RST Display Reset pin GP13 BL Backlight of display -
Buttons Interfacing
Pico Hardware Function GP14 BT1 Programmable Button GP15 BT2 Programmable Button
-
If you already have MicroPython firmware with the inbuilt ST7789 module, then you can skip this step and jump to step 2 for trying demo codes.
-
In case, you need to add MicroPython firmware in Pico of HAT. First, you need to Press and Hold the boot button on pico W, and then, without releasing the button, connect it to PC/laptop using micro USB cable. Check below image for reference,

-
Now your device is in boot mode, and you will see a new mass storage device named "RPI-RP2" as shown in the below figure.

-
Download the MicroPython firmware file provided in this repo above as "firmware.uf2". Drag and drop this firmware.uf2 file onto the RPI-RP2 volume.


-
Download Thonny IDE from Download link as per your OS and install it.
-
Download this github which contains various examples and open anyone of example in Thonny.

-
Now we have Thonny IDE application and github example codes, Connect hardware to laptop/PC. Open any example code in Thonny IDE. Then select micropython device at the bottom right with a suitable COM port, as shown in the below figure. You might get a different COM port.

-
Make sure to save SerialServo.py library file to device to avoid any execution error.

-
Once everything all set, with any demo code open click on green play button to test program.

-
For standalone execution save script into Pico as main.py,

Try out below provided reference example demo codes and modify to build your own application codes.


Try reference demo codes to test onboard components of HAT, make sure to save library file to run Serial Servo Motor related codes.
- Display Demo : code to test display
- Motor Mode Demo : code to run Serial Servo in Motor Mode, 360 degree rotation
- Servo Mode Demo : code to run Servo with angular position
- More..
Using this sample code as a guide, you can modify, build, and share codes!!
- Schematic
- Hardware Files
- Step File
- MicroPython getting started for RPi Pico/Pico W
- Pico W Getting Started
- RP2040 Datasheet
- Serial Servo Manual
This is open source product. Kindly check LICENSE.md file for more information.
Please contact support@sb-components.co.uk for technical support.