WebCombine Overview
This Chrome extension was built to empower non-programmers to scrape data from the web. Rather than write code in a scraping language, users demonstrate how they would collect their data if they were going to scrape it by hand. They fill out the first row of a spreadsheet, and the tool fills out the rest.
The tool currently targets relational data and pages with consistent structures.
To see WebCombine in action, check out the video demo:
Directions
Here we cover how to complete a scraping task with WebCombine.
1. Click on the RS (for Relation Scraper) icon in the upper right of the browser window. This opens the RS control panel, shown at the left in the screen capture below.

2. Open a fresh tab in which to conduct your demonstration.

3. Click on the "Demonstrate List" button. This will open the controls for selecting a list from a webage.

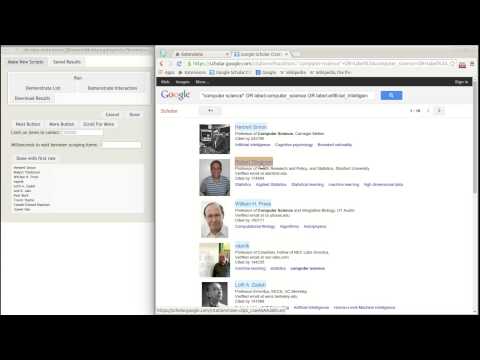
4. On the webpage, select items for which you want Relation Scraper to scrape data. For instance, in the screen capture below, we want to scrape data for each author in Google Scholar that has been tagged with the "Computer Science" tag. Items in the current list will be highlighted in blue. To add non-highlighted items to the current list, click on them. To remove highlighted items from the current list, click on them. The first page of the list will be shown in the control panel.

5. If you're scraping from a multi-page list, indicate how to get to the next set of list items. Is there a next button? A more button? Do you scroll for more? Click the relevant button on the RS control panel.

6. If the next set of list items is accessed with a next button or a more button (and you've already clicked on the appropriate button in the RS control panel to indicate this), click the next button or more button in the webpage.

7. If you're scraping from an extremeley long list, you'll probably want to limit the number of list items you collect. Here, we set a 10 item limit.

8. After clicking the "Done" button on the list demonstration panel, you'll see what your list demonstration has added to the first row of your spreadsheet. In the screen capture below, we see that the first column of our dataset's first row will be "vapnik." At the bottom of the control panel, we see the first row so far. Right now, the first row is just that one cell.

9. Next we'll demonstrate an interaction that we want RS to repeat for each item in the list. But we'll only demonstrate it for the first item. Click the "Demonstrate an Interaction" button to get started.

10. Click the "Start Recording" button to begin the interaction.

11. Now interact with the webpage just as you normally would. Navigate to whatever information you want to collect for the first row of your spreadsheet. In the screen capture below, we've started the recording, then clicked on the first item in our list, and we're now on the author's individual page.

12. To collect data during an interaction demonstration, click the "Start Capturing" button.

13. Click on data in the webpage to indicate that you want to add it to the first row. In the screen capture below, we've clicked on the box that contains the author's tags. The data captured so far is shown in the RS control panel. Once you've captured all the data you want, click the "Done Capturing" button.

14. After clicking the "Done Recording" button on the interaction demonstration panel, you'll see what your interaction demonstration has added to the first row of your spreadsheet. As before, you'll see the first row so far at the bottom of the control panel. Repeat steps 3 through 13 until you've completed the whole first row of your spreadsheet.

15. Now that the whole first row of your spreadsheet is complete, you're ready to run RS. Click the "Run" button, and let RS do the scraping for you!

16. Once RS has finished running, find your full dataset in the control panel.
