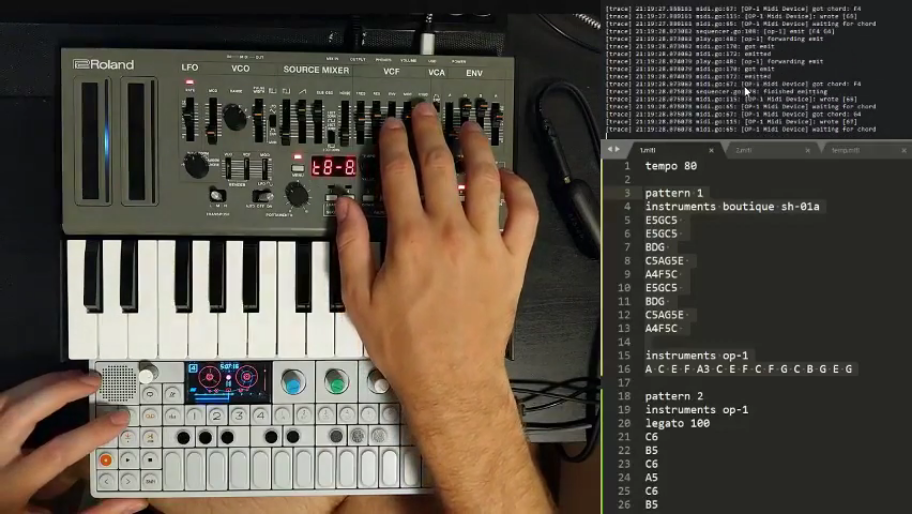
miti is a musical instrument textual interface. Basically, its MIDI, but textual.
miti provides a program and musical notation that you can use to easily connect and control sounds in a very human way. It provides surprisingly simple sequencing for synthesizers or other instruments, namely control from your favorite text editor.
- Control one/many external/virtual MIDI devices simultaneously
- Sequence single notes or chords, at any subdivision
- Low latency (~2 ms) and low jitter (~2 ms, with rare spikes of 10-15 ms)
- Real-time editing of sequences using any text editor
- Sequences specified using human-readable text
- Compatible with Windows, macOS, Linux, Raspberry Pis
The easiest way to install is to download the latest release.
Its very easy to install from the source code too. To install from the source code, first install portmidi, following these directions.
Next install Go and then in a terminal:
> go install github.com/schollz/miti
Optional: If you want to input chord names then you need to also download and instal LilyPond on your system. (Here are instructions for installing on a Raspberry Pi).
That's it! miti is now available from the command-line.
You don't need to be familiar with command-lines to get started. Simply plug in your instruments (or virtual instruments), and double-click on the miti program to get started. It will load up the default .miti file in the default text editor and start playing!
To get started, first plugin your instruments to your computer. Open a command prompt and type miti --list to see which instruments are available to you.
> miti --list
Available MIDI devices:
- midi through port-0
- nts-1 digital kit midi 1
You can then use these instruments to make a simple sequence. Make a new file called first.miti with the following:
pattern 1

instruments nts-1
C D E F G A B C
Make sure you replace nts-1 with the name of your MIDI device!
Also, note that I did not write out the full MIDI device for the instrument. miti will accept any part of the device name and map it to the correct device. So in that example it will accept nts-1 in place of writing nts-1 digital kit midi 1.
Now to play this sequence you can just do:
> miti --play first.miti
[info]  2020/07/17 08:18:12 playing
And you'll hear some music!
You can make a sequence using any text editor you want. To get started quickly, though, you can record a sequence using your MIDI keyboard. Just plug in a keyboard and type:
> midi --record song2.miti
Use MIDI keyboard to enter notes
Press . to enter rests
Press p to make new pattern
Press m to make new measure
Press backspace to delete last
Press Ctl+C to quit
Then you can just play chords and notes on your MIDI keyboard and it will generate the sequence. When you are done with a measure, just press m to start a new one. When you are done with a pattern, just press p to start a new one. If you are finished, press Ctl+C to finish and write the file to disk.
Once the sequence is written, you can play it and edit it as much as you want.
miti reads a .miti file, which is a high-level musical notation developed for miti. The musical notation is simple and powerful, allowing you to create patterns of notes that can be played on many instruments simultaneously.
The basic unit is the pattern. A pattern contains a collection of instruments. Each instrument contains a collection of notes. For example, here is a simple pattern that plays Cmaj followed by Fmaj and then repeats.
pattern 1
instruments <instrument1>
CEG
FAC
The pattern 1 designates the pattern name, "1". This pattern has a single instrument, <instrument1>. The instrument name must be contained in the official MIDI instrument name, case insensitive. For example, "nts-1" is a viable name if the MIDI instrument is "NTS-1 digital kit 1 SOUND."
Each line under instruments designates a different measure. This is where you put notes. Notes without spaces are considered a chord and will be played simultaneously. The first measure plays C, E, and G (C major) and the second measure plays F, A and C (F major). This pattern will repeat indefinitely when played.
To add more patterns, simply add a line with pattern X and again add instruments and their notes. The patterns will be played in order.
You can easily add a second instrument to this section by adding another line with the instrument name:
pattern 1
instruments <instrument1>
CEG
FAC
instruments <instrument2>
A F E C A F E C
This second instrument will play arpeggios.
It consists of a single repeated measure which eight notes.
Since each note is separated by a space, they are not played together as a chord (unlike in instrument1) and are automatically subdivided according to the number of notes in that measure. In this case they are subdivided into 1/8th notes since there are eight of them in that measure. Since there is only one measure for the instrument2, it will repeat over every chord of instrument1.
You can add rests in using . to create specific subdivisions. For example, we can change instrument1 to play chords on the off-beat of beat 1 and beat 2:
instruments <instrument1>
. CEG . . . CEG . .
. FAC . . . FAC . .
You can add in comments into the .miti file by putting a # in the beginning of the line:
# this is a comment
pattern 1
If you have multiple patterns you can chain them together in any order using chain. The order will repeat once it gets to the end. For example, this repeats the first pattern followed by 5 of the second pattern:
chain a b b b b b

pattern a
CEG

pattern b
DFA
By default, the note played will be the note closest to the previous. If you want to specify the exact note you can add a suffix to include the octave. For example, instead of writing CEG you could instead write C3E4G5 which will span the chord over three octaves.
You can add a line to change the tempo, anywhere in the file.
tempo <10-300>
The legato specifies how much to hold each note until releasing it. Full legato (100) holds to the very end, while the shortest legato (1) will release immediately after playing.
legato <1-100>
For a pedal note (sustain) add a * to the end of the note. For example, the following will sustain a C major chord for two measures:
CEG-
CEG
This next example shows how to hold out a C major chord for three beats and resting on the fourth beat:
CEG- CEG- CEG .
You can assign multiple instruments to a pattern by separating each instrument by a comma. For example:
instruments <instrument1>, <instrumnet2>
C E G
will play the C, E, G arpeggio on both instruments 1 and 2.
Note: Inputting chord names directly requires first downloading and installing LilyPond.
To directly use chords, you can use the semicolon operator flanking the chord name. For instance, here are two C major chords followed by two A minor chords:
:C :C :Am :Am
If you want to alter the chord octave or add sustain, you do same as before but add another semicolon operator on the right side. In this example, the C major chord is played on the 3rd octave and held out for two beats using a sustain (- suffix):
:C:3- :C:3 :Am :Am
Chords can get pretty complex, and they should be understood. For example, you can add chord adjusters:
:Cm7/G
It's useful to get a click track going to be used to sync audio equip. miti will output a click track on the default audio using the --click track and can be lagged (if needed) by setting --clicklag.
- textbeat is a text-based musical notation to do complex sequences using a columnated workflow.
- helio-workstation is a simplified GUI based sequencer.
- lilypond is a GUI based sequencer and musical notation software.
- foxdot is a Python + SuperCollider music environment.
- Sonic Pi is a SuperCollider live coding environment.
- Pure Data is a GUI program that enables music synthesis.
- Chuck is a music programming language.
- melrose is a melody programming language.
- Add legato control
legato: 90 - Hot-reload file
- in midi, create a channel for each instrument
- in midi, each instrument keeps track of which notes are off
- in midi, accept -1 to turn off all notes
- in midi, accept -2 to turn off all notes and shut down
- Add
-suffix for adding sustain - Easily identify instruments with partial matches (if contains)
- Allow chaining patterns in different ways
chain: a a b b a a - allow comments
- Find source of spurious jitter
- use portmidi scheduling to further eliminate jitter
MIT


