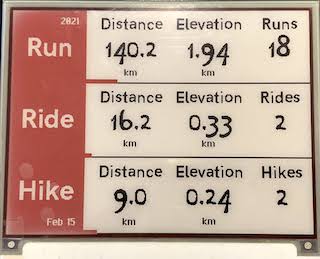
This project calls the Strava API using the programmers Strava API Key to obtain details about runs, bikes and hikes and then displays them on an Inky wHAT paper/e-ink display. The graph is updated once a day and also includes the weather forecast from DarkSky.
The idea for this project came from a reddit mileage monitor post
There is some hardware required for this project, if you don't already have it you will need:
- A Raspberry Pi computer, I'm using a Raspberry Pi 3b+
- An Inky wHAT display, they also have a smaller version called an Inky pHAT which looks to be smaller, and more Pi Zero sized, this program wasn't written for that display so use/modify at your own risk
This project requires JavaScript, the latest version should be fine but it was written on v10.15.1. This project also uses python because Pimoroni Inky e-Ink display works best with Python and most of the work was layed out in python. As a note, I did attempt the npm Inky project but was unsuccessful in getting it to work.
- Ensure your Raspberry Pi has JavaScript v10.15.1 or later
- Ensure your RaspBerry Pi has the Pimoroni Inky Support Libraries
- I use Process Manager 2 to keep the Node Script running and include a pm2 process script in the repo.
- Use the
pm2 startupcommand to get the system specific start-up script to start pm2 at start up - Use the
pm2 savescript at the end of the set up to make sure pm2 remembers what scripts to load on bootup.
- Use the
- Download this repository to your Pi
- Run
npm installto download all related components - Set up the authentication file in
./conf/auth.json(details below) - Start the Inky-Strava process in pm2 with
pm2 start pm2_process.json
- Run
- Download this repository to your Raspberry Pi that you intend to use the inky wHAT display on
- Run
npm installto download all the components - Set up the authentication file in
./conf/auth.json
the auth.json file should look like this:
{
  "clientId": "12345",
  "clientSecret": "abcdefg12345...",
  "refreshToken": "12345abcdefg..."
}
The clientId and clientSecret are obtained from the Strava API Key. The refresh token provided on that page only has the activity:read permission, which is not sufficient to get all the activities if they are marked private. In order to get a new refresh token
you can either implement OAuth2.0 or work through an article from Josh Gotro on Medium.
The key steps in this article in the event Josh takes it down are:
- Login to your own Strava account and hit up the Strava API Key page. Note, this page won't appear unless you have an API key, so use this link to direct link ot the page.
- Follow the instructions to create an API key. Make up a website if you don't need one and use
developers.strava.comas the call back URL so you can use the Strava Swagger website. - Navitage to the Strava Swagger Playground
- Click the Authorize button, enter your clientId and ClientSecret and then select the activities:read_all box and then click the Authorize in the pop-up you entered all this info in.
- A new webpage will open and ensure you check the boxes to authorize against private activities
- Then scroll down on the Swagger page to the Activities controller and select the
GETathlete/activities API, and feel free to try it out to make sure the steps above have worked so far. - Go back to the Strava API Key and change the redirect URI to
localhost - Then we need to call the OAuth end point to request a refresh token. Paste in this URL with the particular parameters replaced with your own:
http://www.strava.com/oauth/authorize?client_id=54753&response_type=code
&redirect_uri=http://localhost/exchange_token&approval_prompt=force&scope=activity:read_all
- This should authorize your app again and you should get an ERROR page, this is good!
- In the URL bar your refresh token wil be listed with the appropriate permissions: activities:read_all
http://localhost/exchange_token?state=&code=b29e1998446705436f2a2952b21eeb8f76c070c9&scope=read,activity:read_all
- Add the refresh token to the auth.json file mentioned above. 🎉
On a daily basis (9am computer time) a node-schedule job will wake the program up, it will authenticate to Strava with the refresh token to obtain an access token. Once an access token is obtained, it will call for the activities that happened after the start of the current year, or after the last time it called Strava (as not to pummel their API and get you in trouble).
On first start, the script figures out the start of the current year, and creates a new file in the /data directory. Then using the Strava Authentication file it calls Strava and downloads all activities from the start of the year and sorts them into Run, Ride and Hike (discarding the other activities such as walk, swim, etc). The data is then stored, along with the current time into the data file. On the next run (9am the next day) it will only query Strava for the changes since the last activity. The current year's data is stored in the /data/data-YYYY.json file and then it's displayed to the Inky e-Ink display.
Once a new year starts, a new file will be started and the display will start over.
The red bars progress along the bottom of each area in accordance to how close you get to the goals.
The goal is stored in the data file and also created by the script at the start of the year. You can change your goal in the .JSON data file throughout the year, or you can update the code for the next year to create a new goal.
- Adding Fonts - This link was used to find the custom font included, along with a reference to the creator of the
ChiKarGo.ttffont. Here is [the original source of the font](http://www.pentacom.jp/pentacom/bitfontmaker2/gallery/?id=3778 76). - Josh Gotro on Medium - Original post on how to get a Strava refresh token.
