Amazon ECS is a highly scalable, fast container management service that makes it easy to run, stop, and manage containers on a cluster. The containers are defined in a task definition that you use to run individual tasks or tasks within a service. Moreover, in this context, a service is a configuration that enables you to run and maintain a specified number of tasks simultaneously in a cluster.
- There has two launch type you can choose: EC2, Fargate
- Fargate is a serverless infrastructure that is managed by AWS. You use ECS to run containers without managing server or cluster of EC2 instances.
- Each Fargate task has its own isolation boundary and does not share the underlying kernel, CPU resources, memory resources, or elastic network interface with another task.
- Alternatively, for more control over your infrastructure, you can run the tasks and services on a cluster of EC2 instances that you manage.
- Fargate is a serverless infrastructure that is managed by AWS. You use ECS to run containers without managing server or cluster of EC2 instances.

- Group of tasks or services.
- It can be group of container instances if launch type is EC2.
- Like a blueprint of your container.
- The following are parameters you can set in the task definition.
- Launch type
- CPU & memory
- Docker image
- Docker network mode (Introduce below)
- Logging configuration
- Whether task should continue to run when container finish or fail
- The command the container should run when it is started
- Data volumes should be used in the containers
- IAM role
- Network mode
- awsvpc
The task is allocated its own Elastic Network Interface(ENI) and a private IP address. This gives the task to have the same networking property as EC2 instances.
★ If the launch type is Fargate, the only Network mode is awsvpc. - bridge
The task utilizes Docker's built-in virtual network which runs inside each EC2 instance hosting the task.
- host
The task bypasses Docker's built-in virtual network and maps container ports directly to the ENI of the EC2 instance hosting the task. As a result, you can't run multiple instantiations of the same task on a single EC2 instance when port mappings are used.
- none
The task has no external network connectivity.
- awsvpc
- An instance based on given Task Definition.
- This is the Docker container which can contain multiple Task Definitions.
- Allows you to create and maintain a number of tasks in the cluster including their lifecycle and deployment properties from same Task Definition.
If any tasks fail or stop, ECS Services scheduler launches another instance of your task definition to replace it in order to maintain the desired number of tasks in the service.
- Often used with Load Balance. ECS Services maintain the number of tasks and Load balancer distributes traffic across the tasks that are associated with the ECS Services.
- The following are services you can set in the ECS Services.
- Deployment types
- Load Balancing
- Auto Scaling
- Service Discovery (Introduce below)
- Service Discovery
★ This is key point can that container communicate with each other.
- Uses AWS Cloud Map API to manage HTTP and DNS namespaces for the ECS Services.
- Consists of the following components:
- namespace
- domain name, such as
example.com
- domain name, such as
- service
- subdomain name, exist in namespace.
- ECS health checks
- namespace
- The Create Service workflow in the ECS console only supports Service Discovery register private DNS namespaces.
Cloud Map is a cloud resource discovery service, allows you to register any application resources with custom names, and no need to manage resources manually.
With Cloud Map, you can create and maintain a map of the backend services and resources that your applications depend on, such as databases, queues, microservices, and cloud resources.
- Cloud Map is tightly integrated with ECS. When new container tasks spin up or down, they automatically register with Cloud Map.
- When a Cloud Map private DNS namespace is created, Route 53 private hosted zone will be created automatically.
In this Lab, We will build a microservice that can count the number of times you visit the website.
Using Golang to create the website, and expose 8000 port to allow traffic to enter from this port.
And using Redis as the database, which port is 6379 by default.
We need to deploy the Web and Redis in different container and allow them to communicate with each other.
Due to data security Web and Redis can't be accessed directly by internet, the traffic can only come in from ALB.
- Build a 3-tier web architecture. Put Front-end, Back-end, Database in different containers.

- Create a VPC environment.
- Prepare the Dockerfile & Docker-Compose and build it into image.
- Use command to create ECR repository, and push images to it.
- Create ECS Cluster and Task Definition.
- Create Application Load Balancer.
- Add the Task to ECS Service.
- Basic understanding of AWS VPC, ALB, and Container knowledge.
- Make sure the region is US East (N. Virginia).
- Download the source file and project:
- Go to CloudFormation
- Use CloudFormation template (vpc.yaml) to setup VPC network.
- We automatically generate the Public Subnet x2, Private Subnet x2, Security Group x3.
- Go to AWS Cloud9, click create environment
- Type the name you like.
- Let all setting default. Then Create environment.

- Go to EC2 Instances console.
- Find the instance we create through Cloud9, right-click and find Security, then click Modify IAM role.
- In Modify IAM role, select Allow EC2 Access ECR.


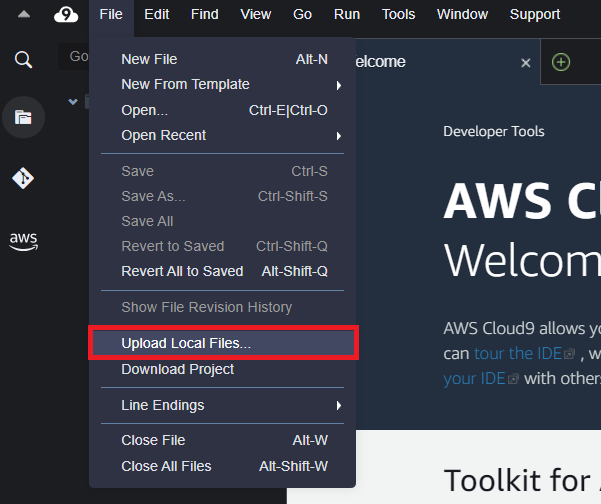
- Go back to Cloud9 IDE and upload local files. (microservice_with_ECS)
- There will have four files in the left panel.
- First, in the command-line interface, install docker-compose.
sudo curl -L https://github.com/docker/compose/releases/download/1.22.0/docker-compose-$(uname -s)-$(uname -m) -o /usr/local/bin/docker-compose # Enable executable permissions sudo chmod +x /usr/local/bin/docker-compose # Confirm installation is successful docker-compose version - Second, login to AWS.
$(aws ecr get-login --no-include-email --region us-east-1) - Third, create an ECR repository from docker-compose using aws-cli.
Remember update
{ID}.dkr.ecr.{Region}.amazonaws.comin.envfilefor r in $(grep 'image: \${DOCKER_REGISTRY}' docker-compose.yml | sed -e 's/^.*\///'); do aws ecr create-repository --repository-name "$r"; doneUse
grepto findimage-namein the docker-compose.yml. And use For-Loop to automatically generate ECR repository. - Then, build docker-compose into images.
docker-compose build - Finally, push images to ECR.
In docker-compose
image, we already tag image and repository.docker-compose push

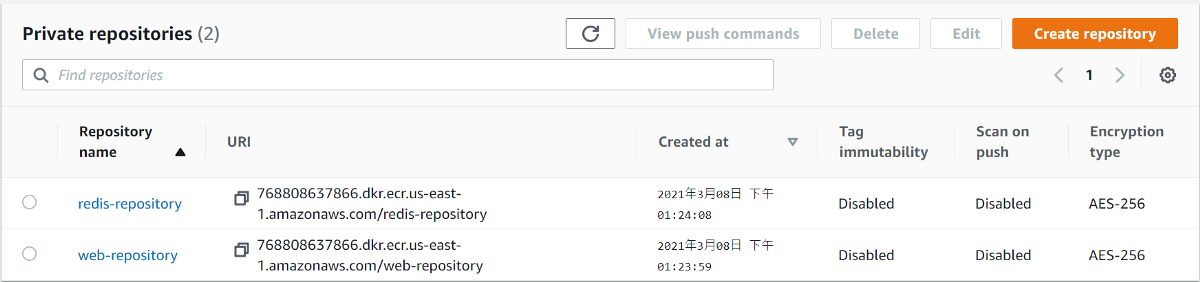
- Go to ECR, click into repository, you will find there has a image you just pushed from Cloud9.

- Go to ECS console -> Cluster.
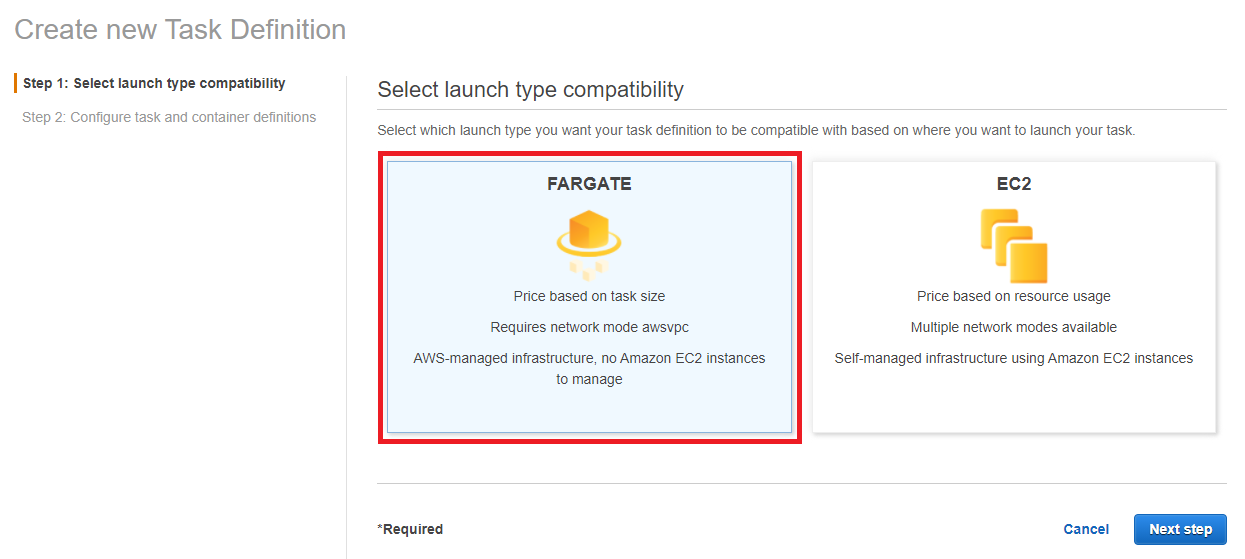
- Choose Fargate as a launch type.
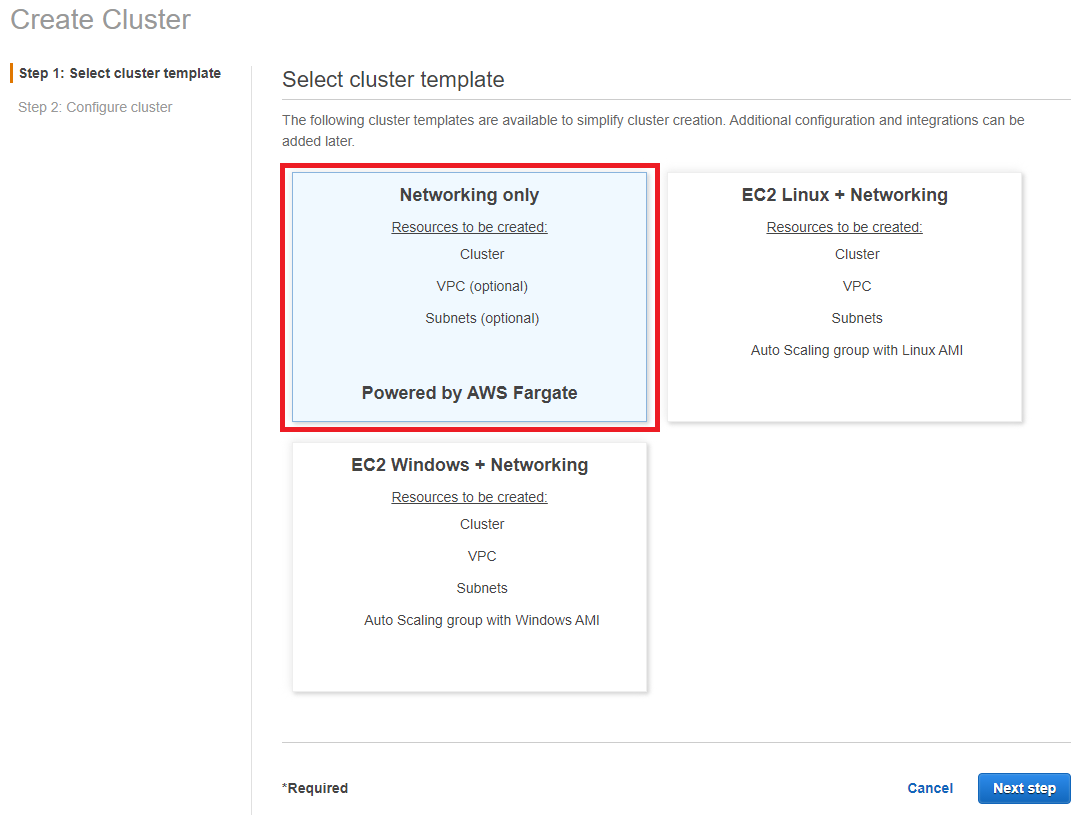
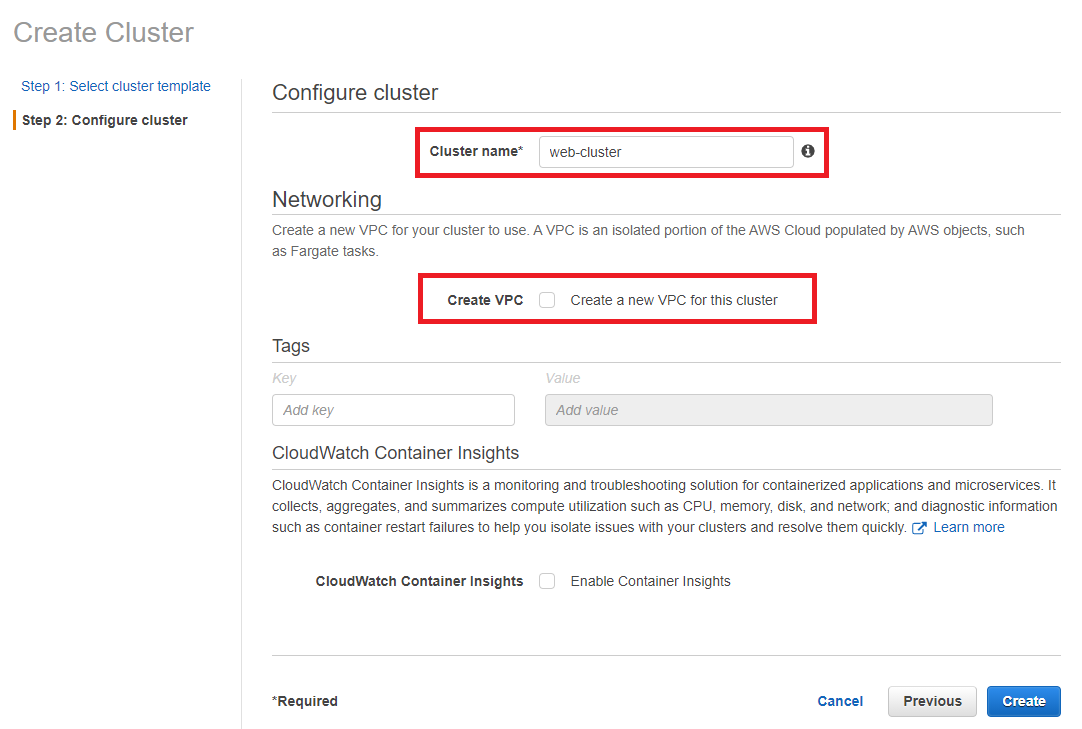
- In Networking, do not Create VPC. We already setup vpc network from CloudFormation.


In this section, we put the two containers (web & redis) in the same Task Definition.
- In ECS console, click Task Definitions in the left penal.
- Choose Fargate as a launch type.
- In Task Definition Name, type web-redis-task.
- In Task Role, select ecsTaskExecutionRole.
If the launch type is Fargate, Network mode is fixed to awsvpc.
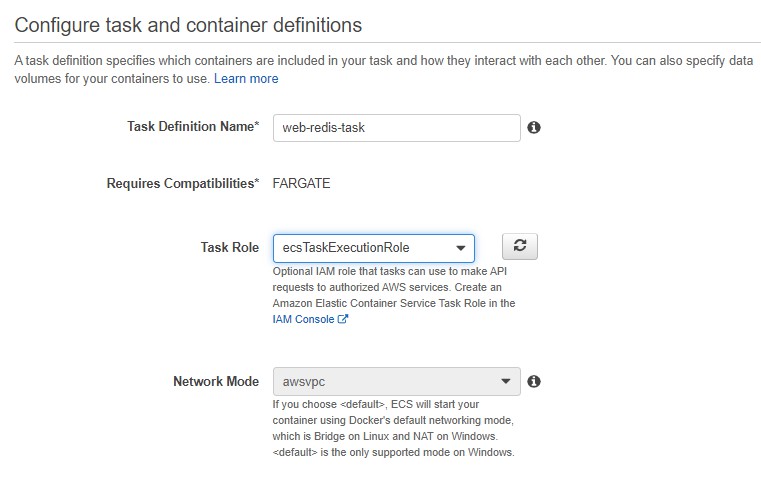
- In Task size, select Task memory and CPU.

- In Container Definitions, click Add Container.
- Find web Image URI from ECR.
- In Port mappings, type 8000 as expose port.
- Click Add. We have completed the creation of web container..
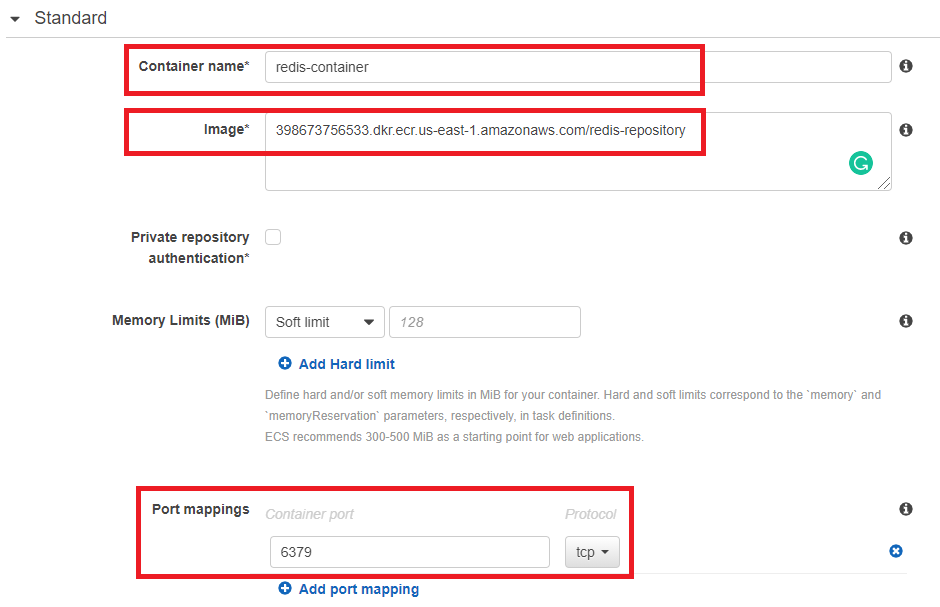
- Find redis Image URI from ECR.
- In Port mappings, type 6379 as expose port.
- Then, click Add. We have completed the creation of redis container.
You can choose paste repository-url, or {image name}:{tag} as an image.
If you choose repository-url, when you push the same image into ECR, task will always select the image which tag is the latest.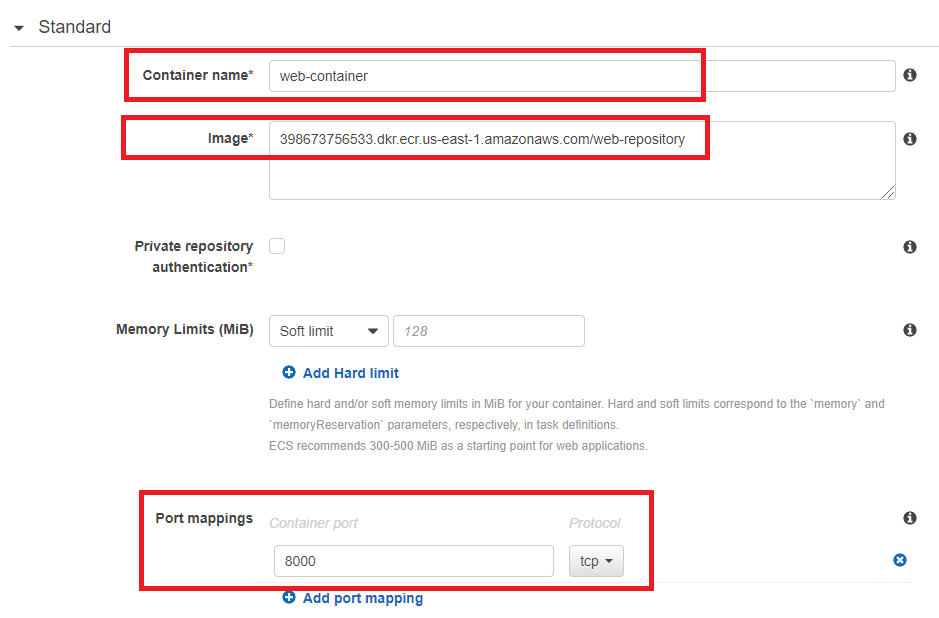


In Container Definitions, Storage and Logging has already set up CloudWatch by default.
If you run container has any problem or bug, can go to cloudwatch to check logs.
Also, you can setup the file you want to mount between local and container in this part.
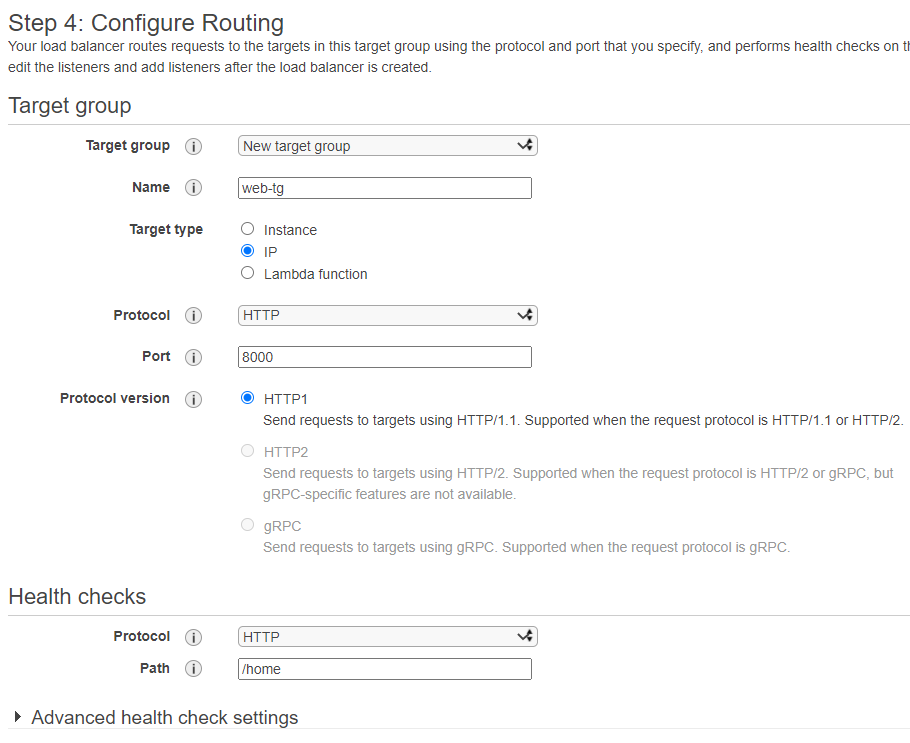
In this section, we let Load Balancer listen port 80 and forward all traffic from port 80 to port 8000 of the web.
So it is importent to set right Listen (80) and Target Group (8000).
- Go to EC2 -> Load Balancers
- In load balancer type, choose HTTP/HTTPS.
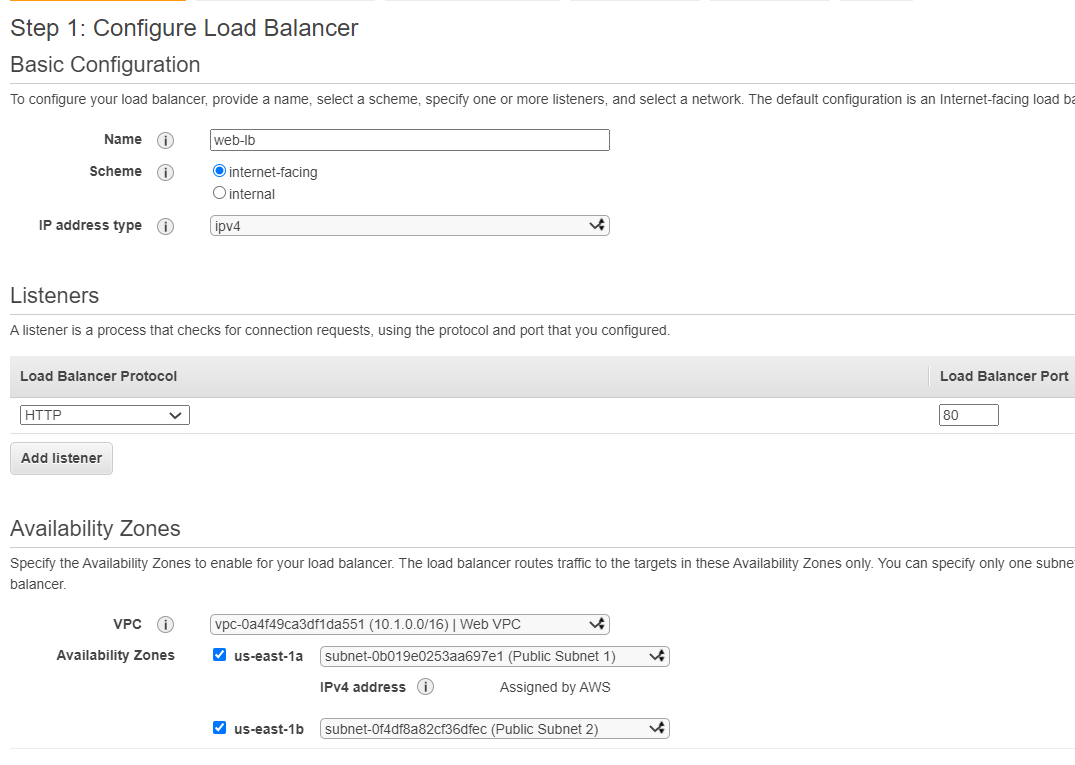
- In Basic Configuration
- In Name, type web-lb.
- In Scheme, choose internet-facing.
Internet-facing routes : requests from clients over the Internet to targets.
Internal routes : requests from clients to targets using private IP addresses. - In Listeners, type 80 Port.
- In Availability Zones, choose Web VPC and Public Subnet. So that you can use public DNS name to access website.
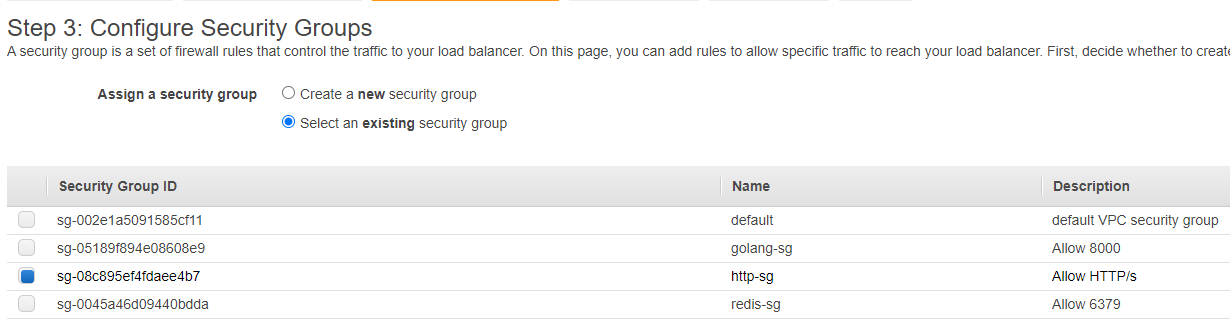
- In Configure Security Groups
- Choose http-sg, which allows traffic enter from 80 & 443 port.
- Choose http-sg, which allows traffic enter from 80 & 443 port.
- In Target Group
When the traffic enter, Target Group control which resource should be redirected to.
- In Target Type, select IP.
- In Port, type 8000, which is web's port.
- In Health checks, type /home as path. ALB will ping this URL to check website is healthy or not.


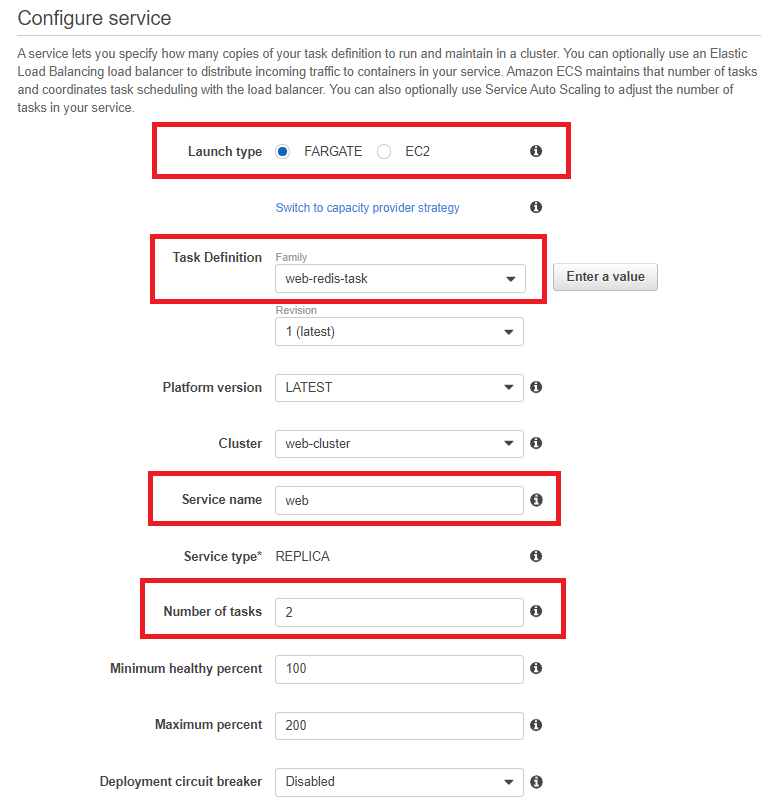
- In the Services, click Create.
- In Configure Service
- In Launch type, choose Fargate.
- In Task Definition, select web-task.
- In Service name, type web.
- In Number of tasks, type 2.
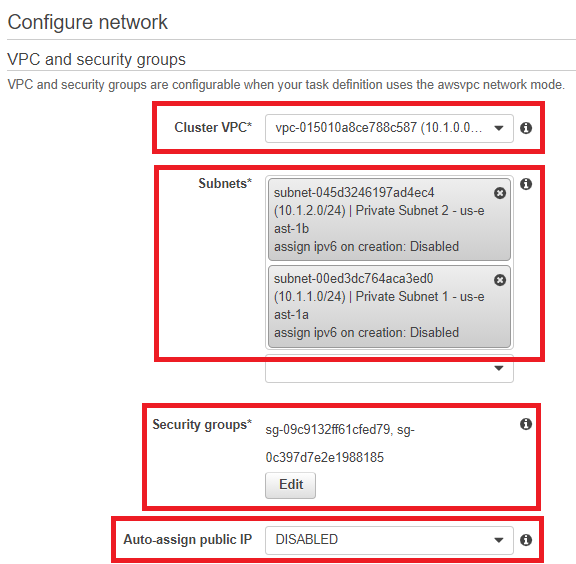
- In Configure network
- In Cluster VPC, select Web VPC we create from CloudFormation.
- In Subnets, we put container into Private Subnet.
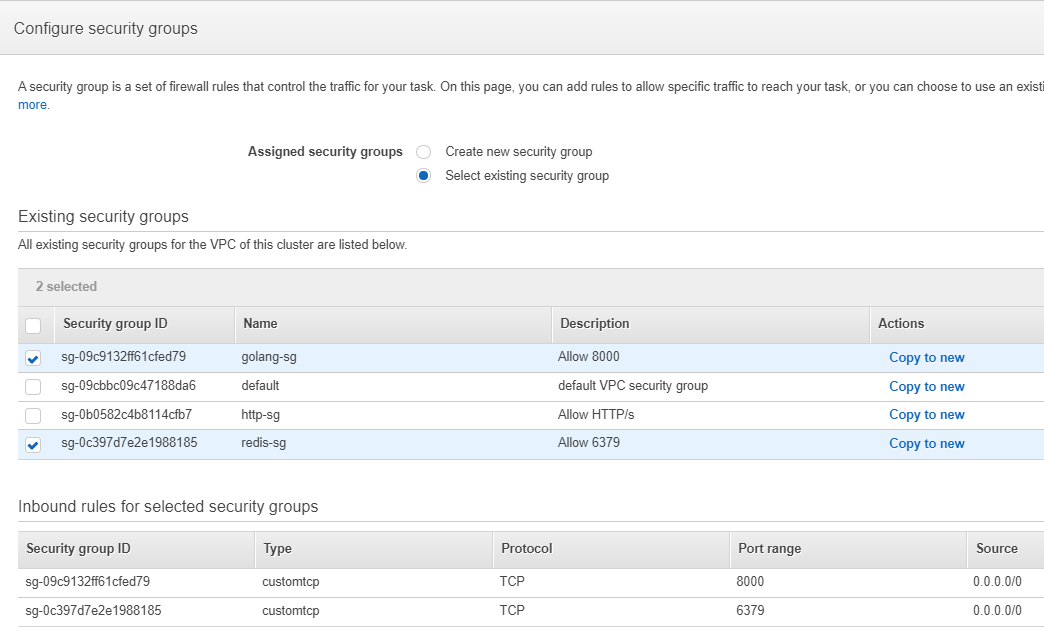
- In Security group, click Edit, and select golang-sg & redis-sg, which allows traffic enter from 8000 & 6379 port.
- In Auto-assign public IP, select DISABLED.
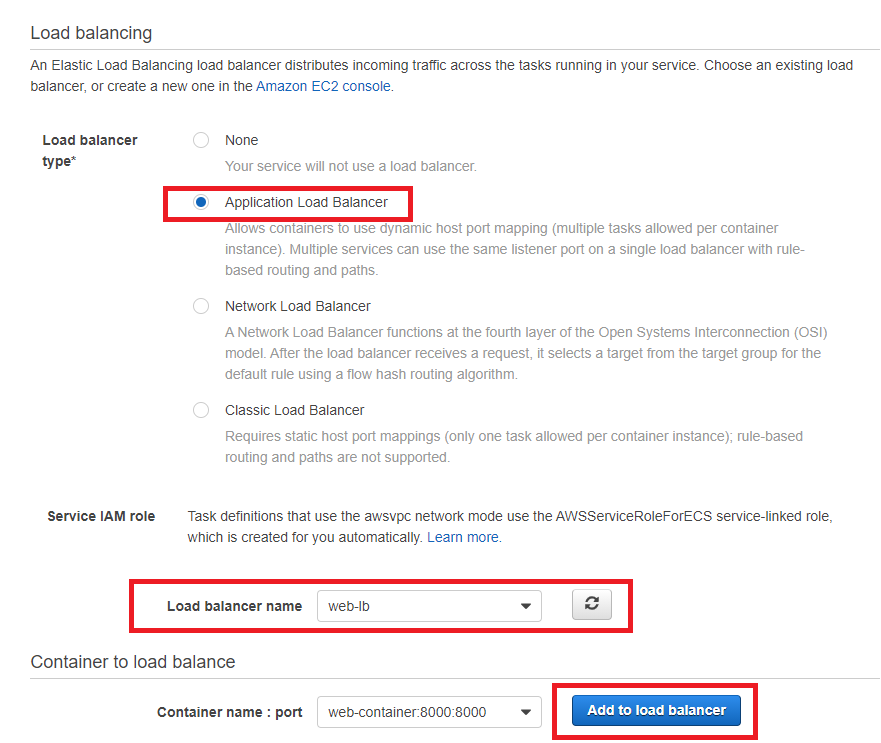
- In Container to load balance
- Click Add to load balancer.
- In Load Balancer name, select web-lb.
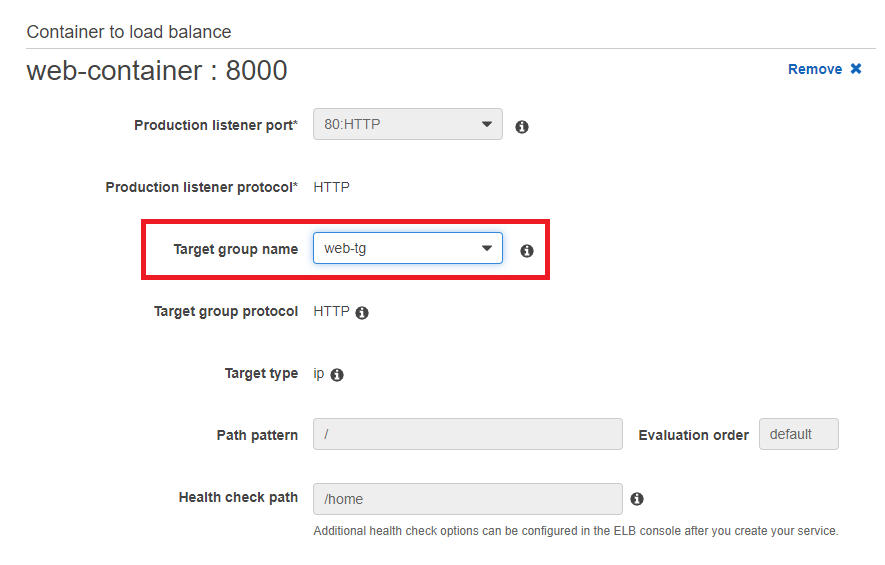
- In Target group name, choose web-tg, which created from ALB.


- Wait for Last status of tasks on ECS cluster change to "RUNNING".
- Go back to EC2 -> Load Balancers, select the load balancer you created.
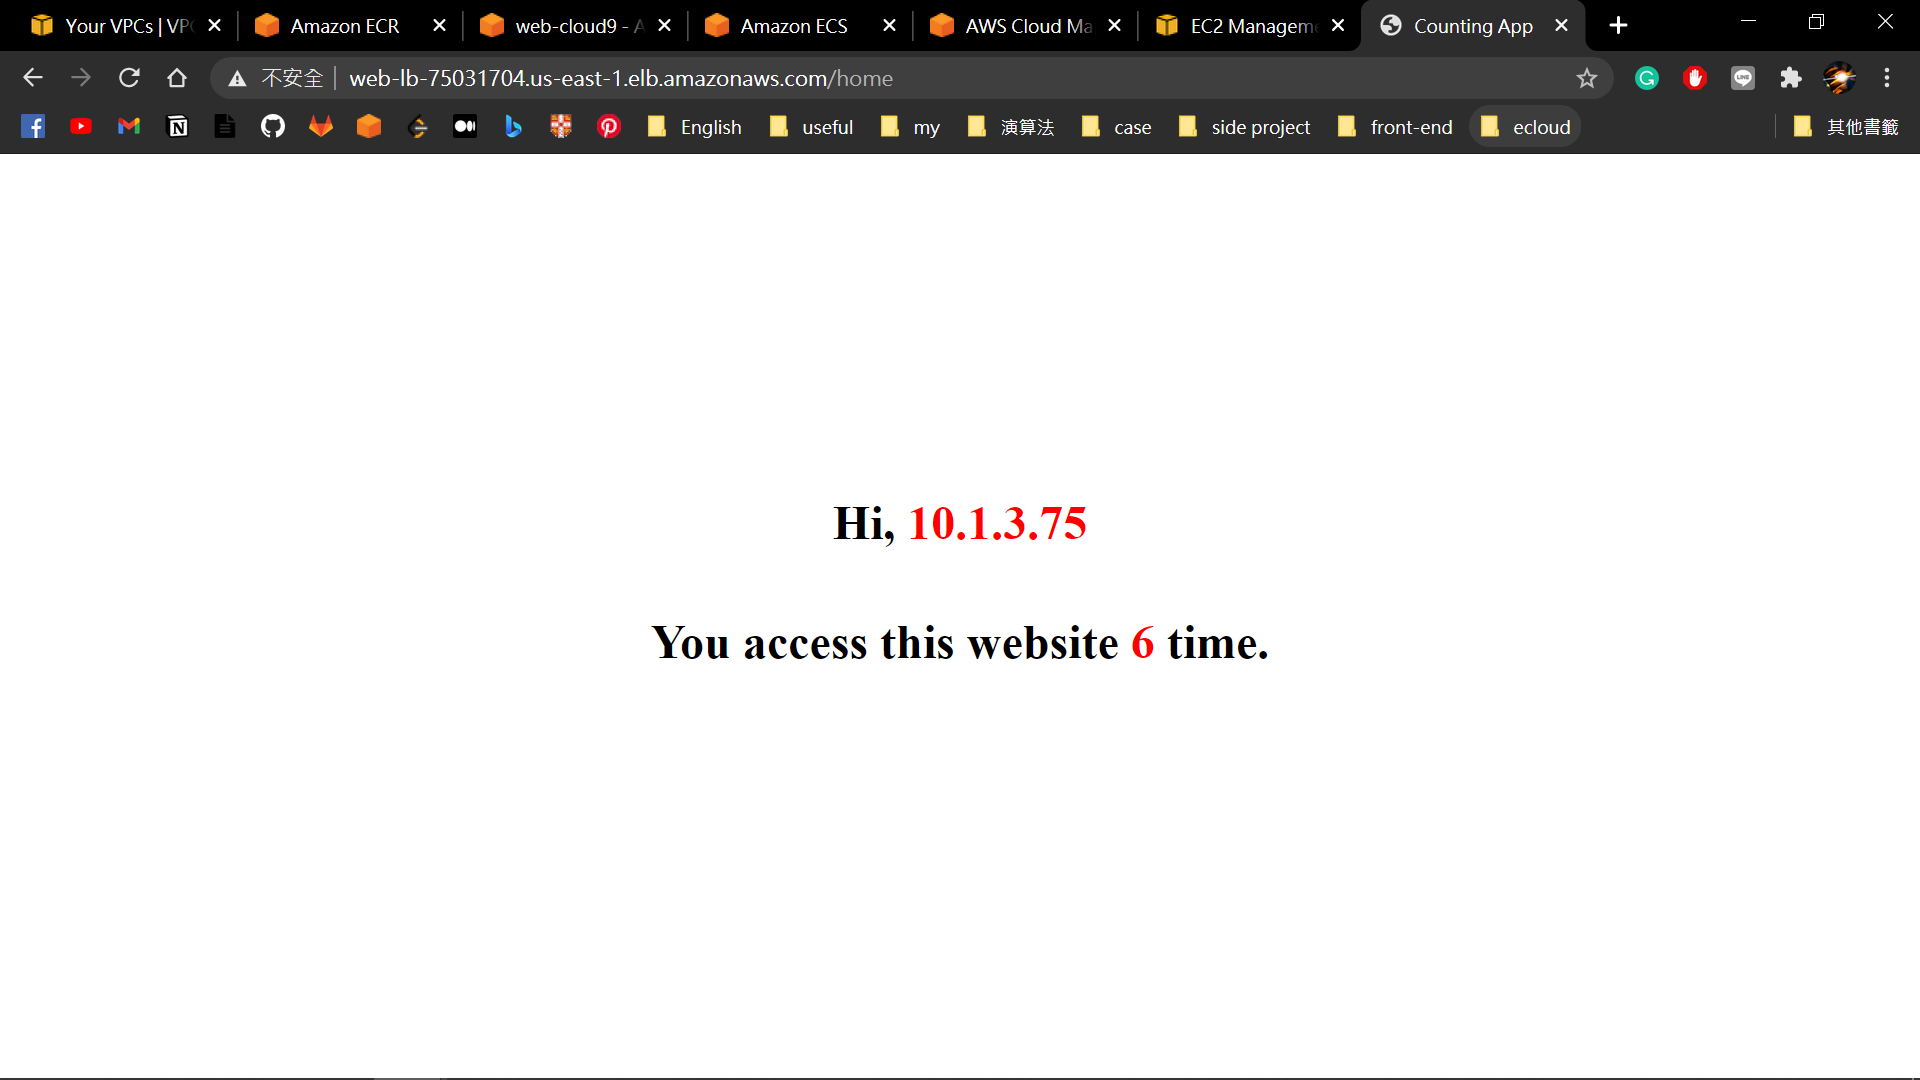
- Copy DNS name, add the path "/home", and paste to browser. You will see your IP and the number of visits to the website.

Maybe you will confuse, why Web can connect to Redis? We didn’t set anything.
The key point is we put web and redis container in the same task definition.
Also, you can find the variable RedisEndpoint is setting as “localhost:6379” in the code of main.go.
According to official document:
In Fargate, when you launch multiple containers as part of a single task, they can also communicate with each other over the local loopback interface. Fargate uses a special container networking mode called awsvpc, which gives all the containers in a task a shared elastic network interface to use for communication.
Each task has its own Elastic Network Interface (ENI) which include a private IP.
The multiple containers in an ENI can share the same network.
That is the reason why IP address set to “localhost” or “127.0.0.1” can run.

Alternatively, if you put the containers in the different Task Definition, the localhost won’t be work because the two tasks have different network environments.
There has another solution called “Service Discovery”, which combined with “AWS Cloud Map”.
If you are interested in, try it.
Congratulations!!
You have learned how to use AWS ECS to create containers, and allow containers to communicate with each other.
Next time you want to deploy a website, there is a lightweight way you can choose, run on the container instead of the VM.
AWS ECS Developer Guide
AWS Cloud Map Developer Guide
Task Networking in AWS Fargate
How to make two containers connectable in AWS ECS Fargate?
docker-compose push image to aws ecr
Docker-Compose: Image and build together