My Water Chain Project
Youtube VideoAbout The Project
My water chain is a waste-water management and monitoring project that embeds the security and transparency of BlockChain Technology along with the ease and effectiveness of IoT to reduce water exploitation and provide high-quality maintenance of wastewater.
"My water chain" allows the consumers (such as water industries and water parks) to monitor their water resources precisely and the waste generated. Specific Water coins (known as water drops) are provided to the industries based on their monthly performance. These coins can be used by industries to use water optimally and purchase water assets and allowances from all the locally performing industries.
The providers can understand the resource utility better with reliable and accurate IoT connectors that are interfaced and push water data every hour that includes "Flow Rate," "Conductivity Measure," "Solid Waste," "Spectral Measure," and "Optical Measure."
The project is an attempt to come up with an innovative application rather than the conventional use of BlockChain and follow the Hardware-Software approach and provide the most accurate data that will help in getting the best possible insights. These insights will be focusing on the prevention of water resource exploitation and take a step towards its effective utilization.
Table of Contents
Project Components
The three major project components are as follows:
BlockChain
We're using Blockchain to bind the sensor Data and record them in real time on hourly basis. The main objective to use blockchain for sensor data is to have a decentralized unaltered system for data storage and facilitate data transparency and verify compliance with set targets and contracts.
All the water allowance are credited to user's account via BlockChain protocol where they make a transaction using water drops (Transaction Currency) and purchase extra allowance on monthly basis. Blockchain ensures security and transparency. It also allows to know about your local competitors.
BlockChain Implimentation

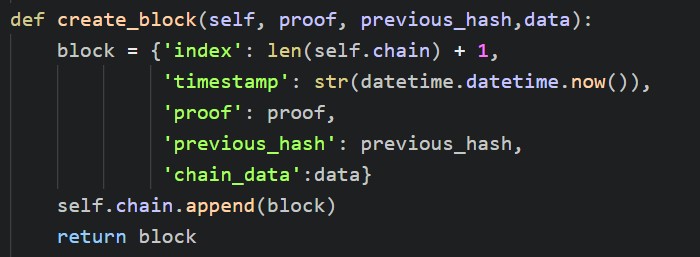
    We have implemented custom blockchain protocol using Python Programming.
    This helped us in customizing the blockchain as per the needs of
    the IoT meters and web-servers. Two parallel chains are implemented
    which include:
        1. A chain for all the IoT data readings
        2. A chain for all the transaction purposes
    The libraries used in implementing the blockchain are:
        1. hashlib (For all sorts of encoding purposes)
        2. json (For json dumping blocks)
        3. datetime (For adding time-stamps)
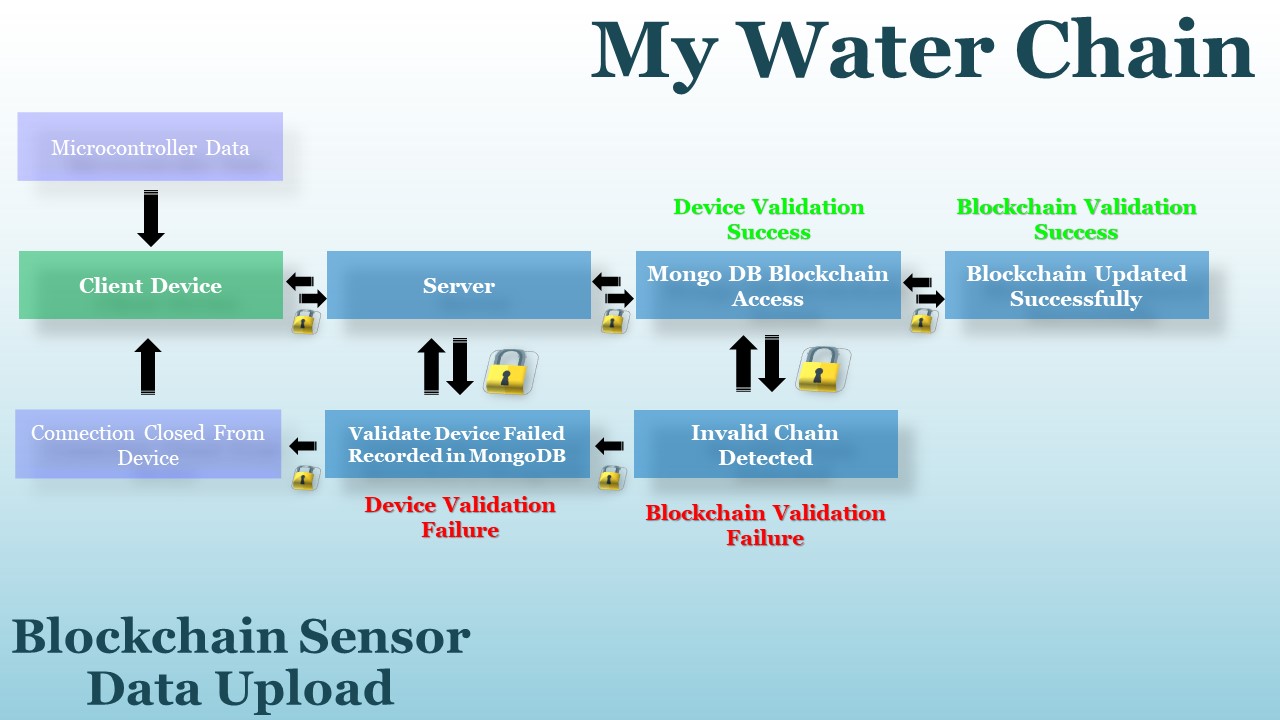
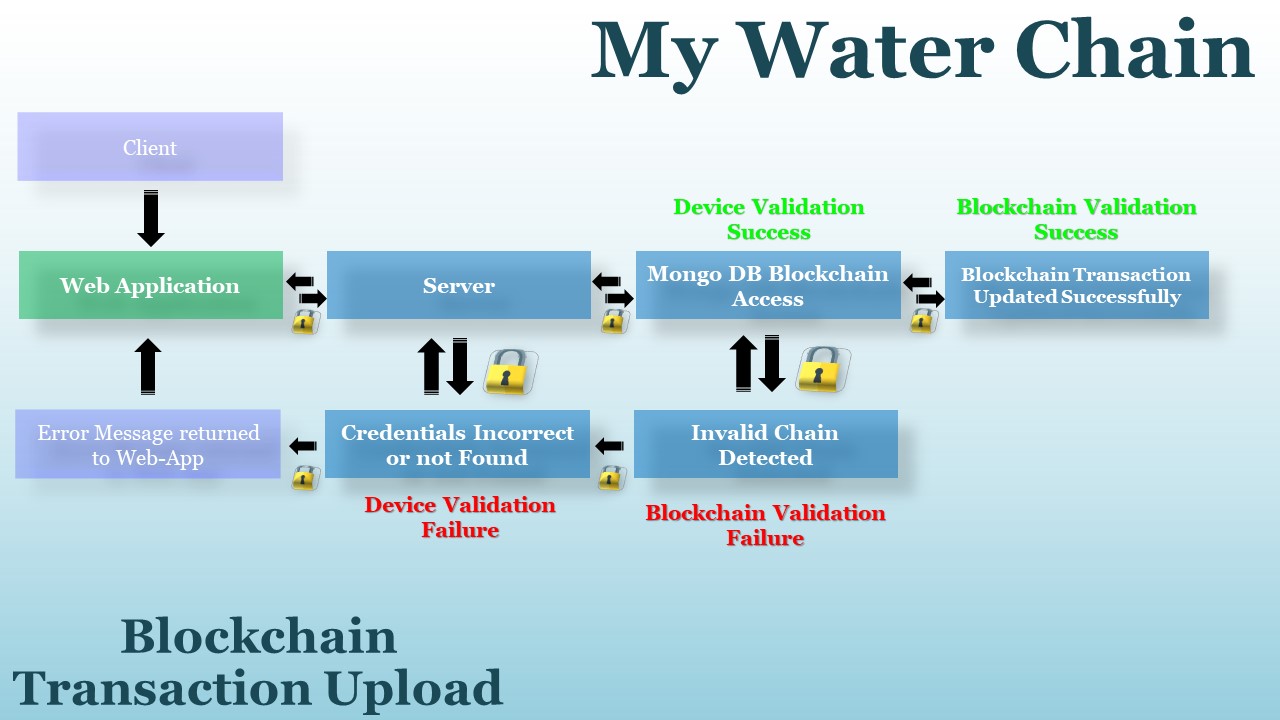
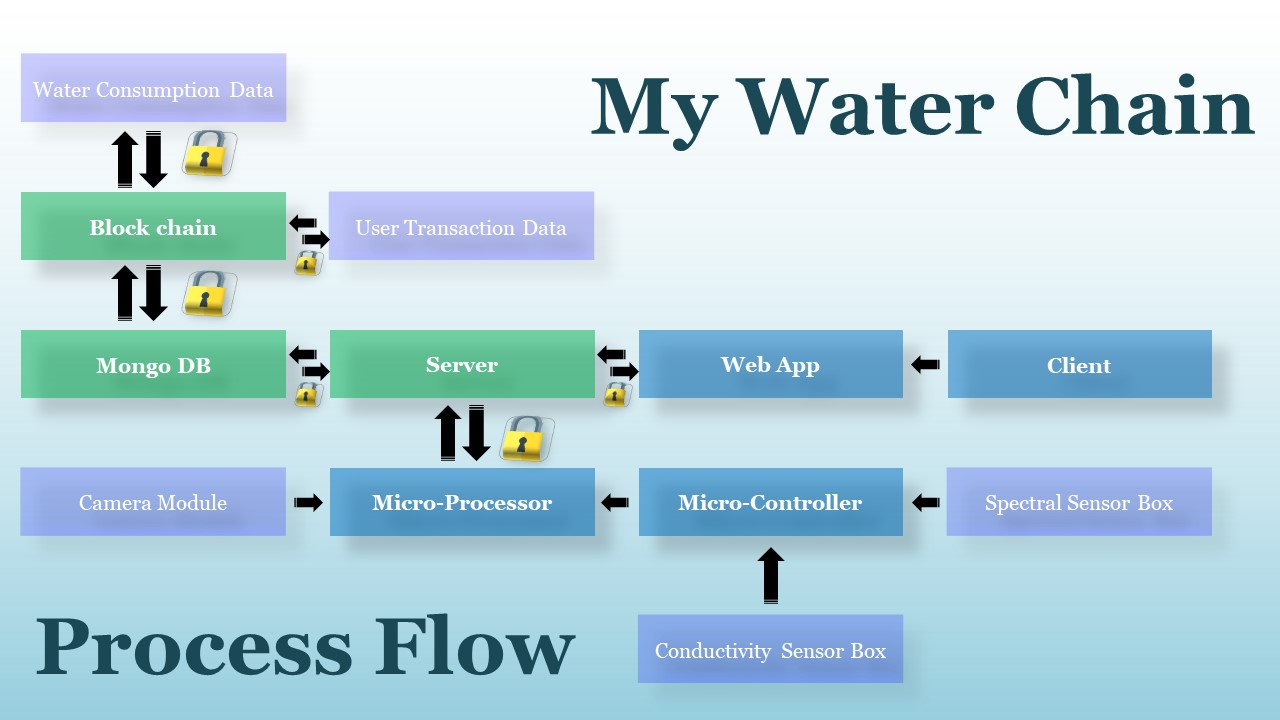
Further here's the process flow of the two blockchain processes that take place within the given architecture:
IoT
IoT is the heart of this project. IoT devices are used that allow to read the water data in real time, look for tamperings, give an alert on leakages or faults and enable the users and industralists to get better insights about their consumptions and water conservation practices.
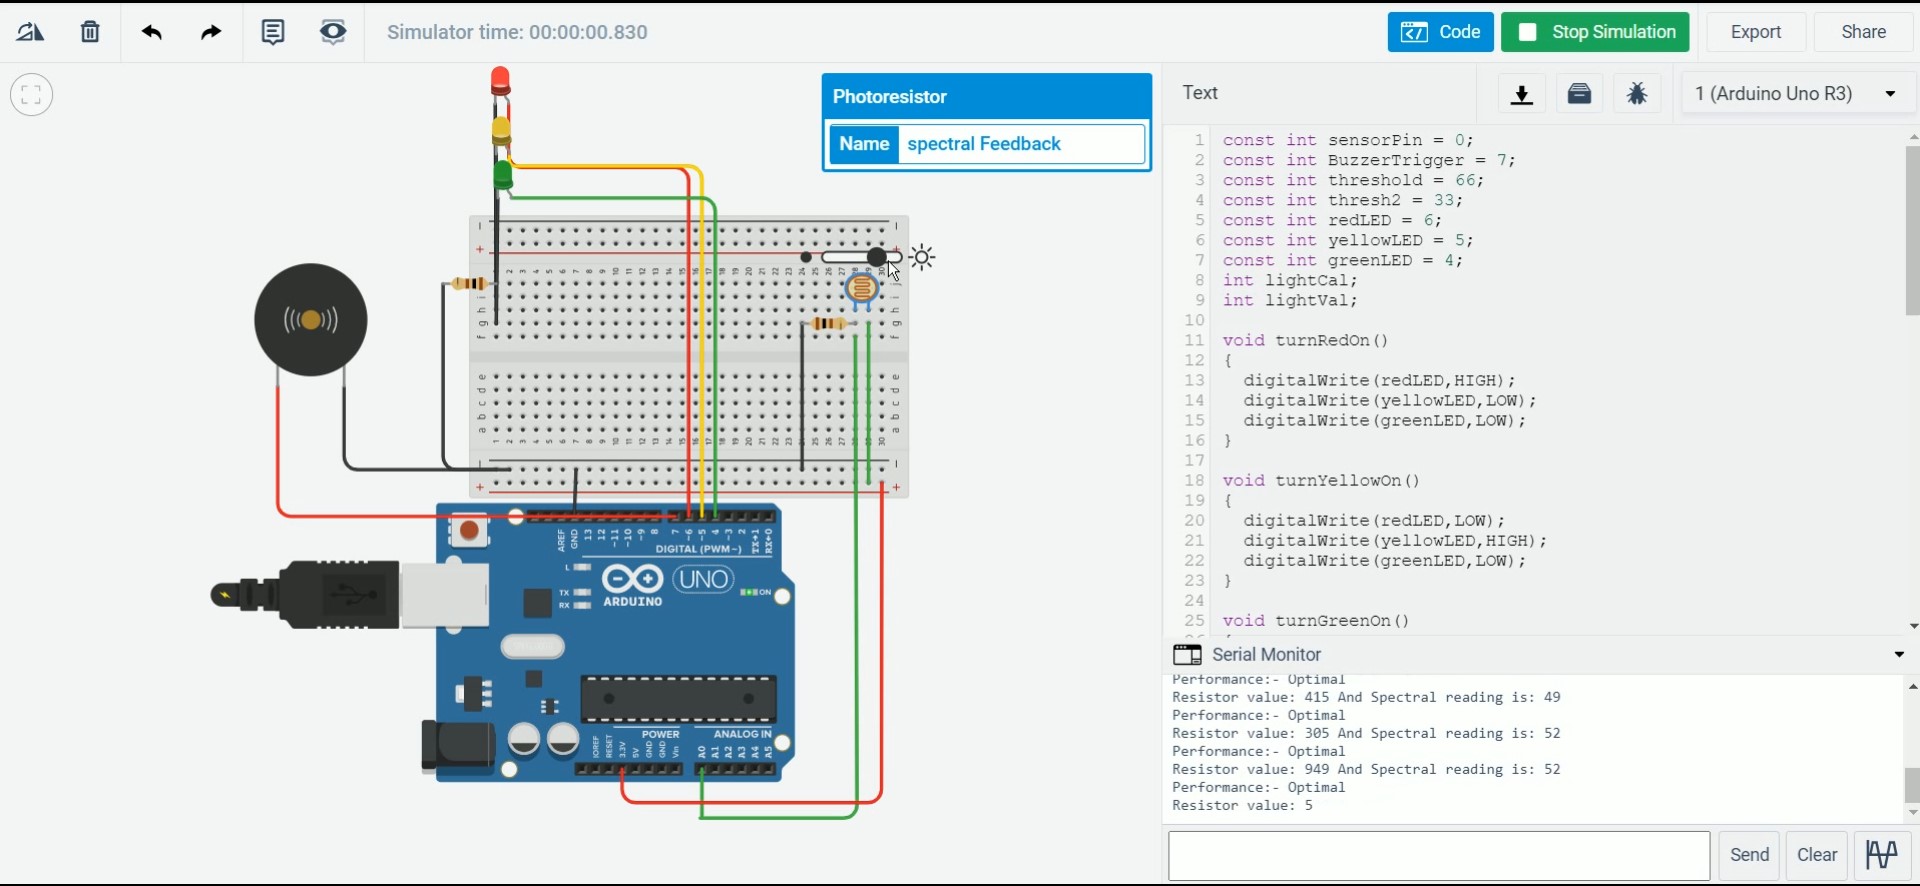
Iot Box consists of a Raspberry Pi which is interfaced to an arduino and a camera module. Further the arduino communicates with a resistive feedback circuit (used to measure conductivity) and spectral circuit which is used to determine the concentration of dissolved micro-solutes and colloids.
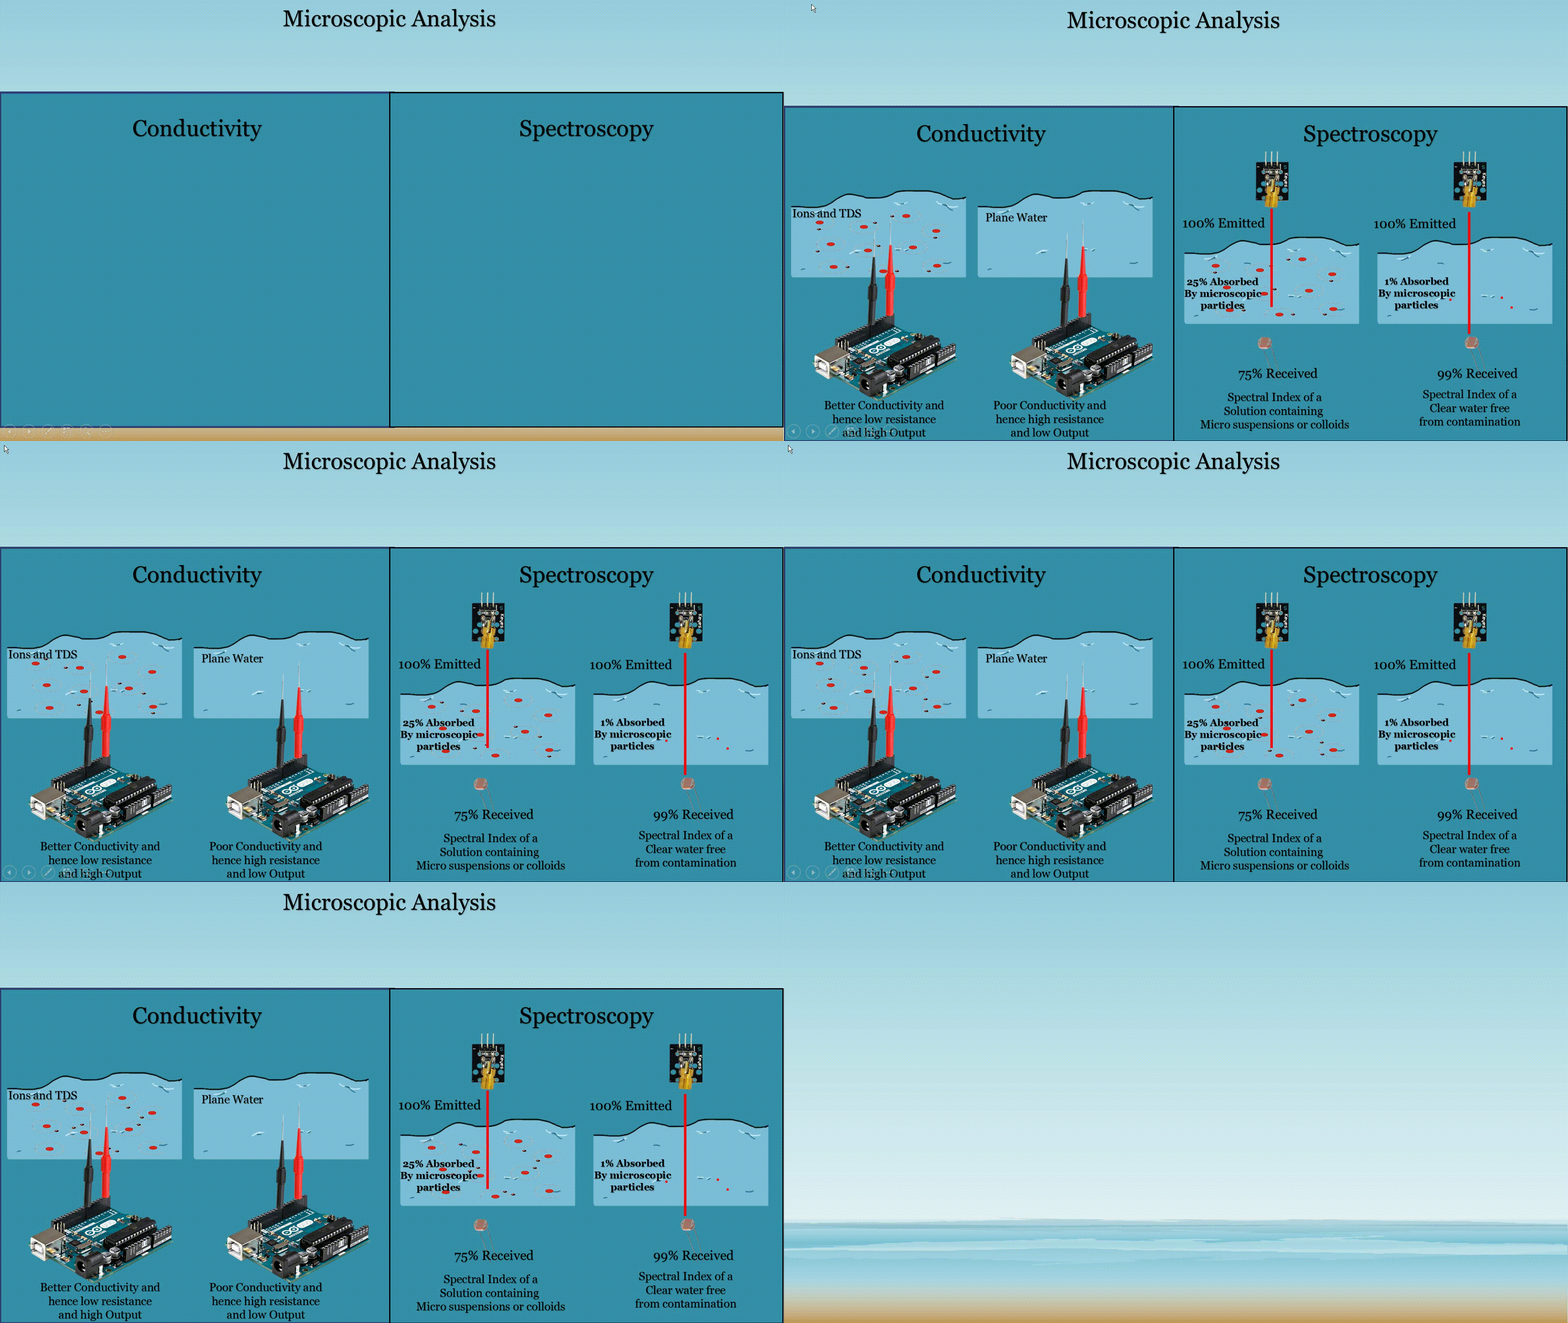 Conductivity & Spectroscopy Application
Computer Vision
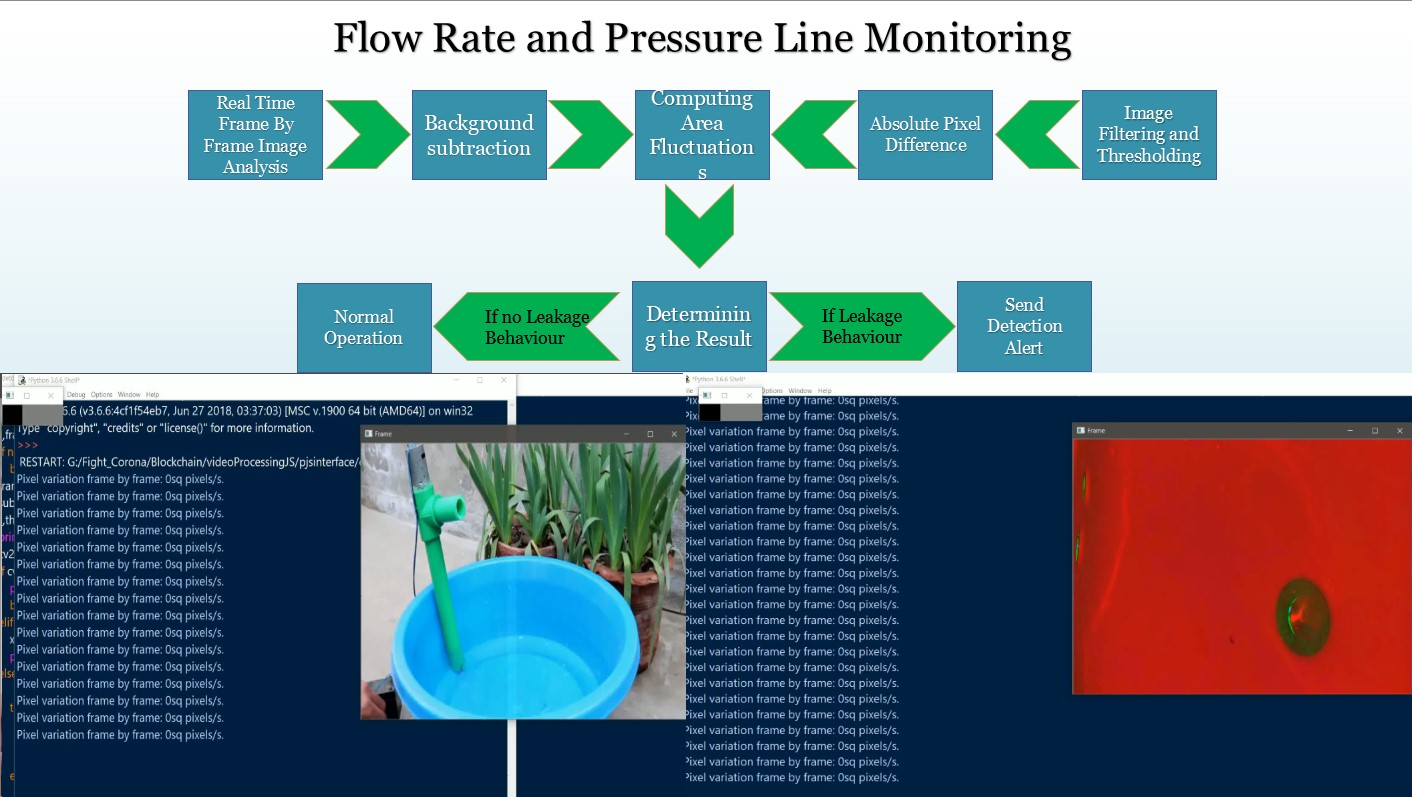
With the help of computer vision, we have been successfully attempting multiplle non destructive testing based on visual properties of water. These include flow rate, solid floating wastes and histogram comparision.
The following methodologies are used for incorporating computer vision algorithms:
- Flow Rate Detection & Pressure Line Monitoring
- Solid waste Detection
- Histogram analysis
LivePeer Real Time Streaming
With the help of LivePeer API Documentation, we have created a LivePeer Python library to post and get requests to perform streaming. For this you must need API key and save that key in API_Key.json as shown below:

Update: No need of manually setting up the Key... Here's how you can automate it after just putting your API Key in the above Field:
Once you type out API Key in the API_Key.json file nothing else needs to be done. LivePeer.py will automatically set up rest of the things for you!
Location to credential file is here
You may keep the other fields empty initially. Once you have entered the json fields, then you can run the following function to obtain Server, StreamKey, id, playbackID:
def configureKeys(path):
    with open(path) as f:
        data = json.load(f)
    return data


LivePeerjsonBody = configureKeys(jsonBodypath)
apiKey = configureKeys(apiKeypath)
livepeer = LivePeer(apiKey,LivePeerjsonBody)
livepeer.DisplayStreamingDetails()
Once you run DisplayStreamingDetails You will get all the data about Server, StreamKey, id and playbackID.
Now just paste it back to your In future I have planned to automate it further and make it even more friendly to push query.API_Key.json before using LivePeer functions.
All the functions provided are self explainatory and allow to perform different API actions. Once the configurations are done, you can use FetchUserUrl function to fetch the url which can be sent to user for streaming. And setting up streaming details can be viewed by DisplayStreamingDetails.
Web Dev
Web App is created using React JS as Frontend and Flask as backend. Along with Flask there are several python libraries used to create the interface.
Further, for the frontend Buttons and some other reusable components are taken from bootstrap Library.
Tools and Frameworks
The majore tools & frameworks used in this project are:
- React JS
- Flask
- OpenCV
- Pymongo
- LivePeer API
- gspread
- pandas
- RPi-GPIO
- Embedded C
Installation
Let's see the front-end and backend setup seperately:
Frontend
Web App frontend is built using React JS frame work. You can just clone the repository:
cd my-water-chainnpm inano src/components/constants/dummyconstantfiles.js
once the editor opens up the file, go to Line 38 and change
const ipaddress = 'http://localhost:5000/';
according to your required backend IP address or global server. Note that / is important to keep and you're supposed to change only the content between http:// and /. In case you're using https service you may try that out too.
Once ipaddress is setup correctly as per the ip and port, now you can save the file by Ctrl+X and then y. Once you save the file, make sure to run your backend before you start your frontend. So let's go and first setup the backend and then we will come back here.
Backend
Please make sure that you're running the model on python 3.6 or newer versions. Because f'' is used for formatting strings which is not compatible with lower versions. You may have to change it everywhere else, if you are installing it for python version <3.6 which is also not recommended.
Once git cloned, from the root folder:
sudo apt-get install python3-pipcd flask-backendpy -3.6 -m pip install -r requirements.txt(or whichever python version you're using just replace it with-3.6flag.)
Once you're done with above process, we need to do some complex stuff but that's important for the app to work. We need to setup our credentials and keys before we could access our database services.
cd my-water-chain/flask-backend/venv/ Create a json file namely secretkey.json It should be structured like:
{
    "key":"thisisarandomsecretusedtohashify",
    "mongo-db-user-name":<your-mongodb-username>,
    "mongo-db-password":<your-mongodb-password>
}
You have to enter your mongodb credentials here. Kindly note that these can be generated in your mongodb account.
now
cd modules/ && makedir credentials && cd credentials
now save two more json files here namely google_credentials.json and keyids.json.
Setting Up GSheets
You need to setup GSheets which looks like this:
Sample Sheet can be viewed here.
Note that red parts are the places you won't be changing manually as it's updated by the program itself. Make sure to give permission to the robot email created by google while you setup google_credentials.json like this:
Please ensure you keep the headers same. It's highly recommended that you don't create your own sheet and make changes to the demosheet as per your convinience.
Note that this GSheet interface is for providers and isn't to be accessed by user. GSheet Panel has been added for it's ease of usage by even a non programmer person. Please make sure you keep all headers and spellings as shown in the image, which is a recomended setting. Although you can modify these headers by changing things @ flask-backend/venv/modules/databases/gSheet_MongoDB.py
Once you add some names in bulk_associate as shown below:
You need to delete the Status Column Entries to make new associates to your database. The entries with TRUE Status means they're already existing in your database, rest anything means on triggering the function you can add them to database. To add entries to database, goto flask-backend/venv directory and run:
py -3.6 bulkAssociate.py
And now you will see all your devices associated in MongoDB Database as well as client_details tab.
Note that there are other GSheet functions to update passwords or info which are embedded in flask-backend/venv/modules/databases/gSheet_MongoDB.py. Based on the requirement, you may use up any of them.
For your reference, google_credentials.json can be generated from google cloud console and keyids.json looks like:
{
    "gSheetKey":<Your Created gSheet Key>,
    "mongoClientURI":<Your MongoDB Uri>
}
Again gsheetkey can be generated from spreadsheet url and mongoClientURI can be generated from mongoDB web interface.
google_credentials.json looks like this:
{
  "type": "service_account",
  "project_id": <id>,
  "private_key_id": <privatekey>,
  "private_key": "-----BEGIN PRIVATE KEY-----<LONG KEY STRING>-----END PRIVATE KEY-----\n",
  "client_email": <generated_email>,
  "client_id": <id>,
  "auth_uri": <uri>,
  "token_uri": <token>,
  "auth_provider_x509_cert_url": <provider_url>,
  "client_x509_cert_url": <another_url>
}
cd ../../../flask-backend/venv/modules/livepeer/
Here make another json file for livepeer credentials which looks like this:
{
  "key":<API_KEY>,
  "Server":"",
  "StreamKey":"",
  "id":"",
  "playbackID":""
}
Note that we have already discussed about setting up LivePeer Json credential file in LivePeer API Section.
Once this is done, we're all set. Now Run the backend by going to:
cd ../.. navigating to venv folder and then run:
py -3.6 waterchain.py
You should see a message which says:
Successfully configured all the admin Databases, LivePeer Streaming & GSheets.
If you see the above message that means you're good to go and ready to setup the front-end, In case you get something else, please cross check all the steps mentioned above and if you still face issues, feel free to raise the issue. I wil reach to you asap. :-)
Front-End
now since everything is done we just need to hit:
npm start
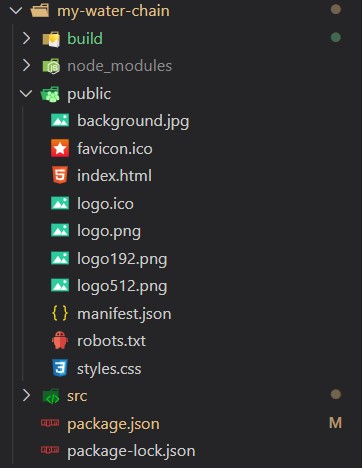
make sure you're in my-water-chain react directory. It looks something like:
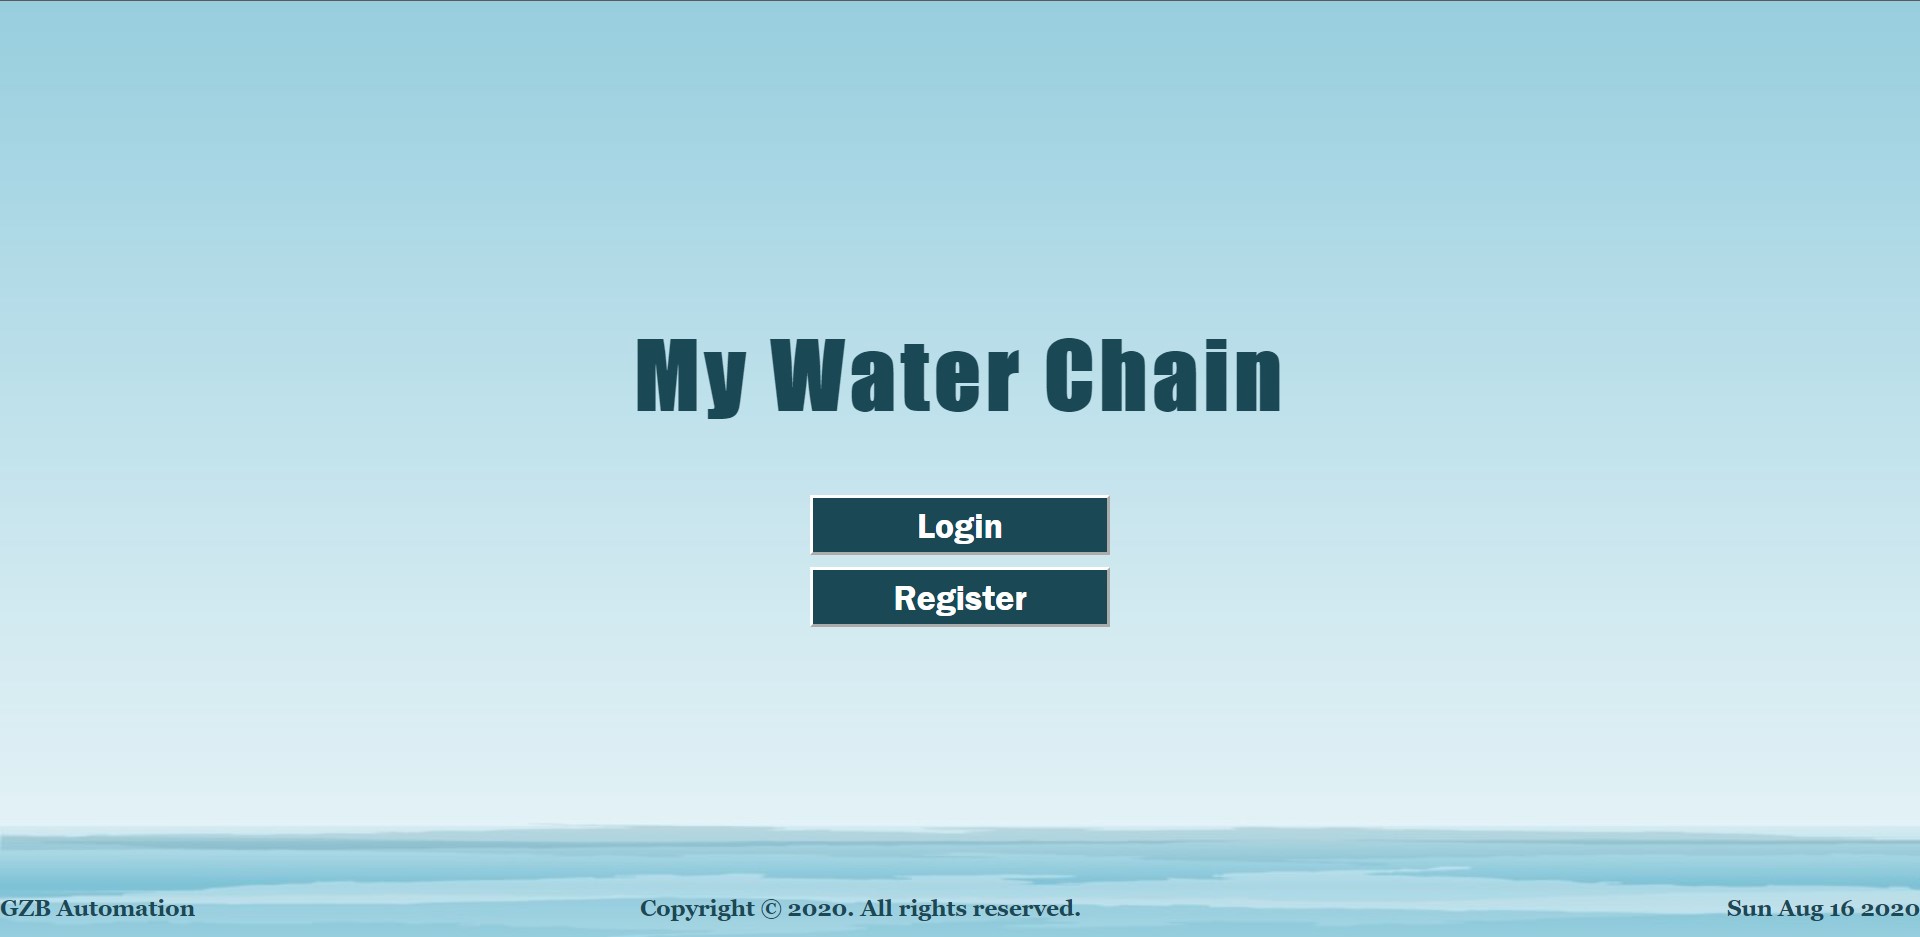
If everything works well, soon you will be able to see this screen:
Great, now log in and have fun with waterchain account! If you missed out something or still not able to get it after cross verifying from the documentation, kindly raise an issue with appropriate snapshots of your problem and error messages.
How it Works?
Here are the Flow Charts of some of the implementations:
Note that Transaction chain is always verified before each transaction at the server end.
What's Next?
We're looking to further improve it's functionalities, add more useful services and integrate a Deep Learning Model that could help consumers as well as providers to understand water consumption on daily basis in depth. Based on their usage, this Deep Learning Model will come up with constructive suggestions pointing about problems like uneven distributions or shortage statistics or excessive polluting or exploitation of water resources.
Moreoever, we may try to expand this technology's usage to some other domains as well where it could sound even more effective and helpful!

