Customized dynamic Message of the Day (MOTD) for Raspberry Pi
Many folks use Raspberry Pi as headless (without display) system. If you use SSH to connect to your Raspberry Pi more often and interested in changing the MOTD (message of the day), this might be the one you were looking for. There are many options available for customized motd on the web with and without ascii art. The goal was to create simple, attractive, swift and useful motd.
I prefer updating my OS manually. After the transition from Ubuntu to Raspberry Pi OS, lack of number of available updates on motd was the triggering point to develop this motd. Few custom motd on the web for Raspberry Pi OS shows the number of available updates. They used apt-check utility which was part of update-notifier-common package. It is no longer available in the RaspiOS buster. They merged the features of update-notifier-common package into unattended-upgrades add-on package. Ubuntu uses the same utility to show package count on motd. I used apt-get to parse the required information.
The process I used for the motd is the same as Raspberry Pi OS OR Ubuntu uses to show the motd dynamically. There is no third party package or tool used. It is written in bash and executes using the same mechanism as the default motd. There are multiple commands for retrieving the same information. I tested various commands for each info and used the ones that took least amount of time. This dynamic motd takes approximately 1 sec or less after entering password. This is the fastest you can get with all the information it is displaying.
Raspberry Pi 4 Model B • 2GB Memory • raspios-buster-arm64-lite
System & Distro I used for build & test. It should work on other specs as well.
-
Delete
/etc/motdfile. This file contains the static text about Debian GNU/Linux liability. You can check the contents of the file with commandsudo nano /etc/motd. Alternatively you can keep a backup of this file at some place.Delete motd file:
sudo rm /etc/motd -
Delete
/etc/update-motd.d/10-unamefile. This file prints the OS version dynamically to the default message. We will print a trimmed down version of OS through our new customized motd.Delete 10-uname file:
sudo rm /etc/update-motd.d/10-uname -
Modify
/etc/ssh/sshd_configfile. This file prints last login timestamp and location. We will print last login timestamp and location through our new customized motd.Edit sshd_config file:
sudo nano /etc/ssh/sshd_config
Find the line#PrintLastLog yesReplace it withPrintLastLog no
Save sshd_config file [Ctrl+O] & Exit nano [Ctrl+X]
Restart sshd processsudo systemctl restart sshd
NOTE:
At this point we completely removed the default motd. You can reconnect using ssh and if you followed the steps correctly you will not see any motd.
-
Copy
10-welcome&15-systemfiles from this repo folderupdate-motd.dto Raspberry Pi OS folder/etc/update-motd.dMake sure these files are under the user:group of root and they are executable. You can either use WinSCP or wget to copy/download these files to tmp folder and then move them to/etc/update-motd.dor create empty files in/etc/update-motd.dusing touch and copy/paste the contents of corresponding file in it.Change ownership of files [If needed]:
sudo chown root:root /etc/update-motd.d/10-welcome
sudo chown root:root /etc/update-motd.d/15-systemCreate empty files to copy/paste contents [If needed]:
sudo touch /etc/update-motd.d/10-welcome
sudo touch /etc/update-motd.d/15-systemMake files executable:
chmod +x /etc/update-motd.d/10-welcome
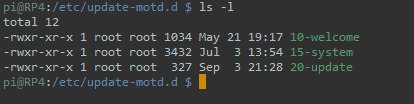
chmod +x /etc/update-motd.d/15-systemIf everything is done properly it will look something like this. Ignore
20-updatefile for now we will create it in next step:
-
Create third file
/etc/update-motd.d/20-updateas empty file using touchCreate file and make it executable:
sudo touch /etc/update-motd.d/20-update
chmod +x /etc/update-motd.d/20-update
NOTE:
If you noticed all the files we have created/copied so far have filenames starting with a number. Dynamic contents of the motd are created by PAM (Pluggable Authentication Module) running bash files from /etc/update-motd.d folder. The files are read in number order and do not need a file extension. In the default motd it was executing 10-uname file to show the OS version which we deleted earlier.
- In this step we will create static contents of our new motd. This is not entirely static, PAM will execute this information from bash file that has static contents. Static file is created from dynamic file using cronjob once a day. It is done this way to minimize startup delay. If I keep it completely dynamic (how I initially did and it was easier), the startup delay between entering the password and seeing the prompt is approximately 3-4 seconds.
-
Create a folder
/etc/update-motd-static.dEven though this folder contains the dynamic file that will generate the static file/etc/update-motd.d/20-updateI am calling itupdate-motd-static.dfor easier distinction (You can name it whatever you prefer and use the same name in automation tasks)Create folder:
sudo mkdir /etc/update-motd-static.d/ -
Copy
20-updatefile from this repo folderupdate-motd-static.dto this newly created folder/etc/update-motd-static.dMake sure file is under the user:group of root and it is executable. You can either use WinSCP or wget to copy/download this file to tmp folder and then move it to/etc/update-motd-static.dor create empty file in/etc/update-motd-static.dusing touch and copy/paste the contents of corresponding file in it.Change ownership of file [If needed]:
sudo chown root:root /etc/update-motd-static.d/20-updateCreate empty file to copy/paste contents [If needed]:
sudo touch /etc/update-motd-static.d/20-updateMake file executable:
chmod +x /etc/update-motd-static.d/20-updateIf everything is done properly it will look something like this:

-
Execute this file. This process will update the static file
/etc/update-motd.d/20-updatewith the number of pending updates (if any). We will automate this process through cronjob later.Execute file:
sudo run-parts /etc/update-motd-static.d
-
NOTE:
At this point we implemented our new motd, pending few automations. Let's test our new motd. It will verify that everything we did so far is working properly. There are multiple ways to test either you can reconnect using ssh or run the new motd from the same shell. If you followed the steps correctly you will see new motd something similar to the initial preview of this guide.Execute motd from the same shell:
sudo run-parts /etc/update-motd.d
- We are almost done. We need to automate the process of finding pending OS updates count. I did it through a cronjob which runs once a day. You can change the time and frequency based on your requirements, once a day serves my purpose very well. Below cronjob will find the count of pending OS updates once a day at 8:00pm and update it in the motd.
Create cronjob:
Open crontab for rootsudo crontab -e
Add below 2 lines at the end of the crontab file, save & close the editor# MOTD - Update '20-update' file - Once A Day At 8:00PM 0 20 * * * run-parts /etc/update-motd-static.d
NOTE:
If this is the first time you are creating a cronjob. It will ask for your preferred editor, I use nano, you can choose your preferred one.
- Last step. We need to update the pending updates count in motd as soon as we update the OS. With this new motd mechanism it will be updated at the next execution of cronjob. Let's assume you update your system manually by running commands
sudo apt update&sudo apt full-upgrade. We need to run another command after thissudo run-parts /etc/update-motd-static.dIt will reset the update count in motd as soon as we are done with OS update. Whatever your preferred way to update the OS, run this command at the very end.- I update OS manually using a bash script
update.shafter seeing pending updates in motd. This script takes care of everything that includes update OS, cleanup and update motd count.update.shis available in the repo under folderupdate-osalong with a screenshot of what it will do upon execution. It is well documented. Open and check the commands first before execution, if you need all of them. Feel free to modify it according to your requirement.
You can add switch -y tosudo apt full-upgradecommand if you want to bypass the yes/no prompt. I prefer not to have it as a last chance to review if I want to update or not. I do cleanup as well in this script usingsudo apt --purge autoremove&sudo apt clean, you can remove them if you prefer not to run these after OS update.
- I update OS manually using a bash script
NOTE:
We are done. If you are not seeing the exact colors in your motd as shown in the preview, check the Putty section below for color scheme.
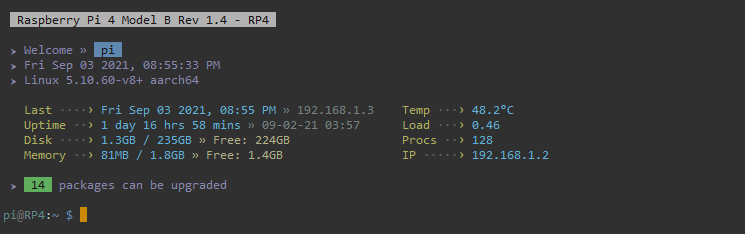
Bash script displays the welcome user message along with current timestamp and OS version.
Script shows various details of the system. It includes system temperature, memory, running processes and few more. I trimmed down on some of the labels, like I used
ProcsforProcesses,TempforTemperature,LastforLast Login. You can use full labels according to your liking and arrange them accordingly.
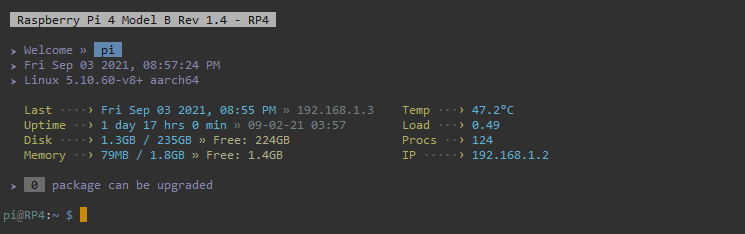
This is the static script. It is generated by
/etc/update-motd-static.d/20-updateto show the number of available updates.
Script calculates the number of available updates and generates the static file for motd display. It can be expanded to show the number of security updates separately like Ubuntu. My requirement was to see the total number only.
I use slight modification of Liquid Carbon PuTTY theme from AlexAkulov. Modified theme Liquid Carbon Mod.reg is available under this repo folder putty along with screenshots of PuTTY settings.