MLOps: Jenkins & Bring-Your-Own-Algorithm
In this workshop, we will focus on building a pipeline to train and deploy a model using Amazon SageMaker training instances and hosting on persistent Sagemaker endpoint instance(s). The orhestration of the training and deployment will be done through Jenkins.
Applying DevOps practices to Machine Learning (ML) workloads is a fundamental practice to ensure machine learning workloads are deployed using a consistent methodology with traceability, consistenc, governance and quality gates. MLOps involves applying practices such as CI/CD,Continuous Monitoring, and Feedback Loops to the Machine Learning Development Lifecycle. This workshop will focus primarily on setting up a base deployment pipeline in Jenkins. The expectation would be to continue to iterate on a base pipeline incorporating more quality checks and and pipeline features including the consideration for an data worflow pipeline.
There is no one-size-fits-all model for creating a pipeline; however, the same general concepts explored in this lab can be applied and extended across various services or tooling to meet the same end result.
Workshop Contents
For this portion of the workshop, we will be building the following pipeline:
The stages above are broken out into:
Checkout: Code is checked out from this repository
BuildPushContainer: Container image is built using code pulled from Git and pushed to ECR
TrainModel: Using the built container image in ECR, training data, and configuration code this step starts the training job using Amazon SageMaker Training Instances
TrainStatus: Check if training was successful. Upon completion, packaged model artifact (model.tar.gz) will be PUT to S3 model artifact bucket.
DeployToTest: Package model, configure model test endpoint, and deploy test endpoint using Amazon SageMaker Hosting Instances
SmokeTest: Ensure we are able run prediction requests against deployed endpoint
DeployToProd: Package model, configure model production endpoint, and deploy production endpoint using Amazon SageMaker Hosting Instances
Note: For this workshop, we are deploying to 2 environments (Test/Production). In reality, this number will vary depending on your environment and the workload.
Prerequisite
- AWS Account & Administrator Access
- Please use North Virginia, us-east-1 for this workshop
- This workshop assumes you have an existing installation of Jenkins or Cloudbees. Because the distributions may vary in look & feel, the instructions may need to be revised for your installation.
Lab Overview
This lab is based on the scikit_bring_your_own SageMaker example notebook. Please reference the notebook for detailed description on the use case as well as the custom code for training, inference, and creating the docker container for use with SageMaker. Although Amazon SageMaker now has native integrations for Scikit, this notebook example does not rely on those integrations so is representative of any BYO* use case.
Using the same code (with some minor modifications) from the SageMaker example notebook, we will utilize this GitHub repository as our source repository and our SCM into our Jenkins pipeline.
This lab will walk you through the steps required to:
• Setup a base pipeline responsible for orchestration of workflow to build and deploy custom ML models to target environments
For this lab, we will perform a lot of steps manually in AWS that would typically be performed through Infrastructure-as-Code using a service like CloudFormation. For the purposes of the lab, we will go step-by-step on the console so attendees become more familiar with expected inputs and artifacts part of a ML deployment pipeline.
IMPORTANT: There are steps in the lab that assume you are using N.Virginia (us-east-1). Please use us-east-1 for this workshop
Workshop Setup & Preparation
The steps below are included for the setup of AWS resources we will be using in the lab environment.
Step 1: Create Elastic Container Registry (ECR)
In this workshop, we are using Jenkins as the Docker build server; however, you can also choose to use a secondary build environment such as AWS Code Build as a managed build environment that also integrates with other orchestration tools such as Jenkins. Below we are creating an Elastic Container Registry (ECR) where we will push our built docker images.
-
Login to the AWS Account provided: https://console.aws.amazon.com
-
Verify you are in us-east-1/N.Virginia
-
Go to Services -> Select Elastic Container Registry
-
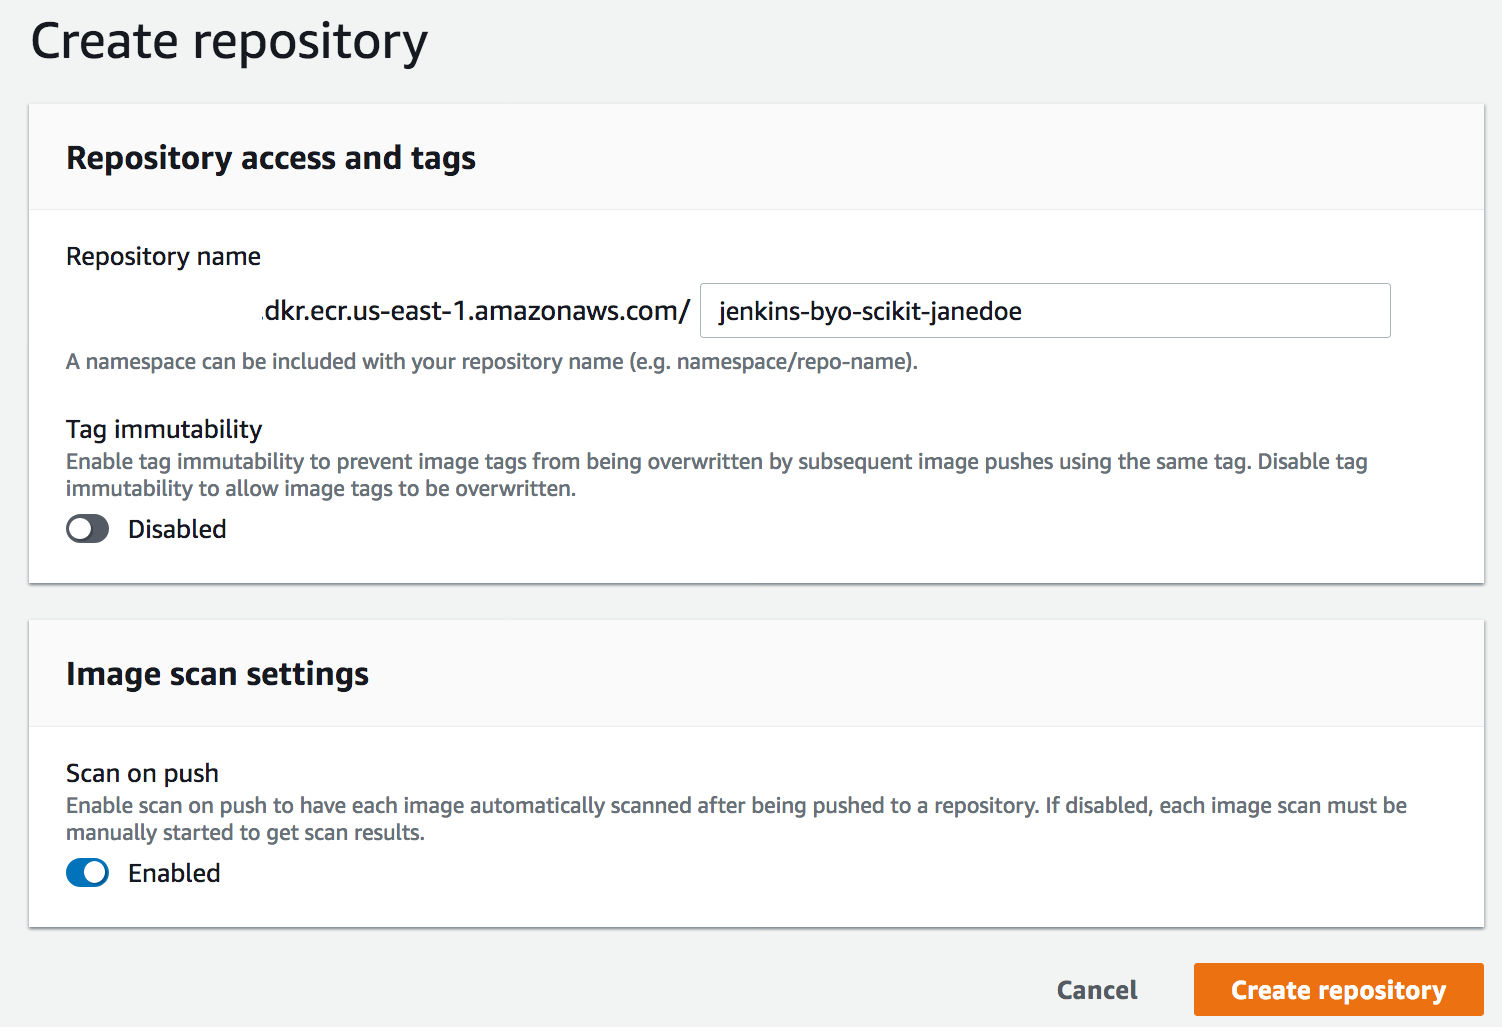
Select Create repository
- For Repository name: Enter a name (ex. jenkins-byo-scikit-janedoe)
- Toggle the Image scan settings to Enabled (This will allow for automatic vulnerability scans against images we push to this repository)
- Click Create repository
- Confirm your repository is in the list of repositories
Step 2: Create Model Artifact Repository
Create the S3 bucket that we will use as our packaged model artifact repository. Once our SageMaker training job completes successfully, a new deployable model artifact will be PUT to this bucket. In this lab, we version our artifacts using the consistent naming of the build pipeline ID. However, you can optionally enable versioning on the S3 bucket as well.
-
From your AWS Account, go to Services-->S3
-
Click Create bucket
-
Under Create Bucket / General Configuration:
-
Bucket name: yourinitials-jenkins-scikitbyo-modelartifact
Example: jd-jenkins-scikitbyo-modelartifact
-
Leave all other settings as default, click Create bucket
-
Step 3: Create SageMaker Execution Role
Create the IAM Role we will use for executing SageMaker calls from our Jenkins pipeline
-
From your AWS Account, go to Services-->IAM
-
Select Roles from the menu on the left, then click Create role
-
Select AWS service, then SageMaker
-
Click Next: Permissions
-
Click Next: Tags
-
Click Next: Review
-
Under Review:
- Role name: MLOps-Jenkins-SageMaker-ExecutionRole-YourInitials
-
Click Create role
-
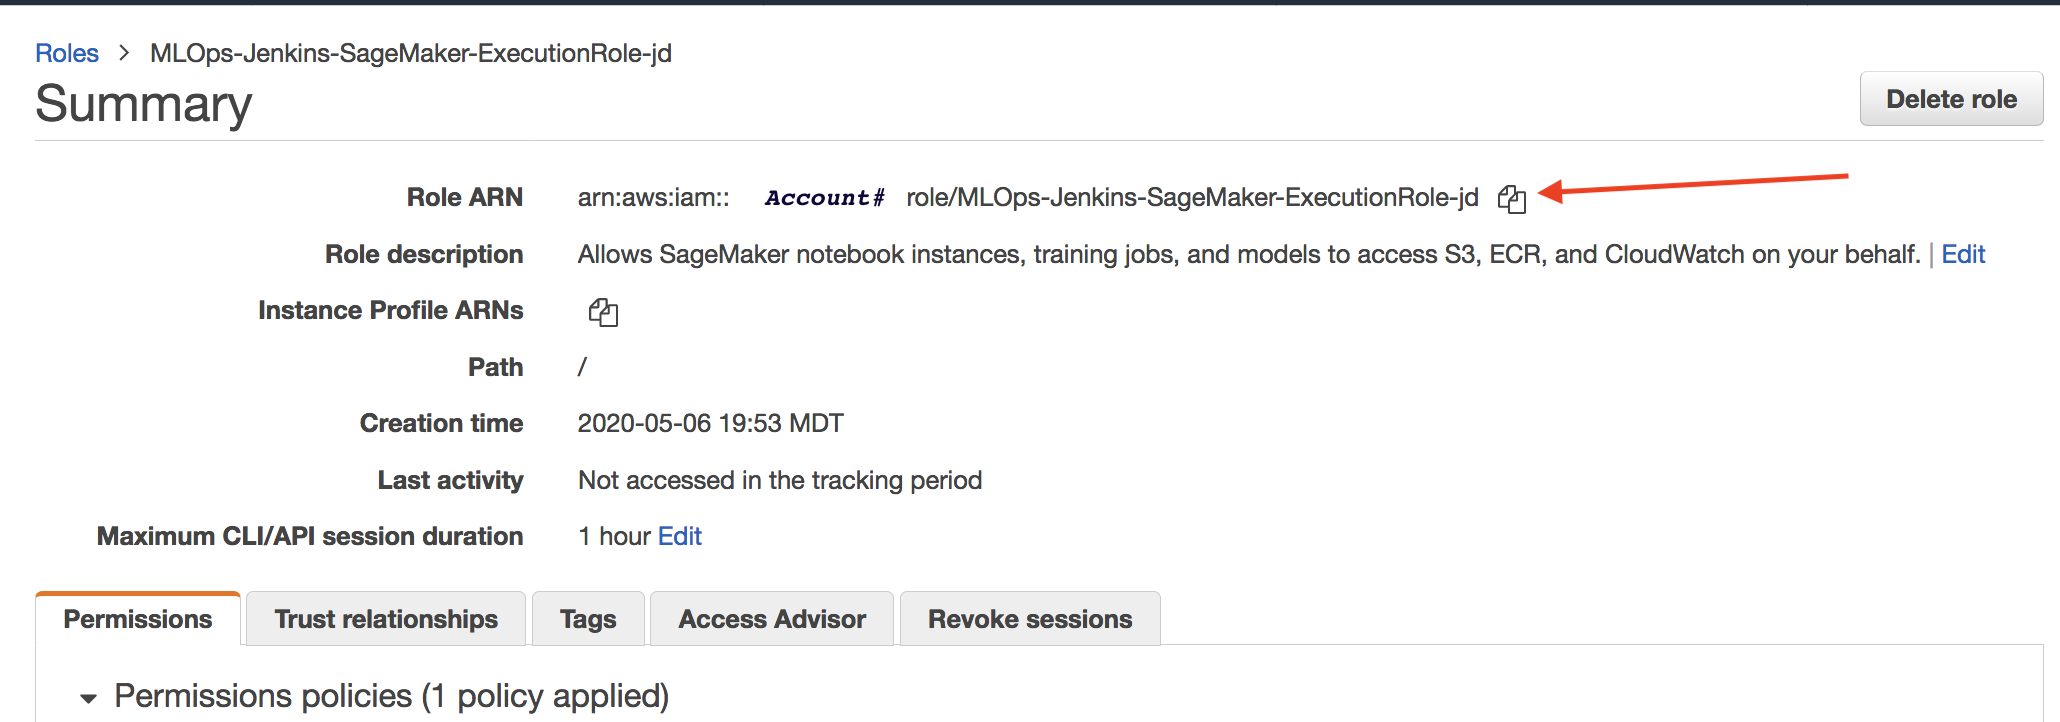
You will receive a notice the role has been created, click on the link and make sure grab the arn for the role we just created as we will use it later.
-
We want to ensure we have access to S3 as well, so under the Permissions tab, click Attach policies
-
Type S3 in the search bar and click the box next to 'AmazonS3FullAccess', click Attach policy
Note: In a real world scenario, we would want to limit these privileges significantly to only the privileges needed. This is only done for simplicity in the workshop.
Step 4: Explore Lambda Helper Functions
In this step, we'll explore the Lambda Helper Functions that were created to facilitate the integration of SageMaker training and deployment into a Jenkins pipeline:
- Go to Services -> Select Lambda
- You'll see Lambda Functions that will be used by our pipeline. Each is described below but you can also select the function and check out the code directly.
The description of each Lambda function is included below:
- MLOps-CheckTrainingStatus: This Lambda function is called from the pipeline and responsible for checking back in on the status of the previous call to create and execute a training job. This is in place because while we may get a successful reesponse back immediately on our Create Training Job request, that response indicates the request for training was successfully submitted. It does not mean training executed successfully so we need to include additional logic to check back in on the status of the training job until the job fails ('Failed') or succeeds ('Completed'). We only want out pipeline to proceed when the training step completes successfully.
- MLOps-InvokeEndpoint-scikitbyo: This Lambda function is triggered during our "Smoke Test" stage in the pipeline where we are checking to ensure that our inference code is in sync with our training code by running a few sample requests for prediction to the deployed test endpoint. We are running this step before committing our newly trained model to a higher level environment.
*Note: While the Lambda functions above have been predeployed in our AWS Account, they are also included in the /lambdas folder of this repo if you want to deploy them following this workshop into your own AWS Accounts. A CloudFormation template is also included as well to depoy using the AWS Serverless Application Model
Build the Jenkins Pipeline
In this step, we will create a new pipeline that we'll use to:
-
Pull updated training/inference code
-
Create a docker image
-
Push docker image to our ECR
-
Train our model using Amazon SageMaker Training Instances
-
Deploy our model to a Test endpoint using Amazon SageMaker Hosting Instances
-
Execute a smoke test to ensure our training and inference code are in sync
-
Deploy our model to a Production endpoint using Amazon SageMaker Hosting Instances
Step 5: Configure the Jenkins Pipeline
-
Login Jenkins portal using the information provided by your instructors
-
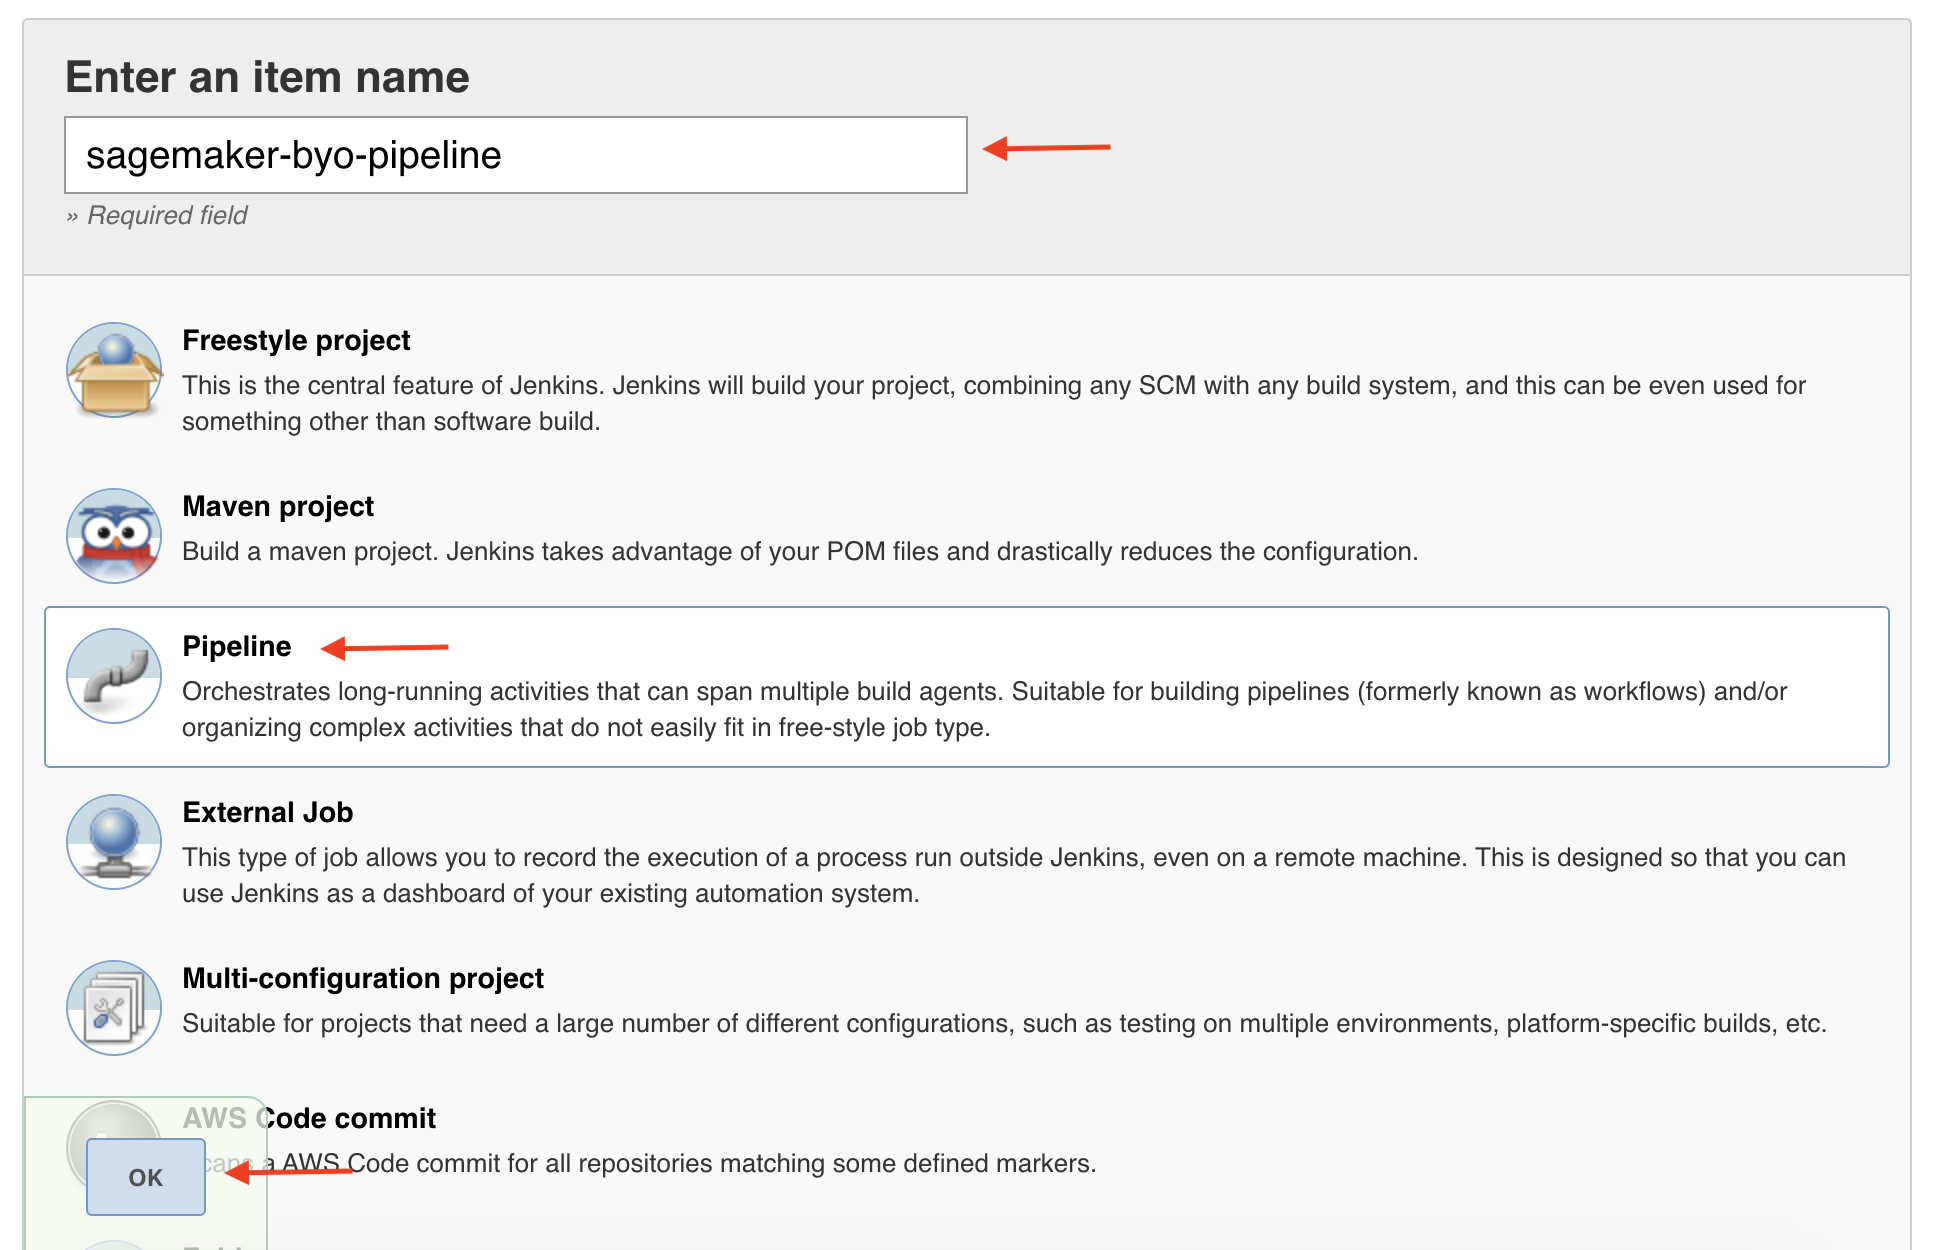
From the left menu, choose New Item
-
Enter Item Name: sagemaker-byo-pipeline-yourinitials
*Example: sagemaker-byo-pipeline-jd
-
Choose Pipeline, click OK
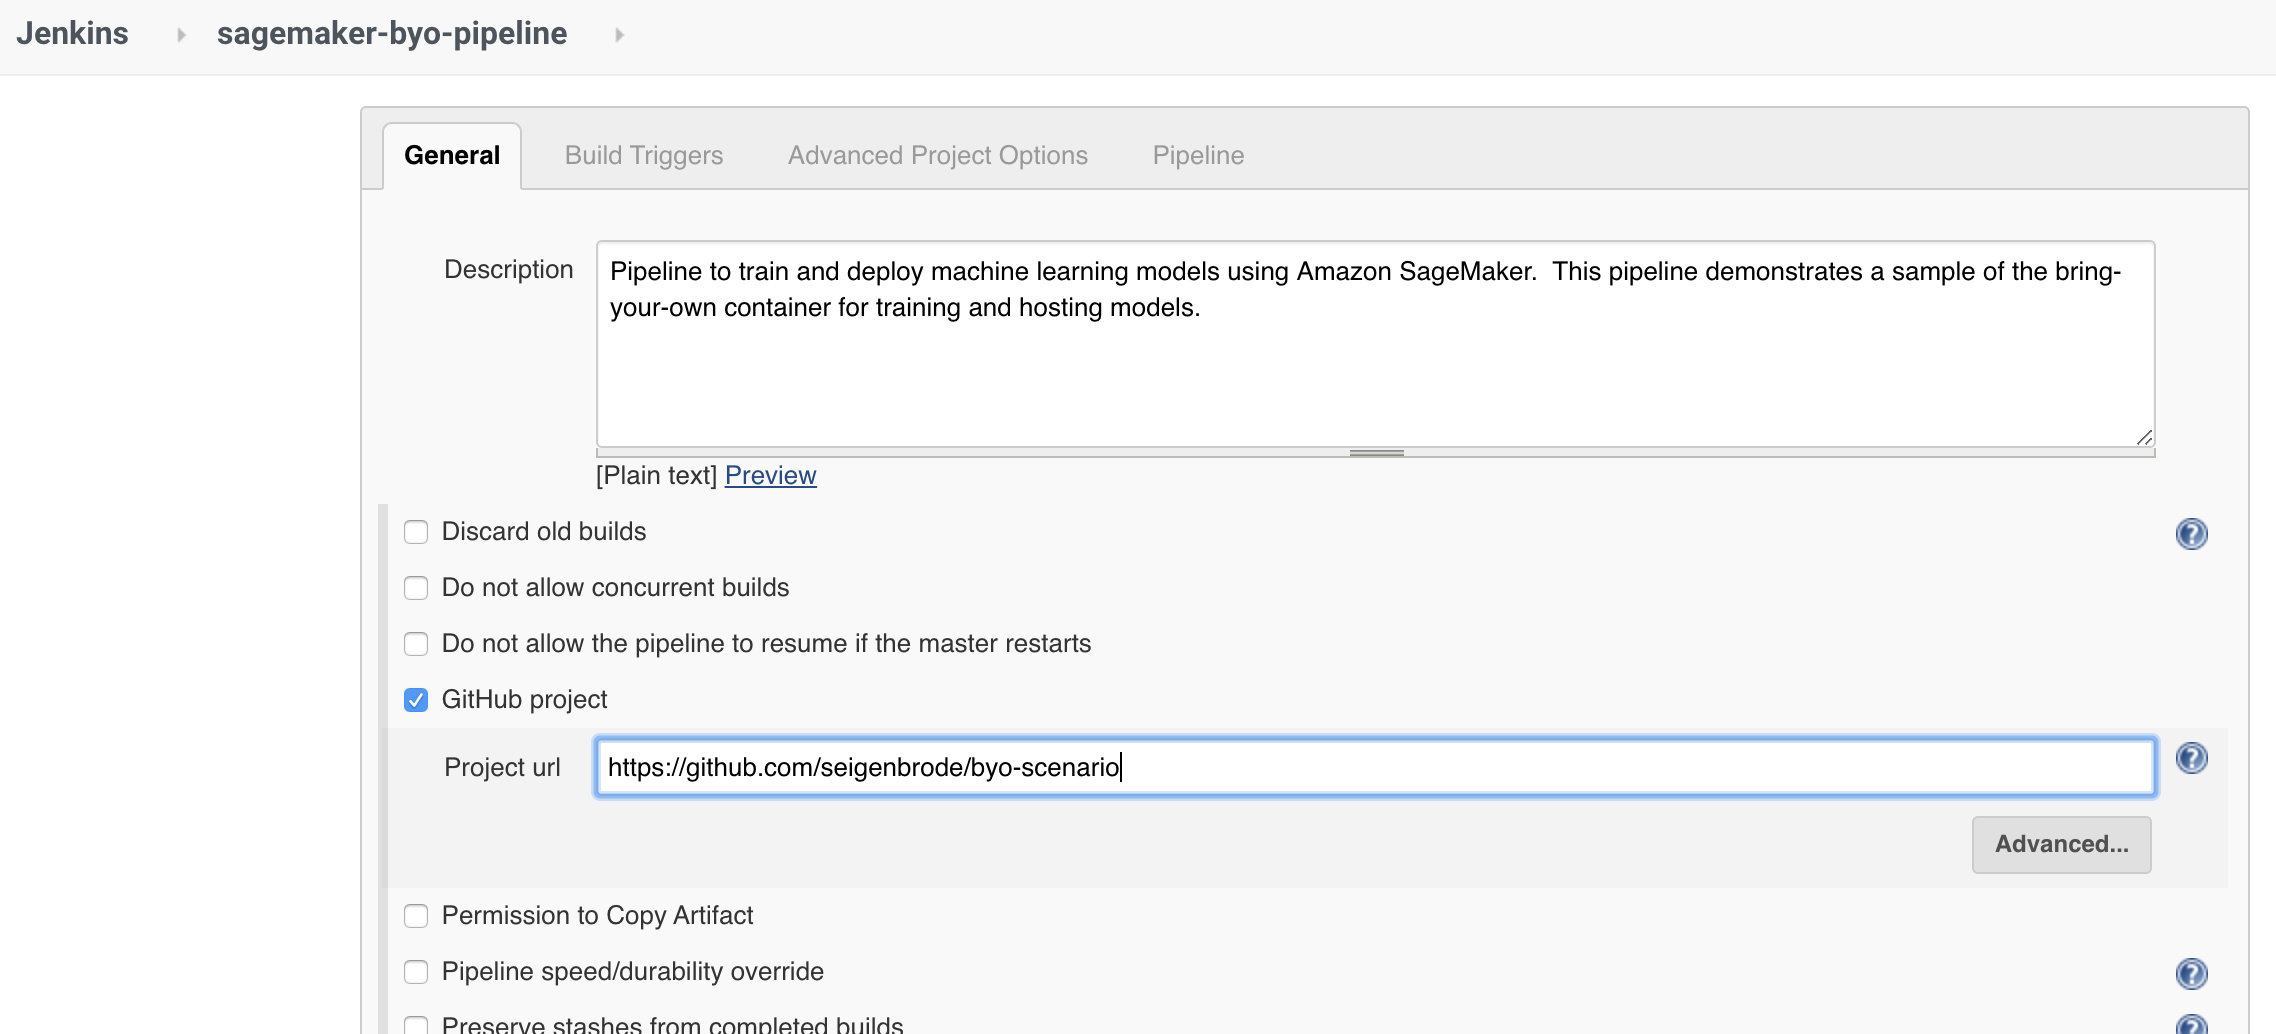
- Under General tab, complete the following:
-
Description: Enter a description for the pipeline
-
Select GitHub project & Enter the following project url: https://github.com/seigenbrode/byo-scenario
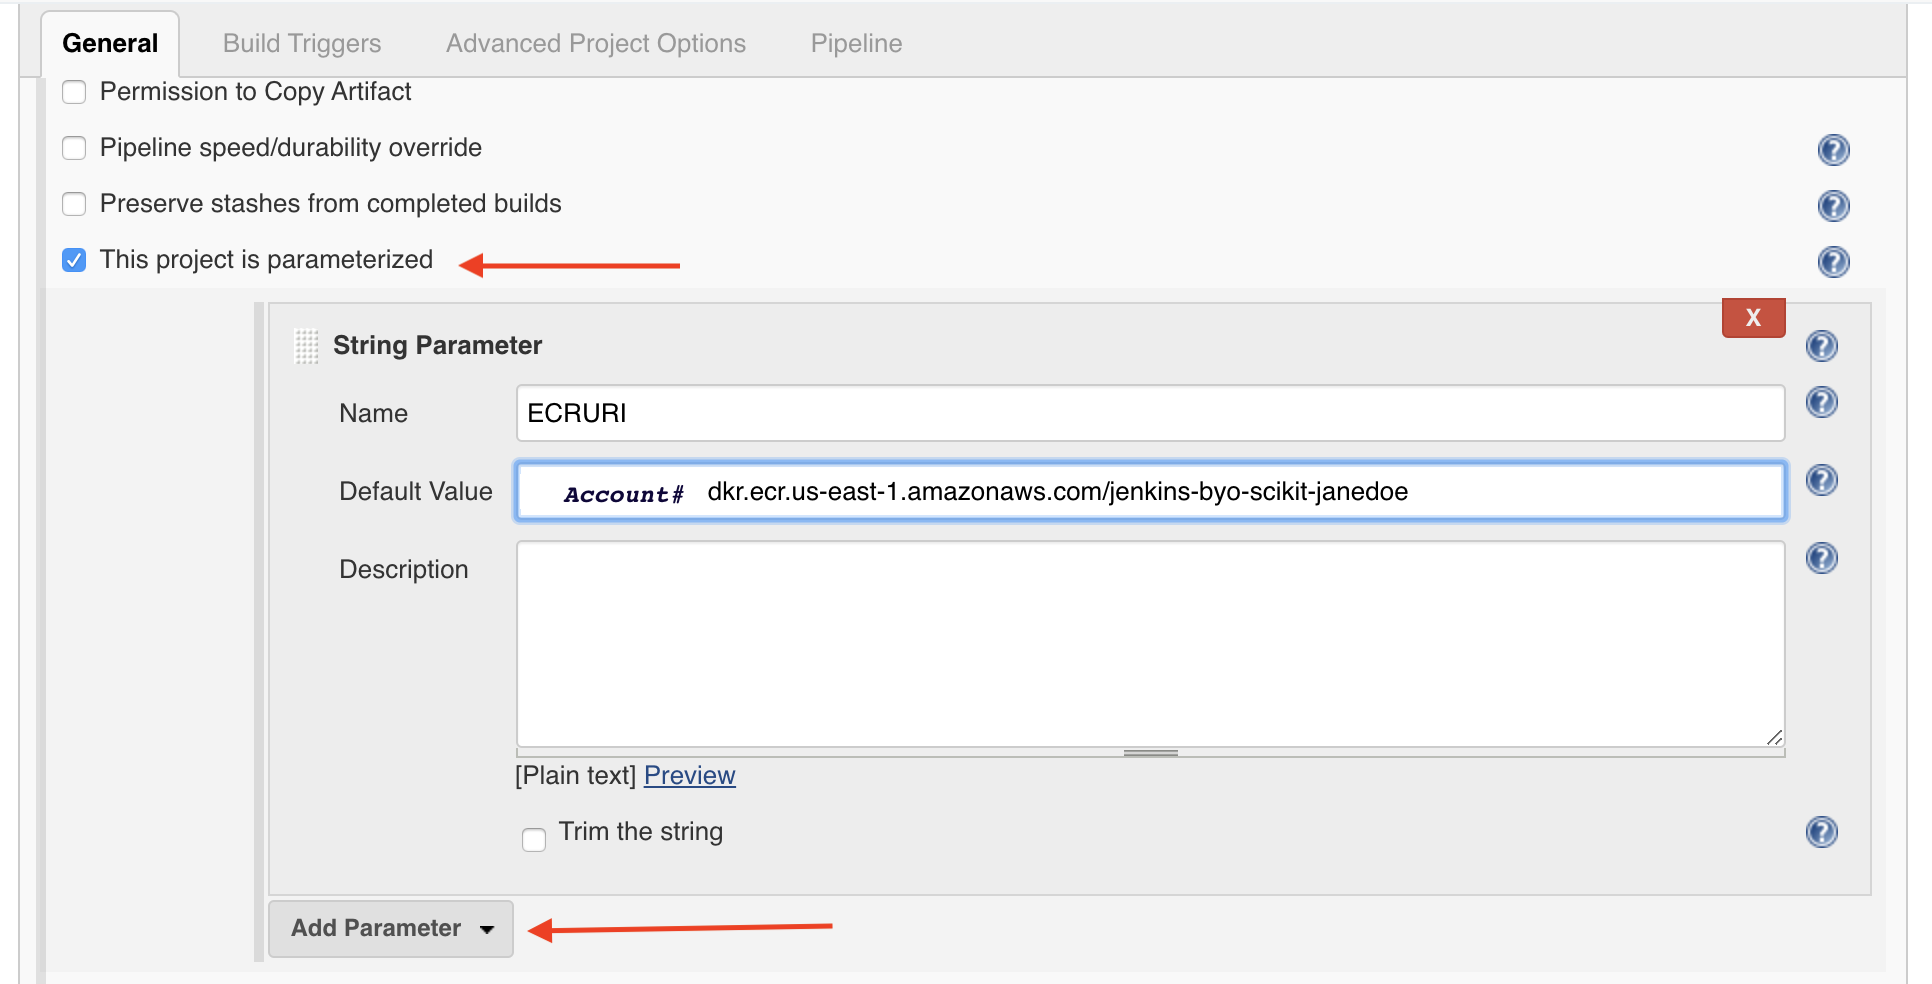
- Scroll Down & Select This project is parameterized:
- select Add Parameter --> String Parameter
- Name: ECRURI
- Default Value: Enter the ECR repository created above
-
We're going to use the same process above to create the other configurable parameters we will use as input into our pipeline. Select Add Parameter each time to continue to add the additional parameters below:
-
Parameter #2: Lambda Execution Role
- Type: String
- Name: LAMBDA_EXECUTION_ROLE_TEST
- Default Value: arn:aws:iam::<InsertAccount#>:role/MLOps-Jenkins-LambdaExecution
-
Parameter #3: SageMaker Execution Role
- Type: String
- Name: SAGEMAKER_EXECUTION_ROLE_TEST
- Default Value: Enter the ARN of the role we created above
-
Parameter #4: Model Artifact Bucket
- Type: String
- Name: S3_MODEL_ARTIFACTS
- Default Value: *Enter the bucket we created above in the format: s3://initials-jenkins-scikitbyo-modelartifact
-
-
Parameter #5: Training Job Name
- Type: String
- Name: SAGEMAKER_TRAINING_JOB
- Default Value: scikit-byo-yourinitials
-
Parameter #6: Lambda Function - Training Status
- Type: String
- Name: LAMBDA_CHECK_STATUS_TRAINING
- Default Value: MLOps-CheckTrainingStatus
-
Parameter #7: S3 Bucket w/ Training Data
- Type: String
- Name: S3_TRAIN_DATA
- Default Value: s3://0.model-training-data/train/train.csv
-
Parameter #8: S3 Bucket w/ Training Data
- Type: String
- Name: S3_TEST_DATA
- Default Value: 0.model-training-data
-
Parameter #9: Lambda Function - Smoke Test
- Type: String
- Name: LAMBDA_EVALUATE_MODEL
- Default Value: MLOps-InvokeEndpoint-scikitbyo
-
Parameter #10: Default Docker Environment
- Type: String
- Name: JENKINSHOME
- Default Value: /bitnami/jenkins/jenkins_home/.docker
- Scroll down --> Under Build Triggers tab:
- Select GitHub hook trigger for GITScm polling
-
Scroll down --> Under Pipeline tab:
-
Select Pipeline script from SCM
-
SCM: Select Git from dropdown
-
Repository URL: https://github.com/seigenbrode/byo-scenario
-
Credentials: -none- We are pulling from a public repo
-
Script Path: Ensure 'Jenkinsfile' is populated
-
-
Leave all other values default and click Save
We are now ready to trigger our pipeline. But first, we need to explore the purpose of Jenkinsfile. Jenkins allows for many types of pipelines such as free style projects, pipelines (declarative / scripted), and external jobs. In our original setup we selected Pipeline. Our Git Repository also has a file named Jenksfile which contains the scripted flow of stages and steps for our pipeline in Jenkin's declarative pipeline language.
Step 6: Trigger Pipeline Executions
In this step, we will execute the pipeline manually and then we will later demonstrate executing the pipeline automatically via a push to our connected Git Repository.
Jenkins allows for the abiliity to create additional pipeline triggers and embed step logic for more sophisticated pipelines.Another common trigger would be for retraining based on a schedule, data drift, or a PUT of new training data to S3.
- Let's trigger the first execution of our pipeline. While you're in the Jenkins Portal, select the pipeline you created above:
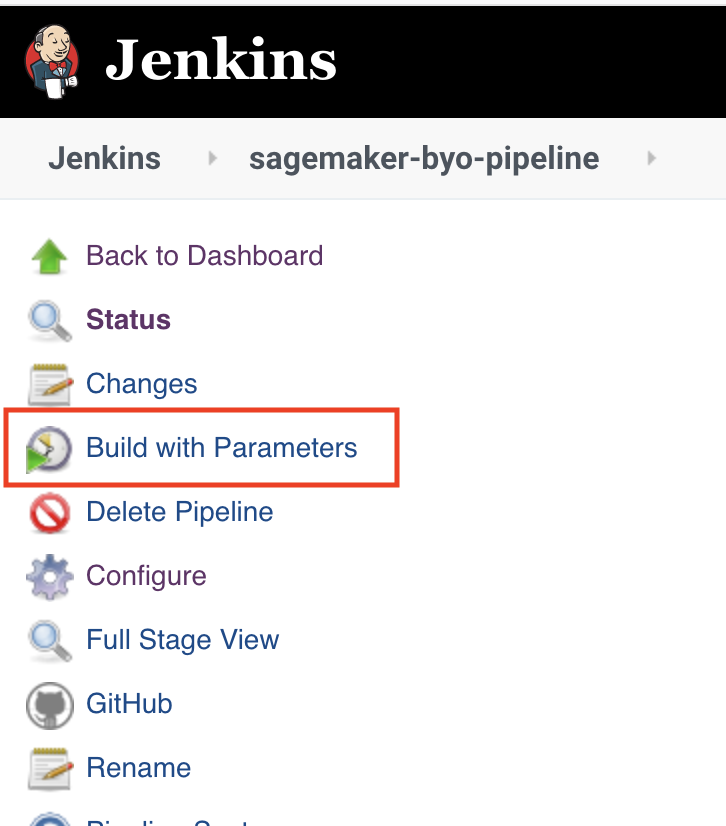
- Select Build with Parameters from the left menu:
-
You'll see all of the parameters we setup on initial configuration, you could change these values prior to a new build but we are going to leave all of our defaults, then click Build
-
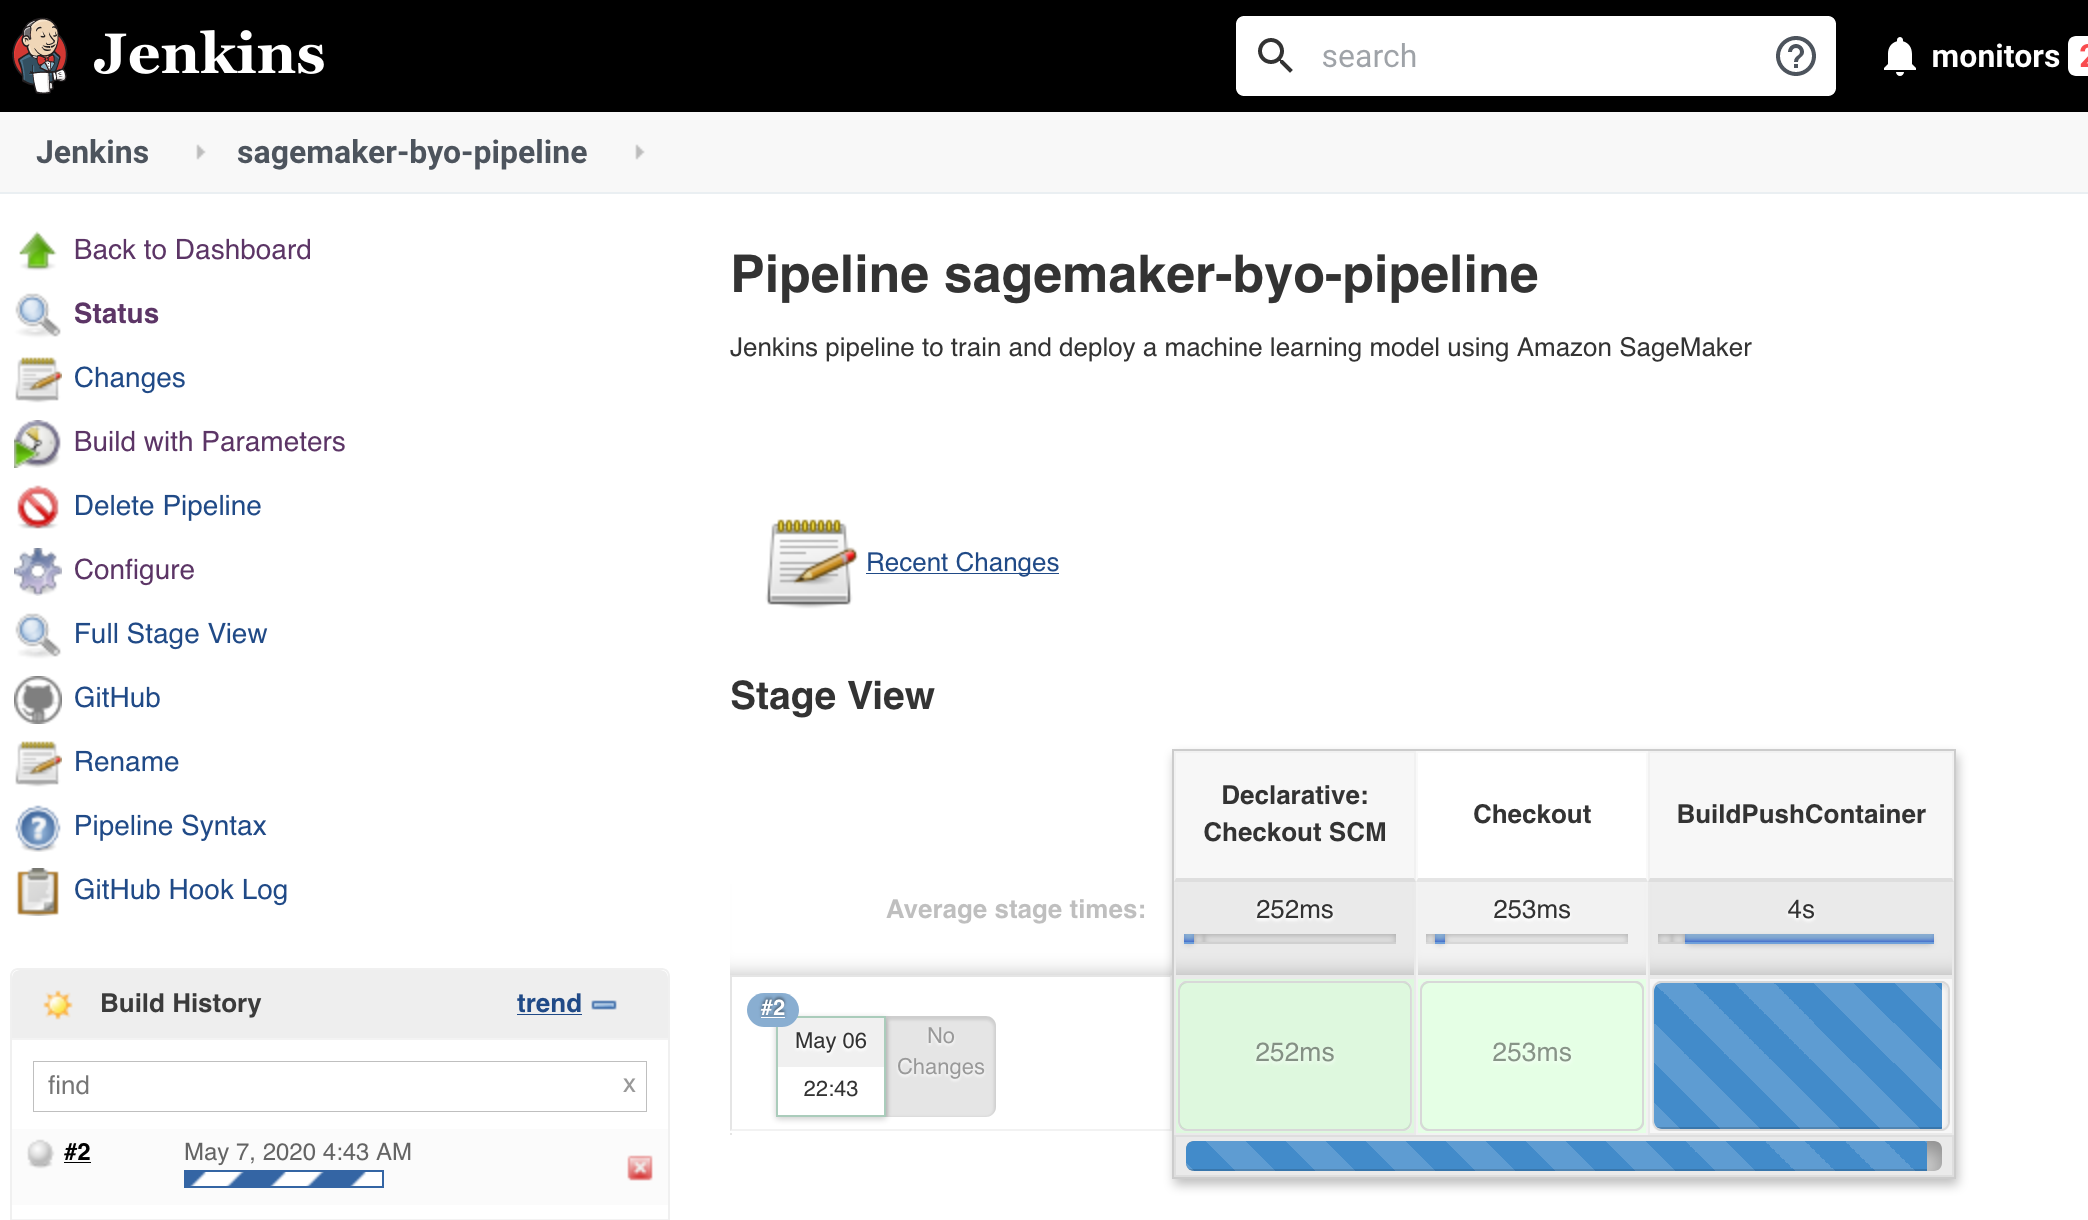
You can monitor the progress of the build through the dashboard as well as the stages/steps being setup and executed. An example of the initial build in progress below:
*Note: The progress bar in the lower left under Build History will turn a solid color when the build is complete.
- Once your pipeline completes the BuildPushContainer stage, you can go view your new training/inference image in the repository we setup: Go To ECR. Because we turned on vulnerability scanning, you can also see if your image has any vulnerabilities. This would be a good place to put in a quality gate, stopping the build until the vulnerabilities are addressed:
-
When you're pipeline reaches the TrainModel stage, you can checkout more details about training because we are reaching out to utilize Amazon SageMaker training instances during our training. Go To Amazon SageMaker Training Jobs. You can click on your job and review the details of your training job, check out the monitoring metrics.
-
When the pipeline has completed the TrainStatus stage, the model has been trained and you will be able to find your deployable model artifact in the S3 bucket we created earlier. Go To S3 and find your bucket to view your model artifact: yourinitials-jenkins-scitkitbyo-modelartifact
-
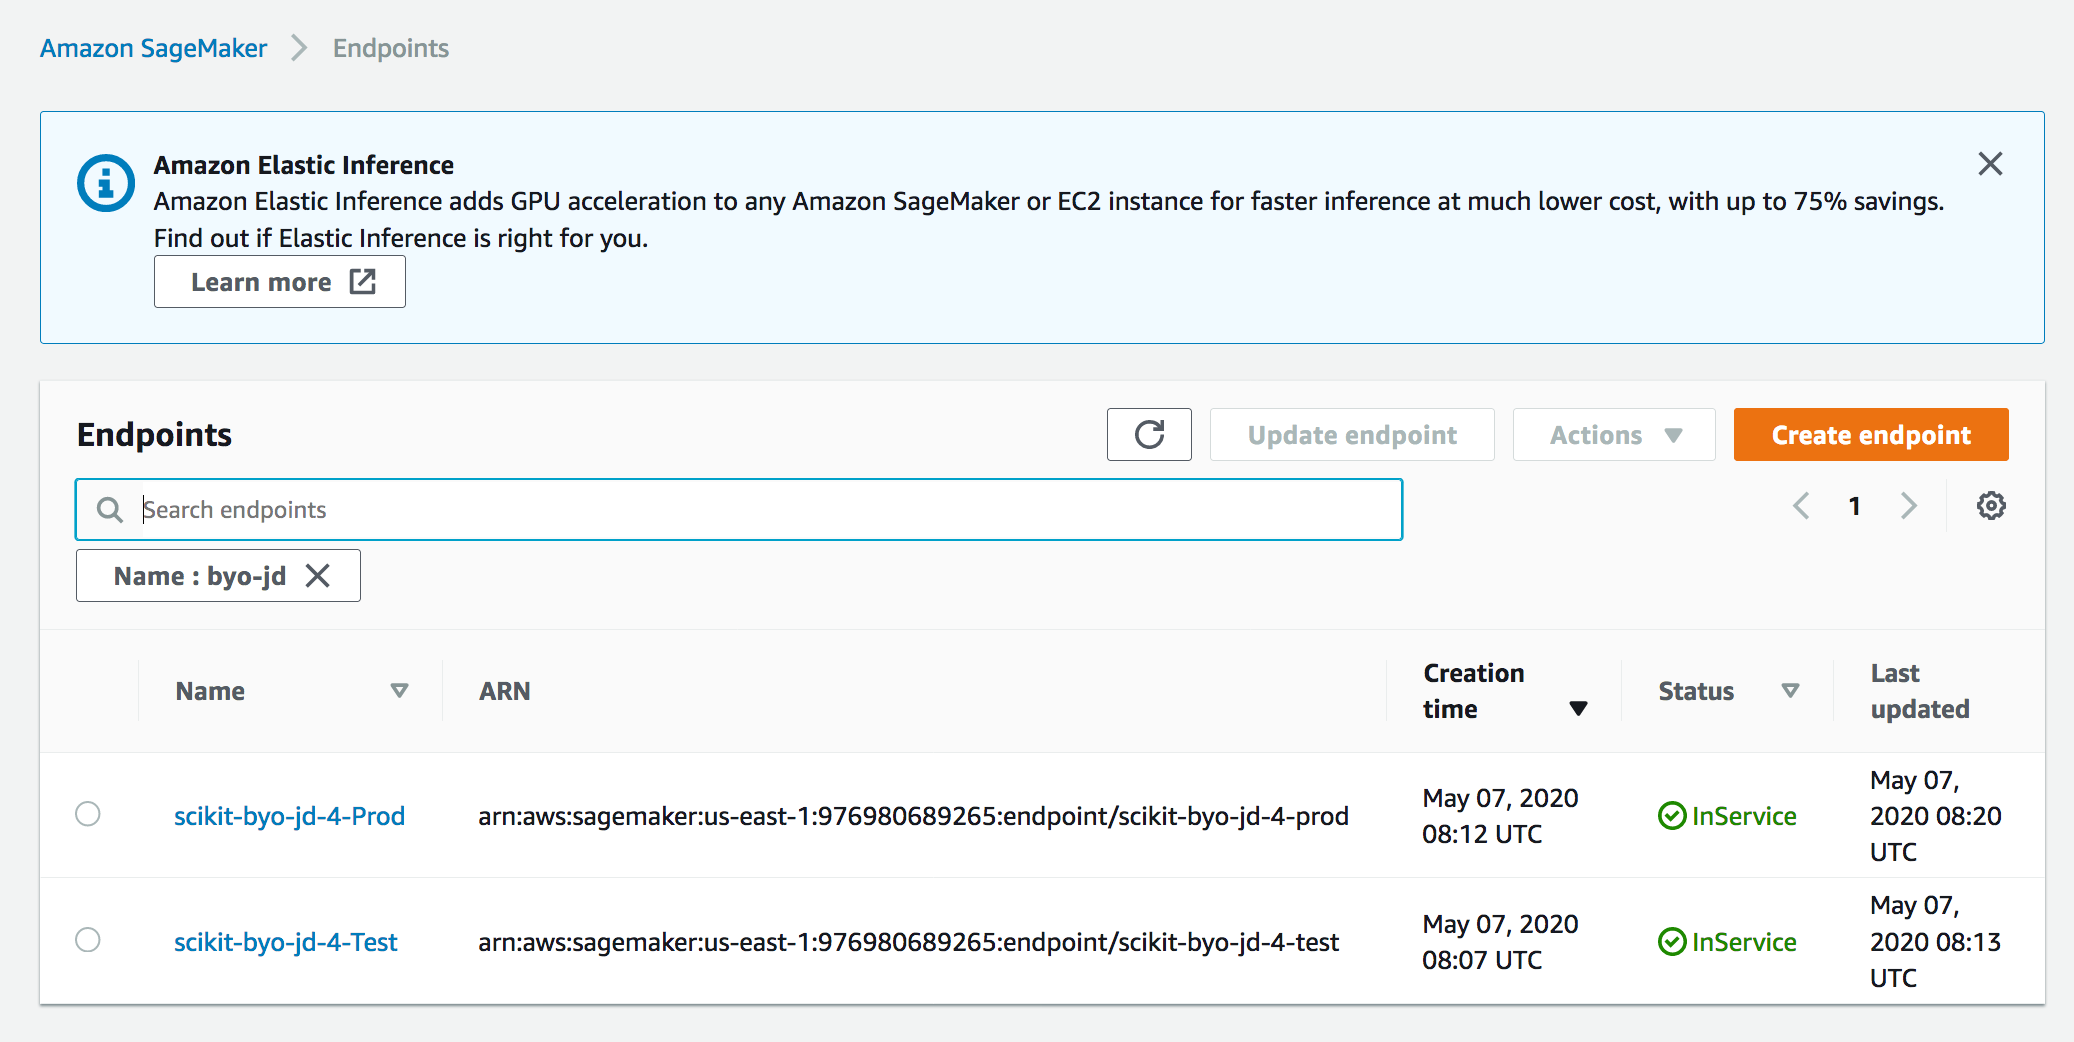
When the pipeline has completed, the model that was trained once is deployed to test, run through a smoke test, and deploy to production. Go to Amazon SageMaker Endpoints to check out your endpoints.
CONGRATULATIONS!
You've setup your base Jenkins pipeline for building your custom machine learning containers to train and host on Amazon SageMaker. You can continue to iterate and add in more functionality including items such as:
- A/B Testing
- Endpoint Cleanup
- Additional Quality Gates
- Retraining strategy
- Include more sophisticated logic in the pipeline such as Inference Pipeline, Multi-Model Endpoint
Step 5: Clean-Up
If you are performing work in your own AWS Account, please clean up resources you will no longer use to avoid unnecessary charges.

