Min ide er at oprette et kursus hvor vi bruger en lille microprossor ESP32 som har både Bluetooth, Wifi og Flash disk indbygget, med den kan vi styre vores udstyr fra en Smartphone eller iPad.
Jeg vil bruge Platformio, Microsoft’s Visual Studio Code, sammen med Arduino IDE, når vi kommer i gang skal vi samarbejde med 3D holdet om at lave dele til en robot, bil eller andet som vi kan styre.
Jeg har lavet ESP32 udviklings kit til dette kursus som eleverne får udleveret ved kursus start, softwaren vi skal bruge er gratis.
Eleverne skal selv medbringe en Pc til kursuset, undervisningen vil bruge et mødelokale til teori og 1.sal på metal værkstedet til praktiske opgaver.
Kursus starter den 8/1 2020 kl.: 12:30, mødested metalværkstedet
- Niels Jørgen Jensen vil holde de første møder fra 8/1 til 26/2, hvor i vil begynde at definere den robot I skal bruge.
- Svenn-Erik K. Thomsen vil begynde undervisning i programering den 8/1 2020 kl.: 12:30
Robot & Microprosessor Kursus 2020 : https://docs.google.com/forms/d/e/1FAIpQLSfGfbgsCQq_kk3sPVGyZUx6m9FqPH_HSMDtQ0DwIxAxN89SXg/viewform


ESP32S-HiLetgo Dev Boad with Pinout Template
ESP32 Datasheet PDF
ESP32-DevKitC V4 Getting Started Guide
ESP32-DevKitC PinOut
ESP32-DevKitC Diagram
ESP32_Function_Block_Diagram
ESP32-CAM PinOut
ESP32-CAM Diagram
ESP32-CAM Flashing
ESP32-S CAM in Face Detection and Recognition with ESP-IDF / ESP-WHO Library


For linux bruger åben terminal og indsæt linier en af gangen !!
# opret directory til dine bin filer
mkdir -p ~/.local/bin
mkdir -p ~/.local/share/icons
PATH="$PATH:$HOME/bin"

# giv default bruger adgang til serial port
sudo usermod -a -G dialout $USER

# opdater din linux
sudo apt update
sudo apt full-upgrade -y
sudo apt autoremove -y

# installer nogle hjælpe programmer
sudo apt install -y git xclip pinta geany* vlc putty python3-distutils

# opret mappe til projecter
mkdir -p ~/Dokumenter/GitHub/
mkdir -p ~/Dokumenter/FreeCad/
mkdir -p ~/Dokumenter/ESP32/

# installer  printrun (Pronterface)
sudo apt update
sudo apt install printrunKlargør linux PlatformIO :
# installer python util for PlatformIO
sudo apt install -y python3-distutils
Video guide for installation af VSC & PlatformIO :
Klik her for at hente og installer Visual Studio Code

*

*

*

*

*
 *
*

*

*

*
- Start VSC
- Åben Extensions med [Ctrl]+[Shift]+X
- Søg efter PlatformIO IDE
- Tryk install og vent indtil installationen er afsluttet.
- Genstart når det ønskes.
Klik for at se PlatformIO nyeste userguide

- Klik på Platformio logo
- Klik New Terminal under Miscellaneous
- indtast nu følgende linie i Terminal vinduet:
platformio settings get

- indtast nu følgende linie i terminal vinduet:
platformio settings set projects_dir ~/Dokumenter/ESP32
- Se ændringen her.

- Klik PlatformIO Icon
- Klik Open
- Klik New Project

- Name: ESP32_Blink
- Board: Espressif ESP32 Dev Module
- Framework: Arduino
- Location: Use default location
- Tryk på [Finish] når alle felter er udfyldt.

- Åben filhontering
- Åben Project ESP32_Blink
- Åben filen platformio.ini
- tilføj linien "monitor_speed=115200", den vil angiver den hastighed, der sendes og modtages data via vores serial port.
- Gem nu ændringer med [CTRL]+S

sudo apt install -y gitVideo : Git config
git config --global user.name "Dit bruger navn på GitHub"
git config --global user.email "Din GitHub email adresse"

git config --global core.editor "code --wait"Video : Opret SSH login on Github
# Check for SSH Key
ls ~/.ssh

# Creaate an SSH Key
ssh-keygen -t rsa -b 4096 -C "me@mydomain.com" -f ~/.ssh/id_rsa_MyGithub
Video : Opret SSH login on Github - Copy SSH-Key
# Copy the SSH Key
sudo apt install -y xclip
xclip -sel clip < ~/.ssh/id_rsa_MyGithub.pub
Video : Opret SSH login on Github - Test SSH-Key
# test SSH
ssh -T git@github.com

# Responce somthing like this is fine
# Hi sekt1953! You've successfully authenticated, but GitHub does not provide shell access.- Kilde :
create different ssh key
ssh-keygen -t rsa -b 4096 -C "user1@domain1.com" -f ~/.ssh/id_rsa_MyGithub1
ssh-keygen -t rsa -b 4096 -C "user2@domain2.com" -f ~/.ssh/id_rsa_MyGithub2
for example, 2 keys pairs created at:
~/.ssh/id_rsa_MyGithub1
~/.ssh/id_rsa_MyGithub1.pub
~/.ssh/id_rsa_MyGithub2
~/.ssh/id_rsa_MyGithub2.pub
then, add these two keys as following
$ ssh-add ~/.ssh/id_rsa_MyGithub1
$ ssh-add ~/.ssh/id_rsa_MyGithub2
you can delete all cached keys before
$ ssh-add -D
finally, you can check your saved keys
$ ssh-add -l
$ cd ~/.ssh/
$ touch config
$ subl -a config
Then added
#MyGithub1 account
Host github.com-MyGithub1
	HostName github.com
	User git1
	IdentityFile ~/.ssh/id_rsa_MyGithub1

#MyGithub2 account
Host github.com-MyGithub2
	HostName github.com
	User git2
	IdentityFile ~/.ssh/id_rsa_MyGithub2
- NOTE!
- Host
Restricts the following declarations (up to the next Host or Match keyword) to be only for those hosts that match one of the pat‐ terns given after the keyword. If more than one pattern is provided, they should be separated by whitespace. A single ‘*’ as a pattern can be used to provide global defaults for all hosts. The host is usually the hostname argument given on the command line (see the CanonicalizeHostname keyword for exceptions). - HostName
Specifies the real host name to log into. This can be used to specify nicknames or abbreviations for hosts. Arguments to HostName accept the tokens described in the TOKENS section. Numeric IP addresses are also permitted (both on the command line and in HostName specifications). The default is the name given on the command line. - User
Specifies the user to log in as. This can be useful when a different user name is used on different machines. This saves the trouble of having to remember to give the user name on the command line. - IdentityFile
Specifies a file from which the user's DSA, ECDSA, Ed25519 or RSA authentication identity is read. The default is ~/.ssh/id_dsa, ~/.ssh/id_ecdsa, ~/.ssh/id_ed25519 and ~/.ssh/id_rsa. Additionally, any identities represented by the authentication agent will be used for authentication unless IdentitiesOnly is set. If no certificates have been explicitly specified by CertificateFile, ssh(1) will try to load certificate information from the filename obtained by appending -cert.pub to the path of a specified IdentityFile.
Arguments to IdentityFile may use the tilde syntax to refer to a user's home directory or the tokens described in the TOKENS sec‐ tion.
It is possible to have multiple identity files specified in configuration files; all these identities will be tried in sequence. Multiple IdentityFile directives will add to the list of identities tried (this behaviour differs from that of other configura‐ tion directives).
IdentityFile may be used in conjunction with IdentitiesOnly to select which identities in an agent are offered during authentica‐ tion. IdentityFile may also be used in conjunction with CertificateFile in order to provide any certificate also needed for authentication with the identity.
- Host
for MyGithub1
$ git config user.name "user1"
$ git config user.email "user1@domain1.com"
for MyGithub2
$ git config user.name "user2"
$ git config user.email "user2@domain2.com"
Video : Git & GitHub Tutorial for Beginners #12 - Forking
Video : Git & GitHub Tutorial for Beginners #12 - Clone
cd ~/Dokumenter/GitHub/
git clone ssh_url
cd ~Video : Git & GitHub Tutorial for Beginners #12 - Add
git add .Video : Git & GitHub Tutorial for Beginners #12 - Commit
git commit -m "min commit tekst"Video : Git & GitHub Tutorial for Beginners #12 - Clone
git push origin master- Opret et nyt arkiv på GitHub. For at undgå fejl skal du ikke initialisere det nye lager med README-, licens- eller gitignore-filer. Du kan tilføje disse filer, efter at dit projekt er blevet skubbet til GitHub.
- Open Terminal.
- Change the current working directory to your local project.
- Initialize the local directory as a Git repository.

git init
- Add the files in your new local repository. This stages them for the first commit.
$ git add .
- Commit the files that you've staged in your local repository.
$ git commit -m "First commit"
- At the top of your GitHub repository's Quick Setup page, click to copy the remote repository URL.
- In Terminal, add the URL for the remote repository where your local repository will be pushed.
$ git remote add origin remote repository URL # Sets the new remote
$ git remote -v # Verifies the new remote URL
- Push the changes in your local repository to GitHub.
$ git push origin master # Pushes the changes in your local repository up to the remote repository you specified as the origin
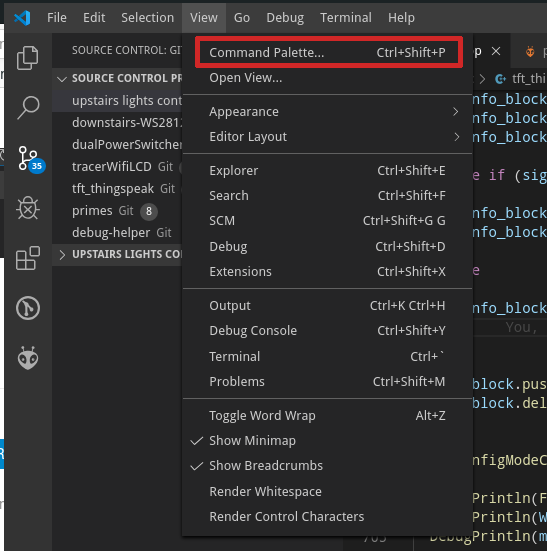
- Open up the Command Pallette…
- … and type “Git init”, and hit enter when you see “Git: Initalize Repository”. You’ll then be asked what folder to initalise the git repo in… and it’ll be added to the source control list when the repo is initialised.
- As soon as the folder is intalised (meaning git has created it’s database in .git), it should turn up in the source control providers list, and then you can do your first commit, and start tracking changes
- You’ll basically need to do it for each folder if you want commit histories for each project, the alternative being the projects folder itself being the repo, meaning changes to all the different projects get intermingled.