- This guide demonstrates the integration between Jenkins and Conjur using the JWT authenticator.
- The JWT authenticator relies on the trust between Conjur and Jenkins via the JSON Web Key Set (JWKS).
- Each project on Jenkins retrieving credentials will have its JWT signed and verified via the JWKS.
- This mitigates the "secret-zero" problem and enable each project on Jenkins to be uniquely identified.
- The demonstration will run 2 projects:
- MySQL-Demo: Run a sql command to show databases using the credentials retrieved from Conjur
- AWS-Access-Key-Demo: Run an AWS CLI command to list users using the credentials retrieved from Conjur

① The Jenkins project requests for a JWT from the Conjur Secrets Plugin
② Conjur Secrets Plugin returns a JWT for the Jenkins project with the relevant details; this JWT is signed with the private key of the JWKS
- Example JWT
{
    "sub": "admin",
    "jenkins_full_name": "AWS-Access-Key-Demo",
    "iss": "https://jenkins.vx:8443",
    "aud": "vxlab",
    "jenkins_name": "AWS-Access-Key-Demo",
    "nbf": 1646394039,
    "identity": "vxlab-AWS-Access-Key-Demo",
    "name": "admin",
    "jenkins_task_noun": "Build",
    "exp": 1646394189,
    "iat": 1646394069,
    "jenkins_pronoun": "Pipeline",
    "jti": "88411dd3f2a4433694f6a707b3b99407",
    "jenkins_job_buildir": "/var/lib/jenkins/jobs/AWS-Access-Key-Demo/builds"
}
③ The Jenkins project sends an authentication request to Conjur using the JWT authenticator web service
- The Jenkins project finds the URI for JWT authenticator using
<Conjur-Appliance-URL>/authn-jwt/<service-id> - The URI for this demo is
https://conjur.vx/authn-jwt/jenkins
④ Conjur fetches the public key from the JWKS of the Conjur Secrets Plugin
- When enabled, the Conjur Secrets Plugin creates a JWT Key Set endpoint at
<Jenkins-URL>/jwtauth/conjur-jwk-set - This JWKS URI is set in the
jwks-urivariable of the JWT authenticator in Conjur so that Conjur knows where to find the JWKS
⑤ Conjur verifies that the token is legit with the JWKS public key and authenticates application identity
- Conjur identifies the application identity via the
token-app-propertyvariable of the JWT authenticator - The
token-app-propertyvariable is set in Conjur as theidentityclaim in this demo - The
identityclaim in Jenkins is configured as<aud>-<jenkins-name>in this demo - Conjur further verifies the applications details as configured in the
annotationslisted in thehost(application identity) declaration - Annotations
jenkins_full_name,jenkins_task_nounandjenkins_pronounare defined for the application identity in this demo- the JWT claims from Jenkins needs to tally with the declaration for application authentication to be successful
⑥ Conjur returns an access token to the Jenkins project if authentication is successful
⑦ The Jenkins project will then use the access token to retrieve the secrets
- RHEL 9.0
- Jenkins 2.361.1
- Conjur Enterprise 12.7.0.1
| Hostname | Role |
|---|---|
| conjur.vx | Conjur master |
| jenkins.vx | Jenkins node |
| mysql.vx | MySQL server |
- Setup MySQL database according to this guide: https://github.com/joetanx/mysql-world_db
- Setup Conjur master according to this guide: https://github.com/joetanx/setup/blob/main/conjur.md
yum -y install java-11-openjdk-devel https://archives.jenkins-ci.org/redhat-stable/jenkins-2.361.1-1.1.noarch.rpm- The Jenkins server certificate in this demo is signed by a personal CA, you should use your own certificate chain in your own environment
- Refer to https://github.com/joetanx/self-signed-ca/ for a guide to generate your own certificates
curl -O https://raw.githubusercontent.com/joetanx/conjur-jenkins/main/jenkins.vx.pfx
keytool -importkeystore -srckeystore jenkins.vx.pfx -srcstorepass cyberark -destkeystore /var/lib/jenkins/.keystore -deststoretype pkcs12 -deststorepass cyberark
chown jenkins:jenkins /var/lib/jenkins/.keystore
rm -f jenkins.vx.pfx- Edit Jenkins configuration file to use HTTPS
- ☝️ Note: Jenkins changed the SSL configuration from
/etc/sysconfig/jenkinsto/usr/lib/systemd/system/jenkins.servicebeginning with version 2.332.1 (Ref: https://www.jenkins.io/doc/book/system-administration/systemd-services/)
sed -i 's/JENKINS_PORT=8080/JENKINS_PORT=-1/' /usr/lib/systemd/system/jenkins.service
sed -i '/JENKINS_HTTPS_LISTEN_ADDRESS/a Environment=\"JENKINS_HTTPS_LISTEN_ADDRESS=\"' /usr/lib/systemd/system/jenkins.service
sed -i '/JENKINS_HTTPS_PORT/a Environment=\"JENKINS_HTTPS_PORT=8443\"' /usr/lib/systemd/system/jenkins.service
sed -i '/JENKINS_HTTPS_KEYSTORE=/a Environment=\"JENKINS_HTTPS_KEYSTORE=\/var\/lib\/jenkins\/.keystore\"' /usr/lib/systemd/system/jenkins.service
sed -i '/JENKINS_HTTPS_KEYSTORE_PASSWORD/a Environment=\"JENKINS_HTTPS_KEYSTORE_PASSWORD=cyberark\"' /usr/lib/systemd/system/jenkins.service- Allow Jenkins on firewall and start Jenkins
firewall-cmd --add-port 8443/tcp --permanent && firewall-cmd --reload
systemctl enable --now jenkins- Retrieve Jenkins initial admin password
cat /var/lib/jenkins/secrets/initialAdminPassword- Browse to the Jenkins URL
https://jenkins.vx:8443Unlock Jenkins: Enter the initial admin passwordCustomize Jenkins: SelectInstall suggested pluginsand wait for the plugins to install (this will take a while...)Create First Admin User: Create your user, or just skip to continue using adminInstance Configuration page: ConfigureJenkins URLaccording to your environment- ☝️ Note that you need to configure the
Jenkins URLfor the JWT integration to work
- ☝️ Note that you need to configure the
MySQL and AWS CLI client tools are needed in the Jenkins project execution later
yum -y install mysqlyum -y install unzip
curl -O https://awscli.amazonaws.com/awscli-exe-linux-x86_64.zip
unzip awscli-exe-linux-x86_64.zip
./aws/install && rm -rf aws*-
Configures the JWT authenticator (https://docs.cyberark.com/Product-Doc/OnlineHelp/AAM-DAP/Latest/en/Content/Operations/Services/cjr-authn-jwt.htm)
-
Defines the authenticator webservice at
authn-jwt/jenkins- The format of the authenticator webservice is
authn-jwt/<service-id>, the<service-id>used in this demo isjenkins, this will be entered into the Conjur Secrets Plugin configuration forAuth WebService IDin 5.1..
- The format of the authenticator webservice is
-
Defines the authentication variables: how the JWT Authenticator gets the signing keys
| Variables | Description |
|---|---|
jwks-uri |
JSON Web Key Set (JWKS) URI. For Jenkins this is https://<Jenkins-URL>/jwtauth/conjur-jwk-set. |
public-keys |
Used to provide a static JWKS to the JWT authenticator if Conjur is unable to reach a remote JWKS URI endpoint |
ca-cert |
The CA certificate that signed the Jenkins server certificate. Implemented only beginning from Conjur version 12.5. |
token-app-property |
The JWT claim to be used to identify the application. This demo uses the identity claim from Jenkins, which is configured in the Conjur Secrets Plugin under Jenkins to use aud concatenated with jenkins_name as identity. This variable is always used together with identity-path. |
identity-path |
The Conjur policy path where the app ID (host) is defined in Conjur policy. The app IDs in authn-jwt-hosts.yaml are created under jwt-apps/jenkins, so the identity-path is jwt-apps/jenkins. |
issuer |
URI of the JWT issuer. This is the Jenkins URL. This is included in iss claim in the JWT token claims. |
enforced-claims |
List of claims that are enforced (i.e. must be present in the JWT token claims). Not used in this demo. |
claim-aliases |
Map claims to aliases. Not used in this demo. |
audience |
JWT audience configured in the Conjur Secrets Plugin under Jenkins. This is configured as vxlab in this demo. |
- Defines
consumersgroup - applications that are authorized to authenticate using this JWT authenticator are added to this group - Defines
operatorsgroup - users who are authorized to check the status of this JWT authenticator are added to this group
jwt-apps/jenkins- policy name, this is also theidentity-pathof the app IDs- applications
vxlab-AWS-Access-Key-Demoandvxlab-MySQL-Demoare configured- the
idof thehostcorresponds to thetoken-app-property - annotations of the
hostare optional and corresponds to claims in the JWT token claims - the more annotations/claims configured, the more precise and secure the application authentication
- the
- the host layer is granted as a member of the
consumersgroup defined inauthn-jwt.yamlto authorize them to authenticate to the JWT authenticator vxlab-AWS-Access-Key-Demoandvxlab-MySQL-Demoare granted access to secrets inaws_apiandworld_dbby granting them as members of the respectiveconsumersgroup defined inapp-vars.yaml- ☝️ Note:
authn-jwt-hosts.yamlbuilds on top ofapp-vars.yamlin https://github.com/joetanx/setup/blob/main/app-vars.yaml. Loadingauthn-jwt-hosts.yamlwithout havingapp-vars.yamlloaded previously will not work.
- Login to Conjur
conjur init -u https://conjur.vx
conjur login -i admin -p CyberArk123!- Download and load the Conjur policies
curl -O https://raw.githubusercontent.com/joetanx/conjur-jenkins/main/authn-jwt.yaml
curl -O https://raw.githubusercontent.com/joetanx/conjur-jenkins/main/authn-jwt-hosts.yaml
conjur policy load -b root -f authn-jwt.yaml && rm -f authn-jwt.yaml
conjur policy load -b root -f authn-jwt-hosts.yaml && rm -f authn-jwt-hosts.yaml- Enable the JWT Authenticator
- ☝️ Note: This step requires that the
authenticatorssection in/etc/conjur/config/conjur.ymlto be configured (Ref: 2.5 https://github.com/joetanx/setup/blob/main/conjur.md#25-allowlist-the-conjur-default-authenticator)
podman exec conjur sed -i -e '/authenticators:/a\  - authn-jwt/jenkins' /etc/conjur/config/conjur.yml
podman exec conjur evoke configuration apply- Inject the CA certificate into a environment variable to be set into Conjur variable
- The Jenkins server certificate in this demo is signed by a personal CA (
central.pem), you should use your own certificate chain in your own environment - ☝️ Note: The
authn-jwt/<service-id>/ca-certvariable is implemented begining from Conjur version 12.5. If you are using an older version of Conjur, the CA certificates needs to be trusted by the Conjur container. Read theArchived - Trusting CA certificate in Conjur containersection at the end of this page.
CA_CERT="$(curl https://raw.githubusercontent.com/joetanx/conjur-jenkins/main/central.pem)"- Populate the variables
- Assumes that the secret variables in
world_dbandaws_apiare already populated in step 2 (Setup Conjur master)
conjur variable set -i conjur/authn-jwt/jenkins/jwks-uri -v https://jenkins.vx:8443/jwtauth/conjur-jwk-set
conjur variable set -i conjur/authn-jwt/jenkins/ca-cert -v "$CA_CERT"
conjur variable set -i conjur/authn-jwt/jenkins/token-app-property -v identity
conjur variable set -i conjur/authn-jwt/jenkins/identity-path -v jwt-apps/jenkins
conjur variable set -i conjur/authn-jwt/jenkins/issuer -v https://jenkins.vx:8443
conjur variable set -i conjur/authn-jwt/jenkins/audience -v vxlab- Select
Manage Jenkins→Manage Plugins→Available - Search for
conjur

- Check the plugin and select
Install without restart

- Select
Manage Jenkins→Configure System, scroll toConjur Applianceand configure the following:- Account:
cyberark - Appliance URL:
https://conjur.vx - Enable JWT Key Set endpoint?:
✓ - Auth WebService ID:
jenkins - JWT Audience:
vxlab - Enable Context Aware Credential Stores?:
✓ - Identity Format Fields:
aud,jenkins_name
- Account:
- Save

- Select
New Item→ EnterMySQL-Demoas name → SelectPipeline

- Scroll to
Conjur Appliance→ ClickRefresh Credential Store

-
For the
Pipeline script, we will be using a simpleSHOW DATABASEScommand to show that jenkins is able to login to the MySQL database with secrets fetched from conjur -
The secrets retrieval is done using
withCredentialspipeline step (you can use thePipeline Syntaxfunction in Jenkins to help generate the syntax)
pipeline {
    agent any
    stages {
        stage('getDatabases') {
            steps {
                withCredentials([conjurSecretCredential(credentialsId: 'world_db-username', variable: 'MYSQLUSER'), conjurSecretCredential(credentialsId: 'world_db-password', variable: 'MYSQLPASSWORD')]) {
                    sh '/usr/bin/mysql --host=mysql.vx --user=$MYSQLUSER --password=$MYSQLPASSWORD -e "SHOW DATABASES;"'
                }
            }
        }
    }
}
- Save and exit the project → Select the project again → Select
Credentials - The credentials that the project is authorized to access were populated automatically from the
Refresh Credential Storeaction earlier

- Select
Build Now→ Wait for build → VerifyConsole Output

- Select
New Item→ EnterAWS-Access-Key-Demoas name → SelectPipeline

- Scroll to
Conjur Appliance→ ClickRefresh Credential Store

- For the
Pipeline script, we will be using a simpleaws iam list-userscommand to show that jenkins is able to use AWS CLI with secrets fetched from conjur - The secrets retrieval is done using
withCredentialspipeline step (you can use thePipeline Syntaxfunction in Jenkins to help generate the syntax)
pipeline {
    agent any
    environment {
        AWS_DEFAULT_REGION = 'ap-southeast-1'
    }
    stages {
        stage('awsListUsers') {
            steps {
                withCredentials([conjurSecretCredential(credentialsId: 'aws_api-awsakid', variable: 'AWS_ACCESS_KEY_ID'), conjurSecretCredential(credentialsId: 'aws_api-awssak', variable: 'AWS_SECRET_ACCESS_KEY')]) {
                    sh '/usr/local/bin/aws iam list-users'
                }
            }
        }
    }
}
- Save and exit the project → Select the project again → Select
Credentials - The credentials that the project is authorized to access were populated automatically from the
Refresh Credential Storeaction earlier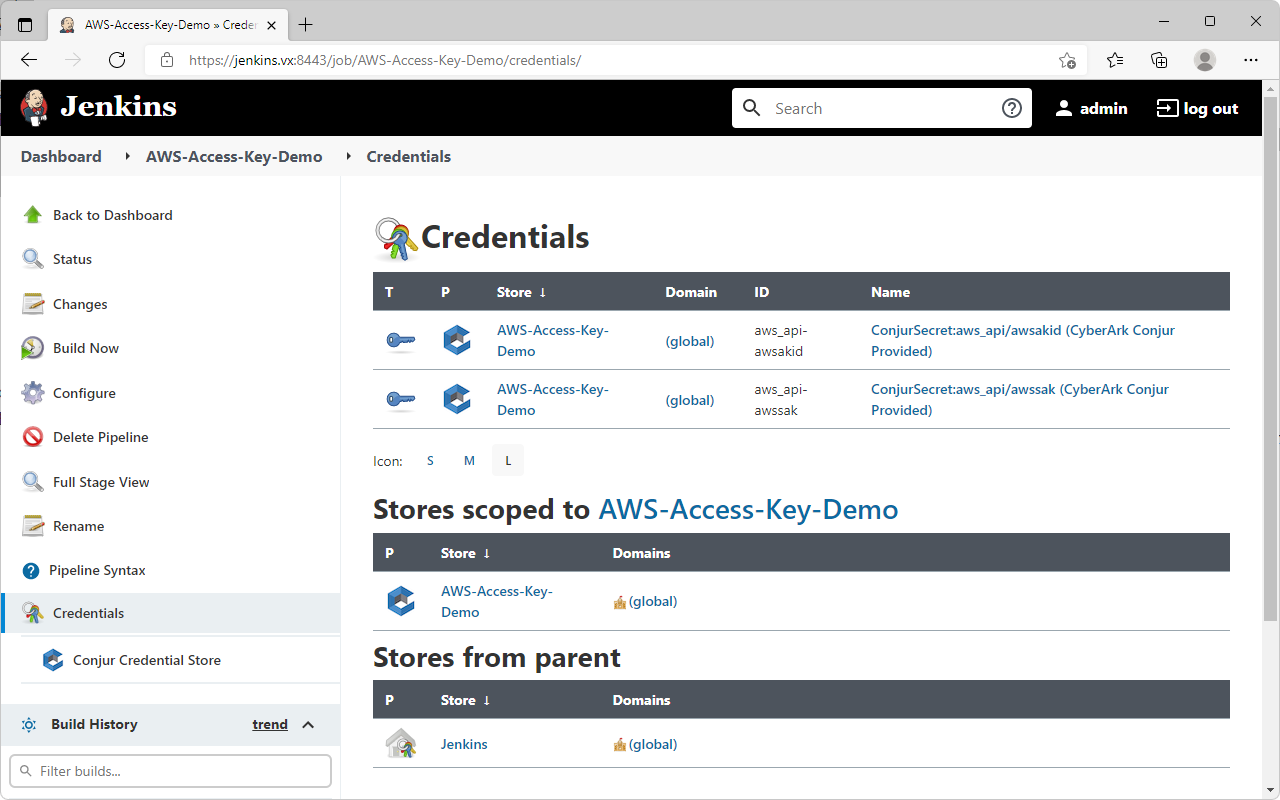
- Select
Build Now→ Wait for build → VerifyConsole Output


- For Conjur versions before 12.5, the
authn-jwt/<service-id>/ca-certvariable was not yet implemented. - If you are using a self-signed or custom certificate chain in your Jenkins like I did in this demo, you will encounter the following error in Conjur, because the Jenkins certificate chain is not trusted by Conjur applicance.
USERNAME_MISSING failed to authenticate with authenticator authn-jwt service cyberark:webservice:conjur/authn-jwt/jenkins:
**CONJ00087E** Failed to fetch JWKS from 'https://jenkins.vx:8443/jwtauth/conjur-jwk-set'.
Reason: '#<OpenSSL::SSL::SSLError: SSL_connect returned=1 errno=0 state=error: certificate verify failed (self signed certificate in certificate chain)>'- Import your Jenkins certificate or the root CA certificate to Conjur appliance
- Note: The hash of my CA certificate is a3280000, hence I need to create a link a3280000.0 to my CA certificate. You will need to get the hash of your own CA certificate from the openssl command, and link the certificate to
/etc/ssl/certs/<your-ca-hash>.0 - This procedure is documented in: https://cyberark-customers.force.com/s/article/Conjur-CONJ0087E-Failed-to-fetch-JWKS-from-GitLab-certificate-verify-failed
curl -O https://raw.githubusercontent.com/joetanx/conjur-jenkins/main/central.pem
podman cp central.pem conjur:/etc/ssl/certs/central.pem
podman exec conjur openssl x509 -noout -hash -in /etc/ssl/certs/central.pem
podman exec conjur ln -s /etc/ssl/certs/central.pem /etc/ssl/certs/a3280000.0