v2 does not contain the commandline interface and the animations interface anymore. They are moved to two seperate modules. (node-piglow-cli and node-piglow-animations)
v3 removes node 0.10 and 0.12 support and only works for node versions >4
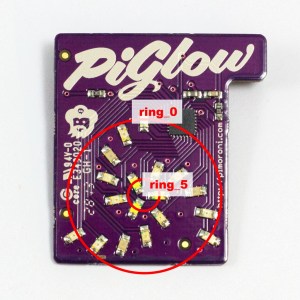
The piGlow is a little LED-Board for the Raspberry Pi sold by Pimoroni. It features 18 LEDs in six different colors (white, blue, green, yellow, orange, red) arranged like a vortex:
This module offers an interface to control the individual LEDs.
In action video: http://www.youtube.com/watch?v=s-rD8PfAke8
$ npm install piglow$ sudo vi /etc/modulesAdd these two lines
i2c-bcm2708
i2c-dev
$ sudo vi /etc/modprobe.d/raspi-blacklist.confComment out blacklist i2c-bcm2708
#blacklist i2c-bcm2708
var piGlow = require('piglow');

//callback fires when board is initialized
piGlow(function(error, pi) {
    pi.all;
});To each LED a brightness value between 0 (off) and 255 (freakin' bright) can be assigned. If one preferrs percentage values, as a convenience function all values smaller than 1 are treated as percentage values. Note that the value of '1' is not treated as 100% but as the brightness value of 1!
//parameter sets the brightness:
pi.l_0_0 = 100; //sets LED 1 of leg 1 to a brightness of 100 (of 255)
pi.l_0_1 = 10; //sets LED 2 of leg 1 to a brightness of 10
pi.l_0_1 = 0.5; //sets LED 2 of leg 1 to a brightness of 50% (=brightness of 127)
...
pi.l_2_5 = 200; //sets LED 6 of leg 3 to a brightness of 200

//shorthand form:
pi.l_0_0; //sets LED 1 of leg 1 to a brightness of 255pi.leg_0 = 100; //sets all LEDs of leg 1 to a brightness of 100
//shorthand
pi.leg_0; //sets all LEDs of leg 1 to 255pi.ring_0 = 100; //sets LED 1 of leg 1, LED 1 of leg 2 and LED 1 of leg 3 to 100
//shorthand
pi.ring_0; //sets LED 1 of leg 1, LED 1 of leg 1 and LED 1 of leg 2 to 255As the rings are distinguishable by color (order from outer ring to the inner: red, orange, yellow, green, blue, white), they can be adressed via the ring's color:
pi.red = 100; //sets the first ring to a brightness of 100

//shorthand
pi.red; //sets the first ring to maximum brightnesspi.all = 100; //set all LEDs to 100
//shorthand
pi.all; //set all LEDs to 255 (watch your eyes)
pi.reset; //set all LEDs to 0pi.random = 0.5;
//shorthand
pi.random;The propbability of lighting up can be defined (pi.random = 0.1;) and is otherwise calculated via this formula: (0.4 + Math.random() * 0.2);.
The brightness is calculated via this formula: parseInt(MAX_VALUE / 2 + (MAX_VALUE / 2 * Math.random()), 10)
Each parameter that is set causes the backend to transfer the complete set of values to the piglow board. Thus the following operation would cause three write operations:
pi.l_0_1 = 100;
pi.l_0_2 = 100;
pi.l_0_3 = 100;
The piglow-interface offers the possibility to open up a transaction and to commit it when all changes have been made. So the following code will cause only one write to the hardware board:
pi.startTransaction();
pi.l_0_1 = 100;
pi.l_0_2 = 100;
pi.l_0_3 = 100;
pi.commitTransaction();
This benefits performance especially when the LEDs are changed in high frequency.
Do you like your piglow animated? Checkout piglow-animations!
node-piglow-cli wraps piglow and offers a command line interface. You can than invoke the piglow like this (lights up the red LEDs):
$ piglow --redPossible use cases:
- use it in your Makefile to indicate a sucessfull built
- use it in your CI server to indicate failed (or sucessfull) built
- ...
This module also exposes its internal structure, with the possibility to invoke the piGlow interface with a injected mocking backend.
There are two backends, BackendMock prints the piglow data as JSON, BackendMockPrettyPrint structures the data in a readable way.
var piGlow = require('piglow');
var PiGlowBackendMock = piGlow.BackendMock;
var piGlowInterface = piGLow.piGlowInterface;

var myMock = new PiGlowBackendMock();
var myInterface = piGlowInterface(myMock);

//lets hack
myInterface.ring_0 = 255;
This way the module can be used in a non raspi environment for development or with a testing mock for unit tests. To implement your own mocks follow this interface:
function PiGlowMock() {}

PiGlowMock.prototype.update = function(piGlowConfiguration, callback) {
  /*
    piGlowConfiguration is a object in the following form:
    {
        "l_0_0":0, "l_0_1":0, "l_0_2":0, "l_0_3":0, "l_0_4":0, "l_0_5":0,
        "l_1_0":0, "l_1_1":0, "l_1_2":0, "l_1_3":0, "l_1_4":0, "l_1_5":0,
        "l_2_0":0, "l_2_1":0, "l_2_2":0, "l_2_3":0, "l_2_4":0, "l_2_5":0
    }
  */
};- piglow-system a system utlity tool that shows metrics about your system
- piglow-clock a binary watch implemented via the piglow


