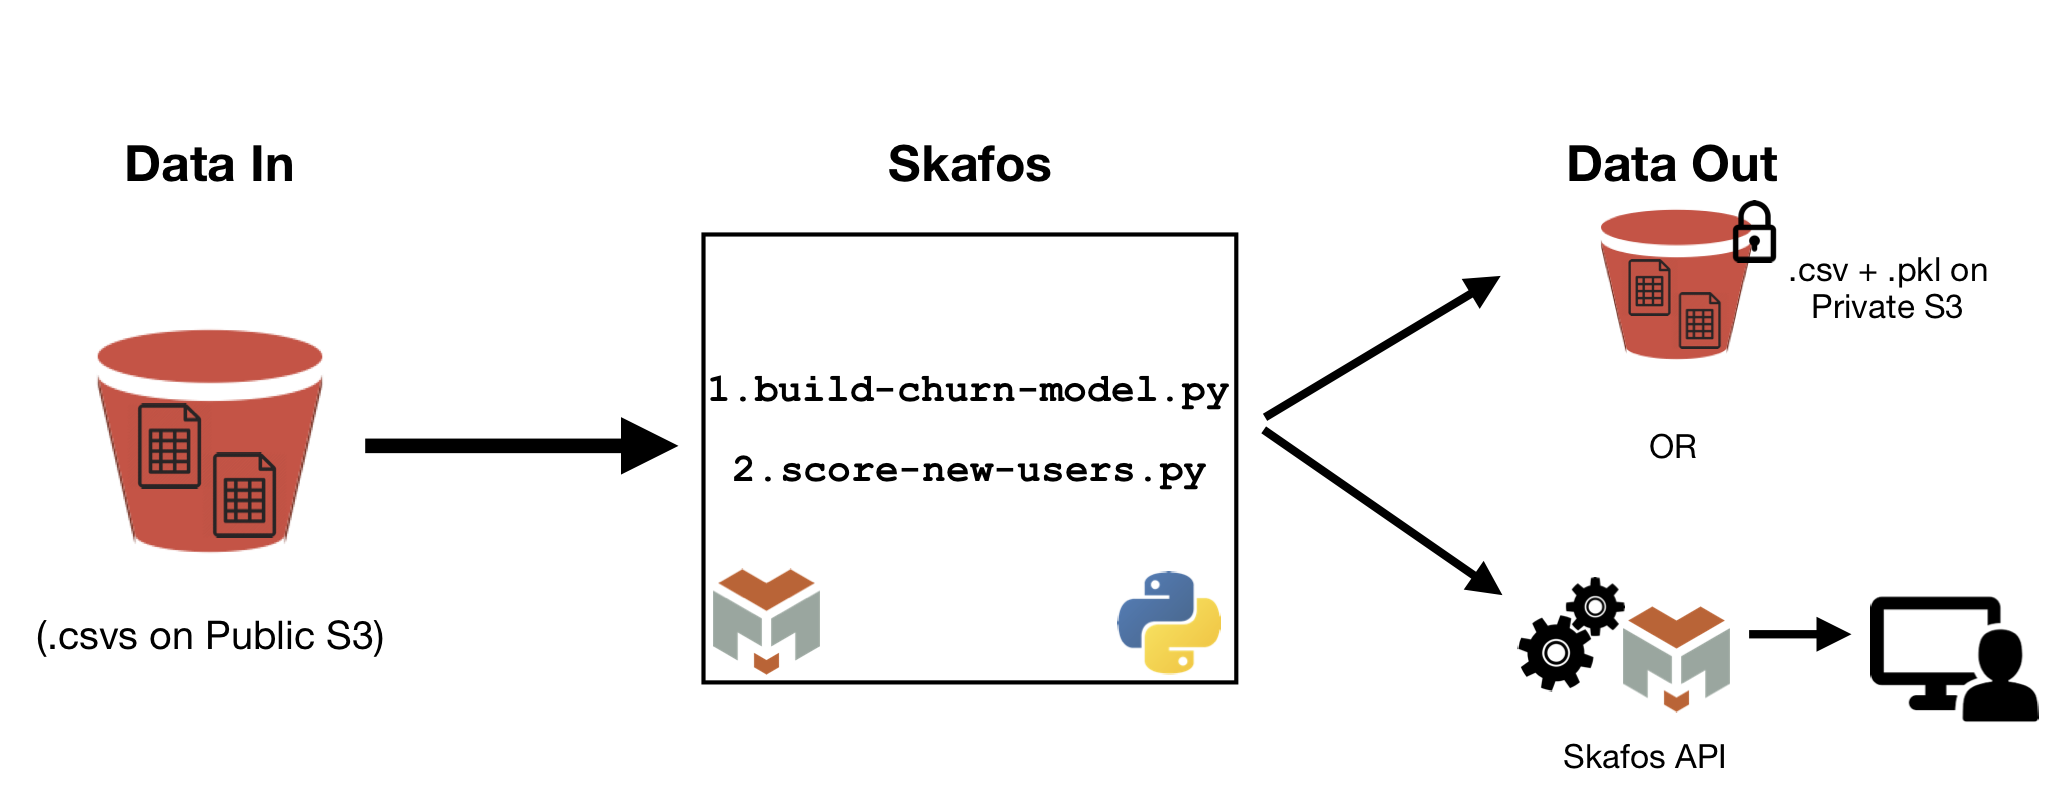
The purpose of this example is to highlight the utility of Skafos, Metis Machine's data science operationalization and delivery platform. In this example, we will:
- Build and train a model predicting cell phone churn with data that is available on a public S3 bucket.
- Save this model using the Skafos data engine
- Score new customers using this model and save these scores.
- Access these scores via an API and S3.
The figure below provides a functional architecture for this process.
-
Sign up for a Skafos account. If you do not have a Skafos account, you will not be able to complete this tutorial.
-
Authenticate your account via the
skafos authcommand. -
A working knowledge of how to use git.
-
In this tutorial, we take advantage of Amazon S3 cloud storage. For information about how to use Amazon S3 buckets, please use the following documentation:
The source data for this example is available in a public S3 bucket provided by Metis Machine. In the steps below, we will describe how to access it. No code modifications are required to access the input data.
This data has been slightly modified from its source, which is freely available and can be found here or here.
In the following step-by-step guide, we will walk you through how to use the code in this repository to run a job on Skafos. Following completion of this tutorial, you should be able to:
- Run the existing code and access its output on S3.
- Replace the provided data and model with your own data and model.
- Fork the churn-model-demo from Github. This code is freely available as part of the Skafos organization. Note that the README is a copy of these instructions.
- Clone the forked repo to your machine, and add an upstream remote to connect to the original repo, if desired.
Once in top level of the working directory of this project, type: skafos init on the command line. This will generate a new metis.config.yml file that is tied to your Skafos account and organization.
Open up this config file and edit the job name and entrypoint to match metis.config.yml.example included in the repo. Specifically, the name and entrypoint should look like this:
name: build-churn-model
entrypoint: "build-churn-model.py"
Note: Do not edit the project token or job_ids in the .yml file. Otherwise, Skafos will not recognize and run your job.
In metis.config.yml.example, you'll note that there are two jobs: one to build a model, and one to score new users. You will need to add a second job to your Skafos project via the following command on the command line:
skafos create job score-new-users
This will output a job_id on the command line. Copy this job id to your metis.config.yml file, again using metis.config.yml.example as a template, and including the following:
language: python
name: score-new-users
entrypoint: "score-new-users.py"
dependencies: ["<job-id for build-churn-model.py>"]
This dependency will ensure that new users are not scored until the churn model has been built. If build-churn-model.py does not complete, then score-new-users.py will not run. Note the quotations that are necessary around the job id on the dependencies line.
Now that your metis.config.yml file has all the necessary components, add it to the repo, commit, and push.
In Steps 3 and 4 above, you initialized a Skafos project so you can run the cloned repo in Skafos. Now, you will need to add the Skafos app to your Github repository.
To do this, navigate to the Settings page for your organization, click on Installed GitHub Apps to add the Skafos app to this repository. Alternatively, if this repo is not part of an organization, navigate to your Settings page, click on Applications, and install the Skafos app.
In common/data.py, the following variables are defined to store the output data scores, model, and project token:
# Output models and scores
S3_PRIVATE_BUCKET = "skafos.example.output.data"
CHURN_MODEL_SCORES = "TelcoChurnData/churn_model_scores/scores.csv"
AWS_ACCESS_KEY_ID = os.getenv("AWS_ACCESS_KEY_ID")
AWS_SECRET_ACCESS_KEY = os.getenv("AWS_SECRET_ACCESS_KEY")

# Project Token
KEYSPACE = "91633e3d419e23dc7a2da419"
You will need to create your own private S3 bucket and AWS access keys Amazon provides documentation for how do to this:
Once you have created these things do the following:
- Replace
S3_PRIVATE_BUCKETwith the bucket you just created. - Provide Skafos with your
AWS_ACCESS_KEY_IDandAWS_SECRET_ACCESS_KEYvia the command line.skafos env AWS_ACCESS_KEY_ID --set <key>andskafos env AWS_SECRET_ACCESS_KEY --set <key>will do this. - Update the
KEYSPACEto be theproject_tokenthat was generated with themetis.config.ymlfile.
In step 7, you generated several changes to common/data.py. These changes now need to be pushed to Github. In doing so, the Skafos app will pick them up and run both the training and scoring jobs.
Navigate to dashboard.metismachine.io to monitor the status of the job you just pushed. Additional documentation about how to use the dashboard can be found here.
Once your job has completed, you can verify that the predictive model itself (in the form of a .pkl file) and the scored users (in a .csv file) are in the private S3 bucket you specified in Step 7.
In addition to data that has been output to S3, this code uses the Skafos SDK to store scored users in a Cassandra database. Specifically, the save_scores function, will write scored users to a table.
The scored users in Cassandra can be easily accessed via an API call. Navigating to the root project directory on the command line, type skafos fetch --table model_scores. This will return both a list of scores and a cURL command that can be incorporated into applications in the usual fashion to retrieve this data.
Now that you have successfully built a predictive model on Skafos and scored new data, you can adapt this code to build your own models.
