Table of Contents

This Project detects faces from your live webcam and predicts the age and gender. If you wish to try it online (via web), there soon will be a website that will support this feature. I will keep this project updated by then. So far, you can only try it by cloning this repo to your local computer and by following the instructions below.:smile:
This is an example of how you can go about setting up this project locally. To get a local copy up and running follow these simple example steps.
- Webcam
- You need a webcam for the project to detect faces.
- Anaconda (If you don't have it installed, please follow through the installation steps below.)
- Anaconda is a free and open-source Python distribution and collection of hundreds of packages related to data science, scientific programming, development and more.
-
Download Anaconda
-
Clone the repo
git clone https://github.com/PricelessCode/Age-Gender-Detector.git
-
Create virtual environment for this project (Optional)
-
Create virtual env
conda create age-gender-detector
-
Activate the virtual env
source activate age-gender-detector
Then you will see the activated virtual environment with parenthesis in your terminal.
-
-
Install required packages via Anaconda
conda install --file requirements.txt
I have exported all the required packages for this project in
requirements.txt. Running the command above will automatically install the required packages by itself. -
Go to the project folder and run the project!
-
Go to the project folder
cd Age-Gender-Detector -
Run the detect_age_gender_video.py
python3 detect_age_gender_video.py
-
-
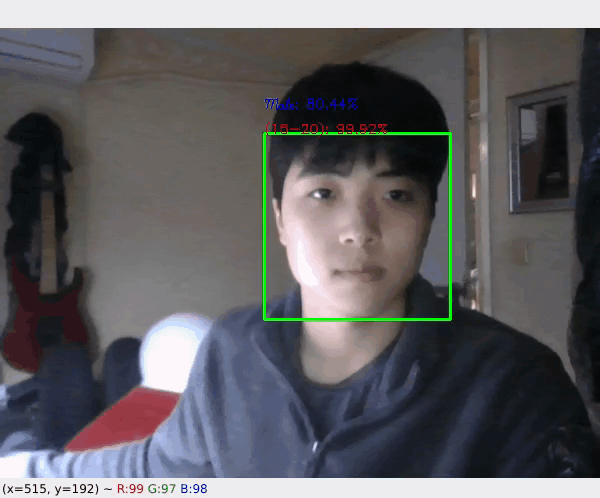
It detects faces in real time and predict age and gender.
-
I am 22 years old by the time I recorded this. So the prediction is quite reliable.
-
It can also detect multiple faces and faces from images and videos. (I got the image in the phone from Google)


-
Face Detection
- The face is detected based on OpenCV's Haar feature-based cascade classifiers.
-
Age Prediction
-
The age is predicted based on Levi and Tal Hassner's Age Classification model
-
Ideally, Age Prediction should be approached as a Regression problem since we are expecting a real number as the output. However, estimating age accurately using regression is challenging. Even humans cannot accurately predict the age based on looking at a person. However, we have an idea of whether they are in their 20s or in their 30s. Because of this reason, it is wise to frame this problem as a classification problem where we try to estimate the age group the person is in. For example, age in the range of 0-2 is a single class, 4-6 is another class and so on.
-
The Adience dataset has 8 classes divided into the following age groups [(0 – 2), (4 – 6), (8 – 12), (15 – 20), (25 – 32), (38 – 43), (48 – 53), (60 – 100)]. Thus, the age prediction network has 8 nodes in the final softmax layer indicating the mentioned age ranges.
-
It should be kept in mind that Age prediction from a single image is not a very easy problem to solve as the perceived age depends on a lot of factors and people of the same age may look pretty different in various parts of the world. Also, people try very hard to hide their real age!
-
-
Gender Prediction
-
The Gender is predicted based on Levi and Tal Hassner's Gender Classification model
-
They have framed Gender Prediction as a classification problem. The output layer in the gender prediction network is of type softmax with 2 nodes indicating the two classes “Male” and “Female”.
-
Contributions are what make the open source community such an amazing place to be learn, inspire, and create. Any contributions you make are greatly appreciated. Also, Feel free to raise issues on the issue page
- Fork the Project
- Create your Feature Branch (
git checkout -b feature/AmazingFeature) - Commit your Changes (
git commit -m 'Add some AmazingFeature') - Push to the Branch (
git push origin feature/AmazingFeature) - Open a Pull Request
Distributed under the MIT License. See LICENSE for more information.
Seungho Lee - poream3387@gmail.com