Langchain-Chatchat is a RAG (Retrieval Augmented Generation) application that implements knowledge and search engine based QA. This repo is a fork of chatchat-space/Langchain-Chatchat, and includes BigDL-LLM optimizations to run it on Intel GPU (e.g., local PC with iGPU, discrete GPU such as Arc, Flex and Max).
You can change the UI language in the left-side menu. We currently support English and 简体中文 (see video demos below).
English |
简体中文 |
Langchain-chatchat-en.mp4 |
Langchain-chatchat-chs.mp4 |
The following sections introduce how to install and run Langchain-chatchat on Intel Core Ultra platform (MTL), utilizing the iGPU to run both LLMs and embedding models.
See the RAG pipeline in the Langchain-Chatchat architecture below (source).
Download the Langchain-Chatchat with BigDL-LLM integrations from this link. Unzip the content into a directory, e.g.,C:\Users\arda\Downloads\Langchain-Chatchat-bigdl-llm.
Visit the Install BigDL-LLM on Windows with Intel GPU Guide, and follow Install Prerequisites to install Visual Studio, GPU driver, oneAPI, and Conda.
- Open Anaconda Prompt (miniconda3), and run the following commands to create a new python environment:
conda create -n bigdl-langchain-chatchat python=3.11 libuv
conda activate bigdl-langchain-chatchat
Note: When creating the conda environment we used python 3.11, which is different from the default recommended python version 3.9 in Install BigDL-LLM on Windows with Intel GPU
- Install
bigdl-llmpip install --pre --upgrade bigdl-llm[xpu] -f https://developer.intel.com/ipex-whl-stable-xpu pip install --pre --upgrade torchaudio==2.1.0a0 -f https://developer.intel.com/ipex-whl-stable-xpu - Switch to the root directory of Langchain-Chatchat you've downloaded (refer to the download section), and install the dependencies with the commands below. Note: In the example commands we assume the root directory is
C:\Users\arda\Downloads\Langchain-Chatchat-bigdl-llm. Remember to change it to your own path).cd C:\Users\arda\Downloads\Langchain-Chatchat-bigdl-llm pip install -r requirements_bigdl.txt pip install -r requirements_api_bigdl.txt pip install -r requirements_webui.txt
- In root directory of Langchain-Chatchat, run the following command to create a config:
python copy_config_example.py
- Edit the file
configs\model_config.py, changeMODEL_ROOT_PATHto the absolute path where you put the downloaded models (LLMs, embedding models, ranking models, etc.)
Download the models and place them in the path MODEL_ROOT_PATH (refer to details in Configuration section).
Currently, we support only the LLM/embedding models specified in the table below. You can download these models using the link provided in the table. Note: Ensure the model folder name matches the last segment of the model ID following "/", for example, for THUDM/chatglm3-6b, the model folder name should be chatglm3-6b.
| Model | Category | download link |
|---|---|---|
THUDM/chatglm3-6b |
Chinese LLM | HF or ModelScope |
meta-llama/Llama-2-7b-chat-hf |
English LLM | HF |
BAAI/bge-large-zh-v1.5 |
Chinese Embedding | HF |
BAAI/bge-large-en-v1.5 |
English Embedding | HF |
When you run this applcation on Intel GPU for the first time, it is highly recommended to do a one-time warmup (for GPU kernels compilation).
In Anaconda Prompt (miniconda3), under the root directory of Langchain-Chatchat, with conda environment activated, run the following commands:
python warmup.pyNote: The warmup may take several minutes. You just have to run it one-time on after installation.
Open Anaconda Prompt (miniconda3) and run the following commands:
conda activate bigdl-langchain-chatchat
call "C:\Program Files (x86)\Intel\oneAPI\setvars.bat"
set SYCL_CACHE_PERSISTENT=1
set BIGDL_LLM_XMX_DISABLED=1
set no_proxy=localhost,127.0.0.1
python startup.py -a
You can find the Web UI's URL printted on the terminal logs, e.g. http://localhost:8501/.
Open a browser and navigate to the URL to use the Web UI.
To start chatting with LLMs, simply type your messages in the textbox at the bottom of the UI.
- Select
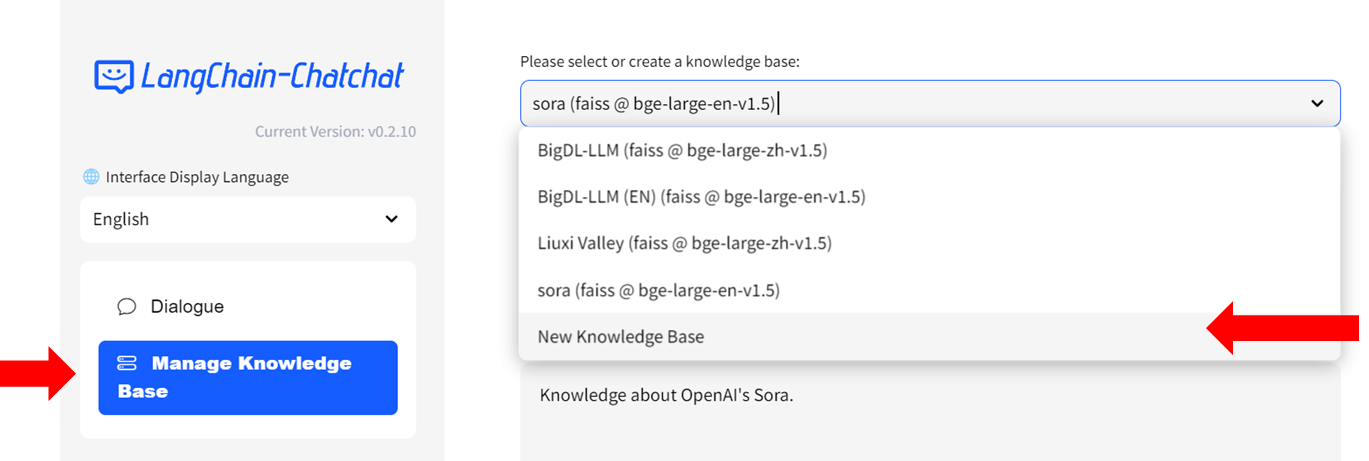
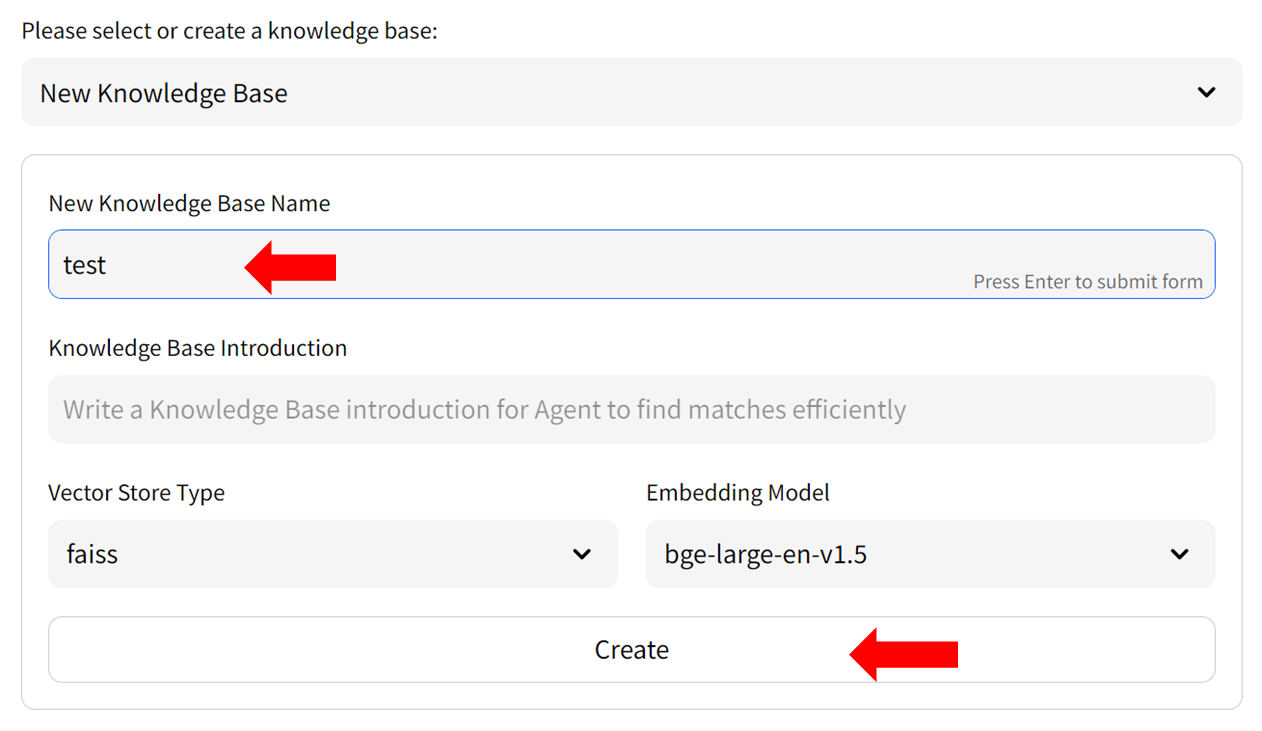
Manage Knowledge Basefrom the menu on the left, then chooseNew Knowledge Basefrom the dropdown menu on the right side. - Fill in the name of your new knowledge base (example: "test") and press the
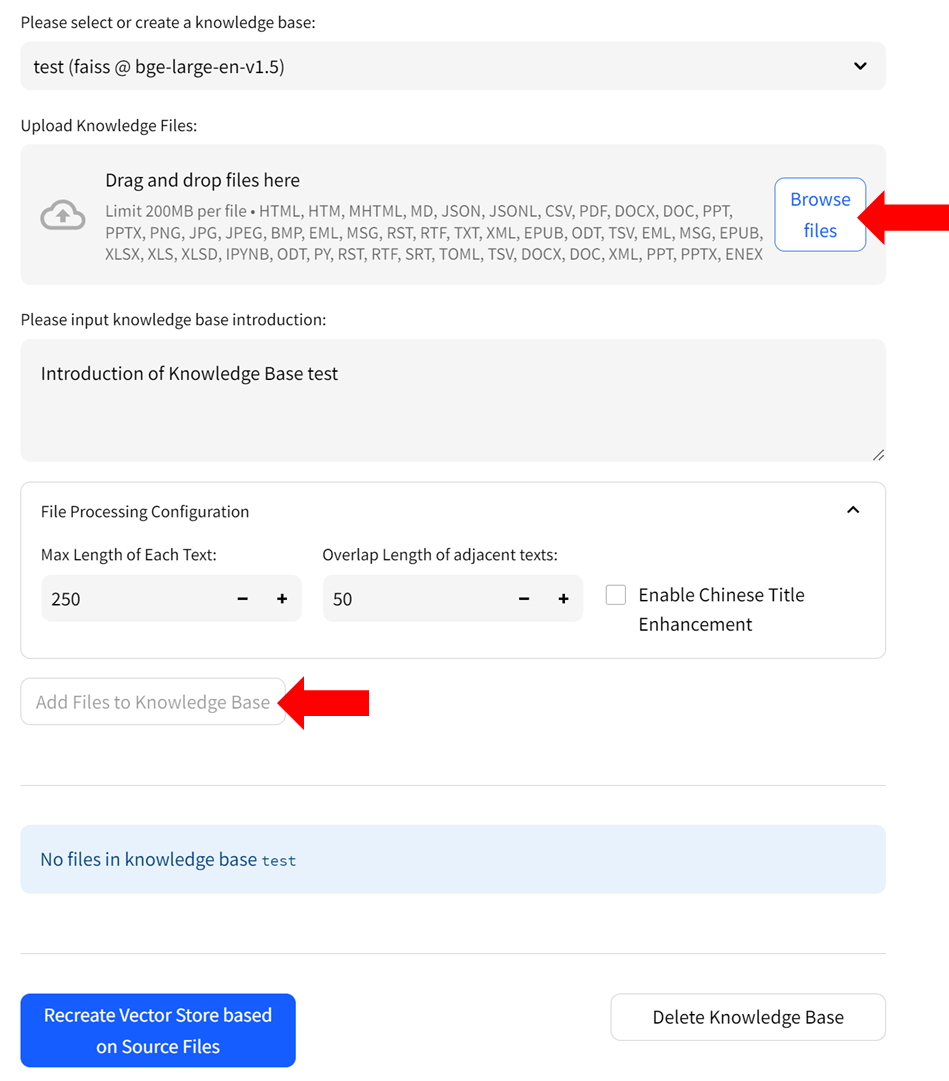
Createbutton. Adjust any other settings as needed. - Upload knowledge files from your computer and allow some time for the upload to complete. Once finished, click on
Add files to Knowledge Basebutton to build the vector store. Note: this process may take several minutes.
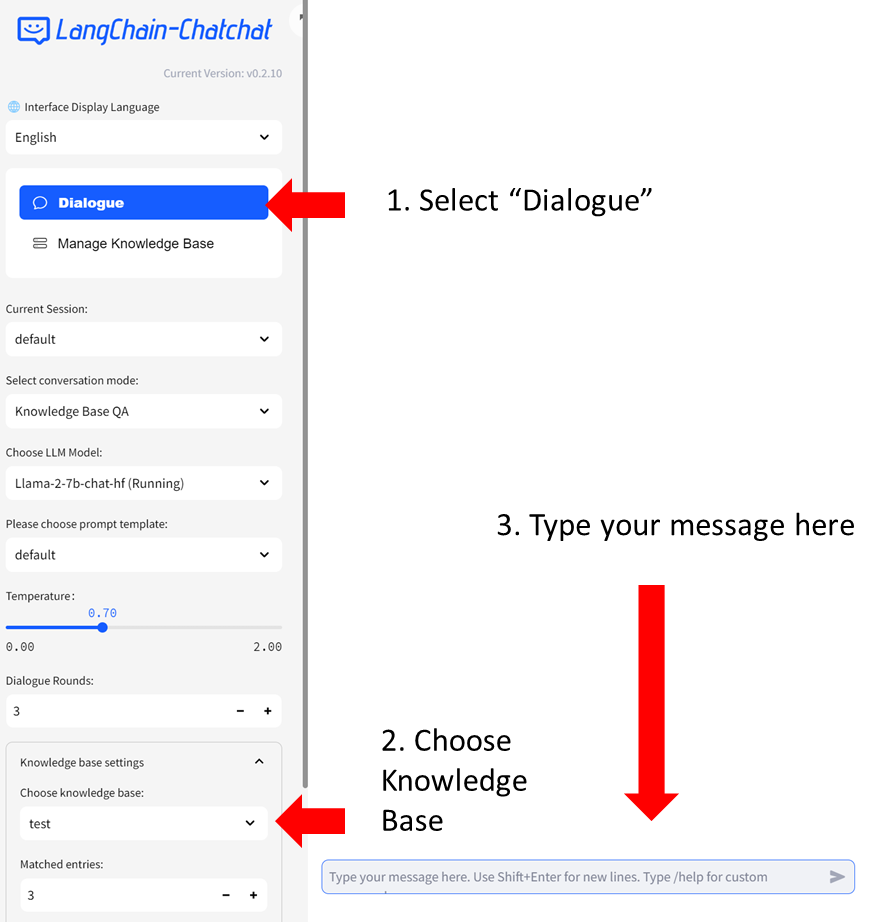
You can now click Dialogue on the left-side menu to return to the chat UI. Then in Knowledge base settings menu, choose the Knowledge Base you just created, e.g, "test". Now you can start chatting.
For more information about how to use Langchain-Chatchat, refer to Official Quickstart guide in English, Chinese, or the Wiki.


