A simple, highly configurable alternative to Linktr.ee and Linkin.bio using only 11ty and TailwindCSS.
(no webpack, parcel, gulp, etc.)
NOTE: This is my first publicly shared and promoted repo. I'm learning while doing and I'm providing the kind of instructions that would be helpful to me while I am/was learning! It's also a great exercise in thinking about the structure, instructions, usage, and how the repo works. I've actually made a LOT of changes to the app while documenting this README.
Jump down here for screenshots of the default install.
- 💥 Features
- 🔧 Install and Deploy
- 🔓 Site Settings
- 🔗 Managing Links
- 📣 Managing Social Icons
- 🔹 Customizing Colors
- 📊 Google Analytics or Fathom Stats
- 📃 Adding Pages to the Nav Bar
- 📱 Screenshots
- 📄 License
- Very simple and basic 11ty and TailwindCSS setup
- No Webpack, Snowpack, Parcel, Gulp, etc. to deal with
- FontAwesome SVG social icons
- Includes settings for Dribbble, Facebook, GitHub, Instagram, LinkedIn!, Pinterest, Twitter, YouTube, and Email
- Uses PurgeCSS and CSSnano resulting in a ~6kb minified CSS file, <2kb gzipped
src/_data/settings.json:- Manage your Name and META data
- Manage your Hero Image and Caption
- Manage your Social SVG links/icons
- Manage Color overrides for all colors, including SVGs
src/_data/links.json:- Manage your link's URL and display text
- One click deploy to Netlify
- Pre-configured for use at Forestry.io (if you want to manage Settings and Links in a browser)
View the Live Demo of this repo.
Install is standard and easy if you're familiar with Node.js.
If you want to host for free on Netlify, follow the Deploy to Netlify instructions below.
(assumes you understand and use the terminal to clone and install Node.js apps)
- Duplicate this repository by clicking Use this template above
- Clone the repository locally
- Run
npm installto install dependencies
Running dev, test, and build:
- Running
npm run devwill run in parallel the following:- Create the
distfolder used for production. - Process TailwindCSS via PostCSS and watch for changes.
- Fire up 11ty and use it to
--servethe site in development mode. - You'll need to open a browser and go to http://localhost:8080 to view the default site and it will automatically reload with any saved changes.
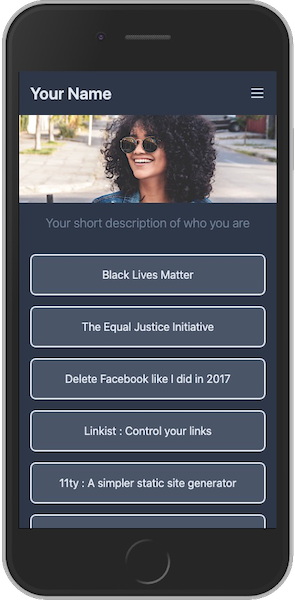
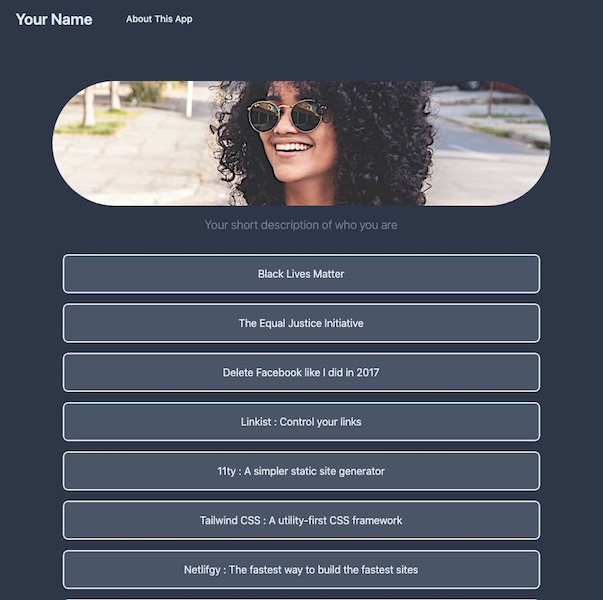
- You should see the default app view shown below
- To stop the live-server use CONTROL c
- Create the
- Running
npm run testwill run the following sequentially:- Fire up 11ty to process all files as needed.
- Process and build the
/dist/assets/css/tailwind.cssfile inNODE_ENV=productionmode to use PurgeCSS to remove unused CSS elements and CSSnano to minify the resulting CSS. - Fire up live-server and automatically open your browser to http://127.0.0.1:8080/ so you can click around to make sure everything will work when live on the hosting server.
- DO NOT make changed while in
testmode. They will not be automatically updated because neither 11ty nor PostCSS are watching for changes.
- DO NOT make changed while in
- To stop the live-server use CONTROL c
- Running
npm run buildwill build the site in full Production mode as it will sit on the hosting server.
To automatically deploy this Template to Netlify for free hosting, simply click the Deploy to netlify button below.
- First you'll need a free Netlify account.
- And, obviously, a free GitHub account.
- Clicking the button will copy this repo to your GitHub account.
- It will then connect it to your Netlify account.
- In less than 1-2 minutes, this Template will be up and running live at a unique Netlify domain.
- Go to your GitHub account and find this repo:
- Clone your new repository locally.
- Run
npm installto install dependencies. - Follow the instructions above for running
dev,test, andbuild. - Any changes you make to your repo, locally and then synced to GitHub, or directly on GitHub will be picked up by Netlify and it will re-deploy your site with the new changes.
- Follow the instruction at Netlify for setting up your own custom domain...still all free!
Forestry.io provides an amazing CMS to manage your static site content...free for personal projects!
Install as outlined above and then login or create a free account at Forestry and follow their instructions for setting up your new site.
Manage all the site settings, Name, Bio, META, stats ID, Image, Social links, and colors in the src/_data/settings.json file.
Hopefully it's pretty obvious. 😃
Manage all your links in the src/_data/links.json file.
Hopefully it's pretty obvious. 😃
Add as many, or as few, as you like. I've provided a few that I feel are relevant as of the publish date of this repo.
We use free FontAwesome SVGs for the social links at the bottom. According to their license, we provide an attribution link. Please do not remove the link unless you have a Pro FontAwesome account.
Manage all your social links in the src/_data/settings.json file.
Hopefully it's pretty obvious. 😃
I decided to require the entire URL (rather than just the profile name) in case people wanted to provide links to specific posts, videos, etc.
You can, of course, add any additional platforms by updating the src/_includes/components/nav.njk file. If you want to manage your custom SVGs' colors, you'll have to provide the raw SVG code and make sure to add the class tag as in the existing platform codes.
This assumes you know/use/understand TailwindCSS.
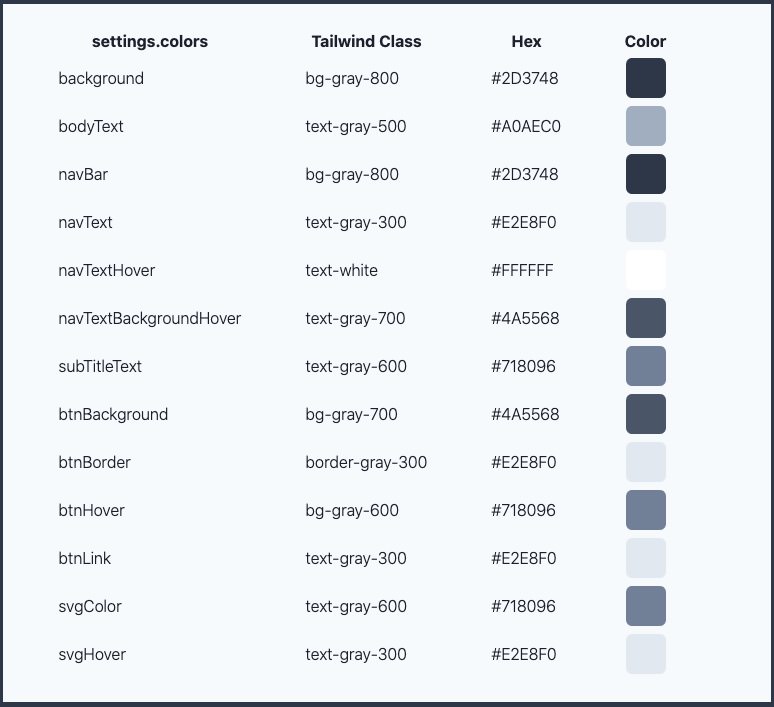
You can override the default colors shown below in the src/_data/settings.json file.
Tailwind includes a generous palette of great-looking, well-balanced colors that are perfect for prototyping or for kicking off a brand new project.
If you use the Tailwind classes, make sure to use the proper bg-[color]-[###] or text-[color]-[###] or border-[color]-[###] depending on if it's a Background, Text, or Border color.
Here are the colors I used in this project.
You can also override some colors at the Page level in the frontmatter.
- Check the src/about.md for an example of NO overrides.
- Check the src/colors.md file for an example of ALL the Page color overrides.
(NOTE: You won't see the /colors page in the Nav Bar but you can get to it manually by adding /colors to the end of your published URL...or even the Live Demo. You can delete the colors.md file if you want. It was helpful for creating the Default Colors table.)
Personally I don't use or care about stats, but I know some do. I've included conditional code in the src/_includes/layouts/base.njk that supports both a Google Analytics tracking code ID and a standard installation Fathom site ID.
Enter your GA or Fathom IDs (only) in the /_data/settings.json file if you want to track site stats.
If you use a different stats provider, you'll have to manually update the src/_includes/layouts/base.njk and you can remove the Fathom and GA stats blocks.
You can add Pages if you want. The easiest way would be to duplicate the src/about.md page and modify it. If you want it to show up in the Nav Bar, be sure to adjust its title: and order: in the frontmatter.
Your new Page will then automatically show up in both the desktop and mobile Navs.
Here's what you should see when you correctly install and run the app locally:
| Mobile | Desktop |
|---|---|
 |
 |
This project is under the MIT license. Please adhere to the code of conduct.

