MonkeyBox mbx enables building CloudStack packages and deploying CloudStack
dev and qa environment using pre-built DHCP-enabled VM templates.
- Architecture
- Compatibility
- Installation and Setup
- Using mbx
- CloudStack Development
- Contributing
- Troubleshooting
An mbx environment consists of VMs that runs the CloudStack management server
and hypervisor hosts. These VMs are provisioned on a local host-only monkeynet
network which is a /16 nat-ed RFC1918 IPv4 network. The diagram above shows how
nested guest VMs and virtual router are plugged in nested-virtual networks that
run in a nested KVM host VM.
To learn more about CloudStack as a user, you may read:
https://github.com/shapeblue/hackerbook/blob/main/0-init.md
https://github.com/shapeblue/hackerbook/blob/main/1-user.md
mbx requires NFS storage to be setup and exported for the base path
/export/testing for environment-specific primary and secondary storages.
A typical mbx environment upon deployment creates two primary storage
directories (primary1 and primary2) and one secondary storage directory
(secondary). The secondary storage directory is seeded with supported
CloudStack version-specific systemvmtemplates if necessary when the env is
launched using mbx launch. The seeded systemvmtemplate is then used to
create system VMs such as the Secondary-Storage VM, Console-Proxy VM and Virtual
Router in an mbx environment.
mbx requires a local 172.20.0.0/16 natted network such that the VMs on this
network are only accessible from the workstation/host but not by the outside
network. The mbx init command initialises this network.
External Network
  .                     +-----------------+
  |              virbr1 | MonkeyBox VM1   |
  |                  +--| IP: 172.20.0.10 |
+-----------------+  |  +-----------------+
| Host x.x.x.x    |--+
| IP: 172.20.0.1  |  |  +-----------------+
+-----------------+  +--| MonkeyBox VM2   |
                        | IP: 172.20.x.y  |
                        +-----------------+
The 172.20.0.0/16 RFC1918 private network is used, as the other 192.168.x.x and 10.x.x.x CIDRs may already be in use by VPN, lab resources and office/home networks.
To keep the setup simple, all MonkeyBox VMs have a single NIC which can be used as a single physical network in CloudStack that has the public, private, management/control and storage networks. A complex setup is possible by adding multiple virtual networks and nics on them.
For QA env, mbx will deploy a single mgmt VM that runs the management
server, the usage server, MySQL server, marvin integration tests etc. and two
hypervisor host VMs.
For Dev env, mbx will deploy a single hypervisor host VM and the management
server, usage server, MySQL server etc. are all run from the workstation/host by
the developer.
For both QA and Dev environments, the environment-specific NFS storage are
generally directories under /export/testing which serve as both primary and
secondary storage.
The mbx templates are initialised and downloaded at
/export/monkeybox/templates/.
The mbx environments, their configurations and VM disks are hosted at
/export/monkeybox/boxes/.
Host requirements:
- Ubuntu 22.04 LTS (recommended) or EL8/9**
- Recommended 32GB RAM with Intel VT-x or AMD-V enabled 4+cores CPU
- Uninstall any other hypervisor software (such as VMware workstation, VirtualBox)
**Note: mbx has been tested and developed on Ubuntu 20.04 and 22.04 LTS; VMware environment require vmxnet3 which may not be supported on EL environments
Supported Management Server (Templates):
- EL7 (CentOS 7)
- EL8 (AlmaLinux 8)
- EL9 (AlmaLinux 9)
Supported Hypervisors (Templates):
- KVM: EL7, EL8, EL9
- VMware vSphere: 6.7u3, 7 (7.0u3), 8 (8.0)
- XCP-ng: 8.2
- XenServer: 7.1 LSTR
Tested CloudStack versions:
-
4.16
-
4.17
-
4.18
-
MBX QA environment deployment supported with CloudStack versions: 4.11 or later.
-
MBX development supported with CloudStack version 4.16 and later.
-
Smoketests supported CloudStack versions: 4.16 or later.
Note: legacy CloudStack releases older than v4.11 that don't have
cloudstack-marvin package will not work.
Refer to https://docs.cloudstack.apache.org for CloudStack version-specific hypervisor and distro compatibility matrix.
Video: https://shapeblue-engineering-videos.s3.eu-west-1.amazonaws.com/mbx/mbx-installation.mp4
mbx requires:
- NFS storage
- (Baremetal) QEMU/KVM host for running nested VMs (Ubuntu and CentOS have been tested)
- Docker for building CloudStack packages: https://docs.docker.com/engine/install/ubuntu/
Additional notes:
- Default password for all
mbxtemplates for the root user isP@ssword123. - Default password for CloudStack
adminuser ispassword.
On Ubuntu:
apt-get install nfs-kernel-server quota sshpass wget jq bc
echo "/export  *(rw,sync,no_root_squash,no_subtree_check)" > /etc/exports
mkdir -p /export/testing
exportfs -a
sed -i -e 's/^RPCMOUNTDOPTS="--manage-gids"$/RPCMOUNTDOPTS="-p 892 --manage-gids"/g' /etc/default/nfs-kernel-server
sed -i -e 's/^STATDOPTS=$/STATDOPTS="--port 662 --outgoing-port 2020"/g' /etc/default/nfs-common
echo "NEED_STATD=yes" >> /etc/default/nfs-common
sed -i -e 's/^RPCRQUOTADOPTS=$/RPCRQUOTADOPTS="-p 875"/g' /etc/default/quota
service nfs-kernel-server restart
On EL8 (Rocky Linux 8):
dnf install -y epel-release
dnf install nfs-utils sshpass wget jq bc
echo "/export  *(rw,sync,no_root_squash,no_subtree_check)" > /etc/exports
mkdir -p /export/testing

# Add the following to /etc/sysconfig/nfs
LOCKD_TCPPORT=32803
LOCKD_UDPPORT=32769
MOUNTD_PORT=892
RQUOTAD_PORT=875
STATD_PORT=662
STATD_OUTGOING_PORT=2020

# Start NFS and rpcbind
systemctl enable --now rpcbind
systemctl enable --now nfs-server

# Disable/configure firewalld as necessary
systemctl disable --now firewalld
On Ubuntu:
apt-get install qemu-kvm libvirt-daemon libvirt-daemon-system libvirt-clients bridge-utils virtinst cpu-checker libnss-libvirt sysfsutils
kvm-ok
On EL8 (Rocky Linux 8):
yum install bridge-utils net-tools chrony qemu-kvm qemu-img libvirt libvirt-daemon libvirt-daemon-driver-qemu libvirt-nss virt-install
On Ubuntu, fixing permissions for libvirt-qemu (for non-root users):
sudo getfacl -e /export
sudo setfacl -m u:libvirt-qemu:rx /export
On EL8/Rocky Linux, add polkit rule to allow non-root users to use virsh (replace 'rohit' with your username):
# cat /etc/polkit-1/rules.d/50-org.libvirt.unix.manage.rules
polkit.addRule(function(action, subject) {
    if (action.id == "org.libvirt.unix.manage" &&
        subject.user == "rohit") {
            return polkit.Result.YES;
            polkit.log("action=" + action);
            polkit.log("subject=" + subject);
    }
});
Note: mbx depends on Libvirt NSS for name resolution; replace rohit with your username on the host.
Next, add the libvirt libvirt_guest in the nss config file, following so that grep -w 'hosts:' /etc/nsswitch.conf returns: (note: ensure the same order as below)
files libvirt libvirt_guest dns mymachines
For Ubuntu, allow non-root users to add tap interfaces to a bridge:
sudo chmod u+s /usr/lib/qemu/qemu-bridge-helper
sudo bash -c 'mkdir -p /etc/qemu && echo "allow virbr0" >>/etc/qemu/bridge.conf && echo "allow virbr1" >>/etc/qemu/bridge.conf'
For EL8/Rocky Linux, do this:
sudo bash -c 'mkdir -p /etc/qemu-kvm && echo "allow virbr0" >> /etc/qemu-kvm/bridge.conf && echo "allow virbr1" >> /etc/qemu-kvm/bridge.conf'
Install virt-manager, the virtual machine manager graphical tool to manage VMs on your machine.
On Ubuntu:
apt-get install virt-manager
On EL8 (Rocky Linux 8):
yum install -y virt-manager
git clone https://github.com/shapeblue/mbx /export/monkeybox

# Enable mbx under $PATH, for bash:
echo export PATH="/export/monkeybox:$PATH" >> ~/.bashrc
# Enable mbx under $PATH, for zsh:
echo export PATH="/export/monkeybox:$PATH" >> ~/.zshrc

# Initialise `mbx` by opening in another shell:
mbx init
The mbx init should be run on first install and on upgrade which will update
templates and domain xmls. When mbx init is executed on upgrade, ensure no mbx
VMs are running.
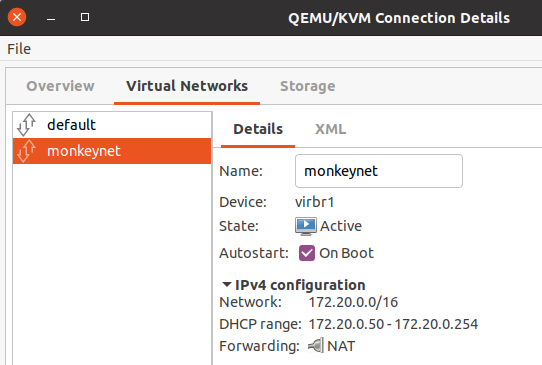
The mbx init command initialises the monkeynet network. You can check and confirm the
network using:
$ virsh net-list --all
Name                 State      Autostart     Persistent
----------------------------------------------------------
default              active     yes           yes
monkeynet            active     yes           yes
Alternatively, you may open virt-viewer manager and click on:
Edit -> Connection Details -> Virtual Networks
You may also manually add/configure a virtual network with NAT in 172.20.0.0/16 like below:
This will create a virtual network with NAT and CIDR 172.20.0.0/16, the gateway
172.20.0.1 is also the workstation/host's virtual bridge IP. The virtual network's
bridge name virbrX may be different and it does not matter as long as you've a
NAT-enabled virtual network in 172.20.0.0/16.
Your workstation/host IP address is `172.20.0.1`.
Video: https://shapeblue-engineering-videos.s3.eu-west-1.amazonaws.com/mbx/mbx-usage-demo.mp4
The mbx tool can be used to build CloudStack packages, deploy dev or QA
environments with KVM, VMware, XenServer and XCP-ng hypervisors, and run
smoketests on them.
$ mbx
MonkeyBox 🐵 v0.3
Available commands are:
  init: initialises monkeynet and mbx templates
  package: builds packages from a git repo and sha/tag/branch
  list: lists available environments
  deploy: creates QA env with two monkeybox VMs and creates marvin cfg file
  launch: launches QA env zone using environment's marvin cfg file
  test: start marvin tests
  dev: creates dev env with a single monkeybox VM and creates marvin cfg file
  agentscp: updates KVM agent in dev environment using scp and restarts it
  ssh: ssh into a mbx VM
  stop: stop all env VMs
  start: start all env VMs
  destroy: destroy environment
-
On first run or when upgrading
mbx, please run:mbx init
-
To list available environments and
mbxtemplates (mbxts), run:mbx list
-
To deploy an environment, run:
mbx deploy <name of env, default: mbxe> <mgmt server template, default: mbxt-kvm-el7> <hypervisor template, default: mbxt-kvm-el7> <repo, default: http://packages.shapeblue.com/cloudstack/upstream/el7/4.18>
Example to deploy test matrix (kvm, vmware, xenserver) environments:
mbx deploy 418-kenv mbxt-kvm-el8 mbxt-kvm-el8 # deploys ACS 4.18 + KVM EL8 env
mbx deploy 418-venv mbxt-kvm-el8 mbxt-vmware7 # deploys ACS 4.18 + VMware7(u3) env
mbx deploy 418-xenv mbxt-kvm-el8 mbxt-xcpng82 # deploys ACS 4.18 + XCP-ng 8.2 env
More examples with custom packages repositories:
mbx deploy cs417-kvm mbxt-kvm-el7 mbxt-kvm-el7 http://download.cloudstack.org/centos/7/4.17/
-
Once
mbxenvironment is deployed, to launch a zone run:mbx launch <name of the env, run
mbx listfor env name> -
To run smoketests, run:
mbx list # find your environment mbx ssh cd /marvin bash -x smoketests.sh
-
To destroy your mbx environment, run:
mbx destroy <name of the env, see mbx list for env name>
Note: to use qemu-ev on EL7 KVM hosts, after deploying an environment you
can run the following on KVM hosts (before launching the zone):
yum install centos-release-qemu-ev
yum install qemu-kvm-ev
This section is only for mbx users who want to access their mbx environments remotely. For this we suggest setting up wireguard VPN.
To setup wireguard on Ubuntu: (note replace LIBVIRT_PRT with the chain name that libvirt uses for NAT rules)
sudo apt-get install wireguard resolvconf
wg genkey | sudo tee /etc/wireguard/private.key
sudo cat /etc/wireguard/private.key | wg pubkey | sudo tee /etc/wireguard/public.key

# cat /etc/wireguard/wg0.conf
[Interface]
PrivateKey = <your base64_encoded_private_key_goes_here>
Address = 10.6.0.1/24
PostUp = iptables -I FORWARD -i wg0 -j ACCEPT; iptables -t nat -I LIBVIRT_PRT -o cloudbr0 -j MASQUERADE
PostDown = iptables -D FORWARD -i wg0 -j ACCEPT; iptables -t nat -D LIBVIRT_PRT -o cloudbr0 -j MASQUERADE
#MTU = 1420
ListenPort = 51820
SaveConfig = true

[Peer]
<... add rest of the peer config here...>
Note: you'll need to allow/enable port 51820/udp.
You may need forwarding enabled if you're connecting to a peer WireGuard server, add the following to /etc/sysctl.conf:
net.ipv4.ip_forward=1
And then run:
sysctl -p
Finally enable the server:
sudo systemctl enable wg-quick@wg0.service
sudo systemctl start wg-quick@wg0.service
sudo systemctl status wg-quick@wg0.service
Note: this is not for developers of 3rd party integration/feature that don't require changes in CloudStack, such developers should use a QA environment. MBX development usage is supported to work with CloudStack 4.16 and onwards.
This section covers how a CloudStack developer can run management server and
MySQL server locally to do development of CloudStack using mbx dev boxes along
side an IDE and other tools.
For developer env, it is recommended that you run your favourite IDE such as
IntelliJ IDEA, text-editors, your management server, MySQL server and NFS server
(secondary and primary storages) on your workstation (not in a VM) where these
services can be accessible to VMs, KVM hosts etc. at your host IP 172.20.0.1.
To deploy a dev env, you can run mbx dev <name of env> <hypervisor template>.
For example:
$ mbx dev some-feature mbxt-kvm-el8
The above will deploy a single hypervisor host and generate a marvin config file that you can use to deploy a zone.
To ssh into deployed hypervisor VM (with NSS configured), you can login by simply using:
$ mbx ssh <name of the dev VM or IP>
Refer to hackerbook for up-to-date guidance on learning CloudStack development: https://github.com/shapeblue/hackerbook
Run this:
$ sudo apt-get install openjdk-11-jdk maven python-mysql.connector libmysql-java mysql-server mysql-client bzip2 nfs-common uuid-runtime python-setuptools ipmitool genisoimage
Setup IntelliJ (recommended) or any IDE of your choice. Get IntelliJ IDEA community edition from:
https://www.jetbrains.com/idea/download/#section=linux
Install pyenv, jenv as well.
Setup aliasrc that defines some useful bash aliases, exports and utilities
such as agentscp. Run the following while in the directory root:
$ echo "source $PWD/files/aliasrc" >> ~/.bashrc
$ echo "source $PWD/files/aliasrc" >> ~/.zshrc
You may need to source your shell's rc/profile or relaunch shell/terminal
to use agentscp.
After installing MySQL server, configure the following settings in its config
file such as at /etc/mysql/mysql.conf.d/mysqld.cnf and restart mysql-server:
[mysqld]

sql-mode="STRICT_TRANS_TABLES,NO_ENGINE_SUBSTITUTION,ERROR_FOR_DIVISION_BY_ZERO,NO_ZERO_DATE,NO_ZERO_IN_DATE,NO_ENGINE_SUBSTITUTION"
server_id = 1
innodb_rollback_on_timeout=1
innodb_lock_wait_timeout=600
max_connections=1000
log-bin=mysql-bin
binlog-format = 'ROW'
After installing nfs server, configure the exports:
echo "/export  *(rw,async,no_root_squash,no_subtree_check)" > /etc/exports
mkdir -p /export/testing/primary /export/testing/secondary
Beware: For Dev env, before deploying a zone on your monkeybox environment, make
sure to seed the correct systemvmtemplate applicable for your branch. In your
cloned CloudStack git repository you can use the cloud-install-sys-tmplt to
seed the systemvmtemplate. Also note this may or may not be necessary depending
on your development base branch.
The following is an example to setup 4.15 systemvmtemplate which you should
run after deploying the CloudStack db: (please use CloudStack branch/version specific
systemvmtemplate)
cd /path/to/cloudstack/git/repo
wget http://packages.shapeblue.com/systemvmtemplate/4.15/systemvmtemplate-4.15.1-kvm.qcow2.bz2
./scripts/storage/secondary/cloud-install-sys-tmplt \
      -m /export/testing/secondary -f systemvmtemplate-4.15.1-kvm.qcow2.bz2 \
      -h kvm -o localhost -r cloud -d cloud
It's assumed that the directory structure is something like:
    /
    ├── $HOME/lab/cloudstack
    └── /export/monkeybox
Fork the repository at: github.com/apache/cloudstack, or get the code:
$ git clone https://github.com/apache/cloudstack.git
Noredist CloudStack builds requires additional jars that may be installed from:
https://github.com/shapeblue/cloudstack-nonoss
Clone the above repository and run the install.sh script, you'll need to do this only once or whenever the noredist jar dependencies are updated in the above repository.
Build using:
$ mvn clean install -Dnoredist -P developer,systemvm
Deploy database using:
$ mvn -q -Pdeveloper -pl developer -Ddeploydb
Run management server using:
$ mvn -pl :cloud-client-ui jetty:run -Dnoredist -Djava.net.preferIPv4Stack=true
Install marvin:
$ sudo pip install --upgrade tools/marvin/dist/Marvin*.tar.gz
While in CloudStack's repo's root/top directory, run the folllowing to copy agent scripts, jars, configs to your KVM host:
$ cd /path/to/git-repo/root
$ mbx agentscp 172.20.1.10  # Use the appropriate KVM box IP
Deploy datacenter using:
$ python tools/marvin/marvin/deployDataCenter.py -i ../monkeybox/adv-kvm.cfg
Example, to run a marvin test:
$ nosetests --with-xunit --xunit-file=results.xml --with-marvin --marvin-config=../monkeybox/adv-kvm.cfg -s -a tags=advanced --zone=KVM-advzone1 --hypervisor=KVM test/integration/smoke/test_vm_life_cycle.py
Note: Use nosetests-2.7 to run a smoketest, if you've nose installed for both Python2.7 and Python3.x in your environment.
When you fix an issue, rebuild cloudstack and push new changes to your KVM host
using agentscp which will also restart the agent:
$ agentscp 172.20.1.10
Using IDEA IDE:
- Import the
cloudstackdirectory and selectMavenas build system - Go through the defaults, in the profiles page at least select noredist, vmware etc.
- Once IDEA builds the codebase cache you're good to go!
Prior to starting CloudStack management server using mvn (or otherwise), export this on your shell:
export MAVEN_OPTS="$MAVEN_OPTS -Xdebug -Xrunjdwp:transport=dt_socket,address=8787,server=y,suspend=n"
To remote-debug the KVM agent, put the following in
/etc/default/cloudstack-agent in your monkeybox and restart cloudstack-agent:
JAVA=/usr/bin/java -Xdebug -Xrunjdwp:transport=dt_socket,address=8787,server=y,suspend=n
The above will ensure that JVM will start with debugging enabled on port 8787. In IntelliJ, or your IDE/editor you can attach a remote debugger to this address:port and put breakpoints (and watches) as applicable.
Report issues on https://github.com/shapeblue/mbx/issues
Send a pull request on https://github.com/shapeblue/mbx


