Distiller is an open-source Python package for neural network compression research.
Network compression can reduce the memory footprint of a neural network, increase its inference speed and save energy. Distiller provides a PyTorch environment for prototyping and analyzing compression algorithms, such as sparsity-inducing methods and low-precision arithmetic.
Note on Release 0.3 - Possible BREAKING Changes
As of release 0.3, we've moved some code around to enable proper packaging and installation of Distiller. In addition, we updated Distiller to support PyTorch 1.X, which might also cause older code to break due to some API changes.
If updating from an earlier revision of the code, please make sure to follow the instructions in the install section to make sure proper installation of Distiller and all dependencies.
What's New in November?
- Quantization: Several new features in range-based linear quantization:
- Asymmetric post-training quantization (only symmetric supported so until now)
- Quantization aware training for range-based (min-max) symmetric and asymmetric quantization
- Per-channel weights quantization support (per output channel) in both training and post-training
- To improve quantization results: Averaging-based activations clipping in post-training quantization.
- More control over post-training quantization configuration: Additional command line arguments in image classification sample.
- Added an implementation of Dynamic Network Surgery for Efficient DNNs with:
- A sample implementation on ResNet50 which achieves 82.5% compression 75.5% Top1 (-0.6% from TorchVision baseline).
- A new SplicingPruner pruning algorithm.
- New features for PruningPolicy:
- The pruning policy can use two copies of the weights: one is used during the forward-pass, the other during the backward pass. You can control when the mask is frozen and always applied.
- Scheduling at the training-iterationgranularity (i.e. at the mini-batch granularity). Until now we could schedule pruning at the epoch-granularity.
- A bunch of new schedules showing AGP in action; including hybrid schedules combining structured-pruning and element-wise pruning.
- Filter and channel pruning
- Fixed problems arising in non-trivial data dependencies.
- Added documentation
- Changed the YAML API to express complex dependencies when pruning channels and filters.
- Fixed a bunch of bugs
- Image classifier compression sample:
- Added a new command-line argument to report the top N best accuracy scores, instead of just the highest score.
- Added an option to load a model in serialized mode.
- We've fixed a couple of Early Exit bugs, and improved the documentation
- We presented Distiller at AIDC 2018 Beijing and @haim-barad presented his Early Exit research implemented using Distiller.
- We've looked up our star-gazers (that might be you ;-) and where they are located:
The map was generated by this utility.

What's New in October?
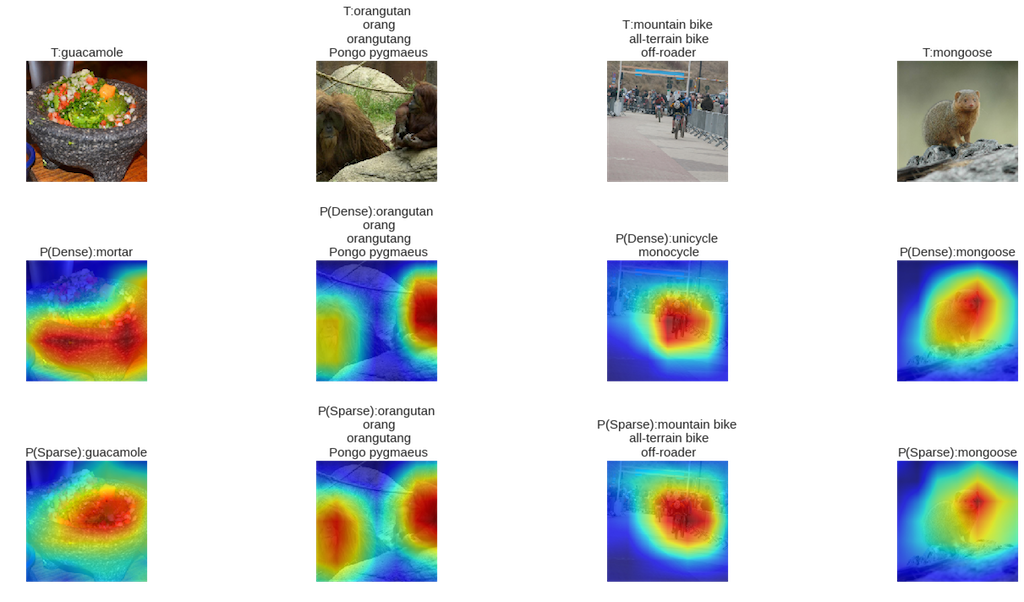
We've added two new Jupyter notebooks:
- The first notebook contrasts what sparse and dense versions of ResNet50 "look at".
- The second notebook shows a simple application of Truncated SVD to the linear layer in ResNet50.
We've added collection of activation statistics!
Activation statistics can be leveraged to make pruning and quantization decisions, and so we added support to collect these data. Two types of activation statistics are supported: summary statistics, and detailed records per activation. Currently we support the following summaries:
- Average activation sparsity, per layer
- Average L1-norm for each activation channel, per layer
- Average sparsity for each activation channel, per layer
For the detailed records we collect some statistics per activation and store it in a record.
Using this collection method generates more detailed data, but consumes more time, so
Beware.
- You can collect activation data for the different training phases: training/validation/test.
- You can access the data directly from each module that you chose to collect stats for.
- You can also create an Excel workbook with the stats.
Table of Contents
- Table of Contents
- Highlighted features
- Installation
- Getting Started
- Set up the classification datasets
- Running the tests
- Generating the HTML documentation site
- Built With
- Versioning
- License
- Community
- Acknowledgments
- Disclaimer
Highlighted features
- Automatic Compression
- Weight pruning
- Element-wise pruning using magnitude thresholding, sensitivity thresholding, target sparsity level, and activation statistics
- Structured pruning
- Convolution: 2D (kernel-wise), 3D (filter-wise), 4D (layer-wise), and channel-wise structured pruning.
- Fully-connected: column-wise and row-wise structured pruning.
- Structure groups (e.g. structures of 4 filters).
- Structure-ranking with using weights or activations criteria (Lp-norm, APoZ, gradients, random, etc.).
- Support for new structures (e.g. block pruning)
- Control
- Soft (mask on forward-pass only) and hard pruning (permanently disconnect neurons)
- Dual weight copies (compute loss on masked weights, but update unmasked weights)
- Model thinning (AKA "network garbage removal") to permanently remove pruned neurons and connections.
- Schedule
- Flexible scheduling of pruning, regularization, and learning rate decay (compression scheduling)
- One-shot and iterative pruning (and fine-tuning) are supported.
- Easily control what is performed each training step (e.g. greedy layer by layer pruning to full model pruning).
- Automatic gradual schedule (AGP) for pruning individual connections and complete structures.
- The compression schedule is expressed in a YAML file so that a single file captures the details of experiments. This dependency injection design decouples the Distiller scheduler and library from future extensions of algorithms.
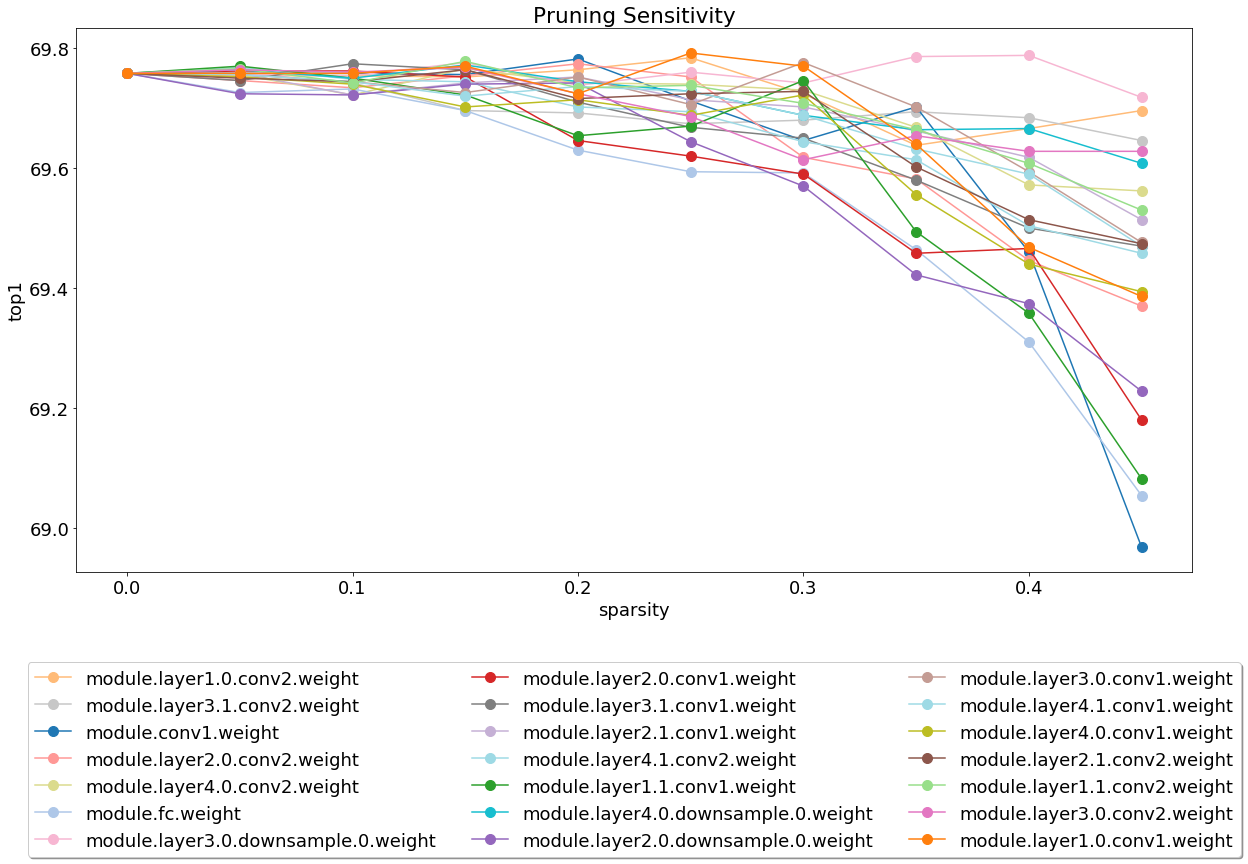
- Element-wise and filter-wise pruning sensitivity analysis (using L1-norm thresholding). Examine the data from some of the networks we analyzed, using this notebook.
- Regularization
- L1-norm element-wise regularization
- Group Lasso an group variance regularization
- Quantization
- Automatic mechanism to transform existing models to quantized versions, with customizable bit-width configuration for different layers. No need to re-write the model for different quantization methods.
- Post-training quantization of trained full-precision models, dynamic and static (statistics-based)
- Support for quantization-aware training in the loop
- Knowledge distillation
- Training with knowledge distillation, in conjunction with the other available pruning / regularization / quantization methods.
- Conditional computation
- Sample implementation of Early Exit
- Low rank decomposition
- Sample implementation of truncated SVD
- Lottery Ticket Hypothesis training
- Export statistics summaries using Pandas dataframes, which makes it easy to slice, query, display and graph the data.
- A set of Jupyter notebooks to plan experiments and analyze compression results. The graphs and visualizations you see on this page originate from the included Jupyter notebooks.
- Take a look at this notebook, which compares visual aspects of dense and sparse Alexnet models.
- This notebook creates performance indicator graphs from model data.
- Sample implementations of published research papers, using library-provided building blocks. See the research papers discussions in our model-zoo.
- Logging to the console, text file and TensorBoard-formatted file.
- Export to ONNX (export of quantized models pending ONNX standardization)
Installation
These instructions will help get Distiller up and running on your local machine.
Notes:
- Distiller has only been tested on Ubuntu 16.04 LTS, and with Python 3.5.
- If you are not using a GPU, you might need to make small adjustments to the code.
Clone Distiller
Clone the Distiller code repository from github:
$ git clone https://github.com/NervanaSystems/distiller.git
The rest of the documentation that follows, assumes that you have cloned your repository to a directory called distiller.
Create a Python virtual environment
We recommend using a Python virtual environment, but that of course, is up to you.
There's nothing special about using Distiller in a virtual environment, but we provide some instructions, for completeness.
Before creating the virtual environment, make sure you are located in directory distiller. After creating the environment, you should see a directory called distiller/env.
Using virtualenv
If you don't have virtualenv installed, you can find the installation instructions here.
To create the environment, execute:
$ python3 -m virtualenv env
This creates a subdirectory named env where the python virtual environment is stored, and configures the current shell to use it as the default python environment.
Using venv
If you prefer to use venv, then begin by installing it:
$ sudo apt-get install python3-venv
Then create the environment:
$ python3 -m venv env
As with virtualenv, this creates a directory called distiller/env.
Activate the environment
The environment activation and deactivation commands for venv and virtualenv are the same.
!NOTE: Make sure to activate the environment, before proceeding with the installation of the dependency packages:
$ source env/bin/activate
Install the package
If you do not use CUDA 9 in your environment, please refer to Pytorch website to install the compatible build of Pytorch 1.1 and torchvision 0.3, before installing the package.
Finally, install the Distiller package and its dependencies using pip3:
$ cd distiller
$ pip3 install -e .
This installs Distiller in "development mode", meaning any changes made in the code are reflected in the environment without re-running the install command (so no need to re-install after pulling changes from the Git repository).
PyTorch is included in the requirements.txt file, and will currently download PyTorch version 1.1.0 for CUDA 9.0. This is the setup we've used for testing Distiller.
Getting Started
You can jump head-first into some limited examples of network compression, to get a feeling for the library without too much investment on your part.
Distiller comes with a sample application for compressing image classification DNNs, compress_classifier.py located at distiller/examples/classifier_compression.
We'll show you how to use it for some simple use-cases, and will point you to some ready-to-go Jupyter notebooks.
For more details, there are some other resources you can refer to:
- Frequently-asked questions (FAQ)
- Model zoo
- Compression scheduling
- Usage
- Preparing a model for quantization
- Tutorial: Using Distiller to prune a PyTorch language model
- Tutorial: Pruning Filters & Channels
- Tutorial: Post-Training Quantization of a Language Model
- Tutorial: Post-Training Quantization of GNMT (translation model)
- Post-training quantization command line examples
Example invocations of the sample application
Training-only
The following will invoke training-only (no compression) of a network named 'simplenet' on the CIFAR10 dataset. This is roughly based on TorchVision's sample Imagenet training application, so it should look familiar if you've used that application. In this example we don't invoke any compression mechanisms: we just train because for fine-tuning after pruning, training is an essential part.
Note that the first time you execute this command, the CIFAR10 code will be downloaded to your machine, which may take a bit of time - please let the download process proceed to completion.
The path to the CIFAR10 dataset is arbitrary, but in our examples we place the datasets in the same directory level as distiller (i.e. ../../../data.cifar10).
First, change to the sample directory, then invoke the application:
$ cd distiller/examples/classifier_compression
$ python3 compress_classifier.py --arch simplenet_cifar ../../../data.cifar10 -p 30 -j=1 --lr=0.01
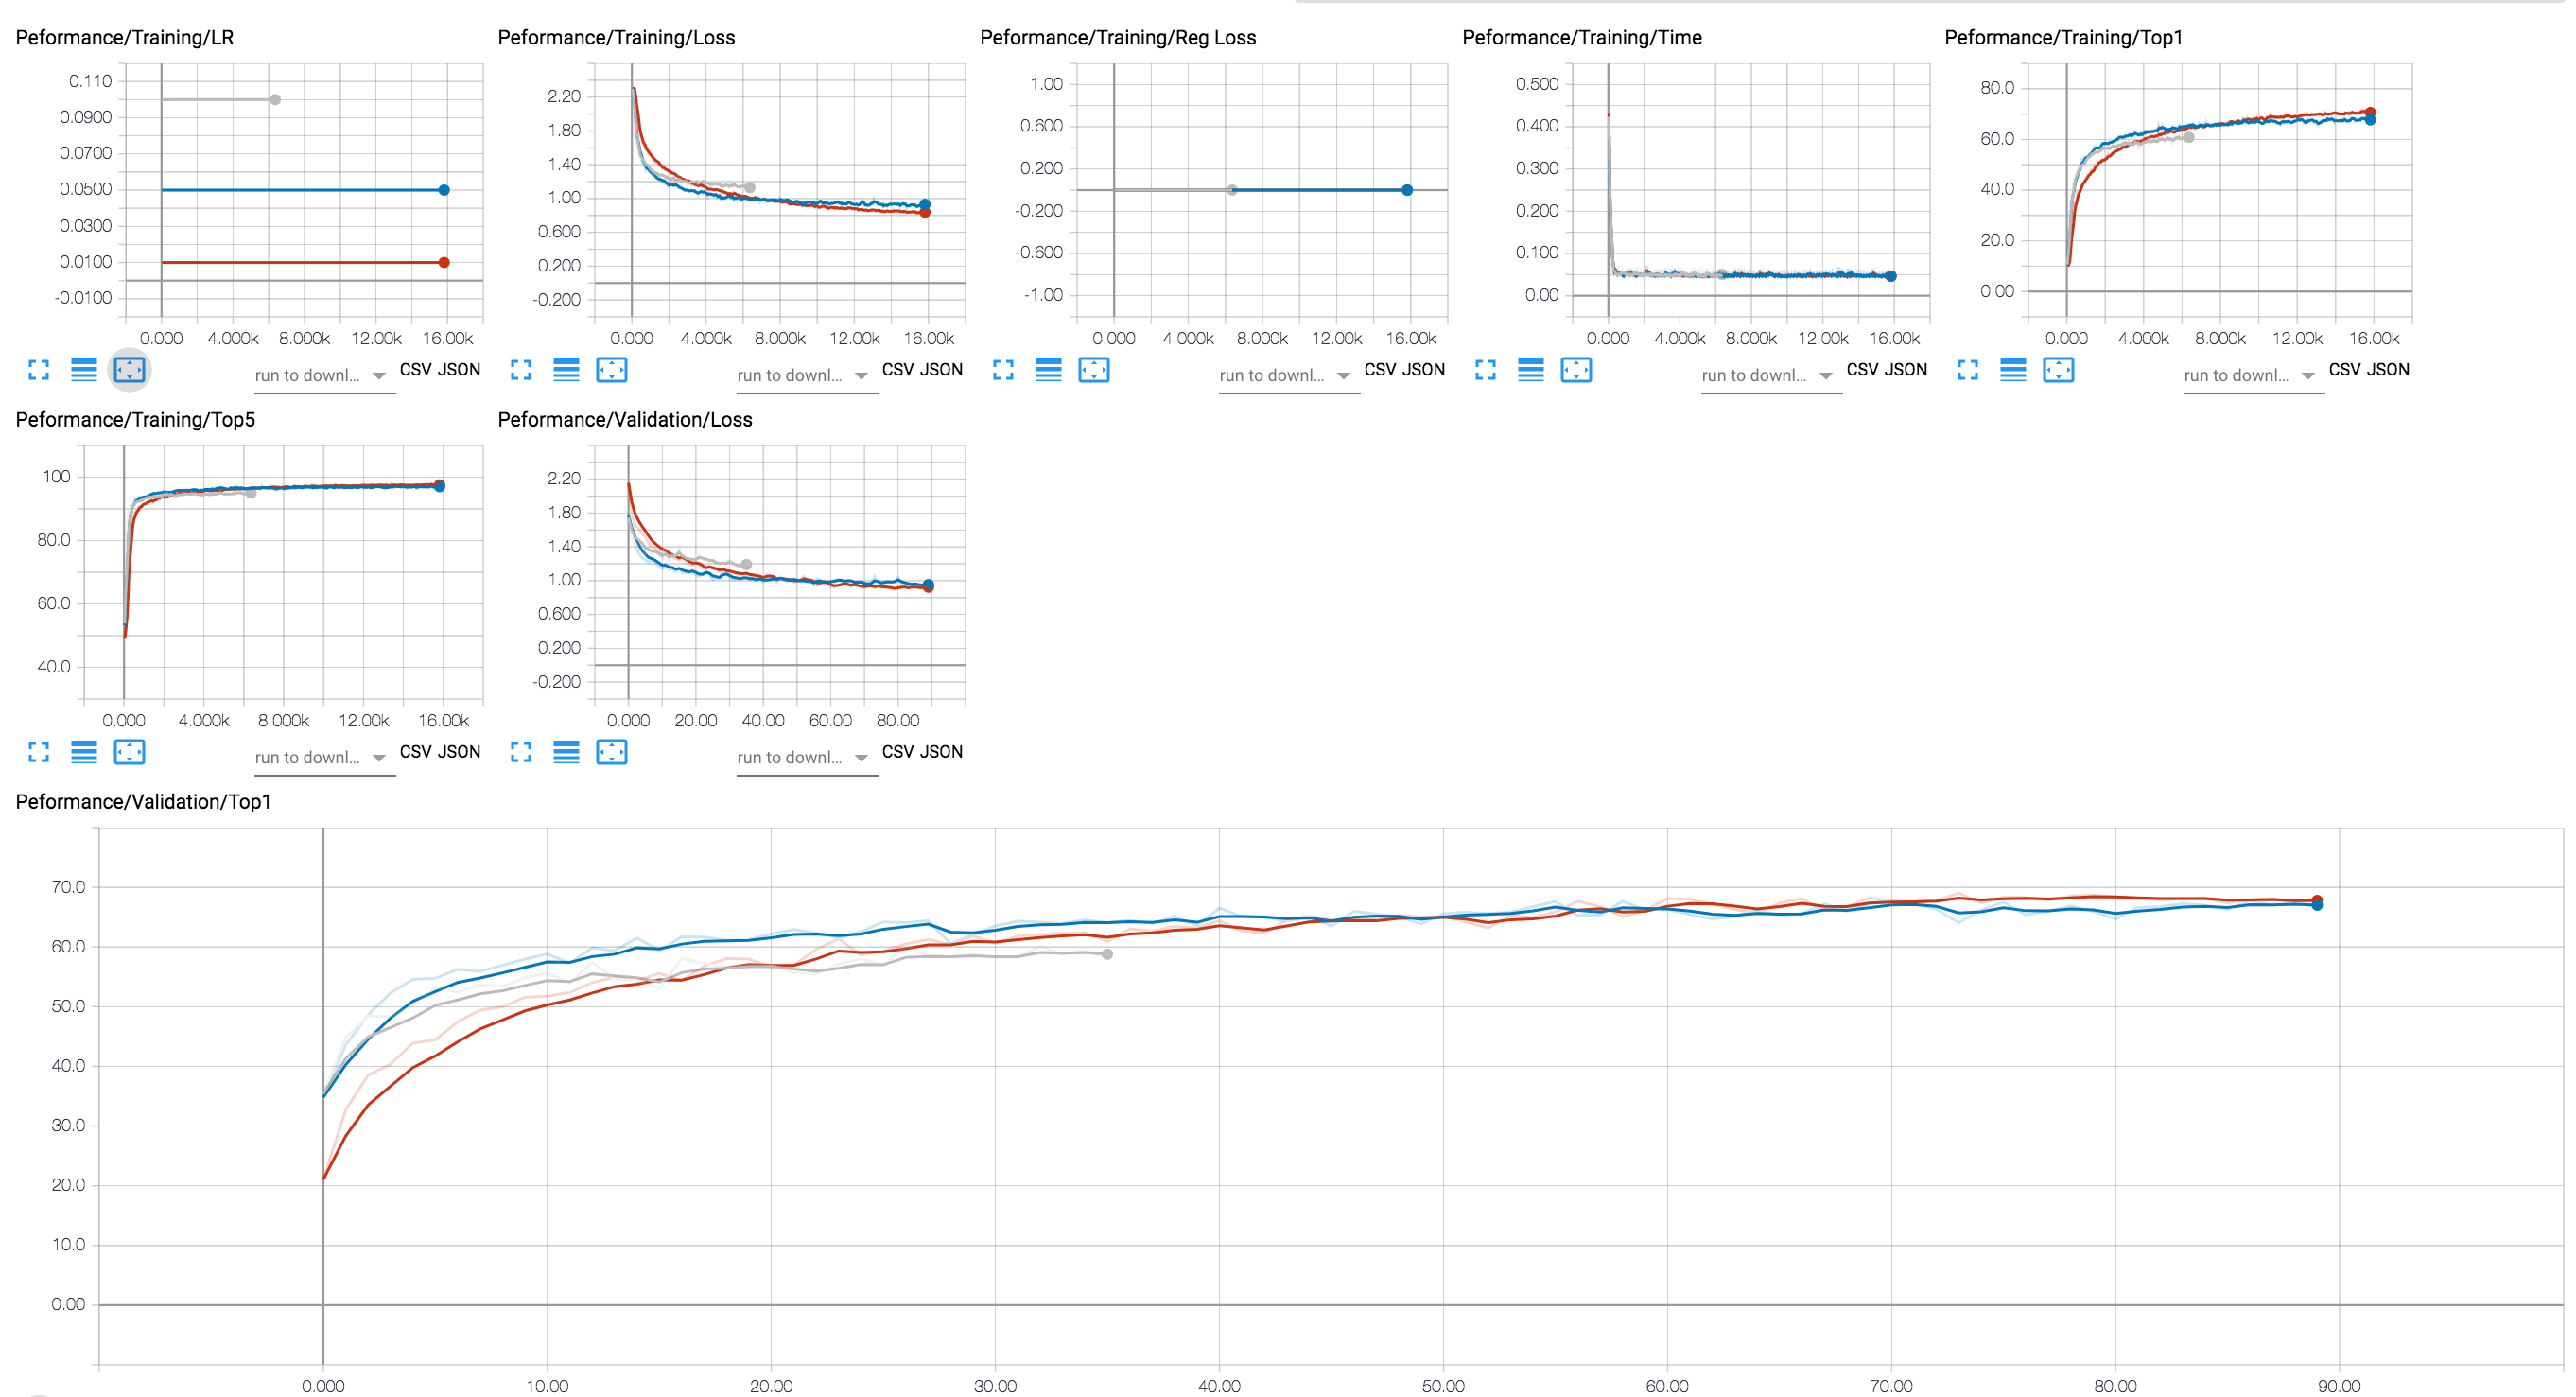
You can use a TensorBoard backend to view the training progress (in the diagram below we show a couple of training sessions with different LR values). For compression sessions, we've added tracing of activation and parameter sparsity levels, and regularization loss.
Getting parameter statistics of a sparsified model
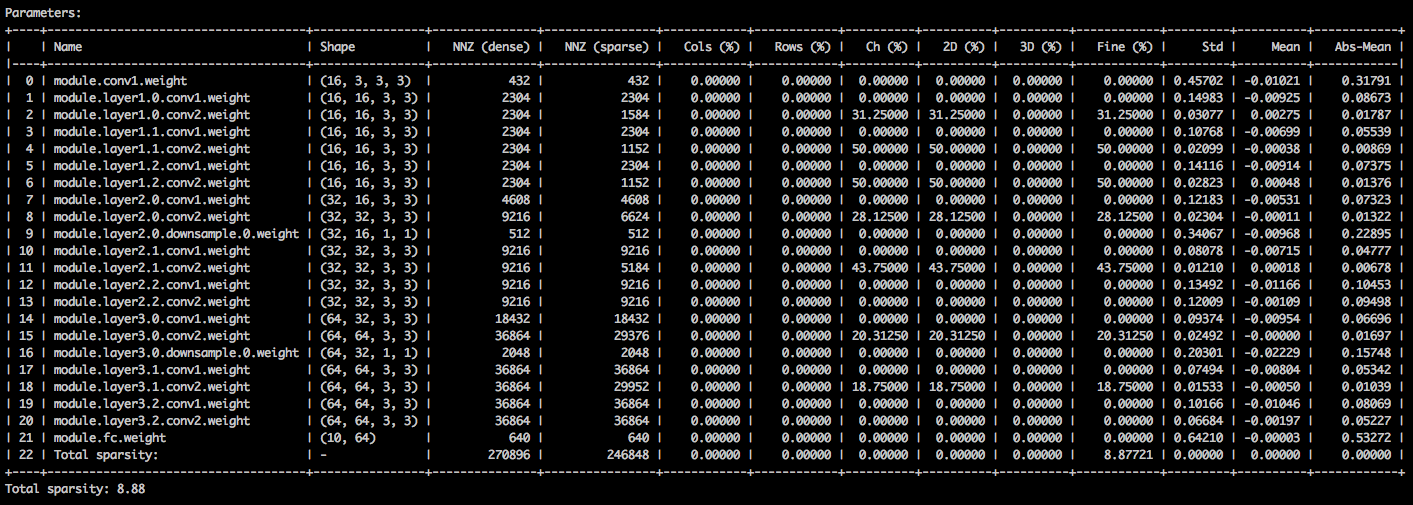
We've included in the git repository a few checkpoints of a ResNet20 model that we've trained with 32-bit floats. Let's load the checkpoint of a model that we've trained with channel-wise Group Lasso regularization.
With the following command-line arguments, the sample application loads the model (--resume) and prints statistics about the model weights (--summary=sparsity). This is useful if you want to load a previously pruned model, to examine the weights sparsity statistics, for example. Note that when you resume a stored checkpoint, you still need to tell the application which network architecture the checkpoint uses (-a=resnet20_cifar):
$ python3 compress_classifier.py --resume=../ssl/checkpoints/checkpoint_trained_ch_regularized_dense.pth.tar -a=resnet20_cifar ../../../data.cifar10 --summary=sparsity
You should see a text table detailing the various sparsities of the parameter tensors. The first column is the parameter name, followed by its shape, the number of non-zero elements (NNZ) in the dense model, and in the sparse model. The next set of columns show the column-wise, row-wise, channel-wise, kernel-wise, filter-wise and element-wise sparsities.
Wrapping it up are the standard-deviation, mean, and mean of absolute values of the elements.
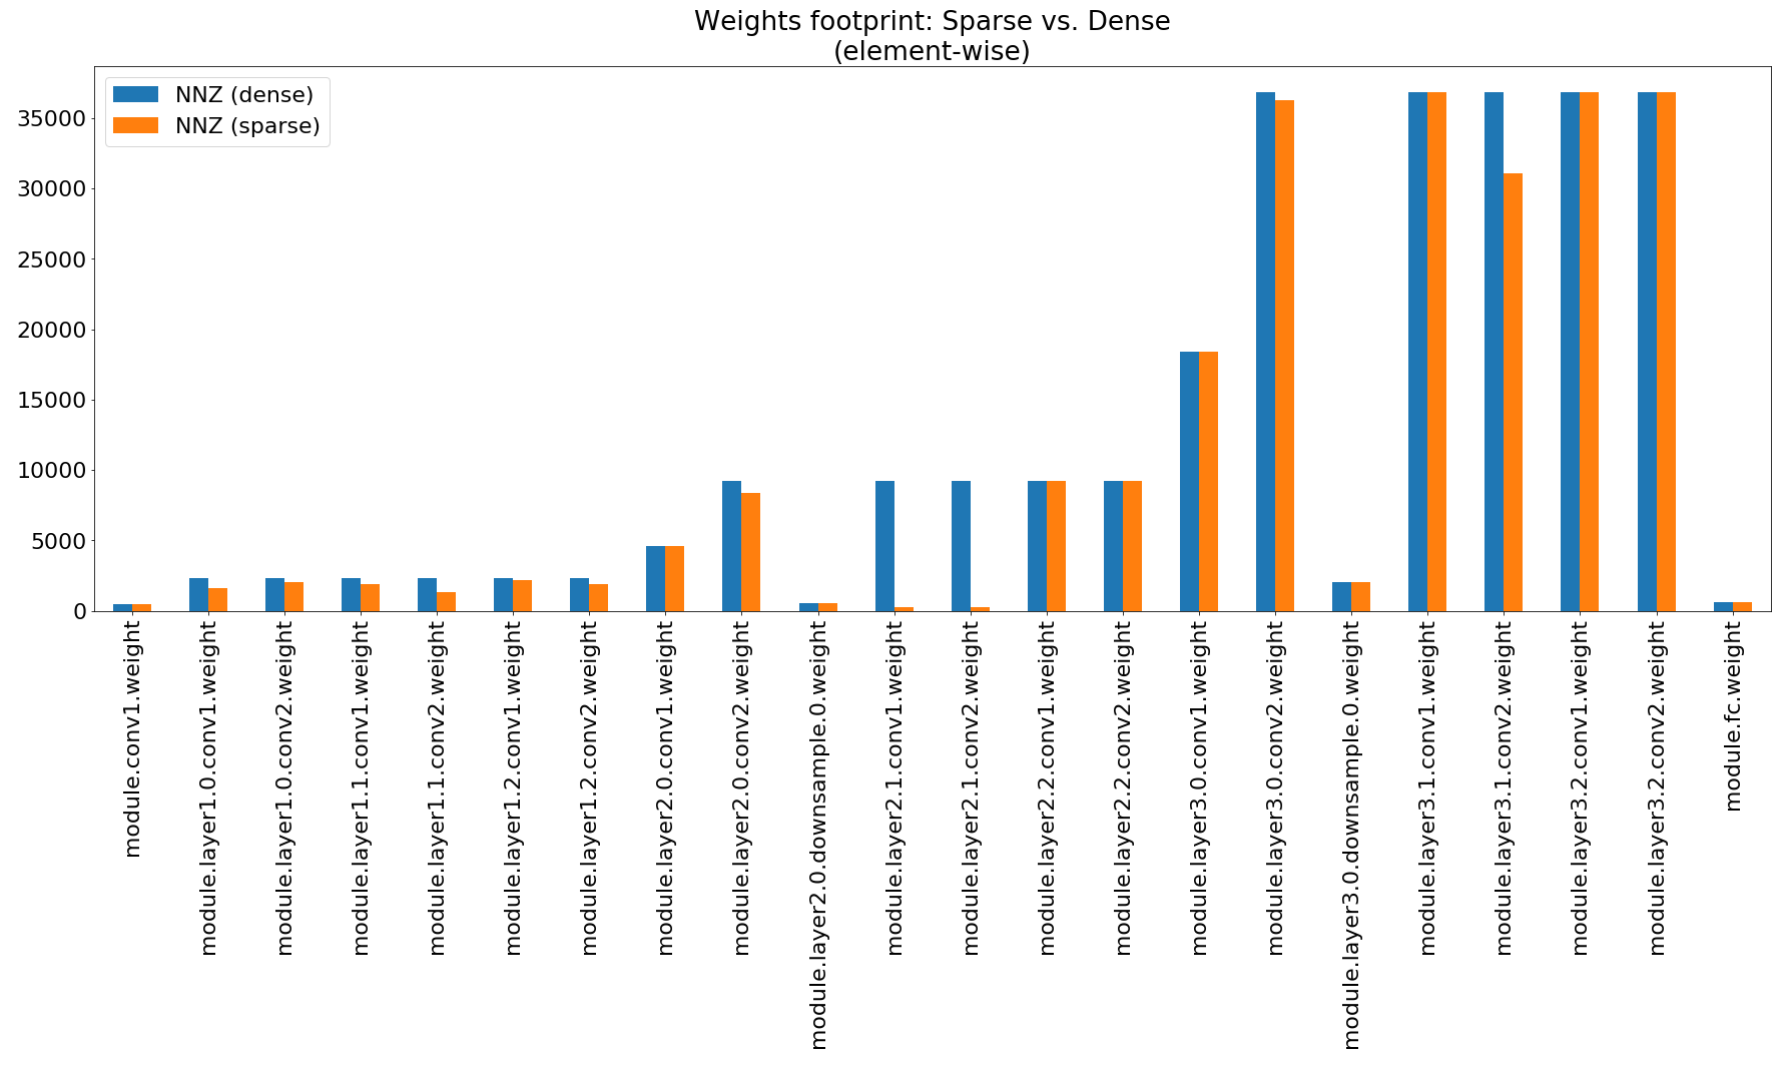
In the Compression Insights notebook we use matplotlib to plot a bar chart of this summary, that indeed show non-impressive footprint compression.
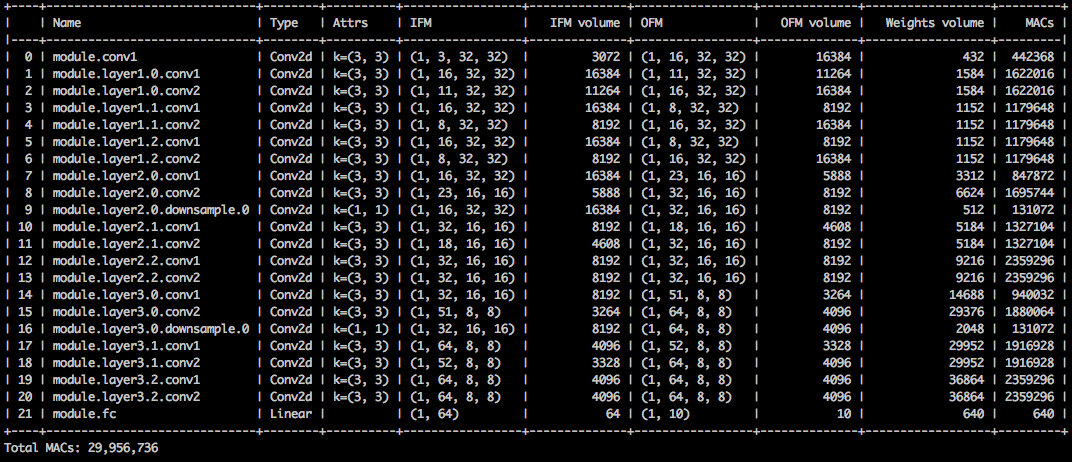
Although the memory footprint compression is very low, this model actually saves 26.6% of the MACs compute.
$ python3 compress_classifier.py --resume=../ssl/checkpoints/checkpoint_trained_channel_regularized_resnet20_finetuned.pth.tar -a=resnet20_cifar ../../../data.cifar10 --summary=compute
Post-training quantization
This example performs 8-bit quantization of ResNet20 for CIFAR10. We've included in the git repository the checkpoint of a ResNet20 model that we've trained with 32-bit floats, so we'll take this model and quantize it:
$ python3 compress_classifier.py -a resnet20_cifar ../../../data.cifar10 --resume ../ssl/checkpoints/checkpoint_trained_dense.pth.tar --quantize-eval --evaluate
The command-line above will save a checkpoint named quantized_checkpoint.pth.tar containing the quantized model parameters. See more examples here.
Explore the sample Jupyter notebooks
The set of notebooks that come with Distiller is described here, which also explains the steps to install the Jupyter notebook server.
After installing and running the server, take a look at the notebook covering pruning sensitivity analysis.
Sensitivity analysis is a long process and this notebook loads CSV files that are the output of several sessions of sensitivity analysis.
Set up the classification datasets
The sample application for compressing image classification DNNs, compress_classifier.py located at distiller/examples/classifier_compression, uses both CIFAR10 and ImageNet image datasets.
The compress_classifier.py application will download the CIFAR10 automatically the first time you try to use it (thanks to TorchVision). The example invocations used throughout Distiller's documentation assume that you have downloaded the images to directory distiller/../data.cifar10, but you can place the images anywhere you want (you tell compress_classifier.py where the dataset is located - or where you want the application to download the dataset to - using a command-line parameter).
ImageNet needs to be downloaded manually, due to copyright issues. Facebook has created a set of scripts to help download and extract the dataset.
Again, the Distiller documentation assumes the following directory structure for the datasets, but this is just a suggestion:
distiller
  examples
    classifier_compression
data.imagenet/
    train/
    val/
data.cifar10/
    cifar-10-batches-py/
        batches.meta
        data_batch_1
        data_batch_2
        data_batch_3
        data_batch_4
        data_batch_5
        readme.html
        test_batch
Running the tests
We are currently light-weight on test and this is an area where contributions will be much appreciated.
There are two types of tests: system tests and unit-tests. To invoke the unit tests:
$ cd distiller/tests
$ pytest
We use CIFAR10 for the system tests, because its size makes for quicker tests. To invoke the system tests, you need to provide a path to the CIFAR10 dataset which you've already downloaded. Alternatively, you may invoke full_flow_tests.py without specifying the location of the CIFAR10 dataset and let the test download the dataset (for the first invocation only). Note that --cifar1o-path defaults to the current directory.
The system tests are not short, and are even longer if the test needs to download the dataset.
$ cd distiller/tests
$ python full_flow_tests.py --cifar10-path=<some_path>
The script exits with status 0 if all tests are successful, or status 1 otherwise.
Generating the HTML documentation site
Install mkdocs and the required packages by executing:
$ pip3 install -r doc-requirements.txt
To build the project documentation run:
$ cd distiller/docs-src
$ mkdocs build --clean
This will create a folder named 'site' which contains the documentation website. Open distiller/docs/site/index.html to view the documentation home page.
Built With
- PyTorch - The tensor and neural network framework used by Distiller.
- Jupyter - Notebook serving.
- TensorBoard - Used to view training graphs.
- Cadene - Pretrained PyTorch models.
Versioning
We use SemVer for versioning. For the versions available, see the tags on this repository.
License
This project is licensed under the Apache License 2.0 - see the LICENSE.md file for details
Community
Github projects using Distiller:
- DeGirum Pruned Models - a repository containing pruned models and related information.
Research papers citing Distiller:
-
Soroush Ghodrati, Hardik Sharma, Sean Kinzer, Amir Yazdanbakhsh, Kambiz Samadi, Nam Sung Kim, Doug Burger, Hadi Esmaeilzadeh.
Mixed-Signal Charge-Domain Acceleration of Deep Neural networks through Interleaved Bit-Partitioned Arithmetic,
arXiv:1906.11915, 2019. -
Gil Shomron, Tal Horowitz, Uri Weiser.
SMT-SA: Simultaneous Multithreading in Systolic Arrays,
In IEEE Computer Architecture Letters (CAL), 2019. -
Shangqian Gao , Cheng Deng , and Heng Huang.
Cross Domain Model Compression by Structurally Weight Sharing,
In The IEEE Conference on Computer Vision and Pattern Recognition (CVPR), 2019, pp. 8973-8982. -
Moin Nadeem, Wei Fang, Brian Xu, Mitra Mohtarami, James Glass.
FAKTA: An Automatic End-to-End Fact Checking System,
In North American Chapter of the Association for Computational Linguistics (NAACL), 2019. -
Ahmed T. Elthakeb, Prannoy Pilligundla, Hadi Esmaeilzadeh.
SinReQ: Generalized Sinusoidal Regularization for Low-Bitwidth Deep Quantized Training,
arXiv:1905.01416, 2019. -
Goncharenko A., Denisov A., Alyamkin S., Terentev E.
Trainable Thresholds for Neural Network Quantization,
In: Rojas I., Joya G., Catala A. (eds) Advances in Computational Intelligence Lecture Notes in Computer Science, vol 11507. Springer, Cham. International Work-Conference on Artificial Neural Networks (IWANN 2019). -
Ahmed T. Elthakeb, Prannoy Pilligundla, Hadi Esmaeilzadeh.
Divide and Conquer: Leveraging Intermediate Feature Representations for Quantized Training of Neural Networks, arXiv:1906.06033, 2019 -
Ritchie Zhao, Yuwei Hu, Jordan Dotzel, Christopher De Sa, Zhiru Zhang.
Improving Neural Network Quantization without Retraining using Outlier Channel Splitting,
arXiv:1901.09504, 2019
Code -
Angad S. Rekhi, Brian Zimmer, Nikola Nedovic, Ningxi Liu, Rangharajan Venkatesan, Miaorong Wang, Brucek Khailany, William J. Dally, C. Thomas Gray.
Analog/Mixed-Signal Hardware Error Modeling for Deep Learning Inference,
Nvidia Research, 2019. -
Norio Nakata.
Recent Technical Development of Artificial Intelligence for Diagnostic Medical Imaging,
In Japanese Journal of Radiology, February 2019, Volume 37, Issue 2, pp 103–108. -
Alexander Goncharenko, Andrey Denisov, Sergey Alyamkin, Evgeny Terentev.
Fast Adjustable Threshold For Uniform Neural Network Quantization,
arXiv:1812.07872, 2018
If you used Distiller for your work, please use the following citation:
@misc{neta_zmora_2018_1297430,
  author       = {Neta Zmora and
                  Guy Jacob and
                  Lev Zlotnik and
                  Bar Elharar and
                  Gal Novik},
  title        = {Neural Network Distiller},
  month        = jun,
  year         = 2018,
  doi          = {10.5281/zenodo.1297430},
  url          = {https://doi.org/10.5281/zenodo.1297430}
}
Acknowledgments
Any published work is built on top of the work of many other people, and the credit belongs to too many people to list here.
- The Python and PyTorch developer communities have shared many invaluable insights, examples and ideas on the Web.
- The authors of the research papers implemented in the Distiller model-zoo have shared their research ideas, theoretical background and results.
Disclaimer
Distiller is released as a reference code for research purposes. It is not an official Intel product, and the level of quality and support may not be as expected from an official product. Additional algorithms and features are planned to be added to the library. Feedback and contributions from the open source and research communities are more than welcome.


