Docker architecture
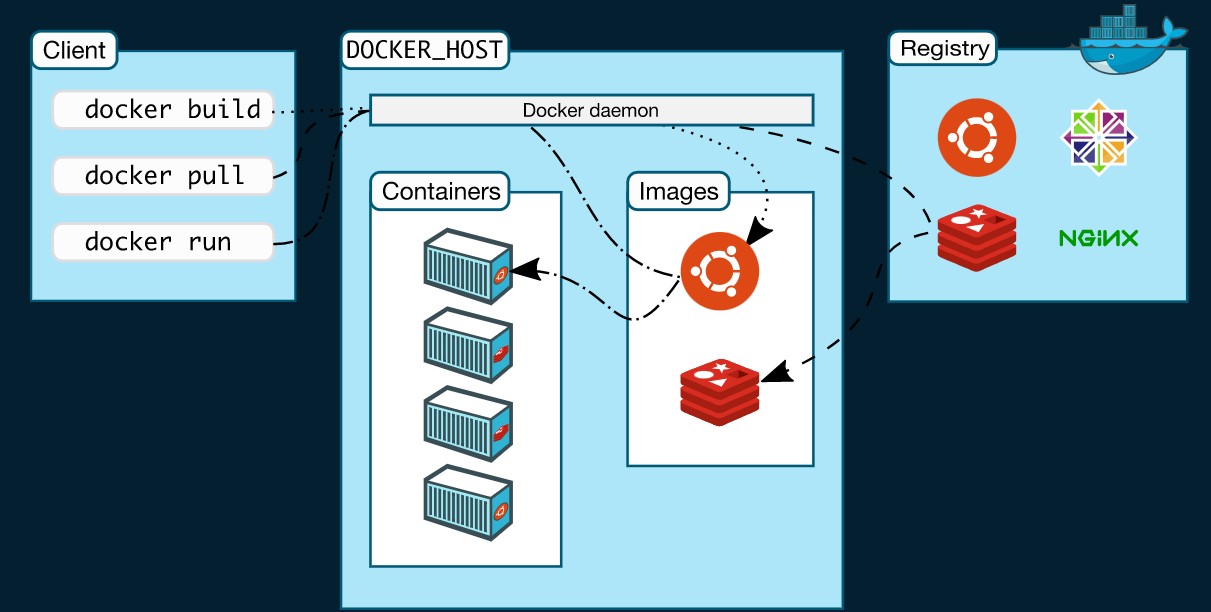
Docker uses a client-server architecture. The Docker client talks to the Docker daemon, which does the heavy lifting of building, running, and distributing your Docker containers. The Docker client and daemon can run on the same system, or you can connect a Docker client to a remote Docker daemon. The Docker client and daemon communicate using a REST API, over UNIX sockets or a network interface. Another Docker client is Docker Compose, which lets you work with applications consisting of a set of containers.
docker version - this command simply returns the version of the docker cli and the server also called as docker engine
>> docker version
Client:
 Cloud integration: v1.0.22
 Version:           20.10.11
 API version:       1.41
 Go version:        go1.16.10
 Git commit:        dea9396
 Built:             Thu Nov 18 00:42:51 2021
 OS/Arch:           windows/amd64
 Context:           default
 Experimental:      true

Server: Docker Engine - Community
 Engine:
  Version:          20.10.11
  API version:      1.41 (minimum version 1.12)
  Go version:       go1.16.9
  Git commit:       847da18
  Built:            Thu Nov 18 00:35:39 2021
  OS/Arch:          linux/amd64
  Experimental:     false
 containerd:
  Version:          1.4.12
  GitCommit:        7b11cfaabd73bb80907dd23182b9347b4245eb5d
 runc:
  Version:          1.0.2
  GitCommit:        v1.0.2-0-g52b36a2
 docker-init:
  Version:          0.19.0
GitCommit: de40ad0The Docker daemon (dockerd) listens for Docker API requests and manages Docker objects such as images, containers, networks, and volumes. A daemon can also communicate with other daemons to manage Docker service
The Docker client (docker) is the primary way that many Docker users interact with Docker. When you use commands such as docker run, the client sends these commands to dockerd, which carries them out. The docker command uses the Docker API. The Docker client can communicate with more than one daemon.
Docker Desktop is an easy-to-install application for your Mac or Windows environment that enables you to build and share containerized applications and microservices. Docker Desktop includes the Docker daemon (dockerd), the Docker client (docker), Docker Compose, Docker Content Trust, Kubernetes, and Credential Helper.
A Docker registry stores Docker images. Docker Hub is a public registry that anyone can use, and Docker is configured to look for images on Docker Hub by default.
docker info - shows details about the configurations and setup for our docker-engine
>> docker info
Client:
 Context:    default
 Debug Mode: false
 Plugins:
  buildx: Docker Buildx (Docker Inc., v0.7.1)
  compose: Docker Compose (Docker Inc., v2.2.1)
  scan: Docker Scan (Docker Inc., v0.14.0)

Server:
 Containers: 1
  Running: 0
  Paused: 0
  Stopped: 1
 Images: 1
 Server Version: 20.10.11
 Storage Driver: overlay2
  Backing Filesystem: extfs
  Supports d_type: true
  Native Overlay Diff: true
  userxattr: false
 Logging Driver: json-file
 Cgroup Driver: cgroupfs
 Cgroup Version: 1
 Plugins:
  Volume: local
  Network: bridge host ipvlan macvlan null overlay
  Log: awslogs fluentd gcplogs gelf journald json-file local logentries splunk syslog
 Swarm: inactive
 Runtimes: io.containerd.runc.v2 io.containerd.runtime.v1.linux runc
 Default Runtime: runc
 Init Binary: docker-init
 containerd version: 7b11cfaabd73bb80907dd23182b9347b4245eb5d
 runc version: v1.0.2-0-g52b36a2
 init version: de40ad0
 Security Options:
  seccomp
   Profile: default
 Kernel Version: 5.4.72-microsoft-standard-WSL2
 Operating System: Docker Desktop
 OSType: linux
 Architecture: x86_64
 CPUs: 1
 Total Memory: 2.858GiB
 Name: docker-desktop
 ID: LP6Z:ZVOX:7WNR:ETCR:5AS7:BMFD:KBEL:JEEY:N3WH:STVM:BT3Q:HQKQ
 Docker Root Dir: /var/lib/docker
 Debug Mode: false
 Registry: https://index.docker.io/v1/
 Labels:
 Experimental: false
 Insecure Registries:
  127.0.0.0/8
 Live Restore Enabled: false
🗒️ Note:
Docker’s old command format was docker <command> (options) (still works) but it’s new management command format is docker <command> <sub-command> (options)
E.g: Old: docker run <container_identifier> New: docker container run <container_identifier>
A container is a runnable instance of an image. You can create, start, stop, move, or delete a container using the Docker API or CLI. You can connect a container to one or more networks, attach storage to it, or even create a new image based on its current state.
By default, a container is relatively well isolated from other containers and its host machine. You can control how isolated a container’s network, storage, or other underlying subsystems are from other containers or from the host machine.
A container is defined by its image as well as any configuration options you provide to it when you create or start it. When a container is removed, any changes to its state that are not stored in persistent storage disappear.
💡 Note:
Containers are not Mini VMs. It is just a process that runs on the host machine and is limited to what resources they can access and exists when the process stops.
>> docker container run --publish 8080:80 --detach nginx
Unable to find image 'nginx:latest' locally
latest: Pulling from library/nginx
a2abf6c4d29d: Pull complete
a9edb18cadd1: Pull complete
589b7251471a: Pull complete
186b1aaa4aa6: Pull complete
b4df32aa5a72: Pull complete
a0bcbecc962e: Pull complete
Digest: sha256:0d17b565c37bcbd895e9d92315a05c1c3c9a29f762b011a10c54a66cd53c9b31
In the background docker server first looks for the image in the image cache named Nginx, if it doesn’t find any then it goes to the docker hub registry(default) to search for an image Nginx. After getting the image, it pulls the latest image(if the version is not specified) to the local system. Now docker creates a new container on top of that image. Docker gives the container a virtual IP on a private network inside the docker engine. The publishing part(or -p) of the command exposes host machine port 8080 to the container’s port 80. So all the traffic from the host port 8080 is being mapped to the container port 80. Docker starts the container as a new process using the CMD command in the image Dockerfile. So on visiting https://localhost:8080, one can see the Nginx home page. The detach part(or -d) of the command tells the docker to run the container in the background and exits the foreground.
>> docker container ls
CONTAINER ID     IMAGE     COMMAND                    CREATED             STATUS         PORTS                 NAMES
c95a34a4309f     nginx     "/docker-entrypoint.…"     7 seconds ago       Up 6 seconds   0.0.0.0:80->80/tcp    gracious_carson
Lists the containers running on the host machine
>> docker container ls -a
CONTAINER ID   IMAGE                        COMMAND                  CREATED        STATUS                      PORTS     NAMES
85a598792e52   ekatvam/midasbackend:0.1.0   "docker-entrypoint.s…"   47 hours ago   Exited (137) 47 hours ago             compassionate_margulis
Lists the containers running or stopped on the host machine
>> docker container stop c95
c95
Stops a running container.
💡 Note:
You don’t need to give a full id of the container. Specifying the first character to make the container identifiable is sufficient.
>> docker container run -p 80:80 -d --name webhost nginx
675b020477cb9b93635823ff52d5d4a23b0ac0a6b2d6bf90eae1a70b2d30839b
>> docker container ls
CONTAINER ID    IMAGE    COMMAND                  CREATED          STATUS          PORTS                 NAMES
675b020477cb    nginx    "/docker-entrypoint.…"   5 seconds ago    Up 4 seconds    0.0.0.0:80->80/tcp    webhost
Run an nginx container with name as WebHost on port 80 in detached mode
>> docker container logs webhost
/docker-entrypoint.sh: /docker-entrypoint.d/ is not empty, will attempt to perform configuration
/docker-entrypoint.sh: Looking for shell scripts in /docker-entrypoint.d/
/docker-entrypoint.sh: Launching /docker-entrypoint.d/10-listen-on-ipv6-by-default.sh
10-listen-on-ipv6-by-default.sh: info: Getting the checksum of /etc/nginx/conf.d/default.conf
10-listen-on-ipv6-by-default.sh: info: Enabled listen on IPv6 in /etc/nginx/conf.d/default.conf
/docker-entrypoint.sh: Launching /docker-entrypoint.d/20-envsubst-on-templates.sh
/docker-entrypoint.sh: Launching /docker-entrypoint.d/30-tune-worker-processes.sh
/docker-entrypoint.sh: Configuration complete; ready for start up
2022/01/18 08:41:41 [notice] 1#1: using the "epoll" event method
2022/01/18 08:41:41 [notice] 1#1: nginx/1.21.5
2022/01/18 08:41:41 [notice] 1#1: built by gcc 10.2.1 20210110 (Debian 10.2.1-6)
2022/01/18 08:41:41 [notice] 1#1: OS: Linux 4.4.0-210-generic
2022/01/18 08:41:41 [notice] 1#1: getrlimit(RLIMIT_NOFILE): 1048576:1048576
2022/01/18 08:41:41 [notice] 1#1: start worker processes
2022/01/18 08:41:41 [notice] 1#1: start worker process 31
2022/01/18 08:41:41 [notice] 1#1: start worker process 32
Shows the logs of the container
>> docker container top webhost
PID    USER   TIME    COMMAND
886    root   0:00    nginx: master process nginx -g daemon off;
947    101    0:00    nginx: worker process
948    101    0:00    nginx: worker process
949    101    0:00    nginx: worker process
950    101    0:00    nginx: worker process
951    101    0:00    nginx: worker process
952    101    0:00    nginx: worker process
953    101    0:00    nginx: worker process
954    101    0:00    nginx: worker process
Shows all the running processes inside a container
>> docker container rm c95
c95
Removes the stopped container.
💡Note:
Show an error if we are trying to remove a running container. To remove a running container directly use the -f flag. E.g, docker container rm -f c95
>> docker container inspect webhostShows metadata about container startup-config, volumes, networking, etc.
>> docker container stats webhost
CONTAINER ID      NAME      CPU %     MEM USAGE / LIMIT      MEM %    NET I/O    BLOCK I/O        PIDS
675b020477cb      webhost   0.00%     10.41MiB / 31.42GiB    0.03%    0B / 0B    1.78MB / 24.6kB  9
Shows the streaming view of live container stats.
💡 Note:
We do not need an SSH server inside a container to SSH into the container. Docker provides several commands at our disposal that let us get a shell inside the container itself while it is running.
>> docker container run -it --name proxy nginx bash
docker container run -it --name proxy nginx bash
root@f20fa0be1b38:/# ls
bin docker-entrypoint.d home media proc sbin tmp
boot docker-entrypoint.sh lib mnt root srv usr
dev etc lib64 opt run sys var
root@f20fa0be1b38:/#
-it has two separate options, -t allocates us a pseudo-TTY(stimulates a real terminal like SSH does) -i keeps the STDIN open to receive terminal input. Here bash is the optional argument that is passed to the container to tell what to run (bash is the most common shell that we can usually find in the container). When running the Nginx container in default settings, it runs the Nginx program itself but when we run the last command we changed that command to run bash so on exiting the bash shell the container automatically stops.
>> docker container start -ai proxy
root@f20fa0be1b38:/# ls
bin docker-entrypoint.d home media proc sbin tmp
boot docker-entrypoint.sh lib mnt root srv usr
dev etc lib64 opt run sys var
Reruns the stopped container with the bash init.
>> docker container exec -it webhost bashRuns a command in the running container. Exiting the bash doesn’t stop the container as one process of Nginx(Nginx process itself) is still running.
💡 Note:
Alpine image is another Linux distribution image that is very small with respect to other Linux distributions as it doesn’t have a bash shell preinstalled in the image.
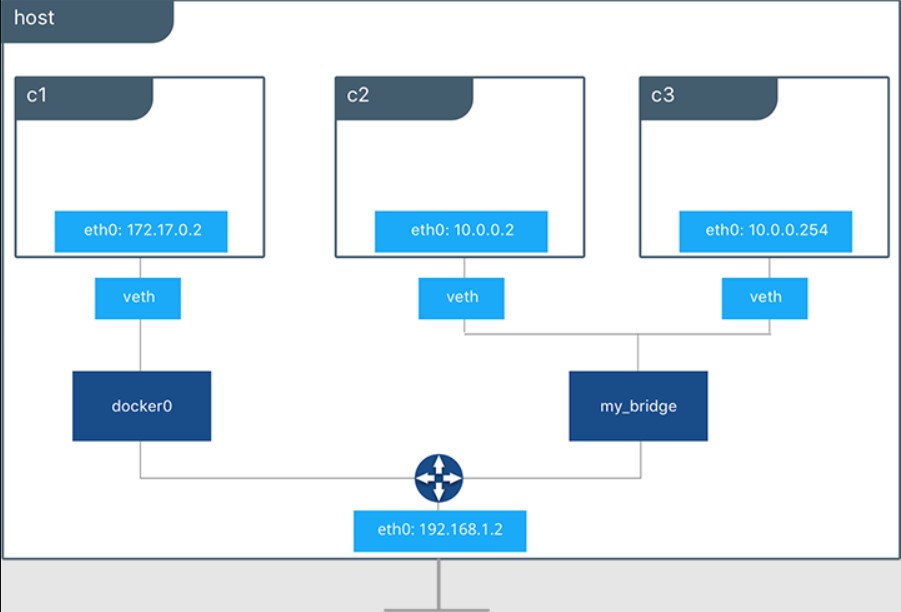
Whenever we start a container, the docker in the background connects that container to a particular virtual network (bridge/docker0: default network). Each virtual network in the docker routes through the NAT firewall on the host IP(i.e, docker daemon configuring the host IP address on the default interface so that its containers can access the internet or to the rest of the other virtual networks).
All containers on the same virtual network do not need to expose their port, to communicate. We can attach the container to more than one virtual network (or none). We can skip the virtual network configuration for the container which comes out of the box and use the host IP with the --net=host flag.
>> docker container port webhost
80/tcp -> 0.0.0.0:80
Shows which ports are forwarding traffic to that container
>> docker container inspect --format '{{.NetworkSettings.IPAddress}}' webhost
172.17.0.2
Shows the IP address of the container. Here we can use the inspect command to look into the configuration of the container and --format flag act as a grep tool and find the NetworkSettings.IPAddress from the inspect result which is the container’s IP address
💡 Note:
IP Address of the container doesn’t match the IP address of the host.
>> docker network ls
NETWORK ID     NAME     DRIVER    SCOPE
fbcdd1527ffb   bridge   bridge    local
ff556f292cc8   host     host      local
6965663fb9e9   none     null      local
Lists all the network that has been created. Here bridge is the default docker virtual network which is NAT’ed behind the host IP. So while running a container, if we do not specify the network then the container is connected to the bridge network (also called docker0) by default. host is the network for the container which uses --net=host flag which skips the virtual networking of docker and attaches the container directly to the host interface. none removes eth0 and leaves you with a localhost interface on the container.
>> docker network inspect bridgeShows the metadata of the network such as the subnet of the network, the gateway of the network, list of containers which is connected to the network, etc.
>> docker network create my_app_net
9f769d238db9381e0a8dfd04e0b61879c4a78008619600f0e045e55401ae8132
>> docker network ls
NETWORK ID     NAME         DRIVER     SCOPE
fbcdd1527ffb   bridge       bridge     local
ff556f292cc8   host         host       local
9f769d238db9   my_app_net   bridge     local
6965663fb9e9   none         null       local
Spawns a new virtual network. We can see that my_app_net was created with the driver of the bridge(because it is the default driver).
>> docker container run -d --name new_nginx --network my_app_net nginx
3582f84ad7f97e4d2b17d344bf669651352d62a893ab5c48ab6b990e61d2bcaa
Creates an Nginx container new_nginx and attach the container to the my_app_net network.
>> docker network connect my_app_net webhostDynamically creates a NIC in a container for an existing virtual network. Now the webhost container is on two networks: the first is the bridge/docker0 and the second is the my_app_net.
>> docker network disconnect my_app_net webhostRemoves the NIC from the container to disconnect from that virtual network.
Docker daemon has a built-in DNS server that containers use by default. On creating a custom network that is not the default bridge network, it actually gets a special new feature which is automatic DNS resolution for all the containers on that virtual network using their containers’ name.
💡 Note:
Docker defaults the hostname to the container’s name, but you can also set the aliases.
>> docker container run -d --net sample_net --net-alias search elasticsearch:2
>> docker container run -d --net sample_net --net-alias search elasticsearch:2
There are two containers running on the same alias. So if another container on the same network pings search then it will follow DNS round-robin i.e, the ping request to the search will be distributed between those two containers in a round-robin fashion.
Image
An image is a read-only template with instructions for creating a Docker container. Often, an image is based on another image, with some additional customization.
You might create your own images or you might only use those created by others and published in a registry. To build your own image, you create a Dockerfile with a simple syntax for defining the steps needed to create the image and run it. Each instruction in a Dockerfile creates a layer in the image. When you change the Dockerfile and rebuild the image, only those layers which have changed are rebuilt. This is part of what makes images so lightweight, small, and fast when compared to other virtualization technologies.
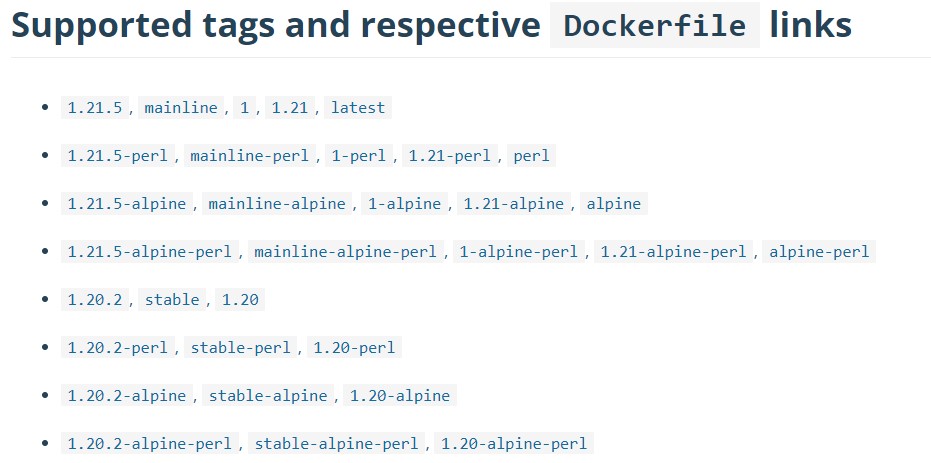
Here 1.21.5, mainline, 1, 1.21 and the latest tag represent the same version of the image.
>> docker pull nginx
Using default tag: latest
>> docker pull nginx:1.21.5
The second command doesn’t even pull the image from the registry as it is present in the local image cache from the first command. Running the docker image ls command will show two images with tags latest and 1.21.5 but it is actually one image as they both have the same image id.
>> docker image history nginx:latestShows layer of changes made to an image. Any change which happens to the image forms another layer. These layers can be cached to make the building of the container on top of the image faster.
>> docker image tag nginx shreyansh/nginxAdds a new tag to the existing image.
>> docker login <server>Defaults to login to the Hub, but you can override by adding server URI.
>> docker logoutLogout of the server.
A recipe for creating a docker image
💡 Note:
By default, we build an image from the Dockerfile usingdocker build . but if we want to build an image from some other file then we can run docker build -f some-dockerfile
Syntax
# NOTE: this example is taken from the default Dockerfile for the official Nginx Docker Hub Repo
# https://hub.docker.com/_/nginx/
FROM debian:stretch-slim
# all images must have a FROM
# usually from a minimal Linux distribution like Debian or (even better) alpine
# if you truly want to start with an empty container, use FROM scratch

ENV NGINX_VERSION 1.13.6-1~stretch
ENV NJS_VERSION   1.13.6.0.1.14-1~stretch
# optional environment variable that's used in later lines and set as env var when the container is running

RUN apt-get update \
	&& apt-get install --no-install-recommends --no-install-suggests -y gnupg1 \
	&& \
	NGINX_GPGKEY=573BFD6B3D8FBC641079A6ABABF5BD827BD9BF62; \
	found=''; \
	for server in \
		ha.pool.sks-keyservers.net \
		hkp://keyserver.ubuntu.com:80 \
		hkp://p80.pool.sks-keyservers.net:80 \
		pgp.mit.edu \
	; do \
		echo "Fetching GPG key $NGINX_GPGKEY from $server"; \
		apt-key adv --keyserver "$server" --keyserver-options timeout=10 --recv-keys "$NGINX_GPGKEY" && found=yes && break; \
	done; \
	test -z "$found" && echo >&2 "error: failed to fetch GPG key $NGINX_GPGKEY" && exit 1; \
	apt-get remove --purge -y gnupg1 && apt-get -y --purge autoremove && rm -rf /var/lib/apt/lists/* \
	&& echo "deb http://nginx.org/packages/mainline/debian/ stretch nginx" >> /etc/apt/sources.list \
	&& apt-get update \
	&& apt-get install --no-install-recommends --no-install-suggests -y \
						nginx=${NGINX_VERSION} \
						nginx-module-xslt=${NGINX_VERSION} \
						nginx-module-geoip=${NGINX_VERSION} \
						nginx-module-image-filter=${NGINX_VERSION} \
						nginx-module-njs=${NJS_VERSION} \
						gettext-base \
	&& rm -rf /var/lib/apt/lists/*
# optional commands to run at shell inside container at build time
# this one adds package repo for nginx from nginx.org and installs it

RUN ln -sf /dev/stdout /var/log/nginx/access.log \
	&& ln -sf /dev/stderr /var/log/nginx/error.log
# forward request and error logs to docker log collector

EXPOSE 80 443
# expose these ports on the docker virtual network
# you still need to use -p or -P to open/forward these ports on the host

CMD ["nginx", "-g", "daemon off;"]
# required: run this command when the container is launched
# only one CMD allowed, so if there are multiple, the last one wins
Each of the stanzas in the above code is an actual layer in our docker image so their order matters as building an image work top-down.
>> docker image build -t <name of the image> <location of the dockerfile>Builds the image from the docker file with the custom name.
Container Lifetime and Persistent Data
- Containers are usually immutable and ephemeral (changing and disposable)
- There are two ways a container can store data: Volumes and bind mounts
- Volumes: makes special location outside of the container UFS
- Bind mounts: link container path to host path
Data Volumes
VOLUME /var/lib/mysql
- This is the default location of the MySQL image
- This line in the image tells docker that when we start a new container from it, docker will create a new volume location and assign it to the given directory inside Docker. So, the running container gets its own location inside the host system (one can see the actual location using
docker volume inspect <volume_id>. Mountpoint shows the actual location inside the host machine that the ‘docker’ uses. E.g, /var/lib/docker/volumes/<volume_id>/_data) and it is then mapped to the /var/lib/mysql. So, the container read and writes to /var/lib/mysql but under the hood, docker read and writes to /var/lib/docker/volumes/<volume_id>/_data - Any files we put in the container will outlive the container until we manually delete the volume
- Named volumes: a friendly way to assign volumes to a container.
- Prior way
docker container run -d --name mysql -e MYSQL_ALLOW_EMPTY_PASSWORD=True -v var/lib/mysql mysql- Named way
docker container run -d --name mysql -e MYSQL_ALLOW_EMPTY_PASSWORD=True -v mysql-db:/var/lib/mysql mysqldocker volume lswill show a long string for the first way and the name of the volume for the second way- We can create volume ahead of creating containers using
docker volume create --help
Build Mounts
- Maps a host file or directory to a container file or directory.
- Here the location of the files will be inside the host system but outside the docker scope as compared to volumes
- It also skips the UFS, and the host file overwrites any file inside the container (more of a overshadow the data inside the container, so until there is a bind mount the container will read from it but as soon as the bind mount gets deleted, the container will read it data)
- It can’t be used in Dockerfile as it is host-specific. So we only use it in
docker container run - E.g,
docker container run test -v //c/Users/bret/stuff:/path/container(windows) //c/Users/bret/stuffis the actual path in the host machine which is being mapped to the/path/container- One advantage of using a bind mount is that if we make any changes in the data inside the bind mount, it will be reflected inside the container in real-time
Docker compose
- it configures the relationship between containers
- it saves our Docker configuration run settings in an easy-to-read file
- it creates a one-liner developer environment startup
- it comprises of two things:
- YAML - describes our solution options for containers, networks, volumes
- CLI tool docker-compose used for local/dev automation with those YAML files
docker-compose.yml
- Compose YAML format has its own version: 1, 2, 2.1, 3, 3.1
- YAML file can be used with the docker-compose command for local docker automation or with docker directly in production with Swarm (as of v1.13)
- docker-compose.yml is the default filename, but any file can be used with docker-compose -f <file_name>
# template for YAML file
version: '3.1'  # if no version is specified then v1 is assumed. Recommend v2 minimum

services:  # containers. same as docker run
  servicename: # a friendly name. this is also DNS name inside network
    image: # Optional if you use build:
    command: # Optional, replace the default CMD specified by the image
    environment: # Optional, same as -e in docker run
    volumes: # Optional, same as -v in docker run
  servicename2:

volumes: # Optional, same as docker volume create

networks: # Optional, same as docker network create
# Example
version: '2'
services:
wordpress:
image: wordpress
ports:
- 8080:80
environment:
WORDPRESS_DB_HOST: mysql
WORDPRESS_DB_NAME: wordpress
WORDPRESS_DB_USER: example
WORDPRESS_DB_PASSWORD: examplePW
volumes:
- ./wordpress-data:/var/www/html # use current directory and paste the content inside wordpress-data to /var/www/html
mysql:
# we sue mariadb here for arm support
# mariadb is a fork of MySQL that's often faster and better multi-platform
image: mariadb
environment:
MYSQL_ROOT_PASSWORD: examplerootPW
MYSQL_DATABASE: wordpress
MYSQL_USER: example
MYSQL_PASSWORD: examplePW
volumes:
- mysql-data:/var/lib/mysql
volumes:
mysql-data:version: '3'
# NOTE: This example only works on x86_64 (amd64)
# Percona doesn't yet publish arm64 (Apple Silicon M1) or arm/v7 (Raspberry Pi 32-bit) images
services:
ghost:
image: ghost
ports:
- "80:2368"
environment:
- URL=http://localhost
- NODE_ENV=production
- MYSQL_HOST=mysql-primary
- MYSQL_PASSWORD=mypass
- MYSQL_DATABASE=ghost
volumes:
- ./config.js:/var/lib/ghost/config.js
depends_on: # do not start this container until the given dependencies have been started
- mysql-primary
- mysql-secondary
proxysql:
# image only works on x86_64 (amd64)
image: percona/proxysql
environment:
- CLUSTER_NAME=mycluster
- CLUSTER_JOIN=mysql-primary,mysql-secondary
- MYSQL_ROOT_PASSWORD=mypass
- MYSQL_PROXY_USER=proxyuser
- MYSQL_PROXY_PASSWORD=s3cret
mysql-primary:
# image only works on x86_64 (amd64)
image: percona/percona-xtradb-cluster:5.7
environment:
- CLUSTER_NAME=mycluster
- MYSQL_ROOT_PASSWORD=mypass
- MYSQL_DATABASE=ghost
- MYSQL_PROXY_USER=proxyuser
- MYSQL_PROXY_PASSWORD=s3cret
mysql-secondary:
# image only works on x86_64 (amd64)
image: percona/percona-xtradb-cluster:5.7
environment:
- CLUSTER_NAME=mycluster
- MYSQL_ROOT_PASSWORD=mypass
- CLUSTER_JOIN=mysql-primary
- MYSQL_PROXY_USER=proxyuser
- MYSQL_PROXY_PASSWORD=s3cret
depends_on:
- mysql-primarydocker-compose CLI
- Not for production (only use in dev and test)
- commands
docker-compose upsetup volumes/networks and start all containersdocker-compose downstop all containers and remove containers/volumes/network
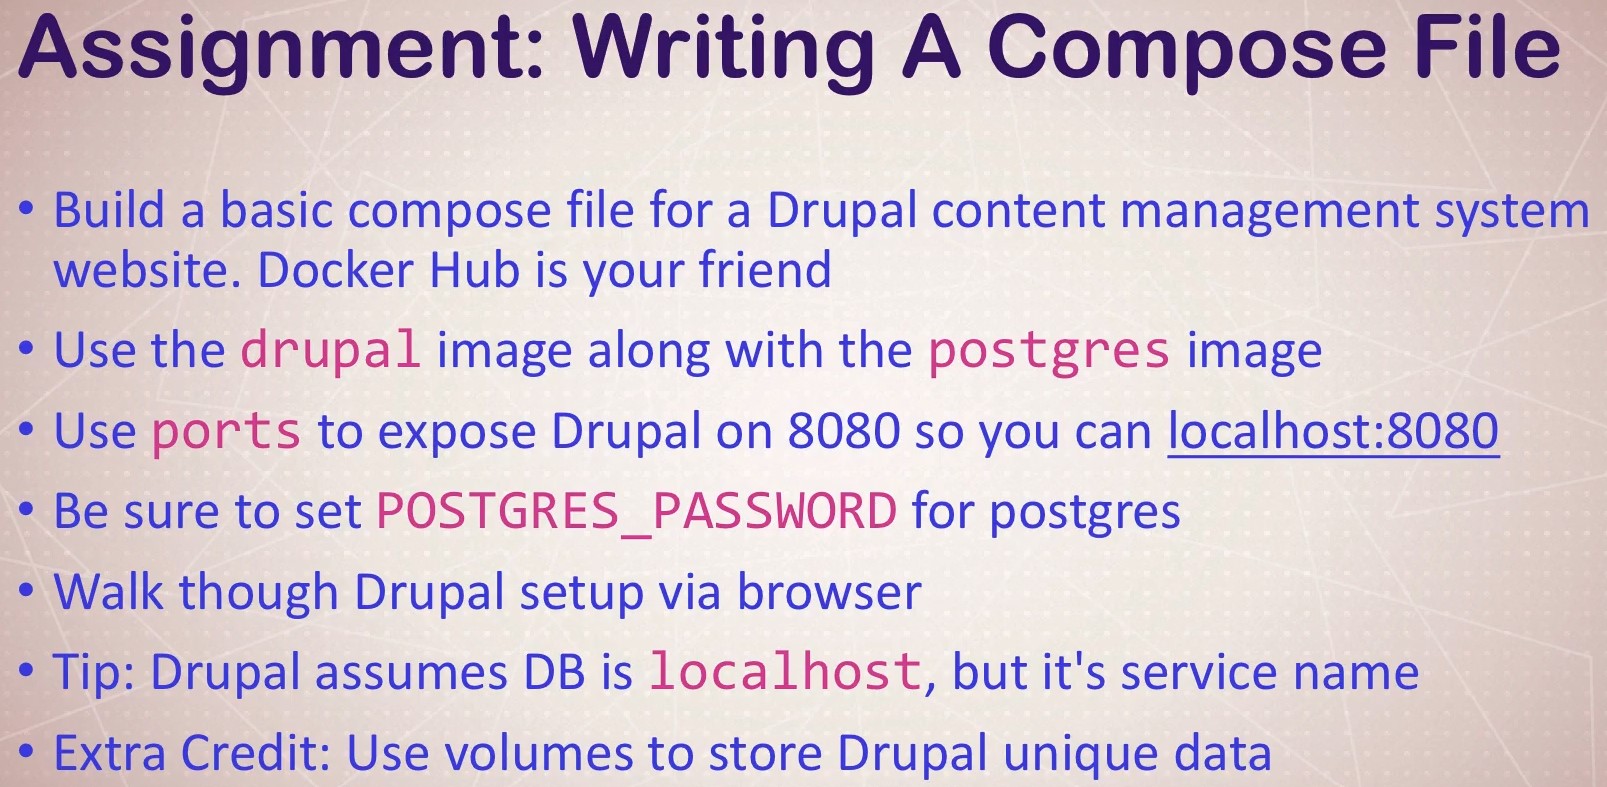
version: "3"
services:
   web:
     image: drupal
     ports:
       - "8080:80"
     volumes:
       - drupal-modules:/var/www/html/modules \
       - drupal-profiles:/var/www/html/profiles \
       - drupal-sites:/var/www/html/sites \
       - drupal-themes:/var/www/html/themes
   db:
     image: postgres
     environment:
       POSTGRES_PASSWORD: example
volumes:
  drupal-modules:
  drupal-profiles:
  drupal-sites:
drupal-themes:-
for docker-compose clean-up, we can use
docker-compose downand if we want to remove the volumes as well usedocker-compose down -v -
using compose to build
- compose can also build your custom images
- will build them with
docker-compose upif not found in the cache - also, rebuild with
docker-compose build - great for complex builds with lots of vars and build args
# full example -> https://github.com/BretFisher/udemy-docker-mastery/tree/main/compose-sample-3
version: '2'

# based on compose-sample-2, only we build nginx.conf into image
# uses sample HTML static site from https://startbootstrap.com/themes/agency/

services:
  proxy:
    build:
      context: .
      dockerfile: nginx.Dockerfile
    ports:
      - '80:80'
  web:
    image: httpd
    volumes:
      - ./html:/usr/local/apache2/htdocs/
-
to remove images the docker-compose has been using:
docker-compose down -rmi all


