- There are two ways of testing web applications:
- Manual Testing
- Automated testing
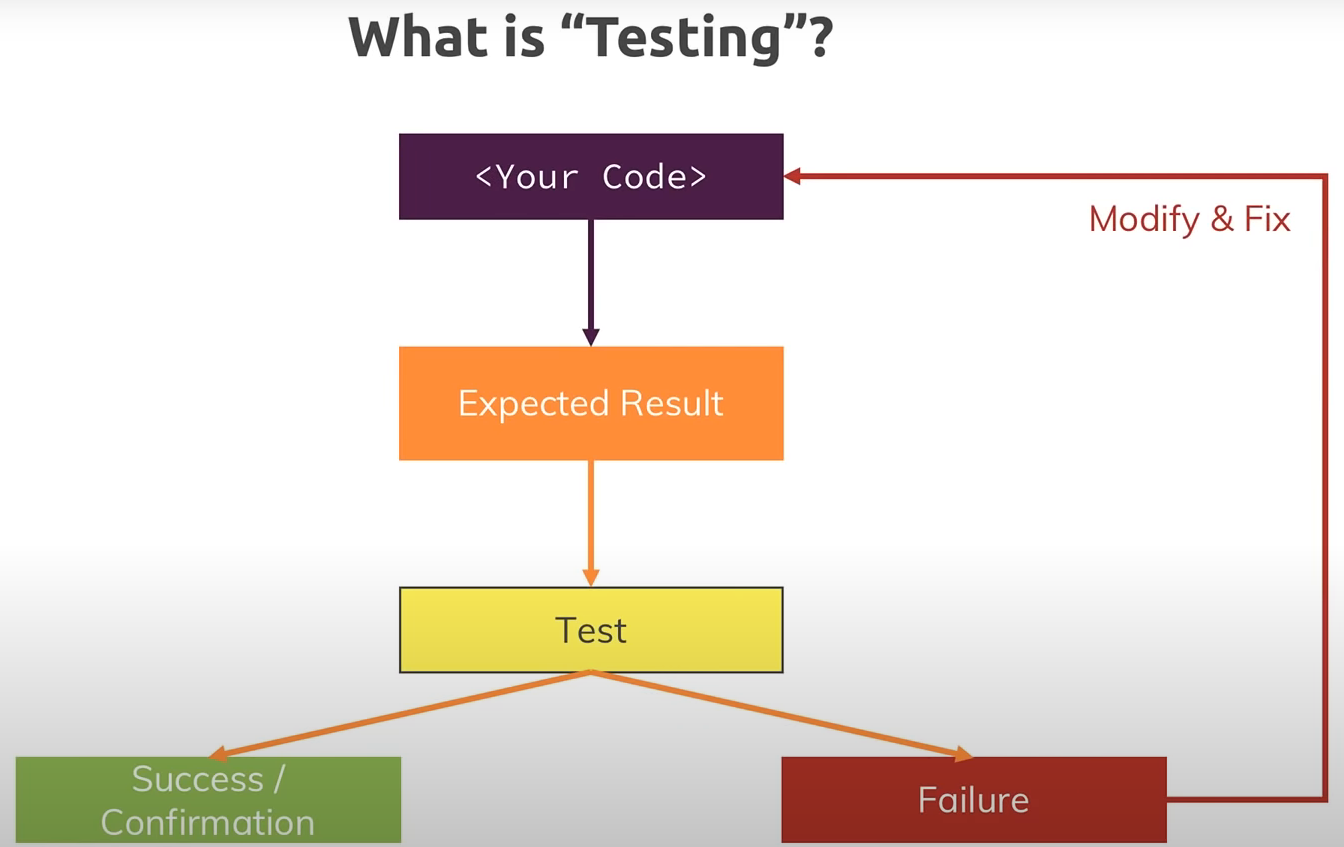
- Testing development code through test code.
- In automated testing we automate this testing process by writing test code so we don't have to manually test everything in our application.
- We may still be interested in manual testing.
- But automated tests can be run whenever we change something in code to see if that affects any part of our application without us having to test everything manually agian.
- Get an error
- We want to test if we get any error and break our code.
- We want to see without testing manually.
- Save time
- Finding possible bugs
- Integrate into build workflow (CICD process)
- We could have a build workflow where we push a git commit to our code repository like github and then we have a workflow that automatically is triggered where this code is then tested in the cloud on some server and if the test succeeds it may be deployed automatically.
- So we can build a complex deployment chain there and tests are then an integral part of ensuring that no breaking or invalid code is deployed.
- Breakup complex dependencies
- We can isolate and modularize overall code base.
- Improve our code
- Helps to write clean code.
- Tests
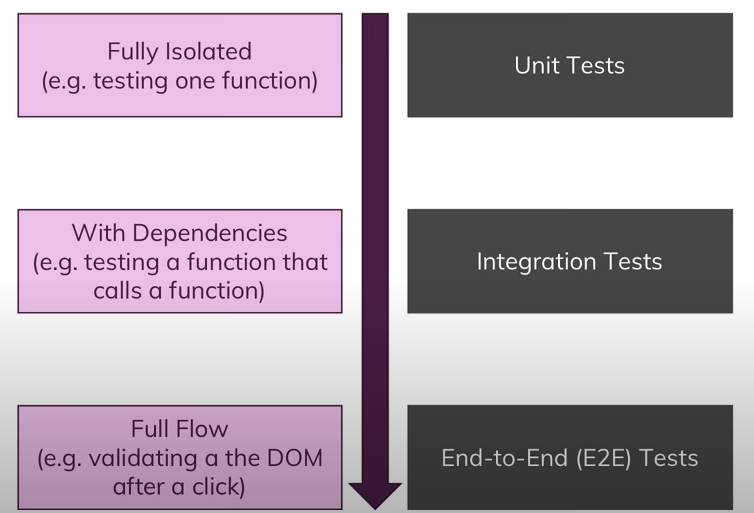
- Unit Tests
- We test a single isolated unit of our application.
- It defines as
for input x and y we expect to get output z. - Integration Tests
- We also have some tests that tests unit with some dependencies so we have no isolated piece of code anymore but we might have a function that calls another function.
- So therefore the function we are testing depends on the result of an another function. And that is called integration test.
- Here we are testing more than just a single unit, we test integration of a feature to another feature.
- End-to-End(E2E) Tests
- We can test full flow of a module or user interface. So the full application or a part of the full appplication is tested.
- This kind of testing is called
End-to-End(E2E)testing. - We could do it manually as well in the browser, but instead we can write kind of automated script that executes a certain series of steps for us and then we can check whether we get the expected result or not.
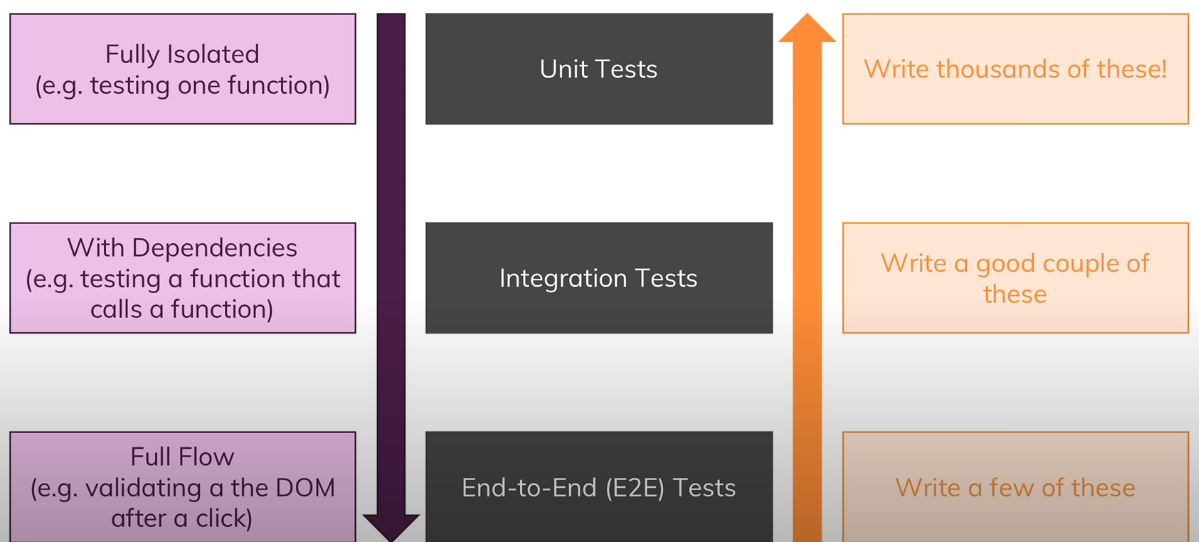
 Here violet line represents complexity.
- Unit tests are relativly easy to write.
- Integration tests are more complex than Unit tests.
- The more dependencies we add the more complex it becomes it gets harder to differentiate between what exactly is causing an error.
- Is it a dependency or the function that uses the dependencies?
- Also we might have some dependencies that reach out to a server and fetch data. That is also a complexity we have to handle.
- E2E tests are the most complex.
- Here we have to define every step that should be executed and cleverly think about what we want to test and what we not want to expect there.
 Here orange line represents frequency.
- We typically have a lot of unit tests. Because if we test every unit of our application.
- We have some integration tests to rule out that two individually working units don't work anymore.
- We have few e2e tests to test some steps or some flows in our application in the browser in an automated way.
We will implement TDD in this app.
- To create an express js application we have to make sure we have
npmandnodejsinstalled in our machine. - We created a new folder named
nestjs-express-todo-appand rannpx express-generatorto generate an express js application. - We could also run
npx express-generator --no-view todo-appto create an app namedtodo-app. - We run
npm installto install the dependencies. - We install
jestas our dev dependencies which is test runner jestnpm install -D jest. - We also install
supertestwe that we are going to use to test apis specifically:npm install -D supertest. - We can run install both the dependencies in a single command:
npm install -D jest supertest. - To verify the dependencies are install we can check
package.jsonfile and look for this"devDependencies": { "jest": "^28.1.3", "supertest": "^6.2.4" }
- Then we add a new
testscript which runsjest --watchAllflag so that anytime our code change it's going to rerun the tests for us which is very important for tdd."scripts": { "test": "jest --watchAll" }
- To verify we can run
npm test. It won't find any tests so we are going to create a file namedapp.test.jsfile. - In
app.test.jsfile we add a demo test case andnpm testwill pass automatically.it('should run', () => {})
- We import necessary dependencies.
- The TDD approach is
- We first write our tests and we they would fail.
- We refactor our code until the tests are passing.
- Then we refactor and improve our code and add more test cases from that.
- We are going to group the tests using
describe()function.
- In
routefolder'sindex.jsfile we have an index route andusers.jsfile we have user route defined.
- Create todo
- Read todo
- Update todo
- Delete todo
-
  describe('Todos', () => {
    it('GET /todos --> todos array', () => {})
    it('GET /todos/id --> specific todo by ID', () => {})
    it('GET /todos/id --> 404 if not found', () => {})
    it('POST /todos --> created todo', () => {})
    it('GET /todos --> validates request body', () => {})
})
- We are going to return fake request and we are going to pass in our application in there.
-
describe('Todos', () => {it('GET /todos --> todos array', () =>
{
    return request(app).get('/todos')
        .expect('Content-Type', /json/) // asserting content type to be json
        .expect(200) // asserting response to be 200
        .then(response => {
            expect(response.body).toEqual(
                expect.arrayContaining([  // asserting the response has array containing
                    expect.objectContaining({
                        id: expect.any(Number),
                        name: expect.any(String),
                        completed: expect.any(Boolean)
                    })
                ])
            )
        })
})

it('GET /todos/id --> specific todo by ID', () => {
    return request(app).get('/todos/1')
        .expect('Content-Type', /json/) // asserting content type to be json
        .expect(200) // asserting response to be 200
        .then(response => {
            expect(response.body).toEqual(
                    // asserting the object has name and completed property
                    expect.objectContaining({
                        name: expect.any(String),
                        completed: expect.any(Boolean)
                    })
                ) // asserting the response has array containing
        })
})

it('GET /todos/id --> 404 if not found', () => {
    return request(app).get('/todos/999999').expect(404);
})

it('POST /todos --> created todo', () => {
    return request(app).post('/todos').send({
        name: 'do dishes'
    })
        .expect('Content-Type', /json/)
        .expect(201)
        .then(response => {
            expect(response.body).toEqual(
                    expect.objectContaining({
                        name: 'do dishes',
                        completed: false
                    })
                )
        })
});

it('POST /todos --> validates request body', () => {
    return request(app).post('/todos')
        .send({ name: 123 })
        .expect(422);
});
});
- We add a new route
todo.jsand register it toapp.jsfile. - Passing
GET /todos --> todos array - We then add code to the route
/todosand pass one of our test cases.
const todos = [
  {
    id: 1,
    name: 'Do something',
    completed: false
  }
]

router.get('/', function (req, res, next) {
  res.json(todos);
});-
Passing
GET /todos/id --> specific todo by ID -
We run
npm install http-errorsto install http errors. -
Passing
GET /todos/id --> 404 if not found -
Passing
POST /todos --> created todo -
Passing
POST /todos --> validates request body
- We run the application as
npm start. - We can request from postman to test the apis.
- We add more tests based on our requirements.
- Go to
frontend/1-js-testing-introfolder. - Then run this command to run the application:
npm install - If we open the
index.htmlfile using a browser we will see an interface where we can add an user by providing name and age.
- For writing tests we need some external tools. We typically need three kinds of tools.
- Test Runner:
- It executes our tests and summarize results.
- We can use a popular test runner called
Mocha.
- Assertion Library:
- Here we define our test logics and our expected outcomes.
- So these libraries give us tools to define expectations to define comparisons, conditions we want to check as part of our tests.
- Example:
Chaiis a popular assertion library.Jestis a popular library for both running tests and asserting. It is a very popular library for both test runner and an assertion library. It's really powerful and provides a lot of functionality.
- Headless Browser:
- For e2e testing we need a headless browser. It's a browser we don't have to click manually.
- We can use browser api, the DOM api and without the necessary user interface.
- Example:
Puppeteeris a popular Headless browser for performing e2e testing.
- Test Runner:
- We install jest in our
frontend/1-js-testing-introproject by running this command:
npm install --save-dev jest- We will start writing our unit test for
util.jsfile. For that we will create a file namedutil.unit.test.js. - We could also write
util.spec.jsand jest will automatically identify that. - After writing the test case we change in the package.json file and add
test:jestand runnpm test. jestwill automatically run all the.testextension files.- If we add
test: "jest --watch"in package.json file then jest automatically check any test on the fly.
- e2e test is also called user interface test.
- We install the
puppeteerby running the command:
npm install --save-dev puppeteer- puppeteer provides headless version of Chrome browser. So basically it is a browser which we can use to interact with DOM and so on.
- We can even run it in a version with the head so where we see the browser and we can basically define steps that should be executed in that browser so that we can automate certain process on our web page and of course test results of these processes as well.
- Frontend: https://www.youtube.com/watch?v=r9HdJ8P6GQI
- Backend: youtube.com/watch?v=M44umyYPiuo


