A Pythonic interface to the Gmail API that actually works as of October 2022.
The official Gmail API quickstart doesn't actually seem to work on Python 3 without some adjustments, and the entire documentation is a bit much for someone who just wants to read and send emails from their Gmail account. I created EZGmail as a simple module that just works.
You can find additional information about the Gmail API documentation by Google at https://developers.google.com/gmail/api/ and the quickstart guide is at https://developers.google.com/gmail/api/quickstart/python You don't need to review these documents to use EZGmail.
To install with pip, run:
pip install ezgmail
For your Python script to use EZGmail to access Gmail account, you need a credentials JSON file and a token JSON file. This requires a one-time set up on Google Cloud services using your Gmail account. If you have a Gmail account, you can do this and it is free (unless you are making large use of the Gmail API by sending out thousands of emails every day.) There's several steps to this, detailed in the following sections. These instructions were last updated September 2022.
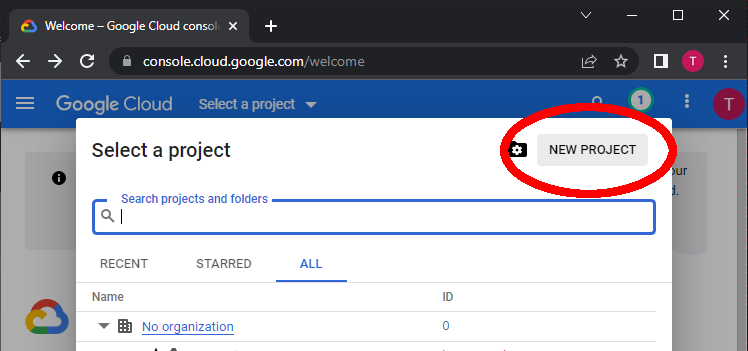
First, you need to set up a Google Cloud project. In your browser, go to https://console.cloud.google.com and sign in to you Google account with your username and password. (Your app can connect to any Gmail account, but this Google account will be one that manages the Google API access for EZGmail.) You will be taken to a Getting Started page. At the top of the page, click on "Select a project". In the pop-up window that appears, click "New Project".
This takes to a new project page. A Project Name like "My Project 23135" will be generated for you. There is also a Project ID like "macro-nuance-362516" randomly generated for you. These names won't be visible to users of your Python scripts and you can use whatever name you want. You can change the Project Name later but not the Project ID. I just use the default names that are generated for me. The Location can be left as "No organization". Note that at the free tier, you can only create 12 projects (as of September 2022) but you only need one for all the Python scripts that you want to create. Click the blue "CREATE" button to create the project.
Free Google accounts can have up to 10 projects.
Click on "Select a project" at the top of the page again, and select the project you just created. You will be taken to the dashboard page for this Google Cloud Project. Next, you need to enable the Gmail API for your project.
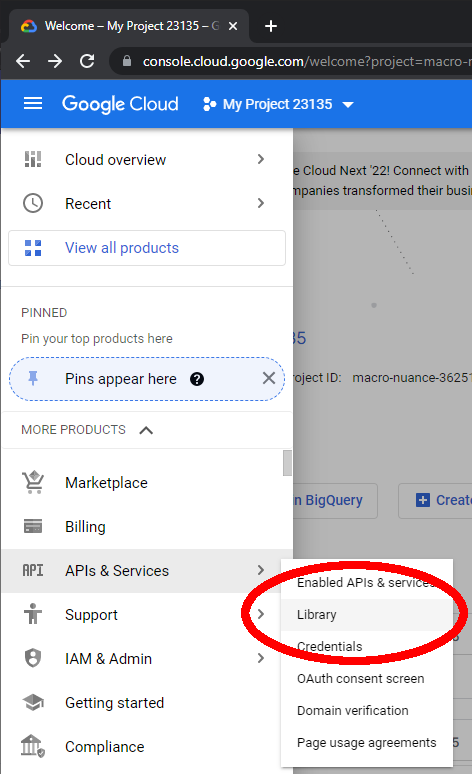
On the https://console.cloud.google.com page, click on the Navigation button in the upper left (the icon is three horizontal stripes, often called the "hamburger" icon.) Navigate to "APIs & Services" and then "Library" to go to the API Library page. There are many Google APIs for Gmail, Google Maps, Google Cloud Storage, and other Google services. We need to allow our project to use the Gmail API.
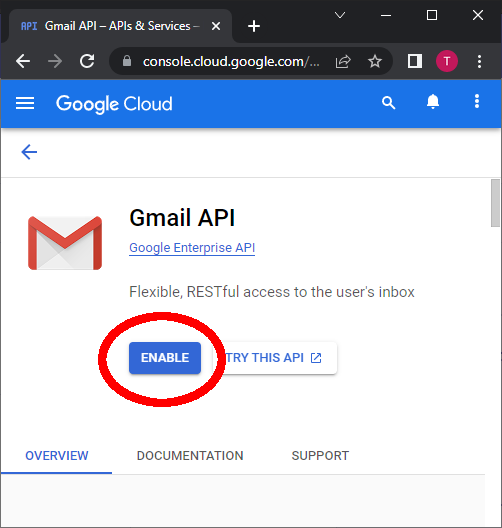
Scroll down and find the "Gmail API" and click it, or enter "Gmail API" into the search bar to find it. This takes you to the Gmail API page. Click the blue "ENABLE" button to enable your Google Cloud project to use the Gmail API. You'll be redirected to the "APIs & Services > Enabled APIs & Services" page where you can find information about how often your Python scripts are using this API. (You might want to go back to the "APIs & Services > Library" page to enable the Google Sheets API and Google Drive API if you want to use the ezsheets Python module to edit Google Sheets spreadsheets from Python scripts too, while you're here.)
Next, you need to configure your project's OAuth Consent Screen.
Click on the Navigation button in the upper left and then navigate to "APIs & Services" and then "OAuth Consent Screen." The consent screen will appear the first time when you or users of your Python script use ezgmail. With a free Gmail account that is not set up as a Google Workspace user, you'll have to select the External User Type option instead of Internal User Type. These are further explained on Google's Setting up your OAuth consent screen help page.
On Step 1 "OAuth consent screen", select External and click the blue "CREATE" button. You'll be taken to a page where you set up what the OAuth consent screen looks like. This screen appears to the user when they first import the ezgmail module. Pick a name for App Name (I use something generic like Python Gmail Script) and enter your email address for the User Support Email and Developer Contact Information. Then click "SAVE AND CONTINUE."
Step 2 "Scopes" involves adding your projects' scopes, which is a term Google chose for "permissions." Click the "ADD OR REMOVE SCOPES" button, and in the new panel that appears, go through the table and check the checkboxes for the scopes https://mail.google.com/ and click the blue "UPDATE" button. Then click "SAVE AND CONTINUE."
Step 3 "Test users" requires you to add the Gmail email addresses your Python script will interact with. Without going through Google's app approval process, your scripts will be limited to interacting with the email addresses you provide in this step. Click the "+ ADD USERS" button and in the new panel that appears, enter the Gmail addresses and click the blue "ADD" button. Then click "SAVE AND CONTINUE."
Step 4 "Summary" provides a summary of the previous steps. If all the information looks right, click the "BACK TO DASHBOARD" button. The next step is to create credentials for your project.
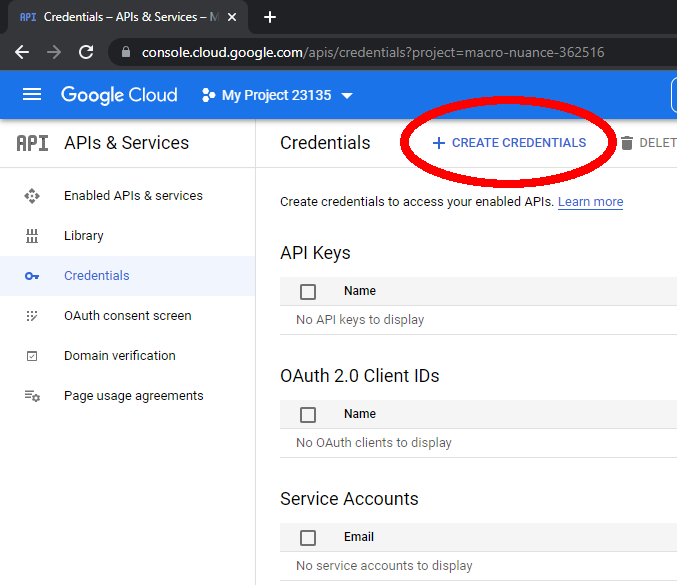
From the Navigation sidebar menu, click on "APIs & Services" and then "Credentials" to go to the Credentials page. Click the "+ CREATE CREDENTIALS" link at the top of the page. A submenu will open asking what kind of credentials you want to create: "API key", "OAuth client ID", or "Service account". Click on "OAuth client ID".
On the new page that appears, select "Desktop app" for the "Application type" and leave "Name" as the default "Desktop client 1." (You can change this to a different name if you want, it doesn't appear to the users of your Python script.) Click the blue "CREATE" button.
The pop up that appears shows your , click "DOWNLOAD JSON" to download the credentials file. This file will have a name like client_secret_282792235794-p2o9gfcub4htibfg2u207gcomco9nqm7.apps.googleusercontent.com.json. Rename it to credentials.json and place it in the same folder that your Python script will be in.
Run the Python interactive shell from the same folder that the credentials.json file is in and run import ezgmail. Or, place a .py Python program in this folder and have it run import ezgmail. EZGmail will load and automatically check this folder for a credentials.json file and, if found, launches your web browser to the OAuth consent screen. Sign in with the Gmail account you want to access from your Python script. This must be the same email address that you gave for the "test user" when configuring the Google Cloud project's OAuth consent screen.
You will get a warning message that reads "Google hasn’t verified this app," but that's fine because this is the app (or project) that you've just created yourself. Click the Continue link. You'll come to another page that says "Python Gmail Script wants access to your Google Account" (or whatever name you gave in the OAuth consent screen setup.) Click Continue.
You'll come to a plain web page that says, "The authentication flow has completed." You can now close the browser window. In the same folder as your credentials.json file, you'll now see a token.json file. Do not share these files: they can be used to log in and access your Gmail account.
After you've set up your credentials and token files, you can import EZGmail with import ezgmail. To see what email address you are sending from, examine ezgmail.EMAIL_ADDRESS (this is configured by the token-gmail.json file you're using, and you must first call ezgmail.init() or some other ezgmail function first):
>>> import ezgmail
>>> ezgmail.EMAIL_ADDRESS
'example@gmail.com'
To send an email from your "example@gmail.com" account:
>>> import ezgmail
>>> ezgmail.send('recipient@example.com', 'Subject line', 'Body of the email', ['attachment1.jpg', 'attachment2.mp3'])
The attachments argument is optional, and if you only have one attachment you can just specify the filename string. Also note that Gmail will most likely filter any emails that contain .exe, .zip, or any other suspicious attachments.
The cc and bcc fields are also optional keyword arguments:
>>> import ezgmail
>>> ezgmail.send('recipient@example.com', 'Subject line', 'Body of the email', cc='friend@example.com', bcc='otherfriend@example.com,someoneelse@example.com')
The main classes in ezgmail are GmailThread and GmailMessage. A GmailThread is a chain of emails replying to one another, while a GmailMessage is an individual email in a thread.
To retrieve unread emails:
>>> import ezgmail
>>> unreadThreads = ezgmail.unread()  # Returns a list of GmailThread objects.
The summary() function is an easy way to print out info on a list of thread or message objects:
>>> ezgmail.summary(unreadThreads)
Jon, Al - Remember that old website Hamsterdance? LOL - Dec 09
Al - This is a test email about gerbils. - Dec 09
If you want this info as a data structure, pass printInfo=False to summary():
>>> ezgmail.summary(unreadThreads, printInfo=False)
[(['Jon Smith <example@gmail.com>', 'Al Sweigart <al@inventwithpython.com>'], 'Remember that old website Hamsterdance? LOL', datetime.datetime(2018, 12, 9, 13, 29, 17)), (['Al Sweigart <al@inventwithpython.com>'], 'This is a test email about gerbils.', datetime.datetime(2018, 12, 9, 13, 25, 58))]
The GmailMessage objects of a thread are in the messages list attribute:
>>> ezgmail.summary(unreadThreads[0].messages)
Jon - Remember that old website Hamsterdance? LOL - Dec 09
Al - Haha that's awesome! On Sun, Dec 9, 2018 at 1:28 PM Jon Smith <example@gmail.com> wrote: Remember that old website Hamsterdance? LOL - Dec 09
The GmailMessage objects have sender, recipient, subject, body, and timestamp attribues:
>>> msg = unreadThreads[0].messages[0]
>>> msg.sender
'Jon Smith <example@gmail.com>'
>>> msg.recipient
'Al Sweigart <al@inventwithpython.com>'
>>> msg.subject
'Hamsterdance'
>>> msg.body
'Remember that old website Hamsterdance? LOL\r\n'
>>> msg.timestamp
datetime.datetime(2018, 12, 9, 13, 28, 48)
You can also call the recent() function to get recent email threads:
>>> import ezgmail
>>> recentThreads = ezgmail.recent()
>>> len(recentThreads)
22
The recent() and unread() functions are just convenient wrappers around search(), which you can pass a query to (just like the query text field in the Gmail.com website):
>>> import ezgmail
>>> threads = ezgmail.search('mancala')
>>> len(threads)
1
>>> ezgmail.summary(threads[0])
Al, Jon - Zanzibar > <b>Mancala</b> is one of the oldest known games to still be widely played today. > <b>Mancala</b> is a generic name for a - Dec 08
The trash() method deletes the message or messages in a GmailMessage or GmailThread object:
>>> import ezgmail
>>> threads = ezgmail.search('mancala')
>>> threads[0].trash()  # Move the entire first thread to the Trash folder.
The search() function can accept search operators just like the query text field:
- label:UNREAD
- from:al@inventwithpython.com
- subject:hello
- has:attachment
More are described at https://support.google.com/mail/answer/7190?hl=en
The search(), recent(), and unread() can also accept a maxResults keyword argument that is set to 25 by default. This sets an upper limit on how many threads/messages will be returned. API usage quotas are posted at https://developers.google.com/gmail/api/v1/reference/quota (roughly one million requests a day (and 25 per second) for the free tier).
By default, EZGmail sends messages as plaintext. You can send HTML emails by passing 'html' for the mimeSubtype parameter in send(). (By default, this parameter is set to 'plain'.) This email has "Hello" appear in bold and "body" appear italicized:
>>> ezgmail.send('recipient@example.com', 'Subject Line', '<strong>Hello</strong>, this is the <em>body</em> of the message.', mimeSubtype='html')
Accessing an email or thread doesn't mark it as unread automatically. You must do that yourself by calling the markAsRead() method of the GmailThread or GmailMessage object. (There is also a corresponding markAsUnread() function.) You can also call ezgmail.markAsRead() and pass it a list of GmailThread or GmailMessage objects.
>>> import ezgmail
>>> unreadThreads = ezgmail.unread()
>>> ezgmail.markAsRead(unreadThreads) # Marks all the GmailThread objects in the unreadThreads list as read.
>>> # Or you can do:
>>> for unreadThread in unreadThreads:
...     unreadThread.markAsRead() # Mark the individual GmailThread objects as read.
These two functions make add/remove the 'UNREAD' label using EZGmail's addLabel() and removeLabel() functions:
>>> import ezgmail
>>> unreadThreads = ezgmail.unread()
>>> ezgmail.removeLabel(unreadThreads, 'UNREAD') # Also marks threads as read.
>>> ezgmail.addLabel(unreadThreads, 'UNREAD') # Marks them as unread again.
>>> # Or you can do:
>>> for unreadThread in unreadThreads:
...     unreadThread.removeLabel(unreadThreads, 'UNREAD') # Mark the individual GmailThread objects as read.
(Currently EZGmail doesn't have functions for adding/deleting/managing custom labels.)
To view the attachments of an email, look at the GmailMessage object's attachments dictionary. The keys are the filenames of the attachments. You can either call the downloadAttachment() or downloadAllAttachments() methods:
>>> import ezgmail
>>> threads = ezgmail.search('See the attached files')
>>> threads[0].messages[0].attachments
>>> import pprint
>>> pprint.pprint(threads[0].messages[0].attachments)
{'a.png': {'id': 'ANGjdJ8eLDbjBpFTfvpuQ2HfR_iwp59XLUIl-IHW8eJcexMsxBYoPCZAXcX16rnqcbJZTknF5r3GmnM1W9n4vAE1oiVgUa4S4zBmNs7rd5PzFwLjO2vU3hp3_9SEZv-KBqVxi9nuNjarxhFqp3mxw6E5mqEYmFOYtT7Gx6CZbLaJuUox9GaWu-W9B4-XPDjwKkEfCdJ21FlOl-CsC6isZgD2Vh-ghh1haZN_2sifccznLv61ZW_KmqPKFcV1j7cXMQVqWU7bkgdH8do4Msc3QsG2ly_PNRid4-7gihsXaLI1ko_j3LSvsoLHFP3edhxh6YKQ2OdMhyZh5lqjmfT1TXgSo7hY16P_ScDO5MnWvmKscf_Hm5y5D4DHfwOq4--Otivoq2WVkVucVUJBkAoB',
           'size': 833609},
 'b.png': {'id': 'ANGjdJ_WYMmPmy2Dd2VBgvVoLAd1p3ARxGXKIzVfKqAiLhvKSBmEowYqFCdHbMJYlDZy4IWBGLg0eQCllMI0icqamM7vfMxBW2irJVogLM6SUT9cIcJFMSF7UhzU2I26bho086J7NjnX5u4kqYj_LHchowO56vTdKLRRsaJ2gfW0esz3cDFZzvthdR4wyBKEIeCJv7OJmFiaJIRf9f1KmFfKPLo9GZSyD2RMXdd6Qa2M3uN9pgT6sZ-OQx3e6aNDAKWh5GCeSiuIt_Z7GsDCdzVJjakMJx5FRFhp5zIck0p04AHnYhKfy1BipWmf7G-DAKzgJHAhFimBVUIBeFsHrqEGxDlevD7lK4ZBeb8cluSmYyEsRkSPSMYMlp-x1GVw25gqMnMVkGMKPfwj38iB',
	       'size': 335911}}
>>> threads[0].messages[0].downloadAttachment('a.png') # Download to current working directory.
>>> threads[0].messages[0].downloadAttachment('b.png', '/path/to/save/in')
>>> threads[0].messages[0].downloadAllAttachments() # Easier way to save all attachments.
Currently, EZGmail cannot do the following:
- Read or set labels. (Including marking emails as read.)
- Sending emails with cc and bcc fields.
- A lot of other basic features. This package is just a start!
If you'd like to contribute to EZGmail, check out https://github.com/asweigart/ezgmail or email al@inventwithpython.com
If you find this project helpful and would like to support its development, consider donating to its creator on Patreon.


