This is a very simple and light-weight application for newsletter campaign management.
It is studied to be integrated with other existing websites / web applications, so the installation is really straightforward.
- Upload everything in a subfolder of your web server (i.e.
/newsletter); - Create the database (you can find the schema in the
/dbdirectory); - Rename
config_sample.phptoconfig.phpand change it to fit your needs.
To get started, you can navigate through quick.php. This is the page from
where you can send newsletters by just following 3 easy steps. So, if your
website is www.example.com and you installed this application under a
newsletter folder, you can go to:
http://www.example.com/newsletter/quick.php.
Please note that the root folder is intended to be not accessible
by design. This way you shouldn't even need to have an authentication system!
Every newsletter has an HTML template, that you should create before creating the newsletter itself. Instead you can use the default template. All templates are stored in the database. When you create a new template, you can see a nice HTML editor with a preview that automatically gets updated every time you edit the code.
Placeholders are available during the template creation: you can inflate the users' name and email directly into the markup, among with the site name, URL, the current date and other.
A newsletter can have resources attached: they're usually just images (jpg, png or gif format). These images are treated as web bugs (also known as web beacons: you can read more about them in my blog). This means that the images you upload will be used to track users' behavior. You will know exactly who opened the newsletter, the time and how many times it has been viewed (or, in other words, requested) by every single user.
Another cool feature is that you can manage as many mailing lists as you want: every user will belong to a single mailing list.
Mailing lists can be updated very easily by just copy pasting the addresses in a
text field and pressing the update button. If you prefer you can always add one
user at a time. Beware that when you delete a list, all users associated to that
list will be automatically deleted too.
However, when you delete something, it's actually soft deleted, meaning that the is_deleted field will be set to 1 (default is 0).
You are encouraged to translate your application into your native language:
you can do this by creating a new file under the languages folder.
Pull requests are - of course - very welcome.
For any questions / problems / suggestions / feature requests, you can open an issue.
-
index.phpfile principale. effettua un redirect alla root del sito. -
config.phpfile di configurazione. -
db_conn.phpconnessione al database tramite driver PDO. -
template.htmltemplate della newsletter. -
send.phpprocessa l'invio di una singola newsletter. -
subscribe.phpform per l'iscrizione alla newsletter. -
unsubscribe.phpform per cancellare l'iscrizione alla newsletter. -
statistics.phpstatistiche generali sulle newsletter inviate. -
Newsletter.phpclasse Newsletter.newsletters.phpmostra le newsletter.newsletter_create.phpcrea una nuova newsletter.newsletter_read.phpmostra il contenuto in anteprima di una singola newsletter.newsletter_update.phpaggiorna il contenuto di una singola newsletter.newsletter_delete.phpelimina una singola newsletter._newsletter_form.phpcontiene il form di inserimento/modifica di una newsletter.
-
User.phpclasse User.users.phpmostra la mailing list.user_create.phpcrea un nuovo user.user_read.phpmostra i dati di un singolo user.user_update.phpaggiorna i dati di un singolo user.user_delete.phpelimina un singolo user._user_form.phpcontiene il form di inserimento/modifica di un utente.
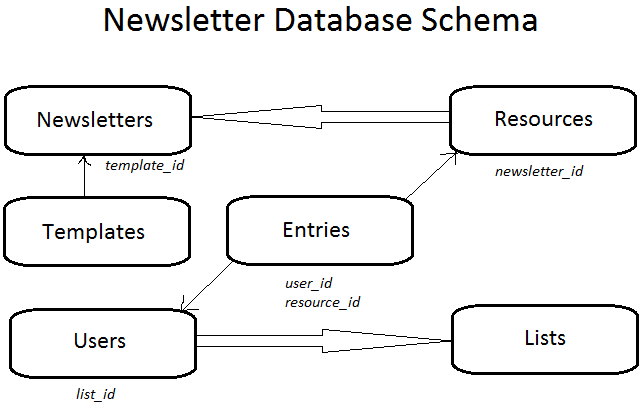
idid univoco progressivo.titletitolo della newsletter, che poi sarà l'oggetto della mail.descriptiondescrizione.is_sentindica se la newsletter è già stata spedita.is_deletedindica se la newsletter è stata cancellata.paramselementi della newsletter.created_atdata di creazione.updated_atdata ultima modifica.sent_atdata di invio.
idid univoco progressivo.mime_typeindica la tipologia di media.pathindica la posizione sul file system.created_atdata di creazione.updated_atdata ultima modifica.newsletter_idid della newsletter a cui è associata l'immagine.
idid univoco progressivo.namenome (o pseudonimo), che poi sarà il destinatario della newsletter.emailemail del destinatario.is_activeindica se l'utente è attivo o se è stato cancellato.is_subscribedindica se l'utente è iscritto alla newsletter.has_received_mailindica se l'utente ha già ricevuto la newsletter.created_atdata di creazione.updated_atdata ultima modifica.last_seen_atdata dell'ultima volta che l'utente ha letto la newsletter.list_idid della lista a cui appartiene.
idid univoco progressivo.namenome descrittivo della lista.
idid univoco progressivo.user_idl'utente che ha richiesto la risorsa.resource_idla risorsa richiesta dall'utente.requested_atdata e ora in cui è stata richiesta la risorsa.ip_addressindirizzo IP dell'utente.user_agentbrowser e sistema operativo dell'utente.
idid univoco progressivo.namenome del template.bodycorpo del template (HTML).created_atdata di creazione.updated_atdata ultima modifica.is_deletedindica se il template è stato cancellato.
User e List sono legati dalla seguente relazione:
list has_many users
user belongs_to list
Newsletter e Resource sono legati dalla seguente relazione:
resource belongs_to newsletter
Newsletter e Template sono legati dalla seguente relazione:
newsletter has_one template
template belongs_to newsletter
Resource e Entry sono legati dalla seguente relazione:
resource has_many entries
entry belongs_to resource
User e Entry sono legati dalla seguente relazione:
user has_many entries
entry belongs_to user
Chiunque conosca il link di accesso all'applicazione, può effettuare un'azione di tipo CRUD+S ( Create, Read, Update, Delete + Send).
Per effettuare un'azione basta entrare nella index.php e cliccare su una delle azioni relative ad una singola newsletter, disponibili a destra.
La newsletter verrà costruita scegliendo titolo, descrizione e parametri.
La mailing list sarà composta fondamentalmente da nome ed email. Esempio: "Pinco Pallino" <pinco@pallino.net>.
I parametri - almeno per il momento - possono essere solo semplici immagini. Il programma consente di inviare una sola newsletter alla volta. Assicurarsi quindi di aver inviato correttamente tutta la newsletter a tutti i destinatari, prima di iniziare un nuovo invio.
Il template si può modificare dal file template.html, ed è lo stesso per ogni newsletter. C'è tuttavia la possibilità di creare un template personalizzato per la newsletter dando in input direttamente il codice HTML.
Dalla versione 0.6 è possibile aggiungere un'immagine personalizzata, e il caricamento avviene dinamicamente (non più tramite FTP) e l'immagine viene salvata come Resource nel database, mentre il file binario viene salvato nella cartella uploads.
Update: ora si possono creare template a piacimento, ed ogni newsletter avra' associato un suo template. Naturalmente i template possono essere associati a piu' newsletter, ma non e' vero il contrario: una newsletter puo' avere uno ed un solo template (tuttavia non e' un problema, si puo' sempre cambiare).
- Una newsletter deve prima essere creata per poter essere spedita: servono quindi oggetto e immagine.
- Deve esserci la possibilità di creare un template on-the-fly.
- Anche una lista deve esistere prima di poter spedire la newsletter.
- Deve esserci la possibilità di crearne una on-the-fly.
-
Scegli la mailing list: [] 1,5. oppure creane una nuova (scegli nome e aggiungi indirizzi) -> ti manda a
list_create.php, e torna indietro. -
Scegli la newsletter: [] 2,5. oppure creane una nuova (scegli oggetto, carica immagine e facoltativamente incolla codice HTML) --> ti manda a
newsletter_create.php, e torna indietro. -
Invia.
È possibile leggere statistiche sull'utilizzo della newsletter da parte degli utenti della mailing list, dalla pagina statistics.php.