Virtual lab to setup a Red Hat OpenStack Platform test installation over a RHEL Hypervisor.
Currently supported RHOSP versions:
- 17.1 (default)
- 17.0
- 16.2
- 16.1
- 13.0
This document assumes that you run a RHEL 8.4 or RHEL 7.9 installation in your server. The steps for other OS versions may differ from the exposed here.
Your server must fulfill the following minimum requirements:
- CPU: 16 cores
- RAM: 128GB
- Disk: 350GB of free space
Your server needs to be registered and attached to a valid pool. To do that:
- On RHEL 8.4:
sudo subscription-manager register
sudo subscription-manager list --available --all
(select a valid available pool)
sudo subscription-manager attach --pool=<POOL_ID>
sudo subscription-manager release --set=8.4
sudo subscription-manager repos --disable=*
sudo subscription-manager repos --enable=rhel-8-for-x86_64-baseos-rpms \
--enable=rhel-8-for-x86_64-appstream-rpms \
--enable=ansible-2.9-for-rhel-8-x86_64-rpms
sudo dnf update -y
sudo reboot- On RHEL 7.9:
sudo subscription-manager register
sudo subscription-manager list --available --all
(select a valid available pool)
sudo subscription-manager attach --pool=<POOL_ID>
sudo subscription-manager repos --disable=*
sudo subscription-manager repos --enable=rhel-7-server-rpms \
--enable=rhel-7-server-extras-rpms \
--enable=rhel-7-server-optional-rpms \
--enable=rhel-7-server-ansible-2.9-rpms \
--enable=rhel-7-server-openstack-13-rpms \
--enable=rhel-7-server-supplementary-rpms
sudo yum update -y
sudo reboot
Repeat this in all your hypervisors when you use a DCN or multiple hypervisors configuration.
The user from which you will execute the lab needs to have username admin and sudo permissions enabled with no password. To achieve that you need to create a file /etc/sudoers.d/admin with the following command:
echo "admin ALL=(ALL) NOPASSWD:ALL" | sudo tee /etc/sudoers.d/admin
Repeat that admin user setup in all your hypervisors when you use a DCN or multiple hypervisors configuration.
In the main hypervisor (central) you need to create an ssh-key using the following command (use default options):
ssh-keygenThen copy that key to all your other hypervisors with:
ssh-copy-id admin@<hypervisor_address>- On RHEL 8.4:
sudo dnf -y install git ansible vim wget bash-completion python3-argcomplete python3-netaddr rhel-system-roles tmux tcpdump- On RHEL 7.9:
sudo yum -y install git ansible vim wget bash-completion python2-netaddr rhel-system-roles tmux tcpdumpRepeat this in all your hypervisors when you use a DCN or multiple hypervisors configuration.
Move to a directory where you want to work, for example the home directory:
cd ~Clone the repository and enter the directory.
git clone https://github.com/yampilop/RHOSPVirtLab.git
cd RHOSPVirtLabYou need to add all your hypervisors in the ./inventory file in the following way:
[infrastructure]
localhost ansible_host=localhost ansible_connection=local ansible_become=yes
<hypervisor1_name> ansible_host=<hypervisor1_address> ansible_user=admin ansible_become=yes ansible_ssh_extra_args='-o StrictHostKeyChecking=no' hypervisor_external_if=<hypervisor1_external_interface_name>
<hypervisor2_name> ansible_host=<hypervisor2_address> ansible_user=admin ansible_become=yes ansible_ssh_extra_args='-o StrictHostKeyChecking=no' hypervisor_external_if=<hypervisor2_external_interface_name>
...
ansible infrastructure -m pinghypervisor | SUCCESS => {
"ansible_facts": {
"discovered_interpreter_python": "/usr/libexec/platform-python"
},
"changed": false,
"ping": "pong"
}
For DCN or multiple hypervisors deployments you need to see a similar output for all the hypervisors:
hypervisor_name | SUCCESS => {
    "ansible_facts": {
        "discovered_interpreter_python": "/usr/libexec/platform-python"
    },
    "changed": false,
    "ping": "pong"
}
...
ansible-galaxy collection install -r requirements.yml
ansible-galaxy install -r requirements.ymlYou need to create a vault file to store your Red Hat Subscription credentials. To do that, execute the following command:
ansible-vault create vault_credentials.yamlYou will write the credentials in the following format:
rh_username: '<USERNAME>'
rh_password: '<PASSWORD>'
To avoid your credentials to be written in text files, you can use the following format:
rh_pool: '<POOL_ID_TO_ATTACH_SUBSCRIPTIONS>'
rh_orgid: '<ORG_ID>'
rh_activationkey: '<ACTIVATION_KEY>'
rh_serviceaccount: '<SERVICE_ACCOUNT>'
rh_token: '<TOKEN>'
rh_pool is optional to be used instead of autoattach.
rh_orgid and rh_activationkey are used in the case an Activation Key is created for subscription-manager.
rh_serviceaccount and rh_token are used in the case a Registry Service Account is created to use with the container registry (in order not to use the credentials in plain text files).
To start/restart the installation from scratch, you can edit the options.yml file and set cleanup: True instead of False.
You can also add --extra-vars "cleanup=True" to the ansible-playbook command.
Execute the playbook with the following command (you will be prompted for the user password and the vault password):
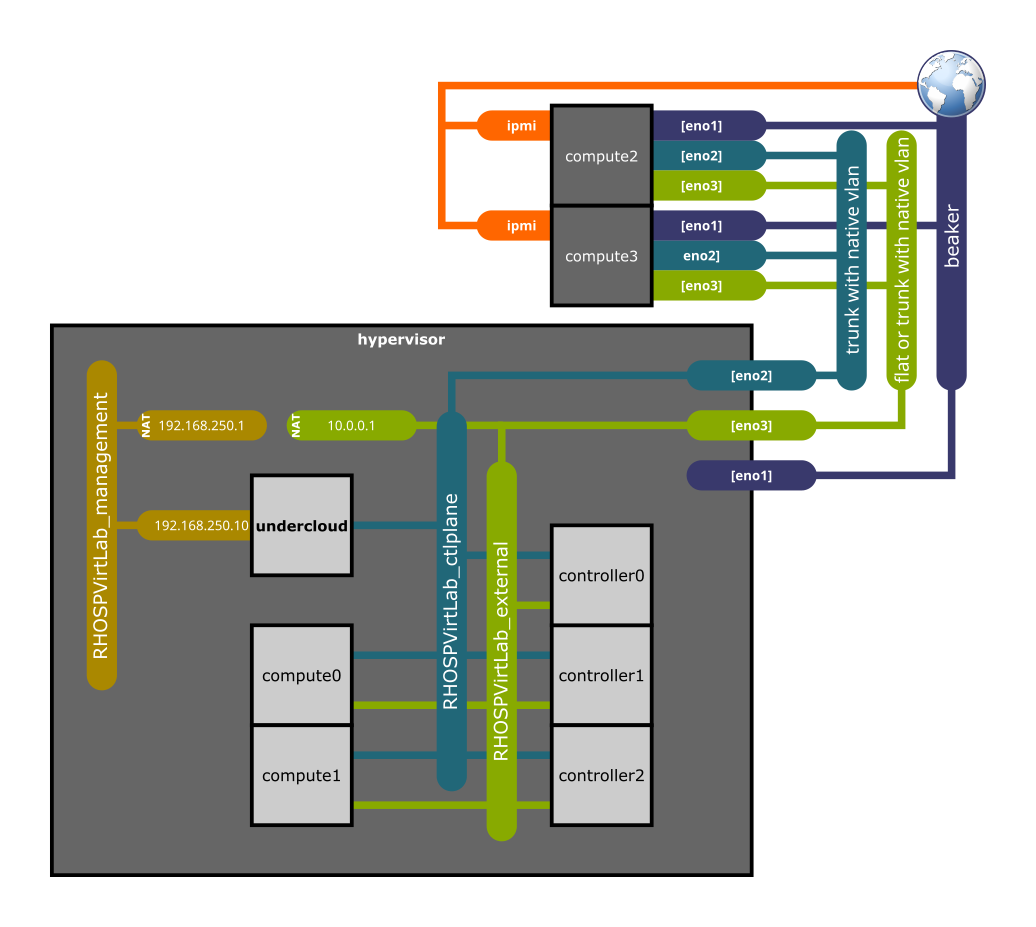
ansible-playbook --ask-vault-pass playbook.ymlThe playbook sets up the following environment:
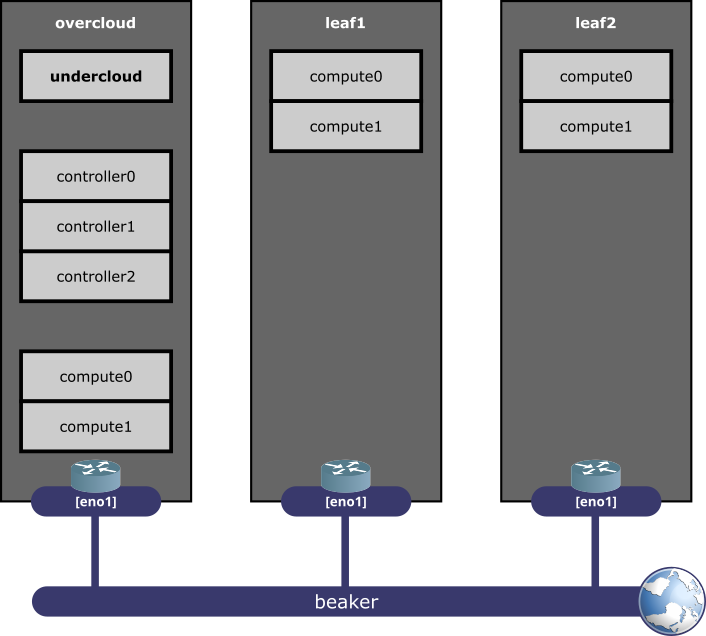
When using DCN Leafs, the playbook sets up the following environment:
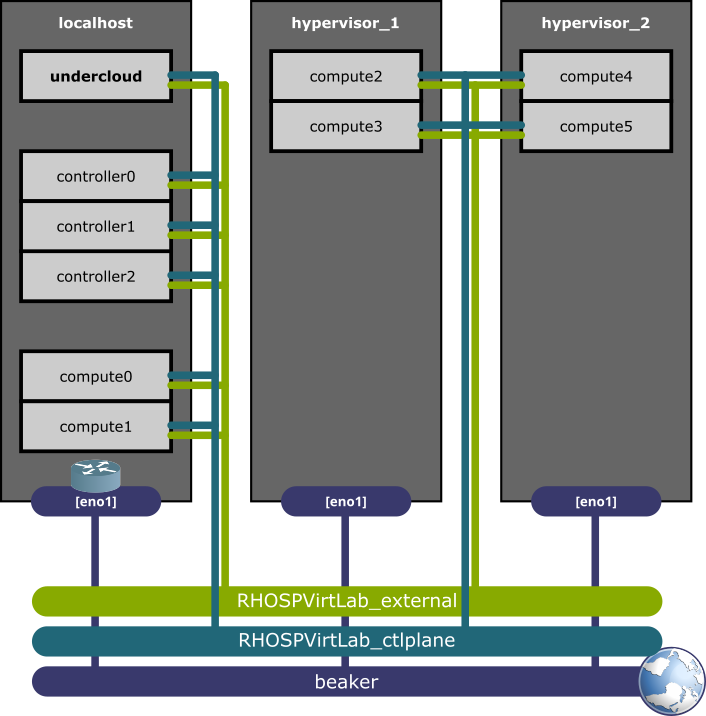
When using multiple hypervisors for a single leaf, add your hypervisor to the DefaultLeaf0 variable in vars/options.yaml this way:
# Default leaf configuration
DefaultLeaf0:
  name: overcloud
  hypervisor: localhost,<hypervisor1_name>,<hypervisor2_name>,...
  subnet:
...
The playbook sets up the following environment:
If you want to customize the default environment created by the playbook, you need to edit the files:
vars/networks.yml(The virtual networks and their connection to the physical interfaces of the hypervisor)vars/vms.yml(The VMs to be created in the hypervisors)vars/physical.yml(The physical nodes to be added as baremetal nodes in the undercloud)vars/options.yml(Customizable parameters like the version of RHOSP to deploy, the cleanup parameter, etc.)
You also can add to vars/options.yml any value overriding the default values from the roles.
If you are not connected to the Red Hat VPN, you will need to download the RHEL base image from somewhere else. To do so you can either:
- Use a valid URL to the qcow2 image file (
CustomRhelImage: "<url>"). - Download the image and use the path to the file (
CustomRhelImage: "file://<full_path>"). As you need to use the full path, the value will have a triple dash, for instance"file:///home/admin/rhel.qcow2"
- The default configuration should work for most cases.
- If you will add physical nodes, you need to define
hypervisor_if: {{ifname}}parameter onRHOSPVirtLab_ctlplaneandRHOSPVirtLab_externalnetworks, setting the interfaces that will be attached to the bridges. Make sure those interfaces are configured as trunks with a native vlan in the switch.
- The default configuration considers an undercloud, 3 virtual controllers and 2 virtual compute nodes. Add or remove nodes making sure the following parameters are unique in each record:
- name
- bmcport
- mac (this is the base MAC address without the last byte)
- Make sure you use only virtual capable profiles for the vms, or the playbook will fail. The available virtual profiles are the ones with
virtual: Trueinovercloud_rolesvariable fromroles/RHOSP-undercloud/vars/main.yml - For the case of ceph or computehci related profiles, you can add a second virtual disk to the VM with the parameter
data_disk_size: SIZE_IN_BYTES. - Make sure you perform the calculations to use the hypervisor physical resources (CPU, RAM and DISK) properly, leaving some of them for the hypervisor itself (for example leaving 4 cpus and 16GB of RAM).
- Make sure you use only distributed capable profiles for the vms in leafs, or the playbook will fail. The available distributed profiles are the ones with
distributed: Trueinovercloud_rolesvariable fromroles/RHOSP-undercloud/vars/main.yml
- The default configuration considers no physical nodes.
- Set the power management parameters matching your servers configuration.
This are the mandatory parameter you most probably need to customize:
- Set the version you will install using the
RHOSP_versionparameter. - Set the
external_ifparameter to the hypervisor external interface name. - Set reachable and working servers in
dns_serversandntp_servers. - Set the proper interfaces names, specially for the physical roles, to avoid network configuration issues. For example:
  ComputeSriov:
    ControlPlane: ens1f0
    External: ens1f1v0
    Sriov:
      - device: ens1f1
numvfs: 8- Set the proper parameters for NFV roles in
ComputeSriovProperties,ComputeOvsHwOffloadProperties,ComputeOvsDpdkPropertiesand/orComputeOvsDpdkSriovProperties. - Choose to deploy Octavia with
DeployOctavia: True. - Choose to deploy Designate with
DeployDesignate: True. - Choose to deploy FRR with
DeployFrr: True. - Choose to register the nodes with
RegisterNodes: True.
For DCN leafs you need the following customizations to the vars files:
vars/networks.yml:RHOSPVirtLab_ctlplaneandRHOSPVirtLab_externalshould beforward: bridge. RHOSPVirtLab_management remains asforward: nat.- Create
RHOSPVirtLab_ctlplane_{{leaf.name}}andRHOSPVirtLab_external_{{leaf.name}}networks for every leaf, withforward: bridgeand consistent configuration, for example:
  - name: RHOSPVirtLab_ctlplane_leaf1
    hypervisor: hypervisor_name
    bridge: br-ctlplane
    forward: bridge
    mac_suffix: '00'
    ipv4:
      address: '192.168.25.1'
      netmask: '255.255.255.0'
      dhcp: false
  - name: RHOSPVirtLab_external_leaf1
    hypervisor: hypervisor_name
    bridge: br-external
    forward: bridge
    mac_suffix: '05'
    ipv4:
      address: '10.1.0.1'
      netmask: '255.255.255.0'
      dhcp: false
- Define `hypervisor_if: {{interface_name}}` for both networks if you plan to attach physical nodes to that leaf.
vars/vms.yml:- Create vms with
hypervisor: {{hypervisorname}}, consistent configuration and nics related to the proper networks, for example:
- Create vms with
  - name: compute0
    hypervisor: hypervisor_name
    title: 'RHOSPVirtLab Leaf1 Virtual Compute 0'
    profile: 'compute'
    memory: 92272640
    vcpus: 26
    bmcport: 6230
    mac: '0c:1f:0d:12:02'
    uefi: false
    disk_size: 157374182400
    data_disk_size: 0
    backing_store: ''
    cdrom: ''
    nics:
      RHOSPVirtLab_ctlplane_leaf1: ''
      RHOSPVirtLab_external_leaf1: ''
- **Do not use `uefi: true` in DCN leafs VMs** because introspection and deployment won't work due to a tftp known problem with firewalld.
vars/physical.yml:- Create physical nodes with
leaf: {{leaf.name}}and the proper configuration, for example:
- Create physical nodes with
  - name: computeovsdpdksriov0
    leaf: leaf1
    title: 'RHOSPVirtLab Compute OVS DPDK SR-IOV 0'
    profile: 'computeovsdpdksriov'
    memory: 263874784
    cpus: 64
    pm_type: "ipmi"
    pm_user: "username"
    pm_password: "password"
    pm_addr: "XXX.XXX.XXX.XXX"
    pm_port: "623"
    mac: 'XX:XX:XX:XX:XX:XX'
    capabilities: 'boot_mode:uefi'
    disk_size: 599577434521
    nics:
      nic1: 'ens1f0'
nic2: 'ens1f1'vars/options.yml:- Define your leafs using the
DCNLeafslist with the proper format, for example:
- Define your leafs using the
DCNLeafs:
 - name: leaf1
   hypervisor: hypervisor_name
   subnet:
     name: leaf1-subnet
     cidr: 192.168.25.0/24
     dhcp_start: 192.168.25.5
     dhcp_end: 192.168.25.55
     inspection_iprange: 192.168.25.100,192.168.25.120
     gateway: 192.168.25.1
     masquerade: false
   networks:
     Tenant:
       prefix: '172.17.0'
       vlan: 10
       network: RHOSPVirtLab_ctlplane_leaf1
     Storage:
       prefix: '172.17.1'
       vlan: 20
       network: RHOSPVirtLab_ctlplane_leaf1
     InternalApi:
       prefix: '172.17.2'
       vlan: 30
       network: RHOSPVirtLab_ctlplane_leaf1
     StorageMgmt:
       prefix: '172.17.3'
       vlan: 40
       network: RHOSPVirtLab_ctlplane_leaf1
     External:
       prefix: '10.1.0'
       network: RHOSPVirtLab_external_leaf1
     Management:
       prefix: '10.1.1'
       vlan: 60
network: RHOSPVirtLab_ctlplane_leaf1When using multiple hypervisors for a single leaf you need the following customizations to the vars files:
vars/networks.yml:RHOSPVirtLab_ctlplaneandRHOSPVirtLab_externalshould beforward: bridge. RHOSPVirtLab_management remains asforward: nat.- Create
RHOSPVirtLab_ctlplane_{{something}}andRHOSPVirtLab_external_{{something}}networks for every hypervisor, withforward: bridge, consistent configuration and no ipv4 addressing, for example:
  - name: RHOSPVirtLab_ctlplane_1
    hypervisor: hypervisor_name
    bridge: br-ctlplane
    forward: bridge
    mac_suffix: '00'
  - name: RHOSPVirtLab_external_1
    hypervisor: hypervisor_name
    bridge: br-external
    forward: bridge
mac_suffix: '05'vars/vms.yml:- Create vms with
hypervisor: {{hypervisorname}}, consistent configuration and nics related to the proper networks, for example:
- Create vms with
  - name: compute0
    hypervisor: hypervisor_name
    title: 'RHOSPVirtLab Virtual Compute 0'
    profile: 'compute'
    memory: 92272640
    vcpus: 26
    bmcport: 6230
    mac: '0c:1f:0d:12:02'
    uefi: false
    disk_size: 157374182400
    data_disk_size: 0
    backing_store: ''
    cdrom: ''
    nics:
      RHOSPVirtLab_ctlplane_1: ''
RHOSPVirtLab_external_1: ''As the undercloud installation and overcloud deploy are tasks that last longer and require attention due to possible failures, they need to be executed manually. To do that, login to the undercloud:
ssh stack@undercloudExecute the following command:
openstack undercloud installWait for the process to finish with the following output:
########################################################

Deployment successful!

########################################################

Writing the stack virtual update mark file /var/lib/tripleo-heat-installer/update_mark_undercloud

##########################################################

The Undercloud has been successfully installed.

Useful files:

Password file is at /home/stack/undercloud-passwords.conf
The stackrc file is at ~/stackrc

Use these files to interact with OpenStack services, and
ensure they are secured.

##########################################################
For most cases it is available a script with all the common pre-deployment tasks. Run it using:
/home/stack/pre_deployment.shIf you want a customized experience, consider reviewing the script and executing the tasks manually.
If you added DCN leafs, execute the corresponding pre_deployment.sh scripts:
/home/stack/templates/{{leaf.name}}/pre_deployment.shExecute the deployment script provided:
/home/stack/deploy.shIf you want a customized experience, consider reviewing the script and executing the task manually.
The output should end with the following:
Ansible passed. Overcloud configuration completed.
Overcloud Endpoint: http://10.0.0.254:5000
Overcloud Horizon Dashboard URL: http://10.0.0.254:80/dashboard
Overcloud rc file: /home/stack/overcloudrc
Overcloud Deployed without error
Analyze the Overcloud rc file to take note of the admin password:
grep PASSWORD overcloudrcexport OS_PASSWORD=XXXXXXXXXXXXXX
If you added DCN leafs, execute the corresponding deploy.sh scripts:
/home/stack/templates/{{leaf.name}}/deploy.shExecute the script to create basic resources:
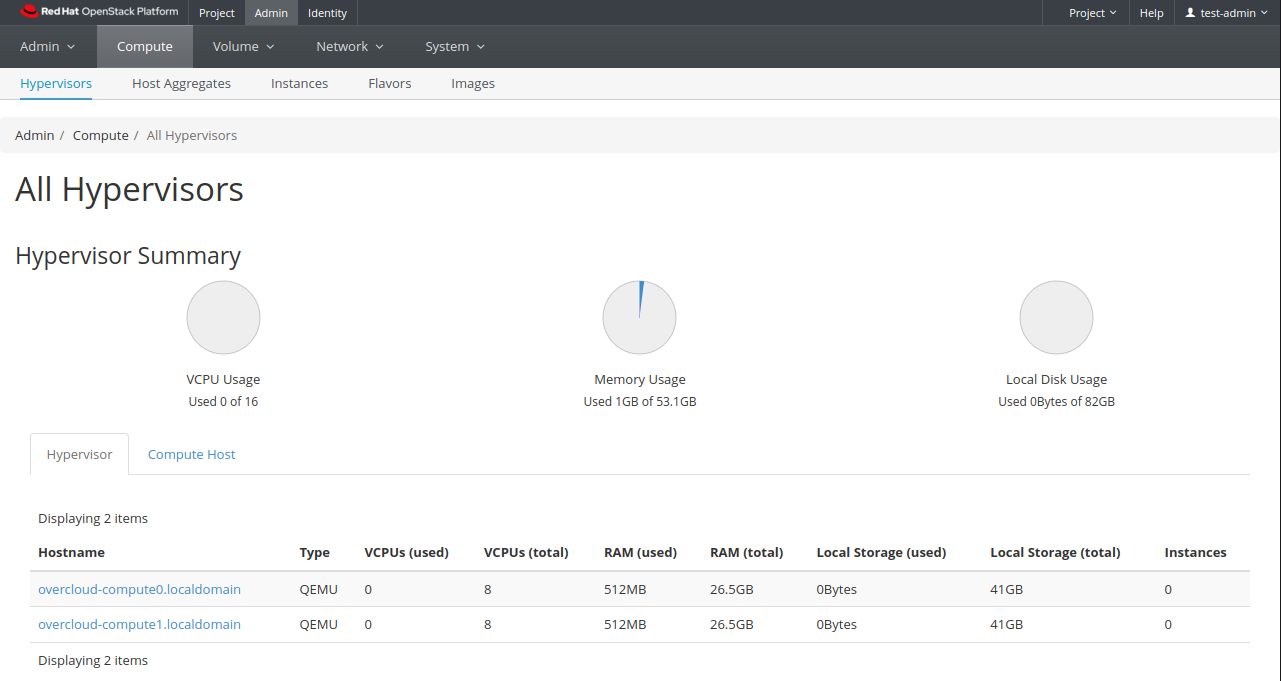
/home/stack/post_deployment.shFrom a web browser, open the Overcloud Horizon Dashboard URL pointing to the hypervisor IP/domain name (http://HYPERVISOR:80/dashboard) and login as test-admin using the password redhat.
Execute the script to delete the stacks, undeploy and clean all the servers:
/home/stack/undeploy.sh


