A WordPress plugin for managing custom image crops through Cloudinary.
Store just the URLs for each crop of each image. Never worry about regenerating custom crops again: let Cloudinary take care of that for you, on the fly!
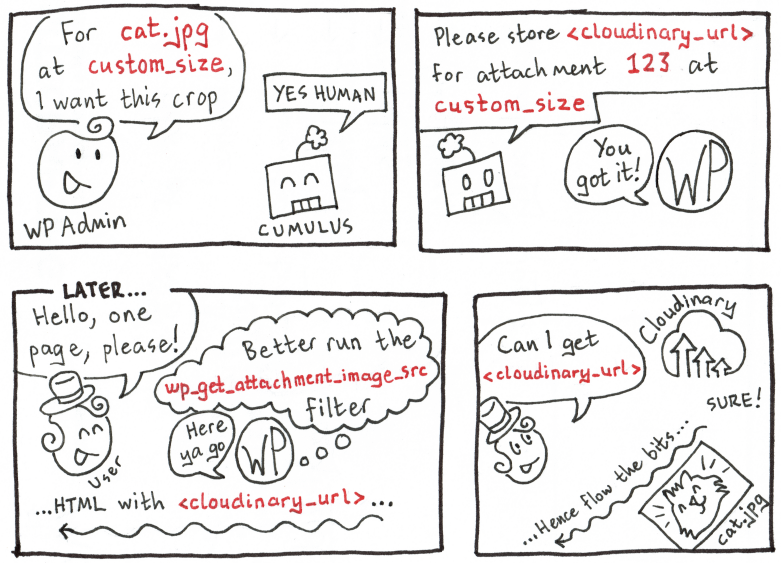
Cumulus works by saving Cloudinary image URLs to the database for each of your images' crop sizes. It overwrites zero data, only saving extra data in the database. That means you can disable it any time and switch seamlessly back to serving your images from WordPress.
Inspired by YoImages, the Cumulus user interface allows you to specify a custom crop for each image at each size, so you don't have to worry about awkward stuff like parts of faces being cut off in automatic crops. Cumulus uses Cloudinary's dynamic lfill, or "limited fill" setting, as a sensible fallback when no custom crop is specified for a given size. Plus, by serving your images from Cloudinary's Content Delivery Network, you can serve your images at some of the highest speeds available on the web, and reduce load on your servers.
Here's an illustration of how it works internally:
Go to the GitHub releases page and download the .zip archive of the latest release. Make sure you download the release archive, not the source code archive. For example, if the latest release is called v0.x.x, click the download link that says cumulus-v0.x.x.zip. (You can also use the tar.gz archive if you want - they are the same code.)
Once downloaded and unzipped, place the extracted directory in wp-content/plugins. Activate the plugin from the WP Admin as you normally would.
TODO
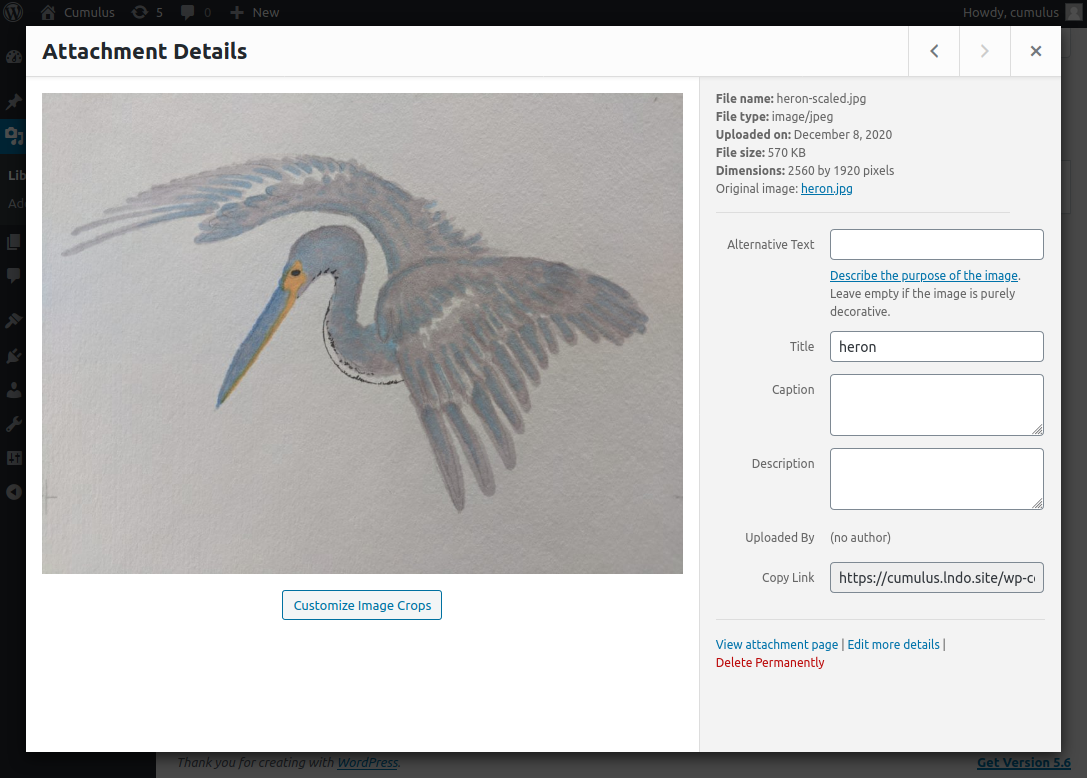
Once you activate the plugin, in the Attachment Details for each item in the Media Library, you will see a Customize Image Crops button:
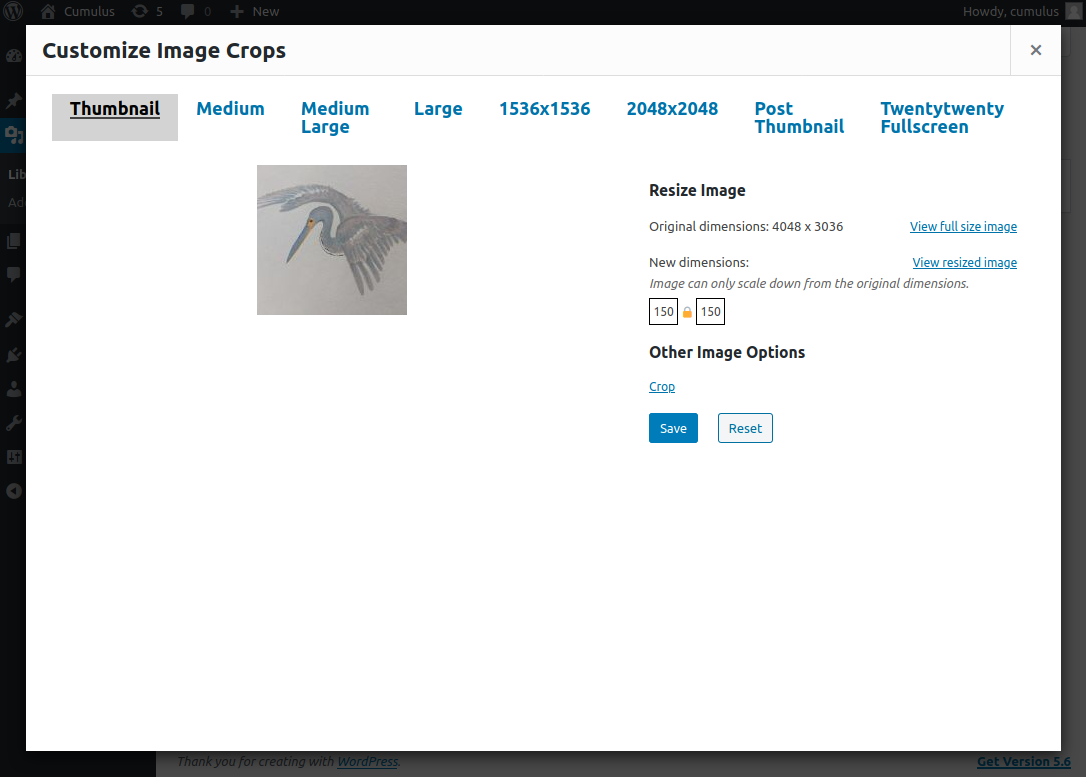
Clicking on this button brings you to the Customize Image Crops screen, which shows you the default auto-scaled image for each crop size. Here it is displaying the auto-scaled thumbnail version of our image:
Leaving it at this setting will cause this auto-scaled image to be served on the frontend for the Thumbnail crop size:
Note that WordPress does not need to regenerate the image to do this. Cloudinary generates the correctly scaled image based on the URL alone!
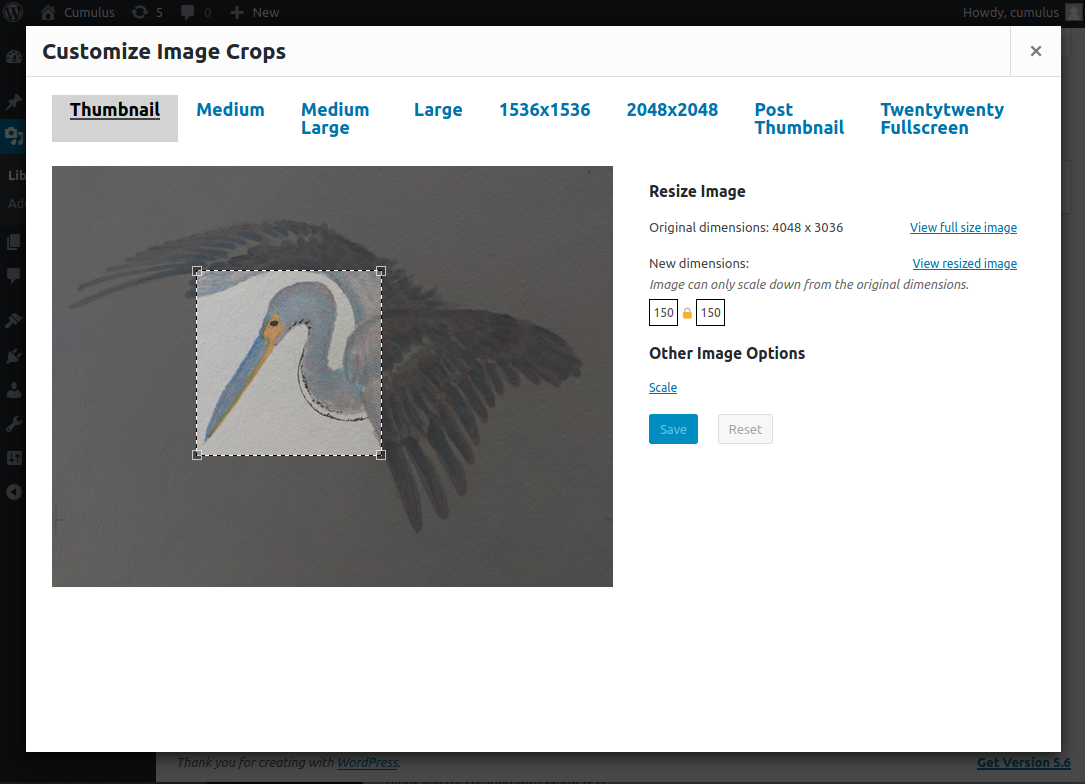
Switching to Crop mode enables the manual cropping tool:
Saving this setting will similarly tell WordPress to apply this exact crop to the original image, and then scale down the derived image to the appropriate dimensions for the image size (in this case Thumbnail):
Each setting for each image size is maintained independently, so for this one image, if you want to set a manual crop for one image size but let the other sizes auto-scale, Cumulus lets you do that.
Currently there is no admin settings UI. This will be implemented in a future version.
For now, there are a few ways to manage your Cumulus settings:
-
Use standard WP options set through WP-CLI
wp optioncommandswp option set cumulus_cloud_name my-cloud wp option set cumulus_api_key my-api-key wp option set cumulus_api_secret my-secret wp option set cumulus_folder my-folder -
PHP constants:
define('CUMULUS_CLOUD_NAME', 'my-cloud');
define('CUMULUS_API_KEY',    'my-api-key');
define('CUMULUS_API_SECRET', 'my-api-secret');
define('CUMULUS_FOLDER',     'my-folder');
-
PHP environment variables:
$_ENV['CUMULUS_CLOUD_NAME'] = 'my-cloud';
$_ENV['CUMULUS_API_KEY']    = 'my-api-key';
$_ENV['CUMULUS_API_SECRET'] = 'my-api-secret';
$_ENV['CUMULUS_FOLDER']     = 'my-folder';
Settings are resolved in that order so for example if the CUMULUS_API_KEY constant is defined, Cumulus does not consider the environment variable even if it is also set. By that same token, if the cumulus_cloud_name option is found in the database, neither the constant nor the environment variable are considered.
When setting up Cumulus, you may get an error like this:
Post-processing of the image failed likely because the server is busy or does not have enough resources. Uploading a smaller image may help. Suggested maximum size is 2500 pixels
This is actually sort of a catch-all for image upload errors. It can happen when Cumulus is configured with the wrong Cloudinary cloud name, API key, or API secret.
You can double check all of these from the CLI with:
wp option get cumulus_cloud_name
wp option get cumulus_api_key
wp option get cumulus_api_secretTODO
This repo was based on the Shadow CLJS Browser Quickstart template.
These are the baseline requirements for the dev environment:
- Lando for running the WordPress test environment
- node.js (v6.0.0+)
- Yarn
- Java JDK (8+) or Open JDK (8+)
- Recommended for Clojure(Script) beginners: VS Code with the Calva extension
It's also worth it to familiarize yourself with shadow-cljs, the ClojureScript compiler.
git clone git@github.com/sitecrafting/cumulus.git quickstart
cd quickstart
yarn
yarn dev
This runs the shadow-cljs server process which all following commands will talk to. Just leave it running and open a new terminal to continue.
The first startup takes a bit of time since it has to download all the dependencies and do some prep work. Once this is running we can get started.
The WordPress test site runs inside Lando. To start it, just run:
lando startThis will install WP Core and activate the Cumulus plugin within the install. It will print out your local dev site URLs when it's done.
To build JavaScript assets for the Lando WP install, run:
yarn build
This will compile the JS code to dist/js/main.js.
yarn shadow watch mainThe main here refers to the name of the build; see the :builds map inside shadow-cljs.edn for exactly how this is configured. The above command will begin the compilation of the :main build and re-compile whenever you change a file.
When you see a "Build completed" message your build is ready to be used.
[:app] Build completed. (23 files, 4 compiled, 0 warnings, 7.41s)You can now open http://localhost:8008.
Instead of yarn shadow watch main, you can also trigger watching files from the browser by going to http://localhost:9630/builds and clicking start watch.
The same goes for the test build (see below).
ClojureScript unit tests run in the browser. To watch src and test files, run:
yarn shadow watch test
Then go to http://localhost:8007/. It will run all tests whenever the ClojureScript compiler detects a change. You can even set it to alert you via desktop notifications.
The Read-Eval Print Loop, or REPL, is an extremely useful dev tool and is the basis for "REPL-driven" development.
If you have run yarn dev and are watching the main build, you can start a REPL straight from your editor with most IDEs. This guide will cover how to do so with VS Code.
(TODO...)
Start by updating the release number in the cumulus.php header comment:
/**
 * Plugin Name: Cumulus: Cloudinary Image Crops
 * Description: Serve your custom image crops from Cloudinary Image CDN
 * Version: 0.1.0 <-- UPDATE THIS
 * ...
 */
Make sure you commit this change before creating the actual release. Otherwise your release download will not include this update.
The scripts/build-release.sh tool creates a build archive that can be uploaded to GitHub as part of a release.
To create a release called vX.Y.Z, run:
scripts/build-release.sh vX.Y.ZThis will create a .tar.gz and a .zip archive which you can upload to a new release on GitHub.
If you have hub installed, it will also prompt you to optionally create a GitHub release for you directly!
- Support bulk upload of existing Media Library
- Admin Settings UI
- Deletion settings
- PHPUnit tests
- Document hooks
- Internationalization
- Finish REPL guide
- Submit to WordPress plugin repository


