This document is a guide on how to buld a iOS TODO list app using Skygear with Swift. It contains the following features:
- Basic user sign-up / login
- Adding todo items
- Editing todo items
- Synchronizing items across devices
We will break down the app development into 5 steps as listed below.
- Step0: Initial Scaffolded project Download zip
- Step1: Basic UI and displaying todo items in a list Download zip
- Step2: Adding "Edit" and "+" Button Download zip
- Step3: Saving todo items to the cloud Download zip
- Step4: Adding the item detail UI - we can edit items now Download zip
- Step5: Synchronizing todo items without app refresh Download zip
- You can sign up for the Skygear backend
- Under the "INFO" tab in the portal, you can obtain your Skygear server endpoint and the API Key. You will need them to connect your app to the server
Open terminal and execute the following command:
pod lib create --silent --template-url=https://github.com/SkygearIO/skygear-Scaffolding-iOS.git "SkygearTodoList"
- You will need to answer the questions as prompted
- After running the script, a scarffolding app with signup and login features will be created.
If you encounter problems in the above step, you can also download the scaffolded project zip here: Download Project zip of Step 0
To ensure the iOS app has been set up properly, you can test signing up as a new user or logging in with an existing user.
If you downloaded the scaffolded zip directly, you will need to fill in the app endpoint and API Key info in the file AppDelegate.swift.
Then we will need to build the UI.
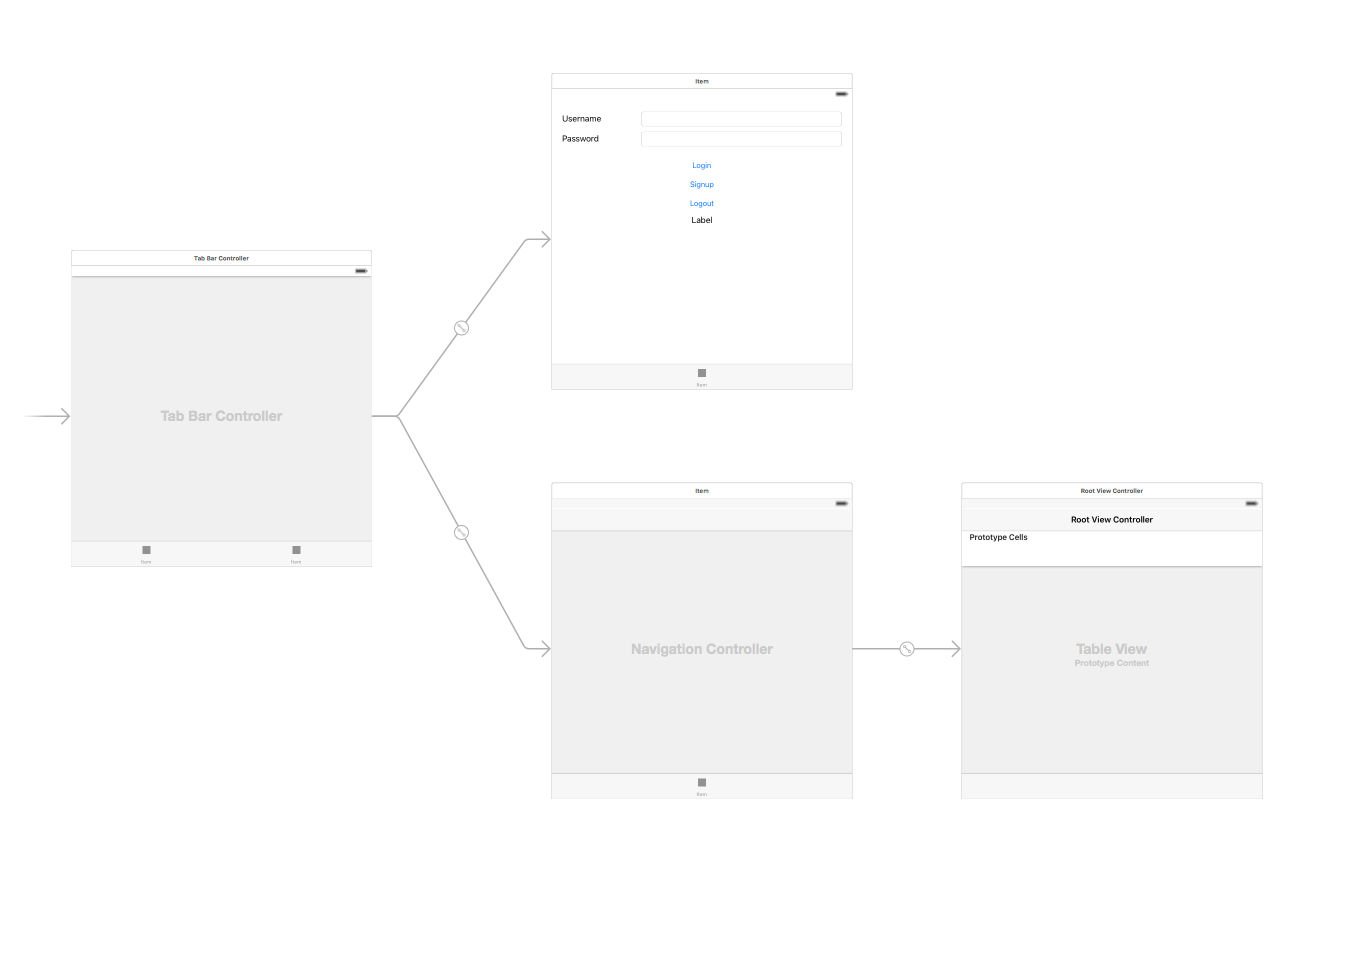
Drag the following things to the Story board:
- UITabViewController, and set it as the entry point
- Add the previous login view as one of the Tab Bar Items to the Tab view.
- Add a NavigationController, as one of the Tab Bar Items to the Tab view.
- A UITableViewController is automatically added, as the default root view controller of the Navigation Controller
The Storyboard now should look like this:
You can download the sample and see the how the project should look like here: Download Project zip of Step 1
We will use a table view to show the todo items. Create a UITableViewController Class and name it TodoTableViewController.
There are a few functions in TodoTableViewController we will need to implement:
func numberOfSectionsInTableView(tableView: UITableView) -> Int
func tableView(tableView: UITableView, numberOfRowsInSection section: Int) -> Int
func tableView(tableView: UITableView, cellForRowAtIndexPath indexPath: NSIndexPath) -> UITableViewCell
The implementation is already included in the Step 1: Download Project zip of Step 1
We now wish to add 2 buttons:
- "Edit" button, to edit or delete an item
- "+" button, to add button
You can uncomment the codes for the "Edit" button to show the button:
// Uncomment the following line to display an Edit button in the navigation bar for this view controller.
// self.navigationItem.rightBarButtonItem = self.editButtonItem()
Imagine we want to have the edit button on the top left instead of the right, you can change the line to:
self.navigationItem.leftBarButtonItem = self.editButtonItem()
To add the "Add" button, use the following code:
let addButton = UIBarButtonItem(barButtonSystemItem: .Add, target: self, action: #selector(insertNewObject(_:)))
        self.navigationItem.rightBarButtonItem = addButton
We now can see the buttons appear on the todo list page: Download Project zip of Step 2
To save the todo item record, we will implement the insertNewObject()
We will save the item as a SKYRecord(recordType: "todo"), and set its value for each key we wish to save.
    func insertNewObject(sender: AnyObject) {
        let alertController = UIAlertController(title: "Add To-Do item", message: nil, preferredStyle: .Alert)
        alertController.addAction(UIAlertAction(title: "Cancel", style: .Cancel, handler: nil))
        alertController.addAction(UIAlertAction(title: "Confirm", style: .Default, handler: { (action) in
            let title = alertController.textFields![0].text
            let todo = SKYRecord(recordType: "todo")
            todo.setObject(title!, forKey: "title")
            todo.setObject(SKYSequence(), forKey: "order")
            todo.setObject(false, forKey: "done")

            self.privateDB.saveRecord(todo, completion: { (record, error) in
                if (error != nil) {
                    print("error saving todo: \(error)")
                    return
                }

                self.objects.insert(todo, atIndex: 0)
                let indexPath = NSIndexPath(forRow: 0, inSection: 0)
                self.tableView.insertRowsAtIndexPaths([indexPath], withRowAnimation: .Automatic)
            })
        }))
        alertController.addTextFieldWithConfigurationHandler { (textField) in
            textField.placeholder = "Title"
        }
        self.presentViewController(alertController, animated: true, completion: nil)
    }
Now every todo item will be saved to the cloud. You can retrieve them when logging in through another device. Download Project zip of Step 3
As we query todo items on the criteria done==false, we can mark done as true in order to delete a todo item.
It can be achieved with the following code in the tableView.
 override func tableView(tableView: UITableView, canEditRowAtIndexPath indexPath: NSIndexPath) -> Bool {
        // Return false if you do not want the specified item to be editable.
        return true
    }

    override func tableView(tableView: UITableView, commitEditingStyle editingStyle: UITableViewCellEditingStyle, forRowAtIndexPath indexPath: NSIndexPath) {
        if editingStyle == .Delete {
            let todo = objects[indexPath.row] as! SKYRecord
            todo.setObject(true, forKey: "done")
            self.privateDB.saveRecord(todo, completion: { (record, error) in
                if (error != nil) {
                    print("error saving todo: \(error)")
                    return
                }

                self.objects.removeAtIndex(indexPath.row) as! SKYRecord
                tableView.deleteRowsAtIndexPaths([indexPath], withRowAnimation: .Fade)
            })
        } else if editingStyle == .Insert {
            // Create a new instance of the appropriate class, insert it into the array, and add a new row to the table view.
        } else {
            print("Editing \(editingStyle)")
        }
    }
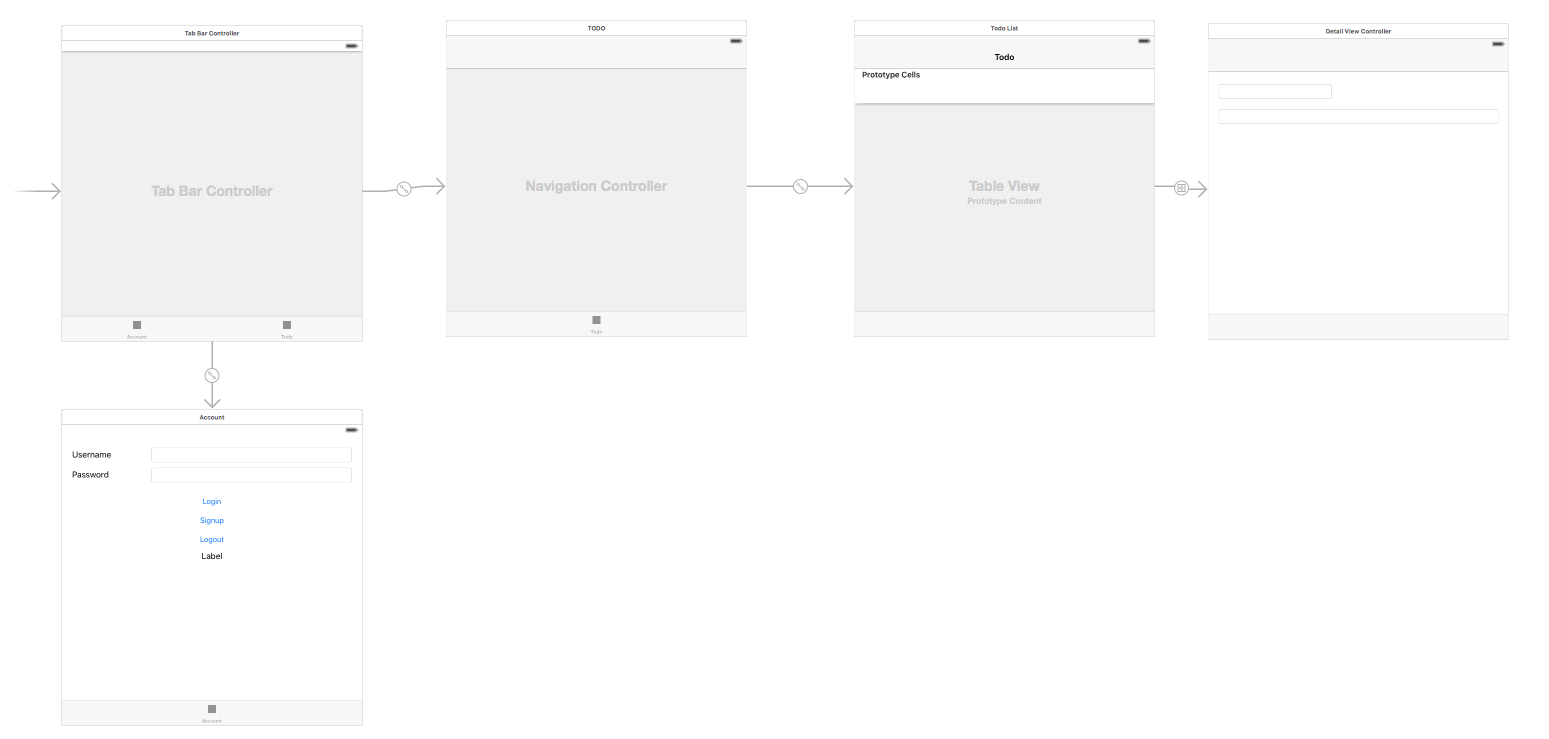
To allow editing a todo item, we need to add a View Controller to the Storyboard, and create a DetailViewController class.
We will add a view controller in the storyboard.
We only need two simple text fields in this view.
Connect the segue from the cell in the TodoTableViewController, and choose the show option. When the user taps the cell, it will show the detail view.
In DetailViewController.swift, we will need to do the following two things:
- Fill in the data
- Listen for field changes and save the record.
We can now edit the items in the detail view and mark the item as deleted. You can download the sample project here: Download Project zip of Step 4
We will implement the data synchronization using the Skygear query change subscription.
The steps are:
- Register the device for push notification
- Define the query change subscription and add the listener
- Add code to handle the changes
Register in application delegate
func application(application: UIApplication, didFinishLaunchingWithOptions launchOptions: [NSObject: AnyObject]?) -> Bool {
    some code…

    // This will prompt the user for permission to send remote notification
    application.registerUserNotificationSettings(UIUserNotificationSettings())
    application.registerForRemoteNotifications()

    return true
}
func application(application: UIApplication, didRegisterForRemoteNotificationsWithDeviceToken deviceToken: NSData) {
    print("Registered for Push notifications with token: \(deviceToken)");
}
SKYContainer.defaultContainer().registerDeviceCompletionHandler { (deviceID, error) in
        if error != nil {
            print("Failed to register device: \(error)")
            return
        }

        // You should put subscription creation logic in the following method
        // self.addSubscription(deviceID)
    }
Update action
func application(application: UIApplication, didFinishLaunchingWithOptions launchOptions: [NSObject: AnyObject]?) -> Bool {
    some code…

    SKYContainer.defaultContainer().delegate = self

    some code..
}
We need to set the AppDelegate to implement SKYContainerDelegate
And we need to implement didReceiveNotification in AppDelegate
func container(container: SKYContainer!, didReceiveNotification notification: SKYNotification!) {
    print("received notification = \(notification)");
    NSNotificationCenter.defaultCenter().postNotificationName(ReceivedNotificationFromSkygaer, object: notification)
}
Add query subscription
func addSubscription(deviceID: String) {
    let query = SKYQuery(recordType: "todo", predicate: nil)
    let subscription = SKYSubscription(query: query, subscriptionID: "my todos")

    let operation = SKYModifySubscriptionsOperation(deviceID: deviceID, subscriptionsToSave: [subscription])
    operation.deviceID = deviceID
    operation.modifySubscriptionsCompletionBlock = { (savedSubscriptions, operationError) in
        dispatch_async(dispatch_get_main_queue()) {
            if operationError != nil {
                print(operationError)
            }
        }
    };
    SKYContainer.defaultContainer().privateCloudDatabase.executeOperation(operation)
}
In TodoTableViewController, let's tell the table view controller to update the data when there is remote notifications. We will do this in viewDidLoad.
override func viewDidLoad() {
    some code...

    NSNotificationCenter.defaultCenter().addObserverForName(ReceivedNotificationFromSkygaer, object: nil, queue: NSOperationQueue.mainQueue()) { (notification) in
        self.updateData()
    }

    some code...
}
You will be able to see the synchronization result in the demo project: Download Project zip of Step 5
We now have a full-featured todo list app:
- Basic user sign-up / login
- Adding todo items
- Editing todo items
- Synchronizing items across devices
You can download the complete project here: Download Project zip of Step 5
Thanks :)

