![]()
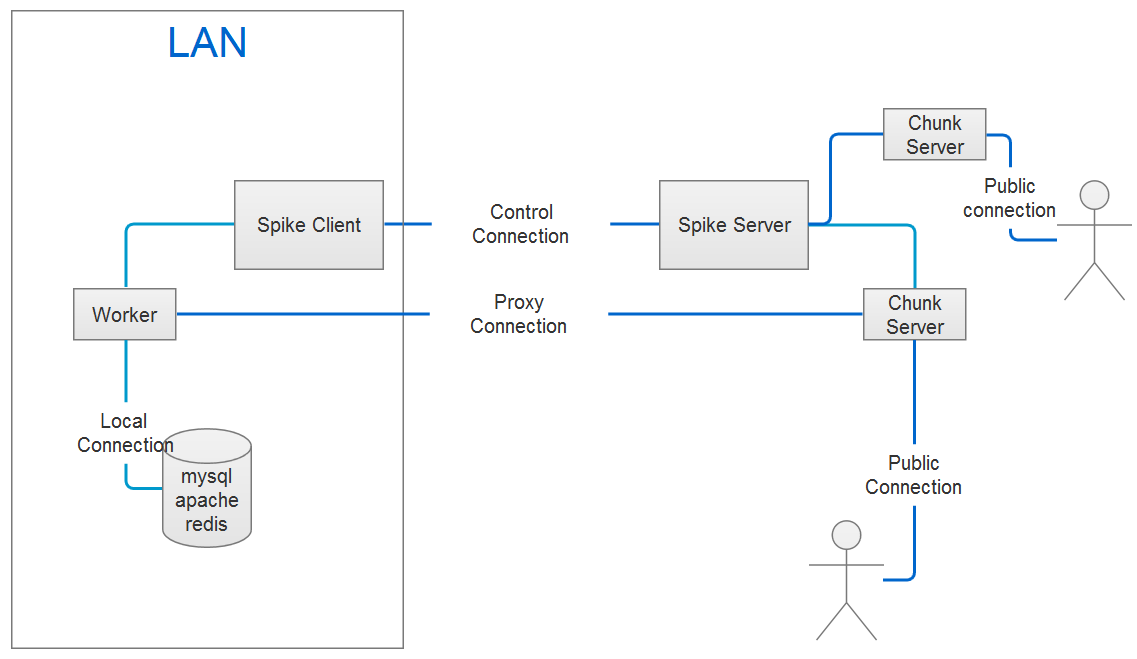
Spike is a fast reverse proxy written in golang that helps to expose your local services to the internet.
Download the latest programs from Release according to your operating system and architecture.
A public machine that can be accessed on the internet is needed. Assuming already. There are two ways to start the server
Use the following command to start the server
$ spiked -p 6200The above command can create a basic service. If you want to customize more information, you should start the server based on the configuration file.
- Creates a configuration file
Execute the following command to create it.
$ spiked initYaml,Xml,Ini and Json(default) files are supported. Use the following command for help.
$ spiked init -h-
Open the configuration file and modify the parameters.
-
Executes the following command to start the service.
$ spiked --config=/home/conf/spiked.yamlYou should first create a configuration file for the client.
- Execute the following command to create it
$ spike initUse the following command for help about this command
$ spike init -h-
Open the configuration file and modify the parameters.
-
Start the client service.
$ spike --config=/home/conf/spike.yamlTunnels only need to be defined on the client side, The server does not need to do anything.
Now supports tcp udp and http
Open the configuration file for the client and modify the parameters for "tunnel".
tunnels:
  - protocol: tcp
    local_port: 3306
    server_port: 6201

  - protocol: udp
    local_host: 8.8.8.8
    local_port: 53
    server_port: 6202

  - protocol: http
    local_port: 80
    server_port: 6203
    headers:
      x-spike: yes
Restarts the client service.
-
Visit
http://{SERVER_IP}:6203, the service will be forwarded to the local127.0.0.1:80. -
The services based on the tcp can use the tunnel, such as: mysql, redis, ssh and so on; The following is an example of proxy mysql service
Execute the following command to visit the local mysql service.
$ mysql -h {SERVER_IP} -P 6201
The authentication is not enabled on the server based on defaults.You should start the server based on configuration file, if you want to enable this.
- Enable authentication
Open the configuration file "spiked.yaml" for the server and modify parameters for users and restart the service.
users:
  - username: admin
password: admin- Modify the client identity information
user:
  username: admin
  password: admin
Open the configuration file for the client and modify parameters for "auth". Keep the same parameters as the server.
The default to open the console and file two forms of the log; the first will print the logs to the console; the second will write all the logs to the specified file; Default log level is "info"; You can adjust this in the configuration file.
$ spike list
 _____   _____   _   _   _    _____
/  ___/ |  _  \ | | | | / /  | ____|
| |___  | |_| | | | | |/ /   | |__
\___  \ |  ___/ | | | |\ \   |  __|
 ___| | | |     | | | | \ \  | |___
/_____/ |_|     |_| |_|  \_\ |_____|

Usage:
  spike [flags]
  spike [command]

Available Commands:
  completion  Generate the autocompletion script for the specified shell
  help        Help about any command
  init        Create a configuration file in the current directory
  version     Print spike version
  view-proxy  Show proxy of the server

Flags:
      --config string     Config file (default is Current dir/spike.yaml) (default "**/spike.yaml")
  -h, --help              help for spike
  -H, --host string       Server host (default "127.0.0.1")
  -p, --password string   Password for the given user (default "admin")
  -P, --port int          Server port (default 6200)
  -u, --username string   User for login (default "admin")

Use "spike [command] --help" for more information about a command.See CHANGELOG.md
The MIT license. See MIT