Note
This demo represents an educational example to use a Chainlink system, product, or service and is provided to demonstrate how to interact with Chainlink’s systems, products, and services to integrate them into your own. This template is provided “AS IS” and “AS AVAILABLE” without warranties of any kind, it has not been audited, and it may be missing key checks or error handling to make the usage of the system, product or service more clear. Do not use the code in this example in a production environment without completing your own audits and application of best practices. Neither Chainlink Labs, the Chainlink Foundation, nor Chainlink node operators are responsible for unintended outputs that are generated due to errors in code.
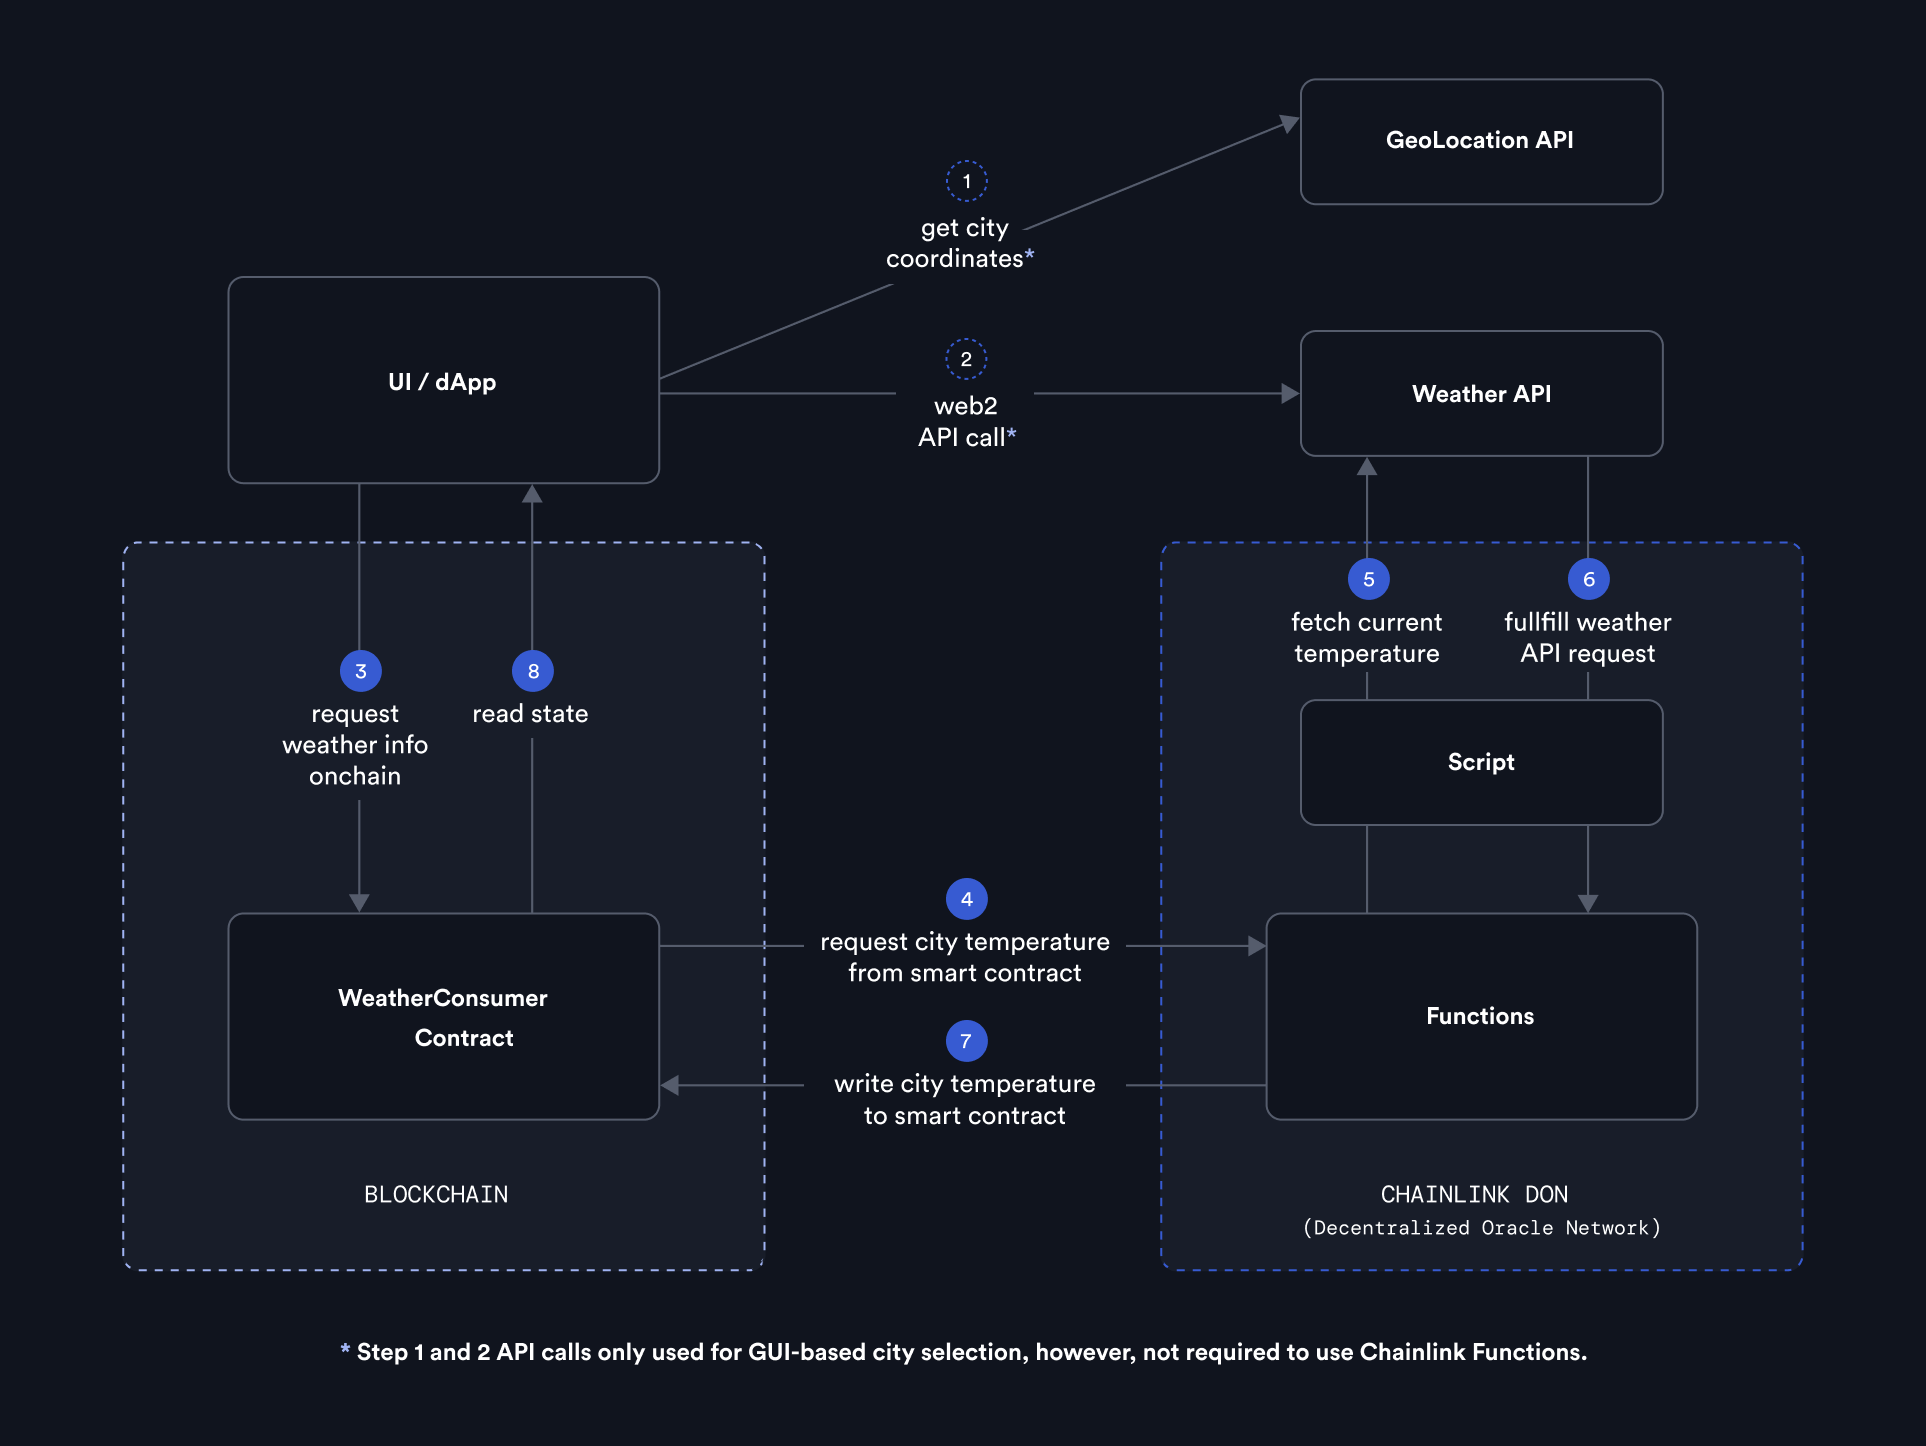
This project is an example dApp, designed to run on the Fuji testnet (Avalanche), using Chainlink Functions. It demonstrates how to use Chainlink Functions in a full-stack implementation with a real smart contract code, coupled with an easy to follow guidance on how it works under the hood. The functionality allows users to query a city's temperature from a web2 API and then write it on-chain via a smart contract.
Chainlink Functions is used to determine the input city's current temperature.
NOTE: This example is not production ready, as edge cases are not handled.
The dApp is designed so the end user does not have to connect a wallet nor create a Chainlink Functions subscription. This is all handled by the dApp.
This dApp consists of two parts: the contracts and the web UI.
The ./app directory is a Next.js project bootstrapped with create-next-app.
It contains the frontend for the Chainlink Functions playground demo dApp.
Install all dependencies:
cd app
npm install
Set environment variables by copying .env.example to .env and filling in the values:
NEXT_PUBLIC_GTM_IDGoogle Analytics id.GEOCODING_API_KEY- API KEY from API Ninjas used for geocoding.CONTRACT_ADDRESS_METEOof the deployed contract that utilizes Meteo API FunctionalityCONTRACT_ADDRESS_Xof the deployed contract that utilizes X API FunctionalityX_SECRET_VERSION_ID- secret version on the DON Storage of the X Bearer Token. This variable can be found in the output of thenpx hardhat functions-upload-secrets-don --slotid 0 --network avalancheFuji --ttl 4320command.X_BEARER_TOKEN- this bearer token is used to get data off-chain from the X API.NETWORK_RPC_URL- Avalanche testnet RPC endpoint.PRIVATE_KEY- for the signing and broadcasting transactions in the backend.
For enabling ratelimiting you need to also fill in the following .env variables:
KV_URL- Vercel KV URLKV_REST_API_URL- Vercel KV REST API urlKV_REST_API_TOKEN- Vercel KV REST API tokenKV_REST_API_READ_ONLY_TOKEN- Vercel KV REST API read only tokenRATELIMIT_IP_EXCEPTION_LIST- list of IPs which should be excluded from the ratelimit functionality, separated with comma (ex."127.0.0.1,8.8.8.8,1.1.1.1")
You can get those from your Chainlink platform coordinator.
Run npm run dev in your terminal, and then open localhost:3000 in your browser.
The dApp is designed so the end user does not have to connect a wallet nor create a Chainlink Functions subscription. This is all handled by the dApp.
Transactions are sent from the backend, which is a Next.js API route. The backend is responsible for signing and broadcasting transactions using the private key provided in the .env file. Make sure to fund the wallet with some testnet tokens before running the dApp.
The fee for the Chainlink Functions request is paid from the subscription balance which is encoded in the contract at the time of deployment. The Functions subscription is also funded by the dApp owner and is not required from the end user.
The dApp uses a rate limiting mechanism to prevent spamming the backend with requests. The rate limiting is implemented using Vercel KV and is based on the IP address of the user. The rate limit is set to 3 request per 10 minutes. The rate limit can be configured by changing the RATELIMIT_IP_EXCEPTION_LIST environment variable.
The frontend displays the last 10 requests made to the backend. The requests and their results are stored in Vercel KV and are fetched from the backend.
./contracts folder is a Hardhat project with a full Chainlink Functions enabled smart contract implementation.
WeatherConsumer.sol contract implements a Chainlink Functions consumer which runs a weather request check for the provided geolocation on the set weather API.
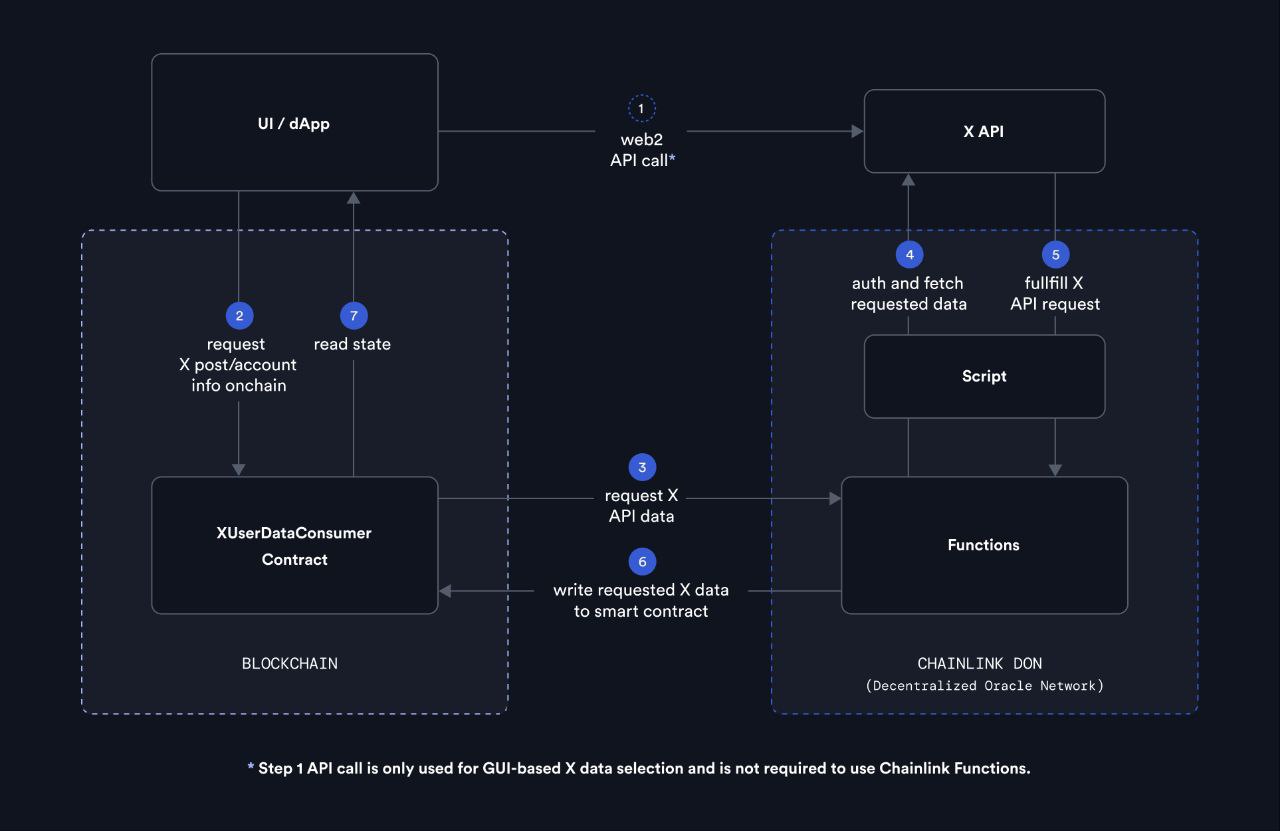
XUserDataConsumer.sol contract implements a Chainlink Functions consumer which can record information from X (formerly known as Twitter)'s API like a user's profile information and user's last tweets on-chain.
- Install dependencies
cd contracts
npm install-
Obtain the values for following environment variables:
PRIVATE_KEYfor your development walletPOLYGON_MUMBAI_RPC_URL,ETHEREUM_SEPOLIA_RPC_URL, orAVALANCHE_FUJI_RPC_URLPOLYGONSCAN_API_KEY,ETHERSCAN_API_KEY, orFUJI_SNOWTRACE_API_KEYblockchain explore API keys depending on which network you're usingX_BEARER_TOKENtoken needed to make API requests on-chain. This token is encoded as a secret and used by Chainlink's DON
-
Set the required environment variables. For improved security, Chainlink provides the NPM package @chainlink/env-enc which can be used to keep environment variables in a password encrypted
.env.encfile instead of a plaintext.envfor additional security. More detail on environment variable management and the tooling is provided in the Environment Variable Management section.- Set an encryption password for your environment variables to a secure password by running
npx env-enc set-pw. This password needs to be set each time you create or restart a terminal shell session. - Use the command
npx env-enc setto set the required environment variables.
- Set an encryption password for your environment variables to a secure password by running
-
Locally simulate the execution of your JavaScript source by running
npx hardhat functions-simulate-script -
Create and fund a new Functions billing subscription using the Chainlink Functions UI
Note: Ensure your wallet has a sufficient LINK balance before running this command. Testnet LINK can be obtained at faucets.chain.link. Also make a note of your subscription Id as you will need it for most commands. -
Deploy and verify the consumer contract to an actual blockchain network by running
-
If you want to deploy the weather consumer contract
npx hardhat deploy-weather-consumer --network network_name_here --subid your_sub_id
Note: Make sure<explorer>_API_KEYis set if using--verify truedepending on which network is used. -
If you want to deploy the X consumer contract
npx hardhat deploy-x-consumer --network network_name_here --subid your_sub_id --verify true
Note: Make sure<explorer>_API_KEYis set if using--verify truedepending on which network is used.
-
-
Add the deployed consumer contract as an authorized consumer to your subscription through the Chainlink Functions UI
This repo uses the NPM package @chainlink/env-enc for keeping environment variables such as wallet private keys, RPC URLs, and other secrets encrypted at rest. This reduces the risk of credential exposure by ensuring credentials are not visible in plaintext as they are with .env files.
By default, all encrypted environment variables will be stored in a file named .env.enc in the root directory of this repo. This file is .gitignore'd.
First, set the encryption password by running the command npx env-enc set-pw.
NOTE: On Windows, this command may show a security confirmation.
The password must be set at the beginning of each new session. If this password is lost, there will be no way to recover the encrypted environment variables.
Run the command npx env-enc set to set and save environment variables.
These variables will be loaded into your environment when the config() method is called at the top of networks.js.
Use npx env-enc view to view all currently saved environment variables.
After pressing ENTER, the terminal will be cleared to prevent these values from remaining visible.
Running npx env-enc remove VAR_NAME_HERE deletes the specified environment variable.
The command npx env-enc remove-all deletes the entire saved environment variable file.
When running this command on a Windows machine, you may receive a security confirmation prompt. Enter r to proceed.
NOTE: When you finish each work session, close down your terminal to prevent your encryption password from getting exposed if your machine is compromised. You will need to set the same password on future session to decrypt the
.env.encfile.
⚠️ Disclaimer: The code used in this Chainlink Functions quickstart template comes from Chainlink community members and has not been audited. The Chainlink team disclaims and shall have no liability with respect to any loss, malfunction, or any other result of deploying a Quickstart Template. By electing to deploy a Quickstart Template you hereby acknowledge and agree to the above.

