This is an unofficial implementation (Pytorch) of S-DCNet and SS-DCNet.
The papers are
- "From Open Set to Closed Set: Counting Objects by Spatial Divide-and-Conquer" (official repo)
- "From Open Set to Closed Set: Supervised Spatial Divide-and-Conquer for Object Counting" (official repo)
See the exact references at the bottom of this page.
Discussions indicate that the authors do not have plans to release the training code (as of Oct 2019).
This repository contains the code for model training and evaluation on the published datasets ShanghaiTech Part_A and Part_B. Code for inference on standalone user-provided images is also present. Only classification-based counter (C-Counter) is implemented (regression-based counter (R-Counter) is not).
Install required packages according to requirements.txt.
All of the scripts intended to be run by user (gen_density_maps.py, train.py, evaluate.py, inference.py) are powered by Hydra configuration system. Run any script with --help to see the available options. The configuration files are in conf/ directory.
Download the ShanghaiTech dataset using the links from this repo or from kaggle. After unpacking the archive, you will have the following directory structure:
./
└── ShanghaiTech/
    ├── part_A/
    │   ├── test_data/
    │   │   ├── ground-truth/GT_IMG_{1,2,3,...,182}.mat
    │   │   └── images/IMG_{1,2,3,...,182}.jpg
    │   └── train_data/
    │       ├── ground-truth/GT_IMG_{1,2,3,...,300}.mat
    │       └── images/IMG_{1,2,3,...,300}.jpg
    └── part_B/
        ├── test_data/
        │   ├── ground-truth/GT_IMG_{1,2,3,...,316}.mat
        │   └── images/IMG_{1,2,3,...,316}.jpg
        └── train_data/
            ├── ground-truth/GT_IMG_{1,2,3,...,400}.mat
            └── images/IMG_{1,2,3,...,400}.jpg
Generate ground truth density maps by running a command like
python gen_density_maps.py dataset=ShanghaiTech_part_B
# and/or similarly for part_A
Files with the names density_maps_part_{A|B}_{train,test}.npz will appear in the current directory.
The generated density maps can be visualized and compared to the pre-calculated density maps provided by the official repo (only for the test sets of ShanghaiTech Part_A and Part_B). In order to do so, download the archive Test_Data.zip using the links in the Data section of the README in the official repo. After unpacking the archive, you will have the following directory structure:
./
└── Test_Data/
    ├── SH_partA_Density_map/
    │   ├── test/
    │   │   ├── gtdens/IMG_{1,2,3,...,182}.mat
    │   │   └── images/IMG_{1,2,3,...,182}.jpg
    │   └── rgbstate.mat
    └── SH_partB_Density_map/
        ├── test/
        │   ├── gtdens/IMG_{1,2,3,...,316}.mat
        │   └── images/IMG_{1,2,3,...,316}.jpg
        └── rgbstate.mat
Next, run gen_density_maps.py with the path to the gtdens directory:
python gen_density_maps.py \
    dataset=ShanghaiTech_part_B \
    dataset.xhp_gt_dmaps_dir=./Test_Data/SH_partB_Density_map/test/gtdens \
# and/or similarly for part_A
Directory named cmp_dmaps_part_{A|B}_test_<some_random_string> containing pairs of images (named IMG_<N>_my.png / IMG_<N>_xhp.png) will be created.
train.py is the script for training a model. Launch the script by a command like this:
python train.py dataset=ShanghaiTech_part_B
# and/or similarly for part_A
Fine-tuning is supported (check the option train.pretrained_ckpt).
The logs and checkpoints generated during training are placed to a folder named like outputs/<launch_date>/<launch_time>. Plots of MAE and MSE vs epoch number can be visualized by tensorboard:
tensorboard --logdir outputs/<date>/<time>evaluate.py is the script for evaluating a checkpoint. Select a checkpoint for epoch N and run a command like this:
python evaluate.py \
    dataset=ShanghaiTech_part_B\
    test.trained_ckpt_for_inference=outputs/<date>/<time>/checkpoints/epoch_<N>.pth
You will get an output like this for part_A:
Evaluating on the (whole) train data and on the test data (in ./ShanghaiTech/part_A)
Metrics on the (whole) train data: MAE: 5.67, MSE: 23.08
Metrics on the test data:          MAE: 60.96, MSE: 104.73
or like this for part_B:
Evaluating on the (whole) train data and on the test data (in ./ShanghaiTech/part_B)
Metrics on the (whole) train data: MAE: 1.13, MSE: 2.79
Metrics on the test data:          MAE: 7.44, MSE: 12.70
The error values shown above were obtained after training on a machine from vast.ai, so the training time was limited. The error values are higher than that reported in the original paper for SS-DCNet C-Counter (MAE = 56.1, MSE = 88.9 for part_A test set; MAE = 6.6, MSE = 10.8 for part_B test set).
| dataset | MAE | MSE | checkpoint |
|---|---|---|---|
| ShanghaiTech part A test | 60.96 | 104.73 | link_A |
| ShanghaiTech part B test | 7.44 | 12.70 | link_B |
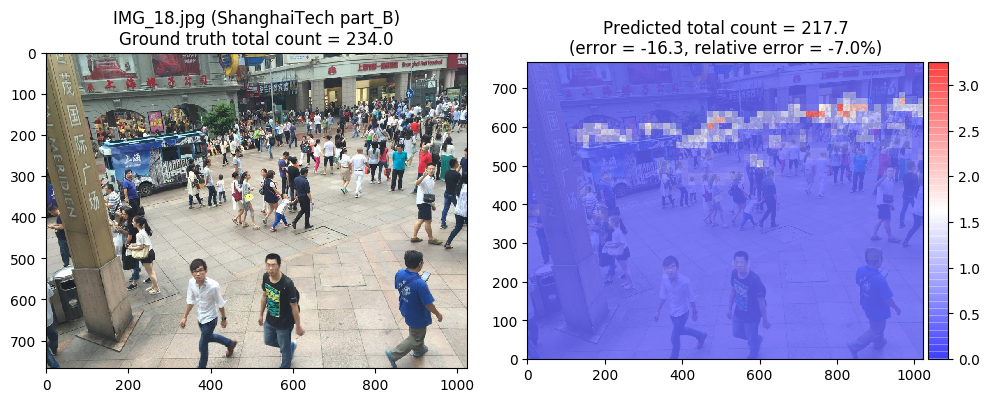
You can visualize the predictions of a model on a test set by adding test.visualize=True to the evaluation script command line. Combined images showing the ground truth counts, predicted counts, absolute / relative errors and coarse-grained density maps will be placed to a folder named outputs/<date>/<time>/visualized_part_{A|B}_test_set_predictions/.
To perform inference on user-specified images, run a command like this:
python inference.py \
    dataset=ShanghaiTech_part_B \
    test.trained_ckpt_for_inference=./outputs/<date>/<time>/checkpoints/epoch_<N>.pth \
    test.imgs_for_inference_dir=./dir_for_inference_B \
    test.visualize=True
where ./dir_for_inference_B folder contains the input images. The visualized predictions will be placed to the newly-created directory outputs/<date2>/<time2>/visualized_predictions. Also, the image file names and corresponding total count values will be printed to stdout.
To try to export a checkpoint to ONNX, 'torch jit trace' and 'torch jit script' formats, run a command like this:
python export.py \
    dataset=ShanghaiTech_part_B \
    test.trained_ckpt_for_inference=./outputs/<date>/<time>/checkpoints/epoch_<N>.pth
The generated files will be placed to the newly-created directory outputs/<date3>/<time3>/.
The exact references to the original S-DCNet and SS-DCNet papers are, respectively,
@inproceedings{xhp2019SDCNet,
    title={From Open Set to Closed Set: Counting Objects by Spatial Divide-and-Conquer},
    author={Xiong, Haipeng and Lu, Hao and Liu, Chengxin and Liang, Liu and Cao, Zhiguo and Shen, Chunhua},
    booktitle={Proceedings of the IEEE/CVF International Conference on Computer Vision (ICCV)},
    year={2019}
}

@misc{xiong2020open,
    title={From Open Set to Closed Set: Supervised Spatial Divide-and-Conquer for Object Counting},
    author={Haipeng Xiong and Hao Lu and Chengxin Liu and Liang Liu and Chunhua Shen and Zhiguo Cao},
    year={2020},
    eprint={2001.01886},
    archivePrefix={arXiv},
    primaryClass={cs.CV}
}