***** Updated on Sep 17th, 2020: A training example on the large-scale document understanding dataset, DocBank, is now available. Please refer to examples/DocBank/README.md for more details. Thanks TengQi Ye for this contribution.*****
PyTorch reimplementation of "PICK: Processing Key Information Extraction from Documents using Improved Graph Learning-Convolutional Networks" (ICPR 2020). This project is different from our original implementation.
- Contents
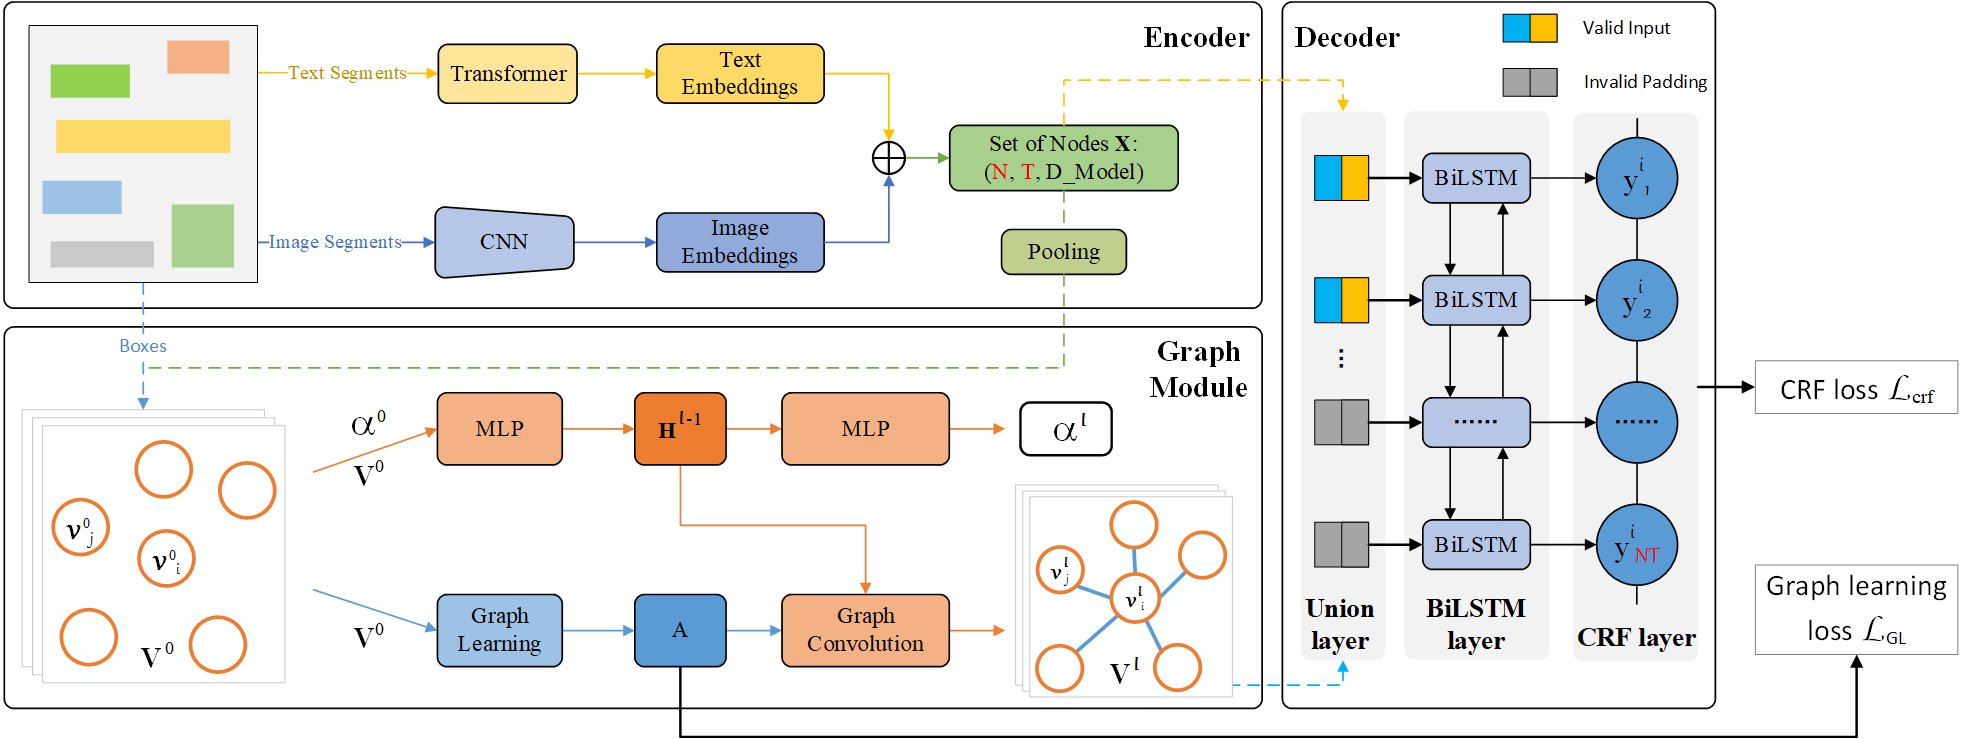
PICK is a framework that is effective and robust in handling complex documents layout for Key Information Extraction (KIE) by combining graph learning with graph convolution operation, yielding a richer semantic representation containing the textual and visual features and global layout without ambiguity. Overall architecture shown follows.
- python = 3.6
- torchvision = 0.6.1
- tabulate = 0.8.7
- overrides = 3.0.0
- opencv_python = 4.3.0.36
- numpy = 1.16.4
- pandas = 1.0.5
- allennlp = 1.0.0
- torchtext = 0.6.0
- tqdm = 4.47.0
- torch = 1.5.1
pip install -r requirements.txtModify the configurations in config.json and dist_train.sh files, then run:
bash dist_train.shThe application will be launched via launch.py on a 4 GPU node with one process per GPU (recommend).
This is equivalent to
python -m torch.distributed.launch --nnodes=1 --node_rank=0 --nproc_per_node=4 \
--master_addr=127.0.0.1 --master_port=5555 \
train.py -c config.json -d 1,2,3,4 --local_world_size 4
and is equivalent to specify indices of available GPUs by CUDA_VISIBLE_DEVICES instead of -d args
CUDA_VISIBLE_DEVICES=1,2,3,4 python -m torch.distributed.launch --nnodes=1 --node_rank=0 --nproc_per_node=4 \
--master_addr=127.0.0.1 --master_port=5555 \
train.py -c config.json --local_world_size 4
Similarly, it can be launched with a single process that spans all 4 GPUs (if node has 4 available GPUs) using (don't recommend):
CUDA_VISIBLE_DEVICES=1,2,3,4 python -m torch.distributed.launch --nnodes=1 --node_rank=0 --nproc_per_node=1 \
--master_addr=127.0.0.1 --master_port=5555 \
train.py -c config.json --local_world_size 1You can enable multi-node multi-GPU training by setting nnodes and node_rank args of the commandline line on every node.
e.g., 2 nodes 4 gpus run as follows
Node 1, ip: 192.168.0.10, then run on node 1 as follows
CUDA_VISIBLE_DEVICES=1,2,3,4 python -m torch.distributed.launch --nnodes=2 --node_rank=0 --nproc_per_node=4 \
--master_addr=192.168.0.10 --master_port=5555 \
train.py -c config.json --local_world_size 4
Node 2, ip: 192.168.0.15, then run on node 2 as follows
CUDA_VISIBLE_DEVICES=2,4,6,7 python -m torch.distributed.launch --nnodes=2 --node_rank=1 --nproc_per_node=4 \
--master_addr=192.168.0.10 --master_port=5555 \
train.py -c config.json --local_world_size 4
You can resume from a previously saved checkpoint by:
python -m torch.distributed.launch --nnodes=1 --node_rank=0 --nproc_per_node=4 \
--master_addr=127.0.0.1 --master_port=5555 \
train.py -d 1,2,3,4 --local_world_size 4 --resume path/to/checkpoint
This option of training mode can debug code without distributed way. -dist must set to false to
turn off distributed mode. -d specify which one gpu will be used.
python train.py -c config.json -d 1 -dist falseYou can test from a previously saved checkpoint by:
python test.py --checkpoint path/to/checkpoint --boxes_transcripts path/to/boxes_transcripts \
               --images_path path/to/images_path --output_folder path/to/output_folder \
               --gpu 0 --batch_size 2
You can train your own datasets following the steps outlined below.
- Prepare the correct format of files as provided in
datafolder.- Please see data/README.md an instruction how to prepare the data in required format for PICK.
- Modify
train_datasetandvalidation_datasetargs inconfig.jsonfile, includingfiles_name,images_folder,boxes_and_transcripts_folder,entities_folder,iob_tagging_typeandresized_image_size. - Modify
entities_listintrain_datasetandvalidation_datasetargs inconfig.jsonfile according to the entity type of your dataset. - Modify
MAX_BOXES_NUMandMAX_TRANSCRIPT_LENindata_tuils/documents.pyfile. (Optional) - Modify
image_extintrain_datasetandvalidation_datasetargs for image extensions different from.jpg. (Optional)
Note: The self-build datasets our paper used cannot be shared for patient privacy and proprietary issues.
You can specify the name of the training session in config.json files:
"name": "PICK_Default",
"run_id": "test"
The checkpoints will be saved in save_dir/name/run_id_timestamp/checkpoint_epoch_n, with timestamp in mmdd_HHMMSS format.
A copy of config.json file will be saved in the same folder.
Note: checkpoints contain:
{
  'arch': arch,
  'epoch': epoch,
  'state_dict': self.model.state_dict(),
  'optimizer': self.optimizer.state_dict(),
  'monitor_best': self.monitor_best,
  'config': self.config
}This project supports Tensorboard visualization by using either torch.utils.tensorboard or TensorboardX.
-
Install
If you are using pytorch 1.1 or higher, install tensorboard by 'pip install tensorboard>=1.14.0'.
Otherwise, you should install tensorboardx. Follow installation guide in TensorboardX.
-
Run training
Make sure that
tensorboardoption in the config file is turned on."tensorboard" : true -
Open Tensorboard server
Type
tensorboard --logdir saved/log/at the project root, then server will open athttp://localhost:6006
By default, values of loss will be logged. If you need more visualizations, use add_scalar('tag', data), add_image('tag', image), etc in the trainer._train_epoch method.
add_something() methods in this project are basically wrappers for those of tensorboardX.SummaryWriter and torch.utils.tensorboard.SummaryWriter modules.
Note: You don't have to specify current steps, since WriterTensorboard class defined at logger/visualization.py will track current steps.
- Dataset cache mechanism to speed up training loop
- Multi-node multi-gpu setup (DistributedDataParallel)
If you find this code useful please cite our paper:
@inproceedings{Yu2020PICKPK,
  title={{PICK}: Processing Key Information Extraction from Documents using
  Improved Graph Learning-Convolutional Networks},
  author={Wenwen Yu and Ning Lu and Xianbiao Qi and Ping Gong and Rong Xiao},
  booktitle={2020 25th International Conference on Pattern Recognition (ICPR)},
  year={2020}
}This project is licensed under the MIT License. See LICENSE for more details.
This project structure takes example by PyTorch Template Project.

