(!) This repository is archived and out of date, because it was moved to https://github.com/CODAIT/MAX-SVL-Workshop
Getting started with the bleeding edge of Deep Learning is extremely easy.. and free!
This repository contains all information for the hands-on part of the session.
Slides URL: slides.pdf
Please install Docker and Jupyter while waiting to save time later.
We will be using MAX-Object-Detector throughout the workshop for the ease of understanding. This model uses AI to detect objects in an image.
The only prerequisite is having Docker installed on your system. Please follow the installation instructions here.
Following the installation of docker, you can check whether the installation was successful by opening the terminal and copying the following:
docker -v
If the above command returns the Docker version, you are pretty much there!
Getting the Object Detector to run is as easy as copying the command below into your terminal. This will take some time depending on your download speed.
docker run -it -p 5000:5000 codait/max-object-detector
If everything works well, you will see the following message as output:
 * Serving Flask app "MAX Object Detector" (lazy loading)
 * Environment: production
   WARNING: Do not use the development server in a production environment.
   Use a production WSGI server instead.
 * Debug mode: off
 * Running on http://0.0.0.0:5000/ (Press CTRL+C to quit)
That works? Great!
Go to http://0.0.0.0:5000/ in your browser to check out the REST API.
The Swagger UI for the REST API
This URL will return a more technical overview of the model, including all information about the REST API and what endpoints are available.
An API (application programming interface) is a set of functions associated with a computer algorithm that allows us to request (GET) information from the underlying algorithm or send information (POST) to the underlying algorithm. This API is basically the front door of the factory (= object detection algorithm).
You can try out the API by unfolding the model section. Under the model section, you can find the three endpoints of this API:
/model/labels/model/metadata/model/predict
The first two endpoints are GET methods. This means that calling these (by unfolding and clicking the Try it out and Execute buttons) will return us information.
/model/labelsreturns the list of objects that the model is able to detect in text-format in the response body./model/metadatareturns the metadata (technical information) about the model.
The last endpoint, /model/predict, is a POST method. This means that we can send information to this endpoint in order to pass it to the object detection algorithm. We can send an image to this /model/predict endpoint in order to have the model's object predictions returned.
Click on the Try it out button, upload an image, and click Execute. As a result, you should receive Code: 200 for a successful query. In addition, under Details, one can find the Response body containing the predictions.
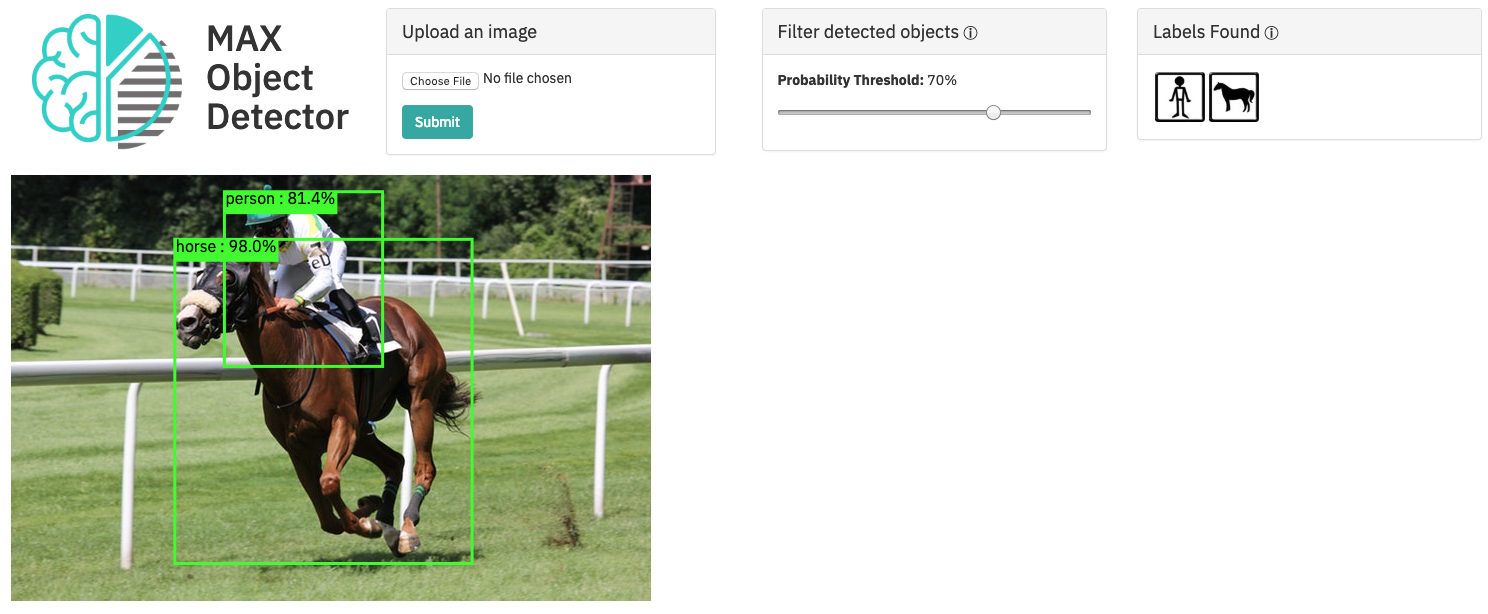
An example of the response body for this image is:
{
  "status": "ok",
  "predictions": [
    {
      "label_id": "19",
      "label": "horse",
      "probability": 0.9800629615783691,
      "detection_box": [
        0.15102773904800415,
        0.25595149397850037,
        0.9119446873664856,
        0.7204358577728271
      ]
    },
    {
      "label_id": "1",
      "label": "person",
      "probability": 0.8138303756713867,
      "detection_box": [
        0.039235919713974,
        0.3334605097770691,
        0.4493279755115509,
        0.5806631445884705
      ]
    }
  ]
}
This can be interpreted as follows:
-
"status": "ok": the query was successful -
"predictions": [ ...: this field contains the predictions. There are two predictions being returned with probability threshold over 0.7. The first prediction is a Horse with probability 0.98. The detection box surrounding the horse is given by 4 coordinates which represent the 4 points needed to reconstruct a rectangle arround the horse. The same is true for the second object, Person with probability 0.81.
For more information, or if you are having trouble, please check out MAX Object Detector README
Now that you have the Object Detector up and running, there are a couple ways to use the model to detect objects in images. In any case, the model takes an image as input, and outputs the location and category of the object.
The user-friendly WebApp
Go to http://0.0.0.0:5000/app in your browser to check out the web app. Under the Upload an image section on the left, you can upload and submit an image to the model. Try this image for example.
The Probability Threshold slider can be adjusted to show less certain labels (lower threshold) or more certain labels (higher threshold). On the right, you can find the Labels Found section in which you can click to highlight or deactivate the corresponding object.
Instead of opening a browser, copying the url and uploading an image to the /model/predict endpoint by hand, you can programmatically access this API using a library for your programming language of choice. For example, in Python, one can use the requests library to efficiently and automatically make GET and POST requests. An example of this can be found in the notebook under the next section.
Have you always wanted to launch your own AI-powered webservice? Using the following tutorial, you will be able to spin up and deploy your own webservice in a matter of minutes.
First, let's understand how to programmatically access this API using a library for your programming language of choice. For example, in Python, one can use the requests library to efficiently and automatically make GET and POST requests.
If this is your first time using jupyter notebooks or Python, please ask one of the hosts for assistance to ensure a proper setup. We're happy to help find a solution that works for you!
Here, we will look at some of the other exciting AI models that the Model Asset Exchange has to offer. For this demonstration, we will use the Python programming language with Jupyter Notebooks as an interactive coding environment.
Following the installation of Jupyter, you can navigate to the Exploring_MAX folder in this repository using the terminal. Start a Jupyter Notebook with the following command:
jupyter notebook
If the installation was successful, your browser will be opened and redirected to a new tab with a file explorer. Navigate to the Exploring MAX.ipynb file in the browser and open it. Please follow the instructions in the notebook. We are happy to help if you are experiencing trouble.
Using this notebook, you will
- Explore other MAX models
- Learn how to query the APIs programmatically
Now that we know how to access a Model API, we can integrate one in a webapp.
In this section, you will
- Download the backbone of a basic web application
- Integrate the Deep Learning MAX model of your choice in the webapp
- Launch the webapp!
Let's get started:
- Clone the repository,
$ git clone https://github.com/IBM/max-tutorial-app-python.git
- Open
app.pyin a suitable editor and complete TODO T1 and TODO T2 by applying your previous experience with the notebook.
More information can be found in the README of the corresponding repository, here.
This introductory tutorial explains how you can process image, video, audio, or text data by using deep learning models from the Model Asset Exchange in Node-RED flows.
https://developer.ibm.com/tutorials/learn-how-to-leverage-deep-learning-in-your-node-red-flows/
- Check out https://developer.ibm.com/exchanges/models/ or contact one of the hosts for further information.
- Blogpost on Medium by Patrick
- Blogpost on Medium by Saishruthi


