IBM Developer Model Asset Exchange: Text Sentiment Classifier
This repository contains code to instantiate and deploy a text sentiment classifier. This model is able to detect whether a text fragment leans towards a positive or a negative sentiment. Optimal input examples for this model are short strings (preferably a single sentence) with correct grammar, although not a requirement.
The model is based on the pre-trained BERT-Base, English Uncased model and was finetuned on the IBM Claim Stance Dataset. The model files are hosted on IBM Cloud Object Storage. The code in this repository deploys the model as a web service in a Docker container. This repository was developed as part of the IBM Developer Model Asset Exchange and the public API is powered by IBM Cloud.
Model Metadata
| Domain | Application | Industry | Framework | Training Data | Input Data |
|---|---|---|---|---|---|
| Natural Language Processing (NLP) | Sentiment Analysis | General | TensorFlow | IBM Claim Stance Dataset | Text |
Benchmark
In the table below, the prediction accuracy of the model on the test sets of three different datasets is listed.
The first row showcases the generalization power of our model after finetuning on the IBM Claims Dataset. The Sentiment140 (Tweets) and IMDB Reviews datasets are only used for evaluating the transfer-learning capabilities of this model. The implementation in this repository was not trained or finetuned on the Sentiment140 or IMDB reviews datasets.
The second row describes the performance of the BERT-Base (English - Uncased) model when finetuned on the specific task. This was done simply for reference, and the weights are therefore not made available.
The generalization results (first row) are very good when the input data is similar to the data used for finetuning (e.g. Sentiment140 (tweets) when finetuned on the IBM Claims Dataset). However, when a different style of text is given as input, and with a longer median length (e.g. multi-sentence IMDB reviews), the results are not as good.
| Model Type | IBM Claims | Sentiment140 | IMDB Reviews |
|---|---|---|---|
| This model (finetuned on IBM Claims) | 94% | 83.84% | 81% |
| Models finetuned on the specific dataset | 94% | 84% | 90% |
References
- J. Devlin, M. Chang, K. Lee, K. Toutanova, BERT: Pre-training of Deep Bidirectional Transformers for Language Understanding, arXiv, 2018.
- Google BERT repository
- IBM Claims Stance Dataset and IBM Project Debater
Licenses
| Component | License | Link |
|---|---|---|
| This repository | Apache 2.0 | LICENSE |
| Finetuned Model Weights | Apache 2.0 | LICENSE |
| Pre-trained Model Weights | Apache 2.0 | LICENSE |
| Model Code (3rd party) | Apache 2.0 | LICENSE |
| IBM Claims Stance Dataset for finetuning | CC-BY-SA | LICENSE 1 LICENSE 2 |
Pre-requisites:
docker: The Docker command-line interface. Follow the installation instructions for your system.- The minimum recommended resources for this model is 4GB Memory and 4 CPUs.
Steps
Deploy from Docker Hub
To run the docker image, which automatically starts the model serving API, run:
$ docker run -it -p 5000:5000 codait/max-text-sentiment-classifier
This will pull a pre-built image from Docker Hub (or use an existing image if already cached locally) and run it. If you'd rather checkout and build the model locally you can follow the run locally steps below.
Deploy on Kubernetes
You can also deploy the model on Kubernetes using the latest docker image on Docker Hub.
On your Kubernetes cluster, run the following commands:
$ kubectl apply -f https://github.com/IBM/MAX-Text-Sentiment-Classifier/raw/master/max-text-sentiment-classifier.yaml
The model will be available internally at port 5000, but can also be accessed externally through the NodePort.
A more elaborate tutorial on how to deploy this MAX model to production on IBM Cloud can be found here.
Run Locally
1. Build the Model
Clone this repository locally. In a terminal, run the following command:
$ git clone https://github.com/IBM/MAX-Text-Sentiment-Classifier.git
Change directory into the repository base folder:
$ cd MAX-Text-Sentiment-Classifier
To build the docker image locally, run:
$ docker build -t max-text-sentiment-classifier .
All required model assets will be downloaded during the build process. Note that currently this docker image is CPU only (we will add support for GPU images later).
2. Deploy the Model
To run the docker image, which automatically starts the model serving API, run:
$ docker run -it -p 5000:5000 max-text-sentiment-classifier
3. Use the Model
The API server automatically generates an interactive Swagger documentation page. Go to http://localhost:5000 to load it. From there you can explore the API and also create test requests.
Example:
[
"The Model Asset Exchange is a crucial element of a developer's toolkit.",
"2008 was a dark, dark year for stock markets worldwide."
]

Result:
[
  {
    "positive": 0.9977352619171143,
    "negative": 0.002264695707708597
  }
],
[
  {
    "positive": 0.001138084102421999,
    "negative": 0.9988619089126587
  }
]
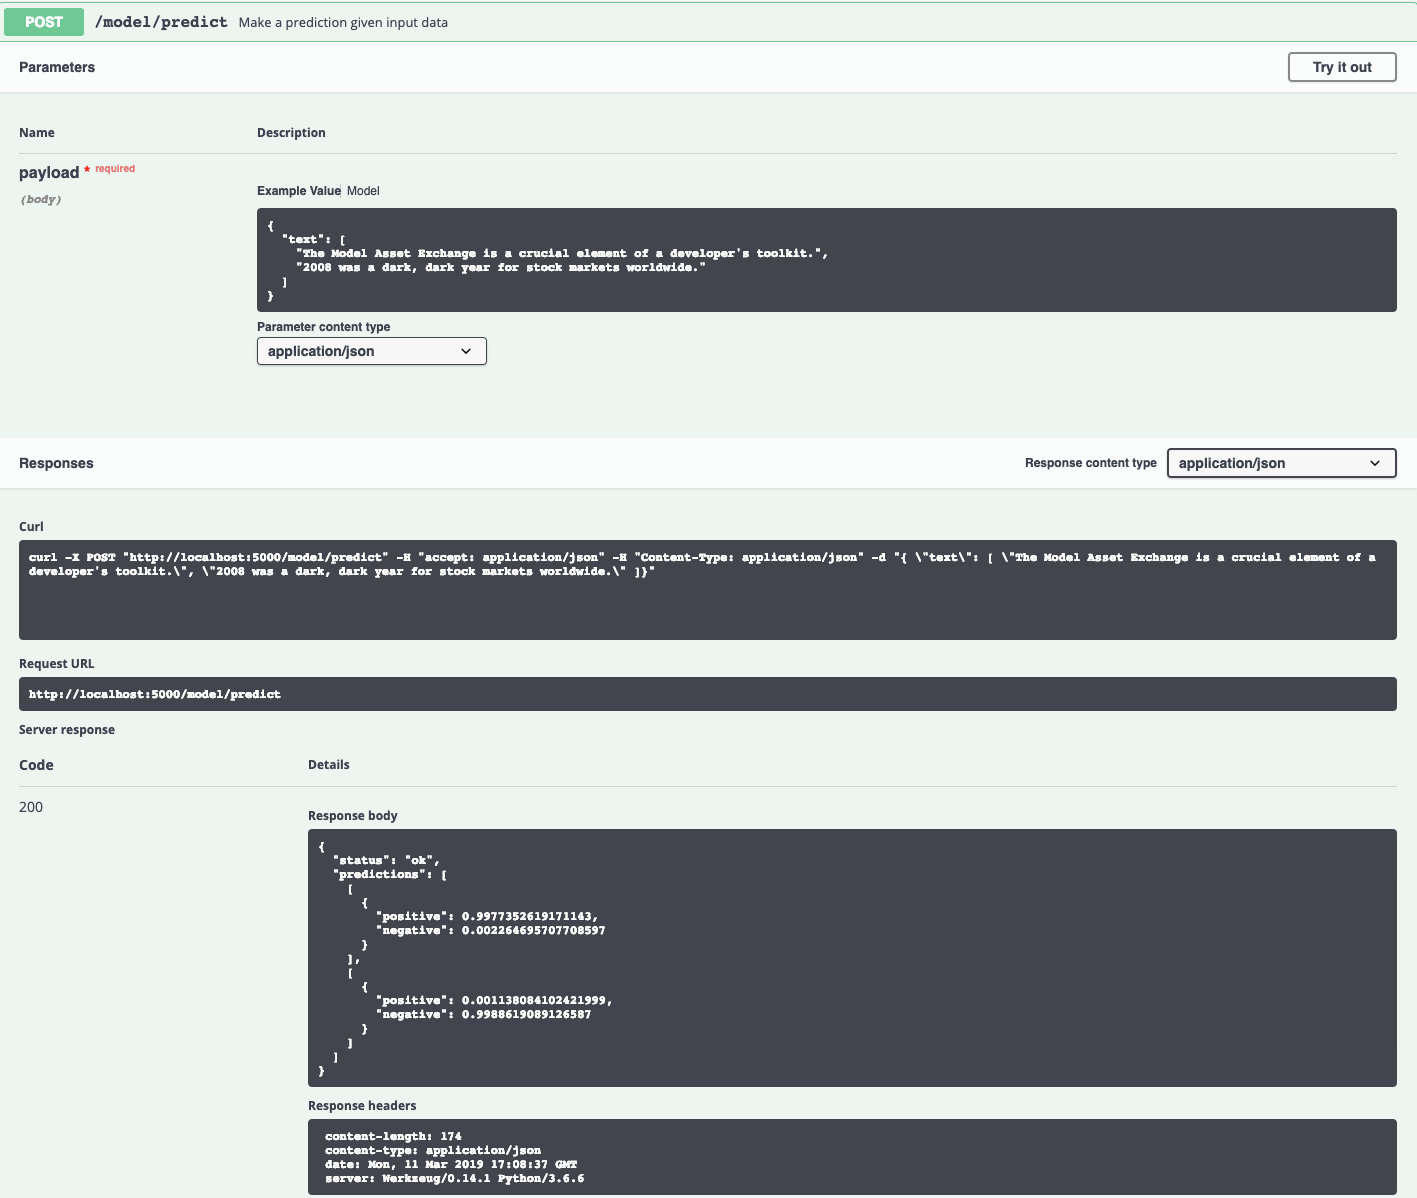
Use the model/predict endpoint to submit input text in json format. The json structure should have one key, text, with as value a list of input strings to be analyzed. An example can be found in the image below.
Submitting proper json data triggers the model and will return a json file with a status and a predictions key. With this predictions field, a list of class labels and their corresponding probabilities will be associated. The first element in the list corresponds to the prediction for the first string in the input list.
You can also test it on the command line, for example:
$ curl -d "{ \"text\": [ \"The Model Asset Exchange is a crucial element of a developer's toolkit.\" ]}" -X POST "http://localhost:5000/model/predict" -H "Content-Type: application/json"
You should see a JSON response like that below:
{
  "status": "ok",
  "predictions": [
    [
      {
        "positive": 0.9977352619171143,
        "negative": 0.0022646968718618155
      }
    ]
  ]
}
4. Development
To run the Flask API app in debug mode, edit config.py to set DEBUG = True under the application settings. You will then need to rebuild the docker image (see step 1).
5. Cleanup
To stop the Docker container, type CTRL + C in your terminal.


