This repository contains the needed instructions to install NVIDIA drivers and libraries:
- CUDA
- cuDNN
So that a Machine learning model can be developed and trained with Tensorflow on the GPU.
- Graphics: NVIDIA Corporation GP104 GeForce GTX 1070
- OS: Ubuntu 22.04.2 LTS
- Python3.8+
- NVIDIA Developer programme account
- CUDA 12.1
- cuDNN 8.9.2
Verify that Nvidia drivers are installed:
$ nvidia-smiOutput example:
+---------------------------------------------------------------------------------------+
| NVIDIA-SMI 530.41.03              Driver Version: 530.41.03    CUDA Version: 12.1     |
|-----------------------------------------+----------------------+----------------------+
| GPU  Name                  Persistence-M| Bus-Id        Disp.A | Volatile Uncorr. ECC |
| Fan  Temp  Perf            Pwr:Usage/Cap|         Memory-Usage | GPU-Util  Compute M. |
|                                         |                      |               MIG M. |
|=========================================+======================+======================|
|   0  NVIDIA GeForce GTX 1070         Off| 00000000:0B:00.0  On |                  N/A |
| 11%   49C    P0               34W / 180W|   1080MiB /  8192MiB |      4%      Default |
|                                         |                      |                  N/A |
+-----------------------------------------+----------------------+----------------------+

+---------------------------------------------------------------------------------------+
| Processes:                                                                            |
|  GPU   GI   CI        PID   Type   Process name                            GPU Memory |
|        ID   ID                                                             Usage      |
|=======================================================================================|
|    0   N/A  N/A      2123      G   /usr/lib/xorg/Xorg                          647MiB |
|    0   N/A  N/A      2294      G   /usr/bin/gnome-shell                        116MiB |
|    0   N/A  N/A     21442      G   ...sion,SpareRendererForSitePerProcess      160MiB |
|    0   N/A  N/A    124925      G   ...8698312,18086028496798649942,262144      148MiB |
|    0   N/A  N/A    157723      G   gnome-control-center                          2MiB |
+---------------------------------------------------------------------------------------+
In above example output, versions installed at the time of writing:
- Driver version:
530.41.03
https://www.nvidia.com/download/driverResults.aspx/200481/en-us/
- CUDA Version:
12.1
https://www.nvidia.com/download/driverResults.aspx/204837/en-us/
At the time of writing this is:
Version: 525.116.04
Release Date: 2023.5.9
Thus current version is outdated:
Version: 530.41.03
Release Date: 2023.3.23
At the time of writing i chose to not update to the latest driver and continue with next steps
CUDA is a parallel computing platform and application programming interface (API) that allows software to use certain types of graphics processing units (GPUs) for general purpose processing. CUDA is a software layer that gives direct access to the GPU's virtual instruction set and parallel computational elements, for the execution of compute kernels
Install CUDA toolkit, select the correct version (that matches the CUDA version, see previous step):
$ wget https://developer.download.nvidia.com/compute/cuda/repos/ubuntu2204/x86_64/cuda-ubuntu2204.pin && \
sudo mv cuda-ubuntu2204.pin /etc/apt/preferences.d/cuda-repository-pin-600 && \
wget https://developer.download.nvidia.com/compute/cuda/12.0.0/local_installers/cuda-repo-ubuntu2204-12-0-local_12.0.0-525.60.13-1_amd64.deb && \
sudo dpkg -i cuda-repo-ubuntu2204-12-0-local_12.0.0-525.60.13-1_amd64.deb && \
sudo cp /var/cuda-repo-ubuntu2204-12-0-local/cuda-*-keyring.gpg /usr/share/keyrings/ && \
sudo apt-get update && sudo apt-get -y install cuda
Verify that CUDA is installed
$ nvcc --versionOutput example:
nvcc: NVIDIA (R) Cuda compiler driver
Copyright (c) 2005-2021 NVIDIA Corporation
Built on Thu_Nov_18_09:45:30_PST_2021
Cuda compilation tools, release 11.5, V11.5.119
Build cuda_11.5.r11.5/compiler.30672275_0
Take note of the release version, at the time of writing, we will need this information for the CUDA installation in the next steps:
11.5.119
This repo contains a CUDA script, (source) to test and verify that Graphics card drives and CUDA is properly installed:
Use the CUDA C compiler to compile the hello.cu example:
$ nvcc -o cuda/hello cuda/hello.cuIt should compile without any errors / warnings
Now we can run the hello world code example:
$ ./cuda/helloExpected output:
Max error: 0.000000
If the output is as the same as the expected output we are good to go and means the CUDA libraries are properly working
NVIDIA cuDNN is a GPU-accelerated library of primitives for deep neural networks
In order to download the cuDNN library you need to register for a free account with the NVIDIA Developer programme in order to obtain the cuDDN library version that is compatible with the CUDA version installed in the previous step.
Once logged in follow this link to download cuDNN
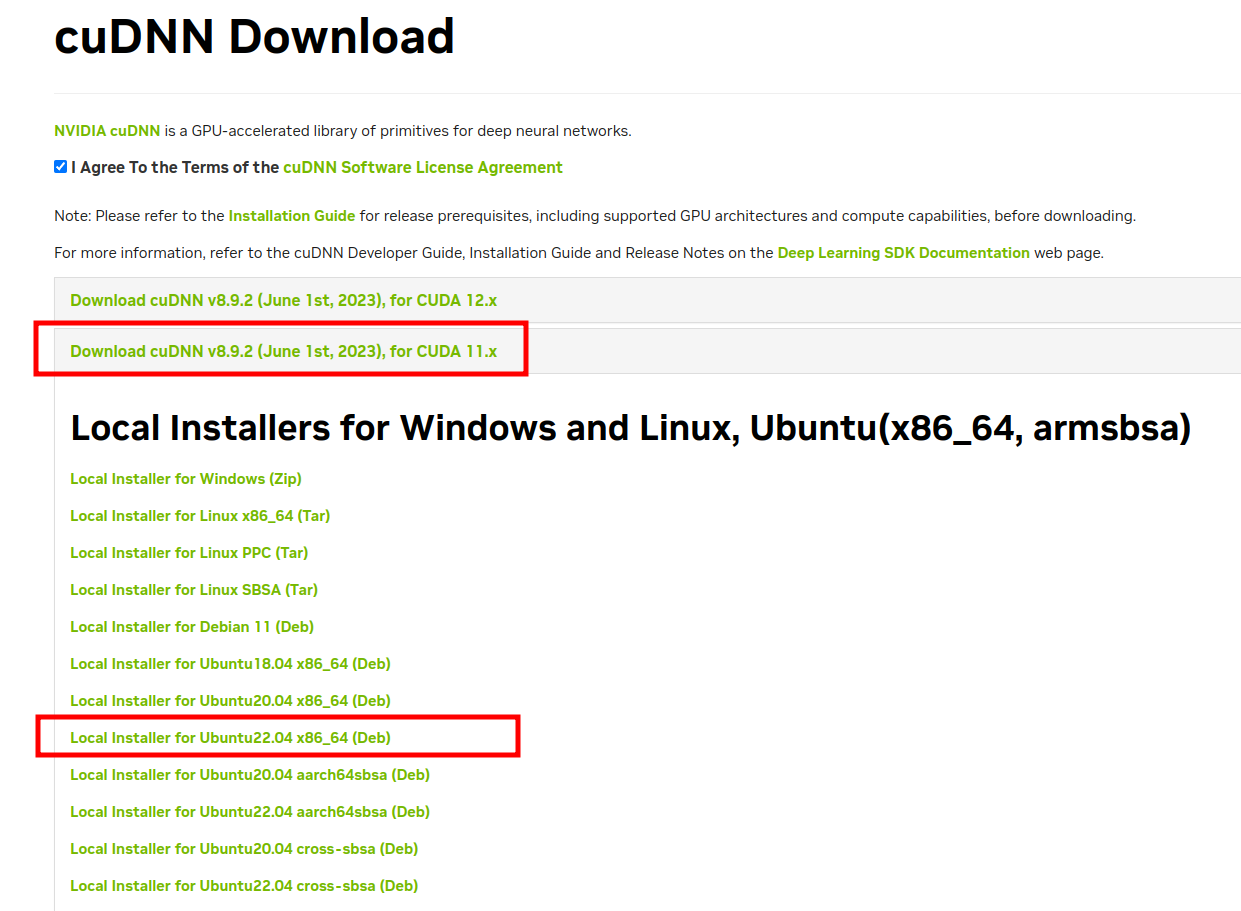
Select the correct library version (that matches the CUDA installation version see previous step):
Here we use the deb file to download:
But also the tar file can be used so either download the deb or the Local Installer for Linux x86_64 (Tar)
Install the downloaded deb file:
$ sudo dpkg -i cudnn-local-repo-ubuntu2204-8.9.2.26_1.0-1_amd64.debIn case you have chosen to download the tar file instead of the deb file, unpack tarball:
$ tar xvf cudnn-linux-x86_64-8.9.2.26_cuda11-archive.tar.xzThen when tarball has been unpacked, copy the libraries:
$ sudo cp cuda/include/cudnn.h /usr/lib/cuda/include/ && \
sudo cp cuda/lib64/libcudnn* /usr/lib/cuda/lib64/ && \
sudo chmod a+r /usr/lib/cuda/include/cudnn.h /usr/lib/cuda/lib64/libcudnn*We need to setup the needed PATH and LD_LIBRARY_PATH variables, before the CUDA Toolkit and Driver can be used.
See also the Post-installation actions guide for more information.
For bash:
$ echo 'export LD_LIBRARY_PATH=/usr/lib/cuda/lib64:$LD_LIBRARY_PATH' >> ~/.bashrc && \
echo 'export LD_LIBRARY_PATH=/usr/lib/cuda/include:$LD_LIBRARY_PATH' >> ~/.bashrc && \
source ~/.bashrc
For zsh:
$ echo 'export LD_LIBRARY_PATH=/usr/lib/cuda/lib64:$LD_LIBRARY_PATH' >> ~/.zshrc && \
echo 'export LD_LIBRARY_PATH=/usr/lib/cuda/include:$LD_LIBRARY_PATH' >> ~/.zshrc && \
source ~/.zshrc
Create and activate a virtual environment, from root of project:
Create a virtual environment to install the needed packages:
$ python -m venv .venv && source .venv/bin/activate
$ pip install --upgrade pip$ pip install -r requirements.txtStart Jupyter notebook:
$ jupyter notebookNavigate to the notebooks directory and open up hello_world_tensorflow_gpu.ipynb and run all
Finallly tensorflow should find the GPU and should result in:
/device:CPU:0: The CPU of your machine./GPU:0: Short-hand notation for the first GPU of your machine that is visible to TensorFlow
import tensorflow as tf
tf.config.list_physical_devices('GPU')
Expected output:
[PhysicalDevice(name='/physical_device:GPU:0', device_type: 'GPU')]
From root of project run:
python src/main.pyExpected output:
[PhysicalDevice(name='/physical_device:GPU:0', device_type: 'GPU')]
