
pibooth-picture-template is a plugin for the pibooth application.
It permits to define the captures/texts positions and sizes using a template. The template file (XML based on mxGraphModel definition) can be easily created/edited using the free online diagram software Flowchart Maker.

A set of templates can be found on GitHub.
The fancy.xml template is automatically installed by this plugin in ~/.config/pibooth/picture_template.xml.
Below are the pictures generated with this one (learn here how to Create a template):


 |
 |
 |
 |
$ pip3 install pibooth-picture-templateHere below the new configuration options available in the pibooth configuration. The keys and their default values are automatically added to your configuration after first pibooth restart.
[PICTURE]

# Pictures template path, it should contain 8 pages (4 capture numbers and 2 orientations)
template = picture_template.xml
Note
Edit the configuration by running the command pibooth --config.
A TemplateParserError is raised if the requested orientation for the selected captures number can not be found in the template file.
If [PICTURE][orientation] = auto the best orientation is chosen following these rules:
- find a template with the correct number of captures and placeholders with same orientation than the captures.
- find a template with the correct number of captures.
- find a template with portrait orientation
The steps below will show how to create a basic template file from scratch using the Flowchart Maker application.
This file may contain several templates to define the picture layout for 1 / 2 / 3 / 4 captures and portrait / landscape orientations.
Click on |
|
Choose a blank diagram. Modify the name of the diagram, it will be the name of the exported file. Click on |
|
Select the appropriated paper size. A custom one can be defined in inches. |


Note
It could be easier to start from an existing file. Click on Open Existing Diagram to load the default template file located in ~/.config/pibooth/picture_template.xml
Choose a rectangle to define a capture placeholder. Other shapes have no effect and will be considered as rectangles. |
|
Resize the rectangle to fit the desired size. The rectangle can overflow the border of the page to make design effects. Up to 4 rectangles can be drawn. |


Choose a text box to represent a text placeholder. |
|
Resize the text box to fit the desired size. Up to 2 text boxes can be drawn depending on the pibooth configuration. |


Extra properties can be set to the template. Click on the button |
|
By default a resolution of |


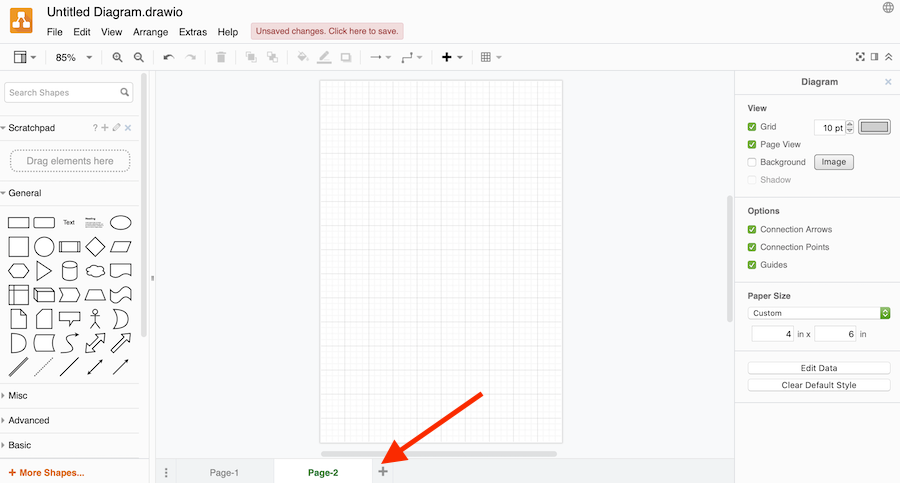
Once the template is created. A new one can be defined for an other captures number or other orientation. Click on |
|
The captures and texts placeholders can be numbered to define the order of the captures/texts. Colored shapes give a better overview of the layout but they are not rendered on the final picture. |

Generate the XML file by clicking |
|
Click on |


Note
Instead of running pibooth each time you want to test the result of your template, use the command pibooth-regen. It will regenerate the existing pictures present in ~/Pictures/pibooth using the new template.