Please be aware that this application / sample is provided as-is for demonstration purposes without any guarantee of support
Over the past couple of years I have seen an increasing interest in developing Flutter apps for Zebra Android mobile devices. Until recently I had directed developers to a 3rd party flutter demo that shows how to wrap the EMDK (Zebra's Android scanner SDK). That sample is at https://github.com/acaliaro/flutterZebraEmdk but Zebra's recommended approach is to use DataWedge rather than the EMDK for scanner integration and I noticed a number of people asking about non-Zebra device compatibility, something that is more difficult to achieve with the EMDK.
This demo application shows how to interface to Zebra's DataWedge service from a Flutter application
For expediency, this article assumes familiarity with Zebra's DataWedge tool as well as the DataWedge profile mechanism. For an overview of DataWedge, please refer to the DataWedge Techdocs page. This project will use DataWedge to capture data aswell as the DataWedge API to configure a profile and control the scanner with a button on the UI. This project does not demonstrate the full capabilities of DataWedge through Flutter, see 'not covered by this sample', below.
You need to have Flutter installed in order to run this sample. The process is fairly straight forward and there are abundant resources out there to help you get Flutter configured on your system
Install flutter
>flutter run
Optionally: Configure the Flutter SDK in Android Studio and run your application from there
This sample application draws heavily on the official Flutter sample for "platform_channel" as well as the approach followed by the previously mentioned 3rd party Flutter EMDK sample. Because the native code is written in Kotlin I also re-used a lot of the code I previously wrote for my DataWedge Kotlin sample.
The sample works as follows:
- A MethodChannel is used to invoke the DataWedge API to instruct DataWedge to do things, e.g. SOFT_SCAN_TRIGGER. Only a couple of methods are used by this demo app but there are about 30 APIs available in DataWedge.
- An EventChannel is used to receive data back from DataWedge. This demo only receives scans but this channel could also be used to parse return values from the asynchronous DataWedge APIs, e.g. GET_VERSION.
As can be seen from the picture, the last scanned barcode is displayed and a scan can be initiated with the blue SCAN button. I personally found it challenging to define my UI in Flutter - respect to those developers who find this easy
Scanned data will be received from the native (Kotlin) layer over an EventChannel as a stringified JSON object. This seemed the easiest way to pass an object over the EventChannel rather than try to get Dart to understand my Kotlin class. Set up the EventChannel and declare an onEvent listener to update the UI when a barcode is scanned.
static const EventChannel scanChannel =
  EventChannel('com.darryncampbell.datawedgeflutter/scan');

@override
void initState() {
  super.initState();
  scanChannel.receiveBroadcastStream().listen(_onEvent, onError: _onError);
}

void _onEvent(Object event) {
  setState(() {
    Map barcodeScan = jsonDecode(event);
    _barcodeString = "Barcode: " + barcodeScan['scanData'];
    _barcodeSymbology = "Symbology: " + barcodeScan['symbology'];
    _scanTime = "At: " + barcodeScan['dateTime'];
  });
}Scan data is received from DataWedge as a Broadcast Intent. A DataWedge profile (created automatically - see later) is required to configure DataWedge to send this broadcast intent. The native code will create the broadcast receiver and when a broadcast is received from a scan, it is sent to the UI (Dart) code over the EventChannel.
private val PROFILE_INTENT_ACTION = "com.darryncampbell.datawedgeflutter.SCAN"
private val SCAN_CHANNEL = "com.darryncampbell.datawedgeflutter/scan"

EventChannel(flutterEngine.dartExecutor, SCAN_CHANNEL).setStreamHandler(
    object : StreamHandler {
        private var dataWedgeBroadcastReceiver: BroadcastReceiver? = null
        override fun onListen(arguments: Any?, events: EventSink?) {
            dataWedgeBroadcastReceiver = createDataWedgeBroadcastReceiver(events)
            val intentFilter = IntentFilter()
            intentFilter.addAction(PROFILE_INTENT_ACTION)
            registerReceiver(
                dataWedgeBroadcastReceiver, intentFilter)
        }

        override fun onCancel(arguments: Any?) {
            unregisterReceiver(dataWedgeBroadcastReceiver)
            dataWedgeBroadcastReceiver = null
        }
    }
)
Received barcodes are parsed from the Intent into a 'Scan' object. The stringified JSON representation of this Scan is sent over the EventChannel.
private fun createDataWedgeBroadcastReceiver(events: EventSink?): BroadcastReceiver? {
    return object : BroadcastReceiver() {
        override fun onReceive(context: Context, intent: Intent) {
            if (intent.action.equals(PROFILE_INTENT_ACTION))
            {
                //  A barcode has been scanned
                var scanData = intent.getStringExtra(DWInterface.DATAWEDGE_SCAN_EXTRA_DATA_STRING)
                var symbology = intent.getStringExtra(DWInterface.DATAWEDGE_SCAN_EXTRA_LABEL_TYPE)
                var date = Calendar.getInstance().getTime()
                var df = SimpleDateFormat("dd/MM/yyyy HH:mm:ss")
                var dateTimeString = df.format(date)
                var currentScan = Scan(scanData, symbology, dateTimeString);
                events?.success(currentScan.toJson())
            }
            //  Could handle return values from DW here such as RETURN_GET_ACTIVE_PROFILE
            //  or RETURN_ENUMERATE_SCANNERS
        }
    }
}The MethodChannel is used to send instructions to DataWedge. The DataWedge API contains APIs which take a range of parameters, from simple Strings to complex nested Bundle structures. There may have been a better way to do this but invokeMethod can only take a single argument type so to exchange two strings I converted them to a stringified JSON object.
The demo code also handles profile creation (not shown below) which is done entirely in the native code rather than try to exchange the nested bundle structure between Dart and Kotlin.
static const MethodChannel methodChannel =
    MethodChannel('com.darryncampbell.datawedgeflutter/command');

Future<void> _sendDataWedgeCommand(String command, String parameter) async {
  try {
    String argumentAsJson = "{\"command\":$command,\"parameter\":$parameter}";
    await methodChannel.invokeMethod(
          'sendDataWedgeCommandStringParameter', argumentAsJson);
  } on PlatformException {
    //  Error invoking Android method
  }
}
Handler for the onTouchDown event, initiate the scan when the button is pressed. Calls the above function with the appropriate DataWedge API command and parameter.
void startScan() {
  setState(() {
    _sendDataWedgeCommand(
        "com.symbol.datawedge.api.SOFT_SCAN_TRIGGER", "START_SCANNING");
  });
}Parse the commands and determine which DataWedge API to call. All DataWedge APIs are invoked by sending a Broadcast Intent to a pre-defined Action which the DataWedge service is always listening for.
MethodChannel(flutterEngine.dartExecutor, COMMAND_CHANNEL).setMethodCallHandler { call, result ->
    if (call.method == "sendDataWedgeCommandStringParameter")
    {
        val arguments = JSONObject(call.arguments.toString())
        val command: String = arguments.get("command") as String
        val parameter: String = arguments.get("parameter") as String
        sendCommandString(applicationContext, command, parameter)
    }
    else {
        result.notImplemented()
    }
}

fun sendCommandString(context: Context, command: String, parameter: String) {
    val dwIntent = Intent()
    dwIntent.action = "com.symbol.datawedge.api.ACTION"
    dwIntent.putExtra(command, parameter)
    context.sendBroadcast(dwIntent)
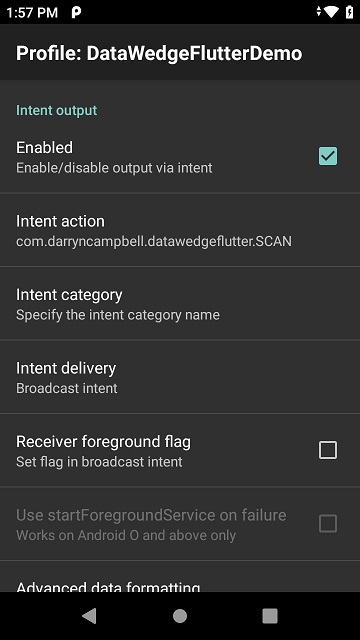
}As previously mentioned, although the Flutter application is listening for broadcast Intents, DataWedge needs to be configured to send the appropriate Intent whenever a barcode is scanned. The sample app will do this automatically with a combination of the CREATE_PROFILE and SET_CONFIG APIs provided your version of DataWedge is 6.4 or higher.
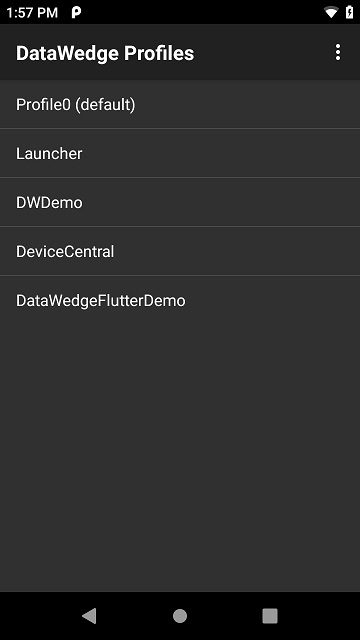
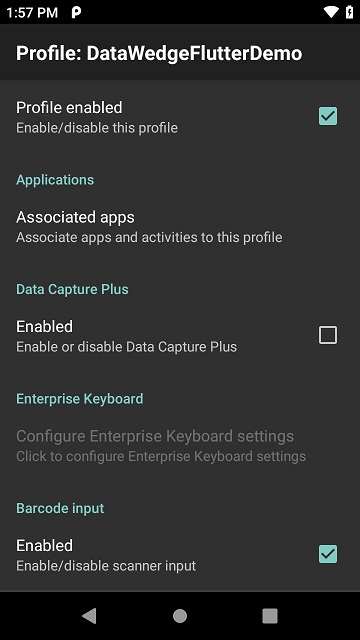
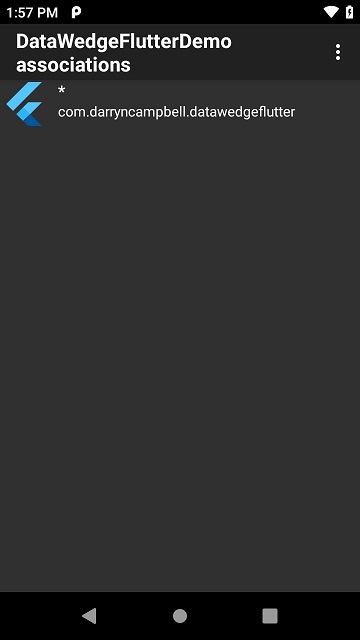
If for whatever reason the profile is not automatically created you can do so manually by launching DataWedge on the device and matching the screenshots below to define the DataWedgeFlutterDemo profile.
This is a very basic sample designed to only show the basics of capturing data in a Flutter app on a Zebra Android device.
Many of the DataWedge APIs return values back to the application, for example GET_VERSION but none of those APIs are shown in this demo. You can reuse the existing EventChannel for this purpose.
Many of the DataWedge APIs take complex data types like SET_CONFIG APIs. Ideally you could define these complex structures in Dart and send them over the MethodChannel... this may well be possible (This Medium article on Flutter Platform Channels talks about BinaryMessages) but it is much simpler to define these in Kotlin, especially since other apps already exist which show how to call the APIs from Kotlin.
This project welcomes contributions. Pleae check out the Contributing guide to learn more on how to get started.
This project is released under the MIT license


