📣 Got feedback? Fill out this survey to help us shape the future of Enterprise App Patterns and understand whether we're focusing on the business goals and features important to you. Microsoft Privacy Statement
The reference implementation provides a production-grade web application that uses best practices from our guidance and gives developers concrete examples to build their own Reliable Web Application in Azure. It simulates the journey from an on-premises ASP.NET application to a migration to Azure. It shows you what changes to make to maximize the benefits of the cloud in the initial cloud adoption phase. Here's an outline of the contents in this readme:
- Azure Architecture Center guidance
- 6 videos on the reliable web app pattern for .NET
- Architecture
- Workflow
- Steps to deploy the reference implementation
- Additional links
- Data Collection
This project has a companion article in the Azure Architecture Center that describes design patterns and best practices for migrating to the cloud. We suggest you read it as it will give important context to the considerations applied in this implementation.
This project has a six-part video series that details the reliable web app pattern for .NET web app. For more information, see Reliable web app pattern videos (YouTube).
- Azure Front Door routes traffic based on availability of the primary region. When the primary region is unavailable it will route traffic to the secondary region.
- When Front Door passes the request to the Web App, it will pass-through the Azure Web Application Firewall. The Azure Web Application Firewall will evaluate the request and protect the web app against common security attacks.
- Once the traffic reaches the web front-end users will be shown the home page. They can view these pages without authenticating.
- Navigating to the Concerts on the web app will send a request to the web front-end that tells it to ask the web api app for details about upcoming concerts.
- Details about the upcoming concerts will be retrieved from the Azure SQL Database by the web api app with a SQL query. The results will be formatted as a JSON response and returned to the web front-end.
- When the web front-end receives results from the API it will use razor template engine to render the HTML page shown to the user that asked for a list of concerts.
- Once a user adds a concert ticket to their shopping cart the front-end web app will start interacting with Azure Cache for Redis. Asking the web app to put a concert ticket into the cart tells the web app to save information about that pending purchase as JSON data in Redis as part of a session object for the current user. Saving the session to an external datastore enables the web app to load balance traffic more evenly and to handle horizontal scaling events without losing the customer's intent to buy a ticket. No inventory management is included in this sample so there are no quantities deducted, or placed on reserve, in the backend of the system.
- As the user checks out the front-end web app will ask the user to authenticate with Azure AD. This scenario is for a call center that places orders on-behalf of customers so the accounts in-use are managed by Relecloud and are not self-managed.
- After authenticating to Azure AD the front-end web app will receive a token from Azure AD that represents the current user. This token is saved as a cookie in the user's browser and is not persisted by the front-end web app.
- As the user proceeds with checkout the web app will collect payment data. Payment data is not sent anywhere for this sample.
- When the payment data is submitted for approval the ticket will be purchased. Logic to handle this is located in the web api project so the web app makes a call to the web api project.
- Prior to calling the API, the front-end web app asks the MSAL library for a token it can use to call the web api app as an authenticated user.
- When the MSAL library, in the front-end web app, has a token it will cache it in Azure Cache for Redis. If it does not have a token it will request one from Azure AD and then save it in Azure Cache for Redis.
- Once the ticket purchase request is sent to the web api app the API will render the ticket image and save it to Azure storage.
- After the ticket purchase is completed successfully the user will be directed to their tickets page where they can see a list of the tickets they have purchased. These tickets will be immediately available because rendering the ticket was part of the purchase request.
- As information flows between services the Azure network handles traffic routing across private endpoints by using Azure Private DNS to lookup the correct IP addresses. This enables the system to block public network traffic and use a single v-net to manage traffic between these systems. This v-net can be connected to others as-needed to allow the app to call other systems in your digital estate or to allow other systems to call the web API so they can access details about ticket purchases.
- As the front-end, and web api, apps process requests they are sending data to Application Insights so that you can monitor information about processing web requests
- When the web app is started for the first time it will load configuration data from App Config Service and Azure Key Vault. This information is saved in the web apps memory and is not accessed afterwards.
This reference implementation provides you with the instructions and templates you need to deploy this solution. This solution uses the Azure Dev CLI to set up Azure services and deploy the code.
-
To run the scripts, Windows users require Powershell 7.2 (LTS) or above. Alternatively, you can use a bash terminal using Windows Subsystem for Linux. macOS users can use a bash terminal.
-
PowerShell users - Install PowerShell Run the following to verify that you're running the latest PowerShell
$PsVersionTable
-
-
Install Git Run the following to verify that git is available
git version
-
Install the Azure CLI. Run the following command to verify that you're running version 2.38.0 or higher.
az version
After the installation, run the following command to sign in to Azure interactively.
az login
-
Upgrade the Azure CLI Bicep extension. Run the following command to verify that you're running version 0.12.40 or higher.
az bicep version
-
Install the Azure Dev CLI. Run the following command to verify that the Azure Dev CLI is installed.
azd auth login
-
Install .NET 6 SDK Run the following command to verify that the .NET SDK 6.0 is installed.
dotnet --version
Please clone the repo to get started.
git clone https://github.com/Azure/reliable-web-app-pattern-dotnet
And switch to the folder so that azd will recognize the solution.
cd reliable-web-app-pattern-dotnet
Relecloud's developers use the azd command line experience to deploy the code. This means their local workflow is the same
experience that runs from the GitHub action. You can use these
steps to follow their experience by running the commands from the folder where this guide is stored after cloning this repo.
Use this command to get started with deployment by creating an
azd environment on your workstation.
| PowerShell |
$myEnvironmentName="relecloudresources"azd init -e $myEnvironmentName |
| Bash |
myEnvironmentName="relecloudresources"azd init -e $myEnvironmentName |
The Relecloud team uses the same bicep templates to deploy
their production, and non-prod, environments. To do this
they set azd environment parameters that change the behavior
of the next steps.
If you skip the next two optional steps, and change nothing, then the bicep templates will default to non-prod settings.
Step: 1
Relecloud devs deploy the production environment by running the following command to choose the SKUs they want in production.
azd env set IS_PROD trueStep: 2
Relecloud devs also use the following command to choose a second Azure location because the production environment is multiregional.
azd env set SECONDARY_AZURE_LOCATION westus3You can find a list of available Azure regions by running the following Azure CLI command.
az account list-locations --query "[].name" -o tsv
Relecloud uses the following command to deploy the Azure services defined in the bicep files by running the provision command.
This step will take several minutes based on the region and deployment options you selected.
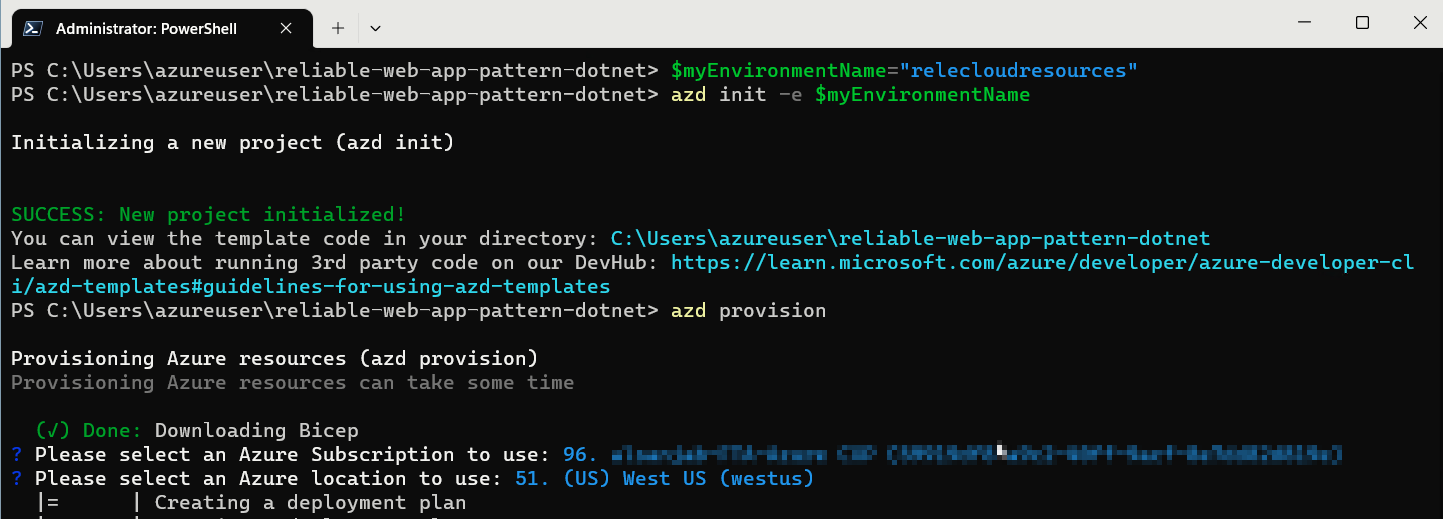
azd provisionWhen prompted, select the preferred Azure Subscription and the Location:
When the command finishes you have deployed Azure App Service, SQL Database, and supporting services to your subscription. If you log into the the Azure Portal you can find them in the resource group named
$myEnvironmentName-rg.
Relecloud devs have automated the process of creating Azure AD resources that support the authentication features of the web app. They use the following command to create two new App Registrations within Azure AD. The command is also responsible for saving configuration data to Key Vault and App Configuration so that the web app can read this data.
| PowerShell |
pwsh -c "Set-ExecutionPolicy Bypass Process; .\infra\createAppRegistrations.ps1 -g '$myEnvironmentName-rg'" |
| Bash |
chmod +x ./infra/createAppRegistrations.sh
./infra/createAppRegistrations.sh -g "$myEnvironmentName-rg" |
Known issue: /bin/bash^M: bad interpreter
To finish the deployment process the Relecloud devs run the
folowing azd commands to build, package, and deploy the dotnet
code for the front-end and API web apps.
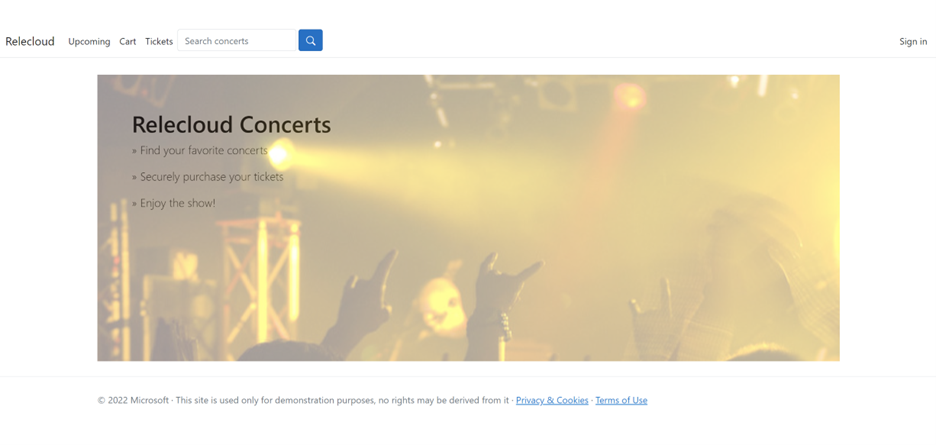
azd env set AZURE_RESOURCE_GROUP "$myEnvironmentName-rg" azd deployWhen finished the console will display the URI for the web app. You can use this URI to view the deployed solution in a browser.
If you face any issues with the deployment, see the Known issues document below for possible workarounds. There could be interim issues while deploying to Azure, and repeating the steps after a few minutes should fix most of them. Azure deployments are incremental by default, and only failed actions will be retired.
- Unprovision the Azure Resources
- Clean up App Registrations
- Delete the Deployment
To tear down an enviroment, and clean up the Azure resource group, use the folloing command:
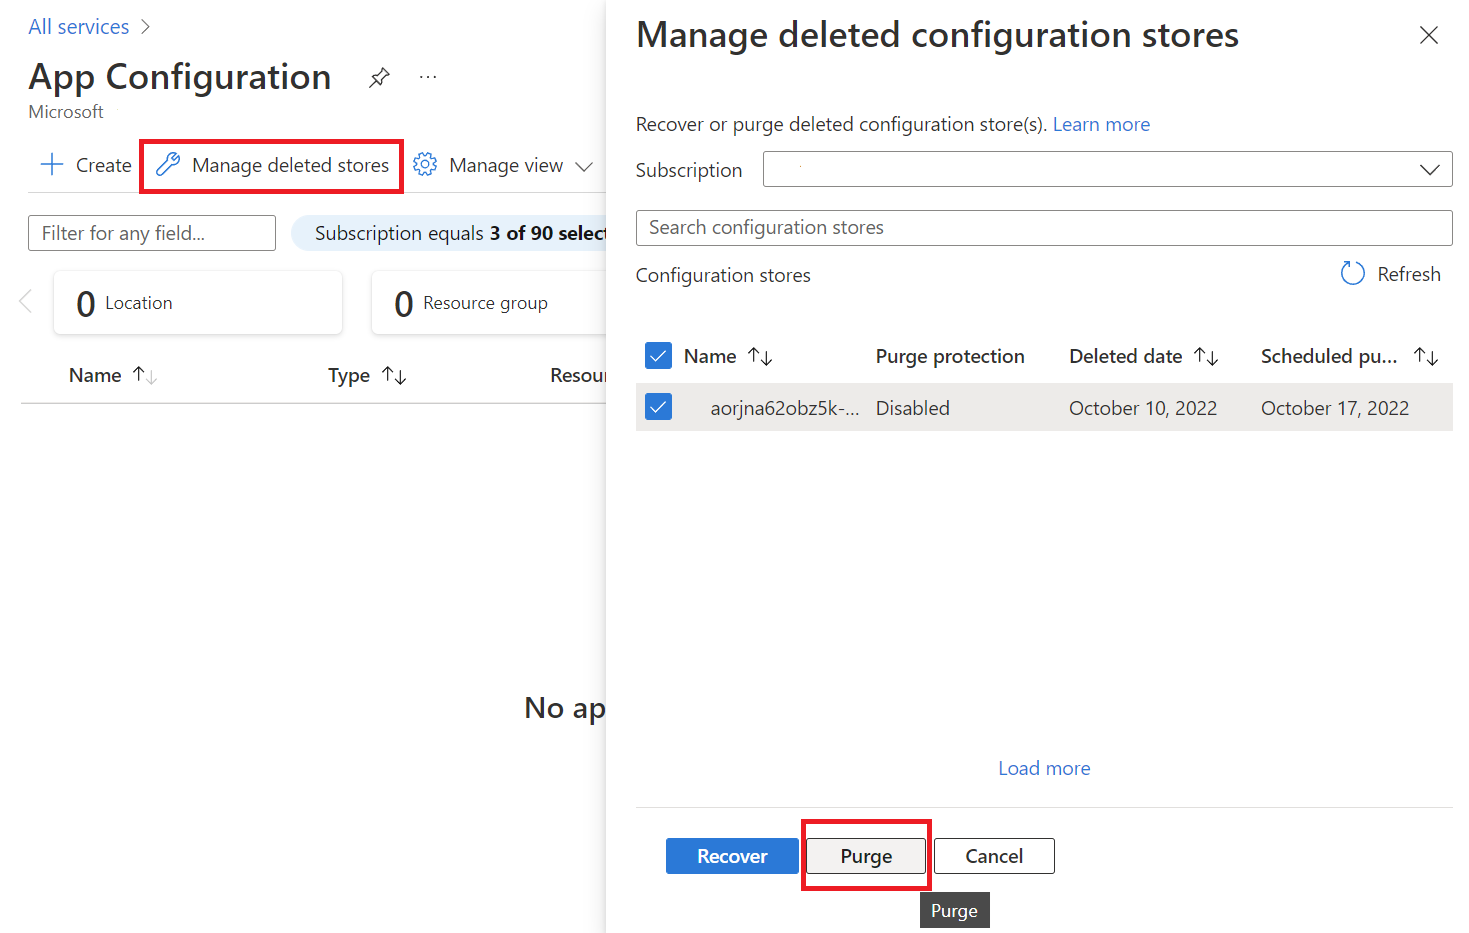
azd down --force --purge --no-promptYou can also use the Azure Portal to delete the "relecloudresources" resource groups. This approach will not purge the Key Vault or App Configuration services and they will remain in your subscription for 7 days in a deleted state that does not charge your subscription. This feature enables you to recover the data if the configuration was accidentally deleted. You can purge these in the Manage deleted stores section of each service in the portal.
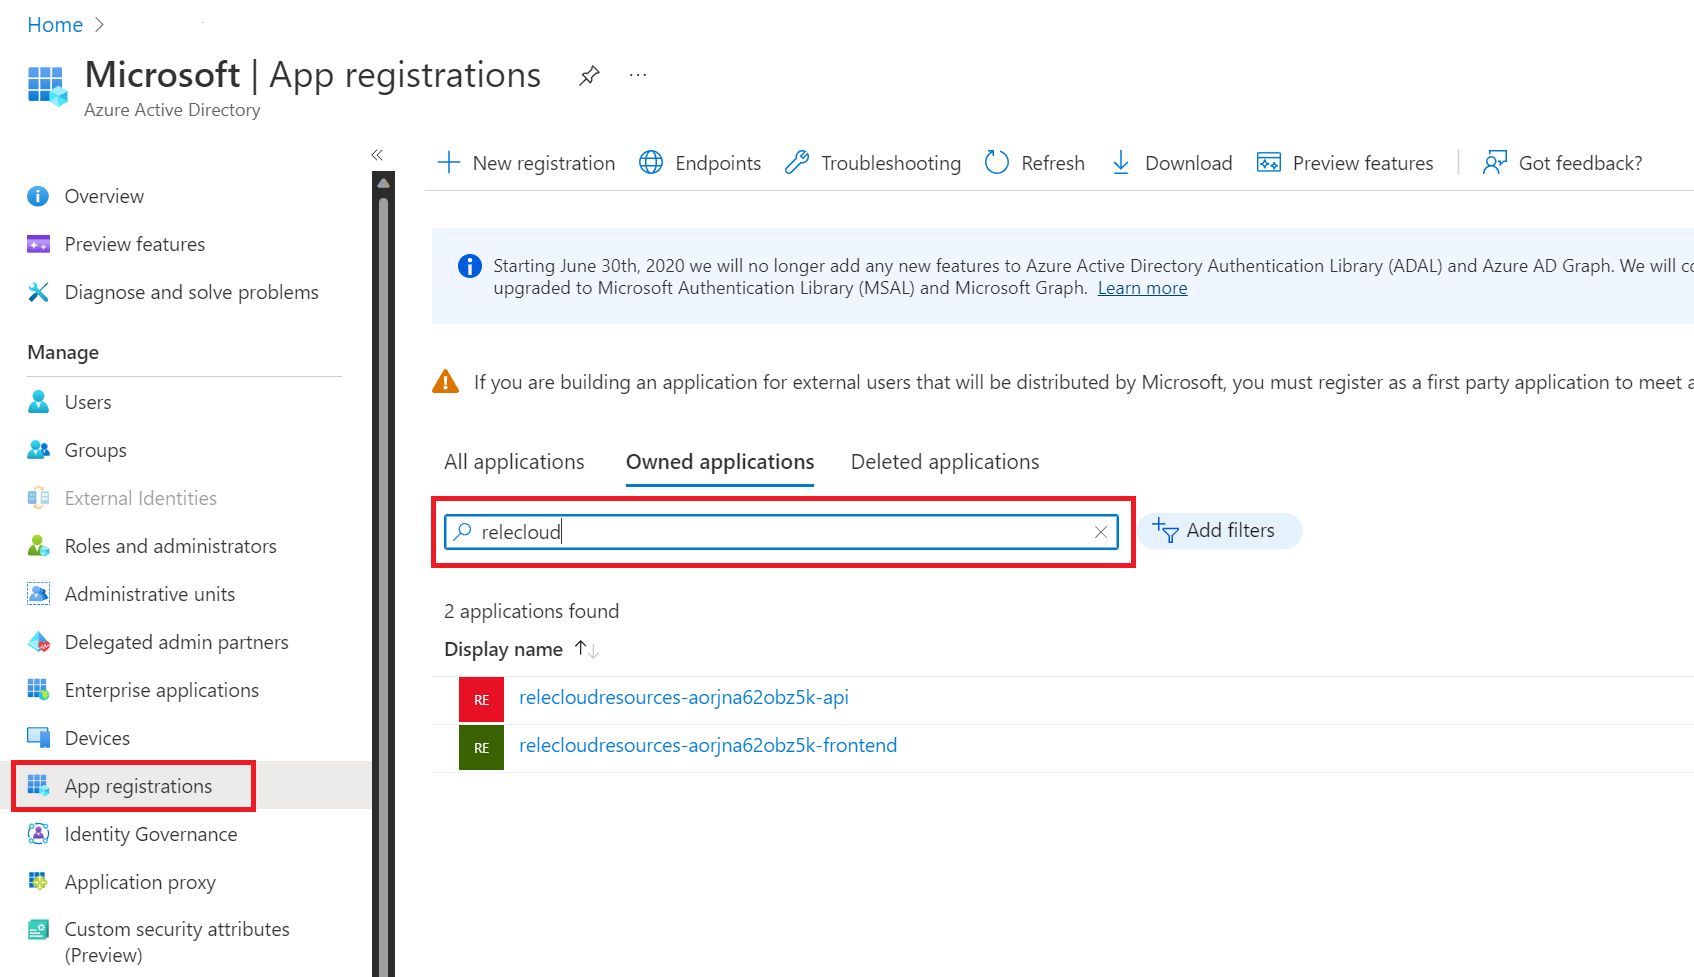
You will also need to delete the two Azure AD app registrations that were created. You can find them in Azure AD by searching for their environment name.
Delete App Registrations
You will also need to purge the App Configuration Service instance that was deployed.
Your Azure subscription will retain your deployment request as a stateful object. If you would like to change the Azure region for this deployment you will need to delete the deployment by running the following command.
az deployment delete --name $myEnvironmentName
You can list all deployments with the following command
az deployment sub list --query "[].name" -o tsv
Relecloud developers use Visual Studio to develop locally and they co-share an Azure SQL database for local dev. The team chooses this workflow to help them practice early integration of changes as modifying the database and other shared resources can impact multiple workstreams.
To connect to the shared database the dev team uses connection strings from Key Vault and App Configuration Service. Devs use the following script to retrieve data and store it as User Secrets on their workstation.
Using the secrets.json file helps the team keep their credentials
secure. The file is stored outside of the source control directory so
the data is never accidentally checked-in. And the devs don't share
credentials over email or other ways that could compromise their
security.
Managing secrets from Key Vault and App Configuration ensures that only authorized team members can access the data and also centralizes the administration of these secrets so they can be easily changed.
New team members should setup their environment by following these steps.
-
Open the Visual Studio solution
./src/Relecloud.sln -
Setup the Relecloud.Web project User Secrets
-
Right-click on the Relecloud.Web project
-
From the context menu choose Manage User Secrets
-
From a command prompt run the bash command
PowerShell pwsh -c "Set-ExecutionPolicy Bypass Process; .\infra\localDevScripts\getSecretsForLocalDev.ps1 -g '$myEnvironmentName-rg' -Web"
Bash chmod +x ./infra/localDevScripts/getSecretsForLocalDev.sh ./infra/localDevScripts/getSecretsForLocalDev.sh -g "$myEnvironmentName-rg" --web -
Copy the output into the
secrets.jsonfile for the Relecloud.Web project.
-
-
Setup the Relecloud.Web.Api project User Secrets
-
Right-click on the Relecloud.Web.Api project
-
From the context menu choose Manage User Secrets
-
From a command prompt run the bash command
PowerShell pwsh -c "Set-ExecutionPolicy Bypass Process; .\infra\localDevScripts\getSecretsForLocalDev.ps1 -g '$myEnvironmentName-rg' -Api"
Bash ./infra/localDevScripts/getSecretsForLocalDev.sh -g "$myEnvironmentName-rg" --api -
Copy the output into the
secrets.jsonfile for the Relecloud.Web.Api project.
-
-
Right-click the Relecloud solution and pick Set Startup Projects...
-
Choose Multiple startup projects
-
Change the dropdowns for Relecloud.Web and Relecloud.Web.Api to the action of Start.
-
Click Ok to close the popup
-
Add your IP address to the SQL Database firewall as an allowed connection by using the following script
PowerShell pwsh -c "Set-ExecutionPolicy Bypass Process; .\infra\localDevScripts\addLocalIPToSqlFirewall.ps1 -g '$myEnvironmentName-rg'"
Bash chmod +x ./infra/localDevScripts/addLocalIPToSqlFirewall.sh ./infra/localDevScripts/addLocalIPToSqlFirewall.sh -g "$myEnvironmentName-rg" -
When connecting to Azure SQL database you'll connect with your Azure AD account. Run the following command to give your Azure AD account permission to access the database.
PowerShell pwsh -c "Set-ExecutionPolicy Bypass Process; .\infra\localDevScripts\makeSqlUserAccount.ps1 -g '$myEnvironmentName-rg'"
Bash chmod +x ./infra/localDevScripts/makeSqlUserAccount.sh ./infra/localDevScripts/makeSqlUserAccount.sh -g "$myEnvironmentName-rg" -
Press F5 to start debugging the website
These steps grant access to SQL server in the primary resource group. You can use the same commands if you want to test with the secondary resource group by changing the ResourceGroup parameter "-g" to "$myEnvironmentName-secondary-rg"
- Known issues
- Developer patterns
- Find additional resources
- Report security concerns
- Find Support
- Contributing
The software may collect information about you and your use of the software and send it to Microsoft. Microsoft may use this information to provide services and improve our products and services. You may turn off the telemetry as described in the repository. There are also some features in the software that may enable you and Microsoft to collect data from users of your applications. If you use these features, you must comply with applicable law, including providing appropriate notices to users of your applications together with a copy of Microsoft's privacy statement. Our privacy statement is located at https://go.microsoft.com/fwlink/?LinkId=521839. You can learn more about data collection and use in the help documentation and our privacy statement. Your use of the software operates as your consent to these practices.
Telemetry collection is on by default.
To opt out, run the following command azd env set ENABLE_TELEMETRY to false in your environment.


