A collection of Tableau Connected Apps code samples. Connected Apps is the latest JWT authentication and SSO method available on the Tableau platform. Authentication via this method is supported for both Tableau's REST API and for displaying visualizations using the Embedding API v3. To understand how these APIs and Connected Apps work together to extend the Tableau platform and add analytical capabilities to your application, refer to the Embedded Analytics Playbook.
Tableau Connected Apps enable a seamless and secure authentication experience by facilitating an explicit trust relationship between your Tableau environment and custom applications that embed Tableau content or make use of Tableau's REST API. For a detailed explanation and setup instructions, refer to the official documentation.
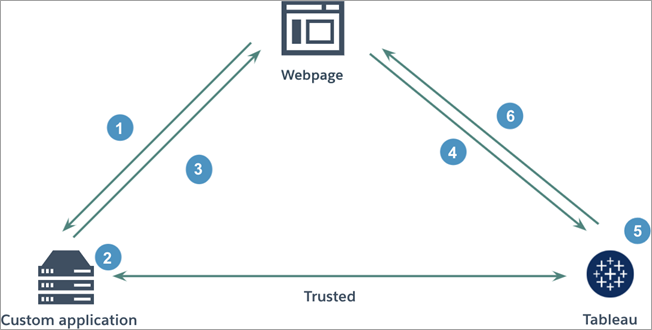
The diagram below illustrates how authentication works between custom applications and a Connected App.
- User visits the webpage
- Custom application constructs an authentication token
- Custom application responds with authentication token
- Webpage requests content from Tableau
- Tableau validates the token
- Tableau returns the content based on the restricted embedding context
A similar flow takes place when Connected Apps are used to authenticate into Tableau's REST API. In this case, successful authentication will return an API token that must be added to subsequent requests via an X-Tableau-Auth header.
This list covers requirements for local development and deployment to Heroku (note that you are free to deploy this server on other platforms).
- Python version 3.8.8
- Anaconda or some other Python environment manager (optional but recommended)
- Tableau Server or Tableau Online site (a developer site is available for free by signing up for the developer program)
- Clone this repository
git clone git@github.com:stephenlprice/tableau-connected-apps.git
# or
git clone https://github.com/stephenlprice/tableau-connected-apps.git

# navigate inside the project directory
cd tableau-connected-apps- Create a
condaenvironment to install all dependencies and activate it (see Dependencies for more info.)
# will create an environment called tableau-webhooks
conda env create -f environment.yml

# activates the environment
conda activate tableau-connected-apps- Create a
.envfile in the project's root directory and add values for each environment variable described in the example file (example-env)
# create the .env file
touch .env- Run the script
# enter the repo's python folder
cd python
# run the script
python index.pyThis project was built with Anaconda, therefore the development environment can be cloned from the environment.yml file. Most dependencies are installed with conda while the last three are installed with pip3.
If you are new to conda I recommend keeping the conda cheatsheet nearby for reference.
name: tableau-connected-apps
channels:
  - defaults
dependencies:
  - python=3.8.8
  - requests=2.28.1
  - pip=21.2.4
  - pip:
    - python-dotenv==0.19.2
    - pyjwt[crypto]==2.4.0
It is possible to recreate this environment without Anaconda, using something like virtualenvwrapper. In that case you can install all dependencies with pip3 and write a requirements.txt file to document your dependencies.
To protect private data such as JWT secrets, this project relies on environment variables to store this information without pushing them to the public Github repository (via .gitignore). If you are new to this concept I highly recommend that you read Twilio's blog post on the subject.
tldr: create a .env file using the example-env file provided with the repo. python-dotenv will load these variables into index.py to be used in the script.
Your .env file must contain all of the following variables:
TABLEAU_SERVER='tableau-server-or-cloud-domain'
TABLEAU_SITENAME='tableau-sitename'
TABLEAU_RESTAPI_VERSION='tableau-rest-api-version'
TABLEAU_USERNAME='tableau-username'
TABLEAU_CA_CLIENT='tableau-connected-app-client-id'
TABLEAU_CA_SECRET_ID='tableau-connected-app-secret-id'
TABLEAU_CA_SECRET_VALUE='tableau-connected-app-secret-value'
