DotNetCore, MVC, Multiple page SPA, TypeScript, ReactJs
In Visual Studio 2019, choose Create a new project in the start window. If the start window is not open, choose File > Start Window. Type web app, choose C# as the language, then choose ASP.NET Core Web Application (Model-View-Controller), and then choose Next. On the next screen, name the project, and then choose Next.
Choose the recommended target framework (.NET Core 3.1) , and then choose Create.
The new site with home page will be created.
-
In the Manage NuGet Packages window, search for Microsoft.TypeScript.MSBuild, and then click Install on the right to install the package.
-
Create folders
/ClientApp/and/ClientApp/Src/for your TypeScript code -
My initial
tsconfig.jsonlooks like below. It will build my typescript code in ClientApp/src folder in to plain js files and output to/wwwroot/jsfolder.{ "compileOnSave": true, "compilerOptions": { "noImplicitAny": false, "noEmitOnError": true, "removeComments": false, "sourceMap": true, "target": "es5", "outDir": "../wwwroot/js" }, "include": [ "src/**/*" ] }
The ignore configuration file .gitignore file for Visual Studio project grab from https://github.com/github/gitignore, add to the solution root.
This project using '/wwwroot/js' as JavaScript output folder, so add below to .getignore file.
WebApplication/wwwroot/js
Add some typescript code to the ClientApp and included in the default home view come with the project template.
//home.ts
function TSButton() {
    let name: string = "Fred";
    document.getElementById("ts-example").innerHTML = greeter(user);
}

class Student implements Person {
    fullName: string;
    constructor(public firstName: string, public middleInitial: string, public lastName: string) {
        this.fullName = firstName + " " + middleInitial + " " + lastName;
    }
}

interface Person {
    firstName: string;
    lastName: string;
}

function greeter(person: Person) {
    return "Hello, " + person.firstName + " " + person.firstName;
}

let user = new Student("Fred", "M.", "Smith");
// /Views/home/index.cshtml
<div id="ts-example">
<br />
<button type="button" class="btn btn-primary btn-md" onclick="TSButton()">
Click Me
</button>
</div>
@section Scripts {
<script src="~/js/home.js" asp-append-version="true"></script>
}In VS2019, run the application in IIS Express, the new web site with TypeScript will working.
Please see more details on the reference tutorial
- Add some controllers and views.
- In the ClientApp, create folder for each pages. Add some Typescript files there.
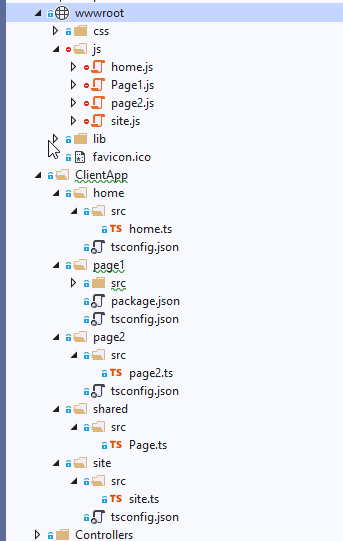
- The final project solution explorer view will looks like below

The there is shared folder, we have site.ts will used by multiple page, and we want build the single js page for each page.
In the project we use javascript module type AMD. and it need use requireJs.
download the required.js and put in the \wwwroot\lib\ folder.
Example of tyConfig.json for /page1/:
{
  "compileOnSave": true,
  "compilerOptions": {
    "noImplicitAny": false,
    "noEmitOnError": true,
    "removeComments": false,
    "sourceMap": true,
    "target": "es5",
    "outDir": "/../../wwwroot/js",
    "module": "AMD",
    "outFile": "../../wwwroot/js/Page1.js"
  },
  "include": [
    "src/**/*",
    "../shared/src/**/*"
  ]
}
Pay attention on the include and exclude section. also the outFile need update to the correct relation path.
outFile will build all ts files in the folder into one js file, and only works with module AMD and System
For documentation of tsconfig setting, please check https://www.typescriptlang.org/tsconfig
The code site.ts will used for all site, it need in Shared/_layout.cshtml files.
    <!-- and the bottom of Shared/_layout.cshtml -->
    <script src="~/lib/jquery/dist/jquery.min.js"></script>
    <script src="~/lib/bootstrap/dist/js/bootstrap.bundle.min.js"></script>
    <script src="~/js/site.js" asp-append-version="true"></script>
    @RenderSection("Scripts", required: false)
In each pages, the js will be include in the view like below:
@{
    ViewData["Title"] = "page1";
}

<h1>page1</h1>

@section Scripts {

    <script data-main="/js/page1.js" src="~/lib/require.js" asp-append-version="true"></script>
    <script>
       require(["page1/src/page1"])
    </script>
}
Note: the page1.js is exported as module name page1/src/page1 since it use module in shared/src/page. the Script require(["page1/src/page1"]) will load the javascript code and run it
Create Controller and View for ReactDemo, and Add ReactDemo folder in the ClientApp, The Controller and view page will like below
using Microsoft.AspNetCore.Mvc;

namespace WebApplication.Controllers
{
    public class ReactDemoController : Controller
    {
        public IActionResult Index()
        {
            return View();
        }
    }
}@{
ViewData["Title"] = "ReactDemo";
}
<h1>ReactDemo</h1>
<div id="root"></div>
@section Scripts {
<script data-main="/js/reactDemo/index.js" src="~/lib/require.js" asp-append-version="true"></script>
<script>
require(["index"])
</script>
}NPM is come with the Node.Js. It should already be installed before you working this TypScript project.
Right-click the ClientApp\ReactDemo in Solution Explorer and choose Add > New Item. Choose the npm Configuration File, use the default name, and click Add.
package.json file will be added.
there are many different way initial a ReactJs project, below will only install minimal need packages that need to demo ReactJs.
Run below in command line of the ClientApp\ReactDemo
npm install --save react react-dom
npm install --save-dev @types/react @types/react-dom
The package.json will looks lke below:
{
  "name": "typescript-reactjs-demo",
  "version": "1.0.0",
  "devDependencies": {
    "@types/react": "^17.0.3",
    "@types/react-dom": "^17.0.3"
  },
  "dependencies": {
    "react": "^17.0.2",
    "react-dom": "^17.0.2"
  }
}
Note, Also could edit the package.json file, then run npm i to retrieve the package to the node_modules
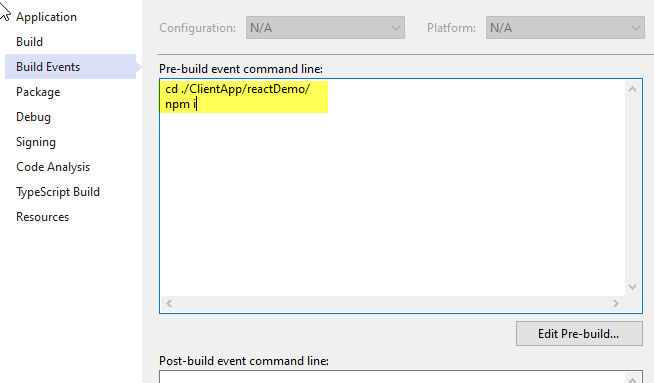
Since we will not include the nod_modules in source control, we will add npm i as the Pre-build event command line

-
Create
\ReactDemo\Src\and add TypeScript JSX Fileindex.tsx//index.tsx import * as React from "react"; import * as ReactDOM from "react-dom"; ReactDOM.render( <div> hello! </div> , document.getElementById("root") );
-
Add
typescript.jsonin the\ReactDemolike below
  {
    "compilerOptions": {

      "module": "AMD",
      "moduleResolution": "Node",
      "target": "ES5",
      "jsx": "react",
      "outFile": "../../wwwroot/js/reactDemo/index.js",
      "lib": [
        "dom",
        "es2015"
      ],

      "sourceMap": true

    },
    "include": [
      "**/*"
    ]
}Note:Below setting is also good to have to for TypeScript and reactJs base your Coding style.
    "allowJs": true,
    "allowSyntheticDefaultImports": true,
    "noImplicitReturns": true,
    "noImplicitThis": true,
    "noImplicitAny": true,
"noEmitOnError": trueTypeScript build will exclude the node_module by default, so the imported library will not be packed in you output javascript file.
To fix, most people were using webpack to pack the need lb into one bundle files,
if not use webpack, you could just simply copy below files to the wwwroot/js/ReactDemo
ClientApp/ReactDemo/node_modules/react/umd/react.development.js -> wwwroot/js/ReactDemo/react.js
ClientApp/ReactDemo/node_modules/react-dom/umd/react-dom.development.js -> wwwroot/js/ReactDemo/react-dom.js
We will keep use typescript build to build ts code to js, then use webpack to pack all the js files to js bundle file
Change the outDir to "outDir": "output"
So all js file build by TypescriptBuild will in the output folder
{
  "compilerOptions": {

    "module": "AMD",
    "moduleResolution": "Node",
    "target": "ES5",
    "jsx": "react",
    "lib": [
      "dom",
      "es2015"
    ],

    "allowJs": true,
    "allowSyntheticDefaultImports": true,
    "noImplicitReturns": true,
    "noImplicitThis": true,
    "noImplicitAny": true,
    "noEmitOnError": true,
    "sourceMap": true,
    "outDir": "output"
  },
  "include": [
    "src"
  ]
}-
You could run below script to install webpac and webpack-cli:
npm install webpack webpack-cli --save-dev -
Your
package.jsonwill looks like{ "name": "typescript-reactjs-demo", "version": "1.0.0", "description": "demo to build a html javascript page with typescript, reactjs, use vs ts build to build project", "author": "wsun", "scripts": { "build": "npm i && webpack", "webpack": "webpack" }, "devDependencies": { "@types/react": "17.0.3", "@types/react-dom": "17.0.3", "webpack": "^5.32.0", "webpack-cli": "^4.6.0" }, "dependencies": { "react": "17.0.2", "react-dom": "17.0.2" } } -
Add webpack config file
//webpack.config.js
const path = require('path');

module.exports = {
    mode: 'production',
    entry: './output/index.js',
    output: {
        filename: 'js/DemoPage/index.js',
        path: path.resolve(__dirname, '../../wwwroot'),
    },
};
since we have npm run script in package.json
    "scripts": {
      "build": "npm i && webpack",
      "webpack": "webpack"
    },
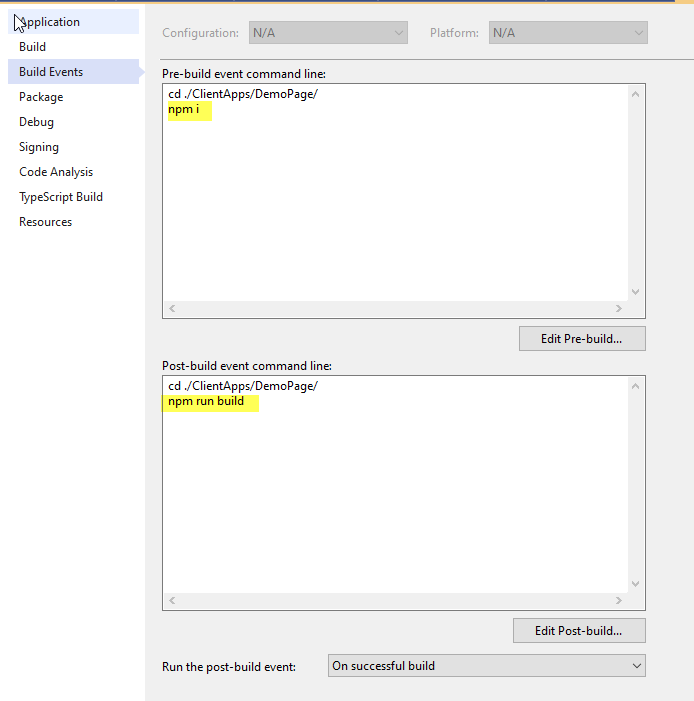
we could run npm run webpack or npm run build to build the client project, just need add this command in the Visual studio post event
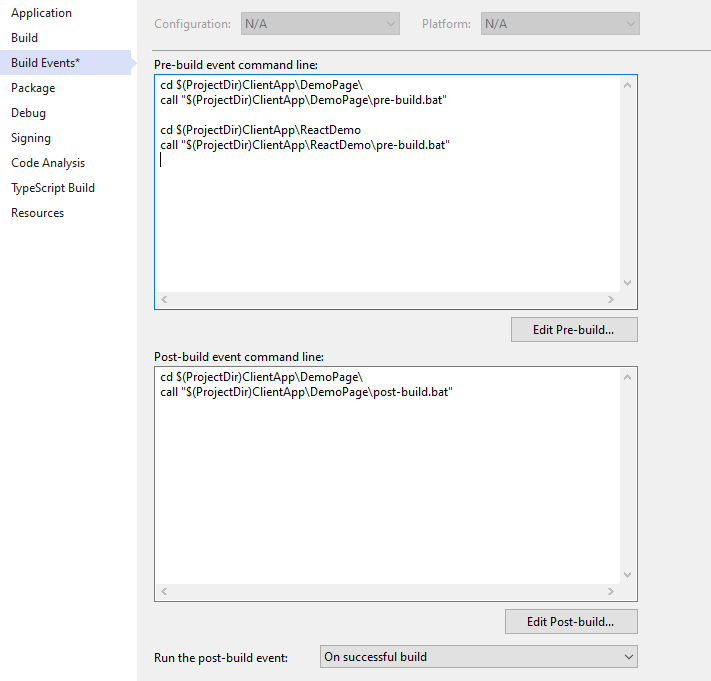
VS studio build has limit will skip next command like npm i run in different folders, we need move the command to batch file pre-build.bat and post-build.bat for each page folder under ClientApp.
# pre-build.bat
echo %CD%
npm i
# post-build.bat
echo %CD%
npm run buildand add below scrip on the project build event
cd $(ProjectDir)ClientApp\DemoPage\
call "$(ProjectDir)ClientApp\DemoPage\pre-build.bat"
cd $(ProjectDir)ClientApp\ReactDemo
call "$(ProjectDir)ClientApp\ReactDemo\pre-build.bat"
cd $(ProjectDir)ClientApp\DemoPage\
call "$(ProjectDir)ClientApp\DemoPage\post-build.bat"See below screenshot as example:

In many cases, we like to put multiple Client App Pages in their individual projects.
- Create empty project, only keep the program.cs
namespace WebApplication.ClientApp.DemoPage2
{
    public class Program
    {
        public static void Main(string[] args)
        {

        }

    }
}- Install Microsoft.Typescript.MSBuild with package
- Add preBuild and postBuild event, the csproj file will have below item
 <Target Name="PreBuild" BeforeTargets="PreBuildEvent">
    <Exec Command="npm i" />
  </Target>

  <Target Name="PostBuild" AfterTargets="PostBuildEvent">
    <Exec Command="npm run build" />
</Target>- Create the script src folder and add the demo typescript code in
- Add package.json
{
  "name": "typescript-reactjs-demo-2",
  "scripts": {
    "build": "npm i && webpack",
    "webpack": "webpack"
  },
  "devDependencies": {
    "@types/react": "17.0.3",
    "@types/react-dom": "17.0.3",
    "webpack": "^5.32.0",
    "webpack-cli": "^4.6.0",
    "source-map-loader": "^2.0.1"
  },
  "dependencies": {
    "react": "17.0.2",
    "react-dom": "17.0.2"
  }
}-
Add Webpack config file
The output file will be export to main web project wwwroot folder
../WebApplication/wwwrootAdd
source-mapconfig for development and debug//webpack.config.js const path = require('path'); module.exports = { mode: 'production', entry: './output/index.js', output: { filename: 'js/DemoPage2/index.js', path: path.resolve(__dirname, '../WebApplication/wwwroot'), }, devtool: "source-map", module: { rules: [ // All output '.js' files will have any sourcemaps re-processed by 'source-map-loader'. { enforce: "pre", test: /\.js$/, loader: "source-map-loader" } ] }, };
- Add a controller, and view
Use the javascript in /js/DemoPage2/index.js which export by webpack from the Demo2 project
@{
    ViewData["Title"] = "ReactDemo 2";
}

<h1>ReactDemo page 2</h1>
<div id="root"></div>
@section Scripts {

    <script data-main="/js/DemoPage2/index.js" src="~/lib/require.js" asp-append-version="true"></script>
    <script>
        require(["index"])
    </script>

}- AspNet with TypeScript: https://docs.microsoft.com/en-us/visualstudio/javascript/tutorial-aspnet-with-typescript?view=vs-2019
- NPM Package Manage with AspNet Core: https://docs.microsoft.com/en-us/visualstudio/javascript/npm-package-management?view=vs-2019#aspnet-core-projects
- github ignore: https://github.com/github/gitignore/blob/master/VisualStudio.gitignore
- tsConfig.json doc:
